background image

12

13

V

iewing

SD CARD

RETURN

DIRECT TV REC

OPTION

EXIT

INPUT

MULTI WINDOW

1 BBS  

23:35 

Corontation Street 
20 : 00 ~ 20 : 55 

Now 

For info press 

Change category

Profile 1 

Cartoon Nwk 

All DVB Services

BBC Radio Wales 

BBC Radio Cymru 

BBC ONE Wales 

BBC THREE 

BBCi 

CBBC Channel 

Select

Connect

EXIT
Page up/down
RETURN

• 

To select the two or three-digit programme number, e.g. 39 

Watching TV

up

down

or

• 

W

atching TV

Freeze / unfreeze picture

Hold


Other useful functions 

(Operate after 

)

Watch TV,

DVD, etc. 

in multi

window

DVD

Exit PandP

Swap

AV1/RGB

AV1/RGB

Exit

PandP

Swap

DVD

AV1/RGB

DVD

Exit

PinP

Swap

MULTI WINDOW 

blue

yellow

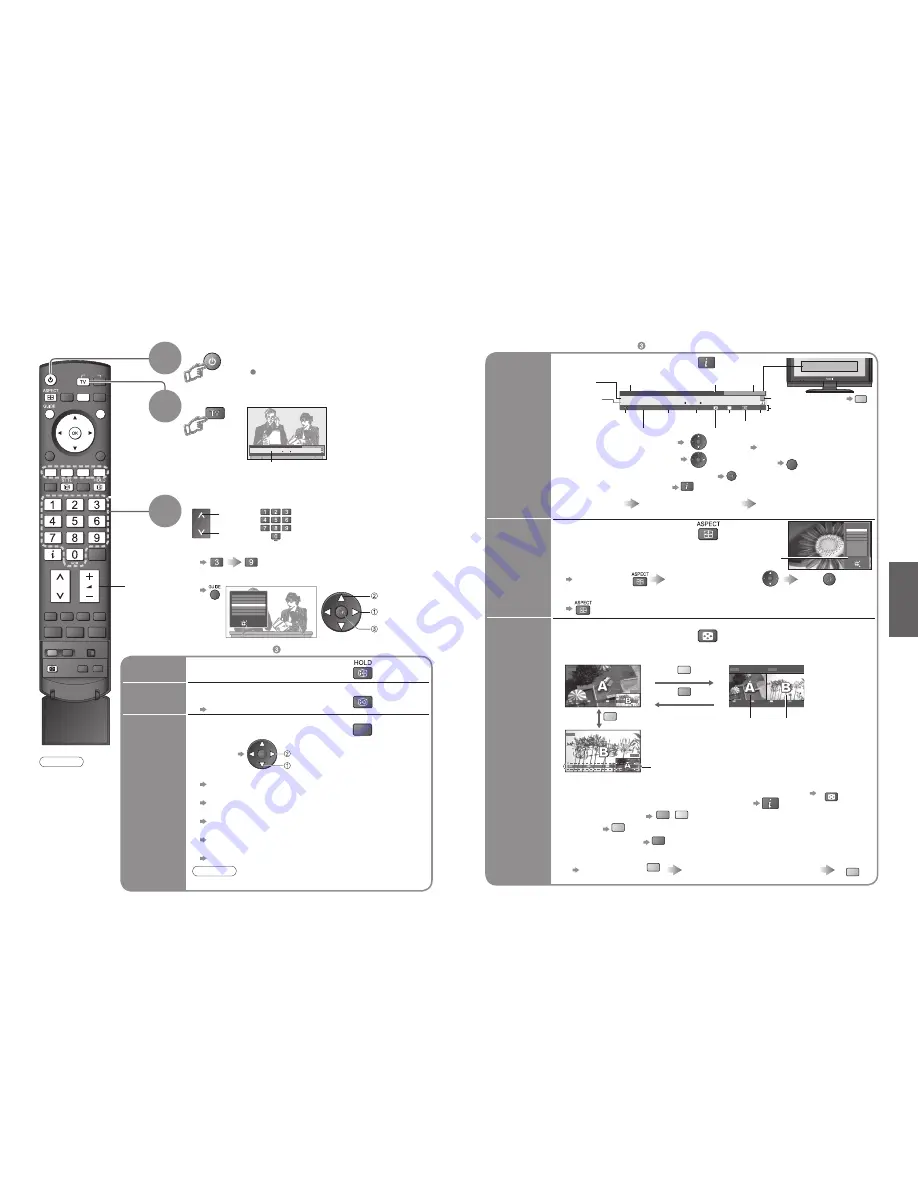
View in multi window


(p. 41)

Main screen

Colour bar

Sub screen

• 

To exit multi window (return to the single-screen view with main screen)   

MULTI WINDOW 

• 

To change the layout, images, 

fi

 rst show the colour bar   

    To change the layout   

green


yellow


To swap   

blue

    To exit multi window   

red

    To change the input mode or position of sub screen

• 

Remote control operations

apply to the main screen.

Enjoy viewing two images at once, such as a TV programme and a DVD.

Picture-in-Picture mode (PinP)

Picture-and-Picture mode (PandP)

green

Operations in multi window

Swap sub screen 

for main screen

Change the input mode or position by 

the remote control (p. 12 or p. 14)

Swap again

blue

blue

(in a short time)


Other useful functions 

(Operate after 

)

Display the 

current 

programme 

status

OPTION 

Check or change the current 
programme status instantly

• 

To change   


Subtitle Language

 (DVB mode) 

  Possible if the programme has some languages of subtitles


Multi Audio

 (DVB mode)

  Possible if the programme has some languages of sounds


Teletext Language

  Setup Menu (p. 21)


MPX

 (Analogue mode)

  Sound Menu (p. 20)


Volume Correction

  Adjusts volume of individual channel or input mode

 select

 change

Note

• 

Also possible to change the settings in Menu list (p. 20 and p. 21).

Change

aspect

ratio

Select

Change

EXIT

RETURN

Aspect selection

16:9

Just

14:9

4:3 Full

4:3

Zoom1

Zoom2

Zoom3

Auto

Change the aspect ratio


(p. 40)

Enjoy viewing the picture at its optimum size and aspect.

Aspect Selection list

• 

To change the mode 

• 

To change the mode using the ASPECT button only 


 (Press repeatedly until you reach the desired mode)

Display Aspect 

Selection list 

During the list is displayed, 

select the mode 

Store

Select a channel

Volume

3

2

Select DVB (Digital Video Broadcasting) or Analogue

Information banner

Mains power On / Off switch should be On.

(Press for about 1 second)

1

• 

You can also select the mode using the TV button on the top panel 

of the TV.

Display 

subtitles

STTL

Display / hide subtitles 

(if available)

• 

To change the language for DVB 

 “Preferred Subtitles” (p. 21) (If available)

Turn power on

Note

• 

To watch pay-TV 

(p. 23)

• 

To select from the Programme Guide 


 select programme

 watch

 select  page

Display

information

banner

1 BBS  

23:35 

Corontation Street 

Bad Signal

Encrypted

Dolby D

45 

20 : 00 ~ 20 : 55 

Now 

For info press 

Change category

Profile 1 

Display programme information

• 

To set display timeout 

 “Banner Display Timeout” (p. 21)

• 

To hide   

EXIT

• 

Appears also when changing channel.

• 

Information of another channel   

• 

Information on next programme   

 (DVB)

•  

To watch the programme listed in the banner   

• 

Information banner operation   

1st press

Display banner

2nd press

programme synopsis

(DVB)

3rd press

Exit

Features available

Programme

DVB:  Programme 

Start / Finish time

Analogue:  Programme 

Status

Channel

Current time

Category

To change the category   

blue

Sound 

mute

Scrambled 

broadcasting

Subtitle

Teletext

Stereo sound / multiple audio

Off timer

Weak TV signal

Dolby 

Digital

Содержание Viera TX-32LXD700F

Страница 1: ...riate waste handling Please contact your local authority for further details of your nearest designated collection point Penalties may be applicable for incorrect disposal of this waste in accordance with national legislation For business users in the European Union If you wish to discard electrical and electronic equipment please contact your dealer or supplier for further information Information...

Страница 2: ...PC Screen on TV 31 Viewing from card Photos 32 Q Link Functions 34 HDMI Functions 35 HDMI terminal VIERA Link External Equipment 38 Basic Features Watching TV 12 Watching Videos and DVDs 14 Viewing Teletext 16 Enjoy your TV Technical Information 40 FAQs 44 Licence 46 Specifications 47 FAQs etc Accessories Options 6 Identifying Controls 7 Basic Connection 8 Auto Setup 10 Quick Start Guide SD memory...

Страница 3: ... care Wipe the surface clean using a soft dry cloth Major contamination Dampen a soft cloth with clean water or water containing a small amount of neutral detergent Then wring the cloth and wipe the surface clean with it Finally wipe the surface clean with a dry cloth Wipe the mains plug with a dry cloth at regular intervals Moisture and dust may lead to fire or electrical shock First remove the m...

Страница 4: ...s Increases or decreases the programme position by one When a function is already displayed press to increase or decrease the selected function When in Standby mode switches TV On Mains power On Off switch Lift door to open C A T S Contrast Automatic Tracking System sensor senses brightness to adjust picture quality in Auto Mode in Picture Menu p 20 Remote control signal receiver Changes the input...

Страница 5: ...nal equipment and cables shown are not supplied with this TV Please ensure that the unit is disconnected from the mains socket before attaching or disconnecting any leads Example 1 Connecting aerial Example 2 Connecting DVD Recorder VCR RF cable RF cable TV only TV DVD Recorder or VCR AC 220 240 V 50 60 Hz AC 220 240 V 50 60 Hz Note Connect to AV1 2 for a DVD Recorder VCR supporting Q Link p 34 DV...

Страница 6: ...al dealer Auto Setup is now complete and your TV is ready for viewing You can now use the remote control to turn On the TV or turn the TV to standby mode Power LED On To edit channels Editing Channels p 24 Analogue Programme Edit p 27 ON SCREEN HELP Instructions box Open the main menu Return to the previous menu Move the cursor select the menu Move the cursor adjust levels select from a range of o...

Страница 7: ...ogue mode Sound Menu p 20 Volume Correction Adjusts volume of individual channel or input mode select change Note Also possible to change the settings in Menu list p 20 and p 21 Change aspect ratio Select Change EXIT RETURN Aspect selection 16 9 Just 14 9 4 3 Full 4 3 Zoom1 Zoom2 Zoom3 Auto Change the aspect ratio p 40 Enjoy viewing the picture at its optimum size and aspect Aspect Selection list ...

Страница 8: ... Select VCR to operate Panasonic VCR or DVD equipment Select DVD to operate Panasonic DVD equipment or Player home theatre Standby Set to Standby mode Turn on Play Playback videocassette DVD Stop Stop the operations Rewind Skip Search VCR Rewind view the picture rapidly in reverse DVD Skip to the previous track or title Press and hold to search backward Fast forward Skip Search VCR Fast forward vi...

Страница 9: ... contrast As the blue bar is displayed Reveal hidden data red Re hide red Reveal hidden words e g quiz page answers Using teletext conveniently FULL TOP BOTTOM green Normal FULL BOTTOM Expand the BOTTOM half Return to the main index page If you wish to hold the current page without updating Stop or resume automatic updating To resume HOLD Store frequently viewed pages in the colour bar List mode o...

Страница 10: ... menu pages up down select Overview VIERA Link Control Speaker Selection VIERA Link Menu Home Cinema Recorder p 37 Main Menu VIERA Link Picture Sound Setup The menu of the accessed equipment 1 2 Viewing Mode Auto Contrast Brightness Colour Sharpness Tint Colour Balance Warm Colour Management Off P NR Off Picture Menu 2 2 3D COMB Off Reset to Default Set MPEG NR Off Picture Menu p 20 2 2 Reset to D...

Страница 11: ...nly MPEG Audio Level Normally MPEG sound is larger than Dolby Digital one You can adjust the audio level of MPEG as the initial setting 0dB to 12dB in 2dB reductions HDMI1 Input Select to fit the input signal Auto Digital Analogue p 35 Auto Automatic detection of digital or analogue sound source Digital HDMI cable connection Analogue HDMI DVI adapter cable connection HDMI input mode only HDMI2 3 t...

Страница 12: ...several min and displays a corresponding message if any Download access select Download may take for about 20 min Pay TV Common Interface Common Interface The Common Interface Module menu provides access to software contained on Common Interface CI Modules This TV receiver works only Pay TV modules complying with CI standard Common Interface Slot 1 Module inserted Access Common Interface select go...

Страница 13: ...dit and To name the Profile red Select the character RETURN To move the channel green Select the new position Confirm green To delete the channel yellow To delete all channels blue access select access select Control channel audience 1 of 2 Child Lock PIN Entry Please enter new PIN PIN Child Lock Service List Change PIN Access Wed 12 05 04 10 46 Child Lock Service List BBC One Wales Service Name 1...

Страница 14: ...pe Quality CBBC Channel DVB 10 62 BBC Radio Wales DVB 10 62 BBC Radio Cymru DVB 10 62 E4 DVB 10 62 Cartoon Nwk DVB 10 CH 29 Analogue CH 33 BBC1 Analogue Settings are made automatically To return to TV F F TV AV For Auto Setup using the buttons on the top of the TV Press repeatedly until Auto Setup appears F Access Auto Setup TV Start Auto Setup TV Edit Analogue channels Delete Add Move Change name...

Страница 15: ...w DVB service found Press OK to add new service Press EXIT to lgnore Selects whether to give a notification message when a new DVB service is found Off On New Service Message Set Analogue channel manually Analogue Manual Tuning Fine Tuning Programme 1 CH33 Analogue Manual Tuning Manual Tuning 2 78 41 1 Fine Tuning Use to make small adjustments to the tuning of an individual channel affected by wea...

Страница 16: ... of 2 Input Labels AV1 DVD AV2 AV2S AV2 AV2S AV3 AV3S AV3 AV3S COMPONENT COMPONENT PC PC HDMI1 HDMI1 HDMI2 HDMI2 HDMI3 HDMI3 30 31 Displaying PC Screen on TV Input Labels To return to TV Displaying PC Screen on TV Select the external input Select PC 2 The screen of the PC connected to the TV can be displayed on the TV You can also listen to PC sound with the audio cable connected To connect PC p 3...

Страница 17: ...ccessing data this can damage card or TV Do not touch the pins on the back of the card Do not subject the card to a high pressure or impact Insert the card in the correct direction otherwise card may be damaged Electrical interference static electricity or erroneous operation may damage the data or card Back up the recorded data at regular intervals in case of deteriorated or damaged data or errat...

Страница 18: ...le equipment 1 with an HDMI or DVI output terminal such as a set top box or a DVD player can be connected to the HDMI terminal using an HDMI compliant fully wired cable About connections see External Equipment p 38 Note HDMI is the world s first complete digital consumer AV interface complying with a non compression standard If the external equipment has only a DVI output connect to the HDMI1 term...

Страница 19: ... set to Standby This function will work even if the TV enters standby mode automatically by Off Timer function or auto power standby function select set Preparations Setup the equipment to enable this function Read the manuals of the equipment About connections see External Equipment p 39 Read the manuals of the equipment too For the first time When adding new equipment reconnecting equipment or c...

Страница 20: ... VIDEO or S VIDEO AUDIO Recommended Connection Headphones Camcorder Game equipment Types of connectable equipment to each connector External Equipment To adjust volume Headphone Volume in the Sound Menu p 20 M3 stereo mini plug Computer Amplifier with speaker system PC Viewing Listening To listen with speakers Conversion adapter if necessary Set top box DVD Recorder VCR SCART cable RF cable or SCA...

Страница 21: ...pands the picture to fill the screen This process can take several minutes depending on the darkness of the picture Multi Window You can watch two images at once p 13 The same input mode cannot be displayed at once The sound is active for main screen only in multi window You cannot change the aspect ratio in multi window Multi window cannot be used with PC SD card or HDMI available for main screen...

Страница 22: ...85 00 1 280 1 024 60 Hz 63 98 60 02 1 366 768 60 Hz 48 39 60 04 Macintosh13 640 480 35 00 66 67 Macintosh16 832 624 49 73 74 55 Macintosh21 1 152 870 68 68 75 06 Mark Applicable input signal COMPONENT Y PB PR HDMI PC D sub 15P SCART S VIDEO and HDMI terminal information Socket Earth CVBS out video CVBS earth Red in Red earth Green in Green earth Blue in Blue earth Audio out L Audio out R CVBS in v...

Страница 23: ...V2 AV2S p 14 On Screen messages I e EC AV1 You can simply clear these by pressing the button Press again to redisplay No DVB programmes shown after Auto Setup Check the DVB transmitter Adjust the direction of the aerial to another transmitter installed nearby Check the analogue broadcast If the image quality is poor check the aerial and consult your nearest dealer An error message appears Follow t...

Страница 24: ...ing synchronization PB PR 0 35 V p p AUDIO L R RCA PIN Type 2 0 5 V rms Others HDMI1 2 3 TYPE A Connectors This TV supports HDAVI Control 2 function PC HIGH DENSITY D SUB 15PIN R G B 0 7 V p p 75 Ω HD VD TTL Level 2 0 5 0 V p p high impedance Card slot SD CARD slot 1 Output AUDIO L R RCA PIN Type 2 0 5 V rms high impedance DIGITAL AUDIO OUT PCM Dolby Digital Fiber optic Dimensions W H D 836 mm 592...

Отзывы: