Advanced
Menu
Item
Adjustments / Con
fi
gurations (alternatives)
VIERA
Link
VIERA Link Control
Controls the connected Panasonic equipment
“Easy control only with VIERA remote control” (p. 37)
“Speaker control” (p. 37)
•
You can also access VIERA Link Menu directly using the VIERA Link button on the
remote control.
Speaker Selection
Picture
Viewing Mode
Basic picture mode
(Dynamic / Normal / Cinema / Auto)
•
Set for each input signal
Contrast, Brightness,
Colour, Sharpness
Adjusts colour, brightness, etc. for each picture mode to suit your taste
Tint
Adjusts tint of image
•
For NTSC signal reception only
Colour Balance
Chooses the colour balance of the entire image
(Cool / Normal / Warm)
Colour Management
Automatically adjusts colours to vivid ones
(Off / On)
•
Not valid on PC signal
P-NR
Picture Noise Reduction
Automatically reduces unwanted picture noise
(Off / Normal / Dynamic / Auto)
•
Not valid on HDMI, PC signal or DVB
MPEG NR
Automatically reduces noise for watching DTV, DVD, VCD and SD Card
(Off / Min / Mid / Max)
3D-COMB
Automatically makes still pictures and slow pictures look more vivid
(Off / On)
•
For PAL or NTSC signal reception only
•
Not valid on RGB, S-Video, components, PC, HDMI and SD Card
Reset to Default
Press the OK button to reset the present Picture Mode to the default settings
Sound
Mode
Basic sound mode
(Music / Speech)
Bass
Adjusts the output level of deep bass
Treble
Adjusts the output level of high-pitch, shrill sound
Balance
Adjusts volume level of right and left speakers
Headphone Volume
Adjusts the volume of the headphones
Surround
Surround sound settings
(Off / Simulated Surround / SRS TruSurround XT)
Simulated Surround: Provides a dynamic enhancer to simulate improved spatial effects
SRS TruSurround XT: SRS TruSurround XT® creates a high quality surround sound effect using just
two speakers from the source which can output surround encoded signals
•
Switching is also possible by the Surround button on the remote control (p. 7)
Volume Correction
Adjusts volume of individual channel or input mode
Preferred Multi Audio
Selects the preferred language for DVB multi audio (depending on the broadcaster)
MPX
Select stereo / monaural
(Mono / Stereo)
•
Normally: Stereo
•
Stereo signal cannot be received: Mono
•
M1 / M2: Available while mono signal is transmitted
•
Analogue mode only
Audio Preference
Selects the initial setting for Audio tracks
(Dolby Digital / MPEG)
If programme has both Dolby Digital and MPEG audio tracks, priority is given to what you select
Dolby Digital : A method of coding digital signals developed by Dolby Laboratories. Apart
from stereo (2ch) audio, these signals can also be multi-channel audio.
MPEG :
An audio compression method that compresses audio to small size
without any considerable loss of audio quality.
•
DVB mode only
SPDIF Selection
Selects the initial setting for digital audio output signal from DIGITAL AUDIO OUT
terminal
(Auto / PCM)
Auto: Dolby Digital is output as Bitstream (5.1ch).
•
Dolby Digital is available for Bitstream (5.1ch) and PCM (2ch).
•
MPEG is
fi
xed to PCM.
•
DVB mode only
MPEG Audio Level
Normally, MPEG sound is larger than Dolby Digital one
You can adjust the audio level of MPEG as the initial setting
•
0dB to -12dB in -2dB reductions
HDMI1 Input
Select to
fi
t the input signal
(Auto / Digital / Analogue)
(p. 35)
Auto
: Automatic detection of digital or analogue sound source
Digital
: HDMI cable connection
Analogue : HDMI-DVI adapter cable connection
•
HDMI input mode only
•
HDMI2 / 3 terminals are for digital signal only
•
No setting for HDMI2 / 3 available
Reset to Default
Press the OK button to reset the present Sound Mode to the default settings
Menu
Item
Adjustments / Con
fi
gurations (alternatives)
Setup
AV Colour System
Selects optional colour system based on video signals in AV mode
(Auto / PAL / SECAM / M.NTSC / NTSC)
DVB Pro
fi
le Edit
Creates list of favourite programmes (p. 25)
DVB Service List
Skips the unwanted DVB channels (p. 25)
Q-Link Settings
Q-Link
Selects which AV terminal is to be used for data communication between this TV and a
compatible recording equipment
(AV1 / AV2)
(p. 34)
AV1 / AV2 out
Chooses the signal to be transmitted from the TV to Q-Link
(Analogue / DVB / AV1 / AV2 / AV3 / Monitor)
•
Monitor: Image displayed on screen
•
Component, PC and HDMI signals cannot be outputted
Download
Downloads analogue channel information to a Q-Link compatible equipment connected
to the TV
Child Lock
Locks a programme channel to prevent access to it (p. 25)
Tuning Menu
Auto Setup
Automatically sets the channels received in the area (p. 27)
Analogue
Programme Edit
Edits analogue channels (p. 27)
DVB Manual
Tuning
Sets the DVB channels manually (p. 28)
Analogue
Manual Tuning
Sets the analogue channels manually (p. 28)
Add New DVB
Services
Adds new DVB services (p. 28)
New Service
Message
Selects whether to give a noti
fi
cation message when a new DVB service is found
(p. 28)
DVB Signal
Condition
Checks the DVB signal condition (p. 28)
Off Timer
Sets the time the TV automatically turns Off
(Off / 15 / 30 / 45 / 60 / 75 / 90 minutes)
Language
OSD Language
Changes language for on-screen displays
Teletext
Language
Selects teletext language
(West / East1 / East2)
•
West: English, French, German, Greek, Italian, Spanish, Swedish, Turkish
•
East1: Czech, English, Estonian, Lettish, Rumanian, Russian, Ukrainian
•
East2: Czech, Hungarian, Lettish, Polish, Rumanian
Preferred Subtitles
Selects the preferred language for DVB subtitles (depending on the broadcaster)
•
To display subtitles p. 12
Teletext
Teletext display mode
(TOP (FLOF) / List)
(p. 16)
Shipping Condition
Resets all settings, for example, when moving house (p. 29)
Common Interface
Uses to watch pay-TV (p. 23)
System Update
Downloads new software to TV (p. 23)
Input Labels
Labels or skips each input terminals (p. 30)
Banner Display
Timeout
Sets how long the information banner (p. 13) stays on screen
•
0 (No display) to 10 sec. in 1-sec. increments
VIERA Link
Sets to use VIERA Link functions
(Off / On)
(p. 36)
Time Zone
Adjusts the time data (p. 23)
Software License
Displays the software licence information
System Information
Displays the system information of this TV
20
21
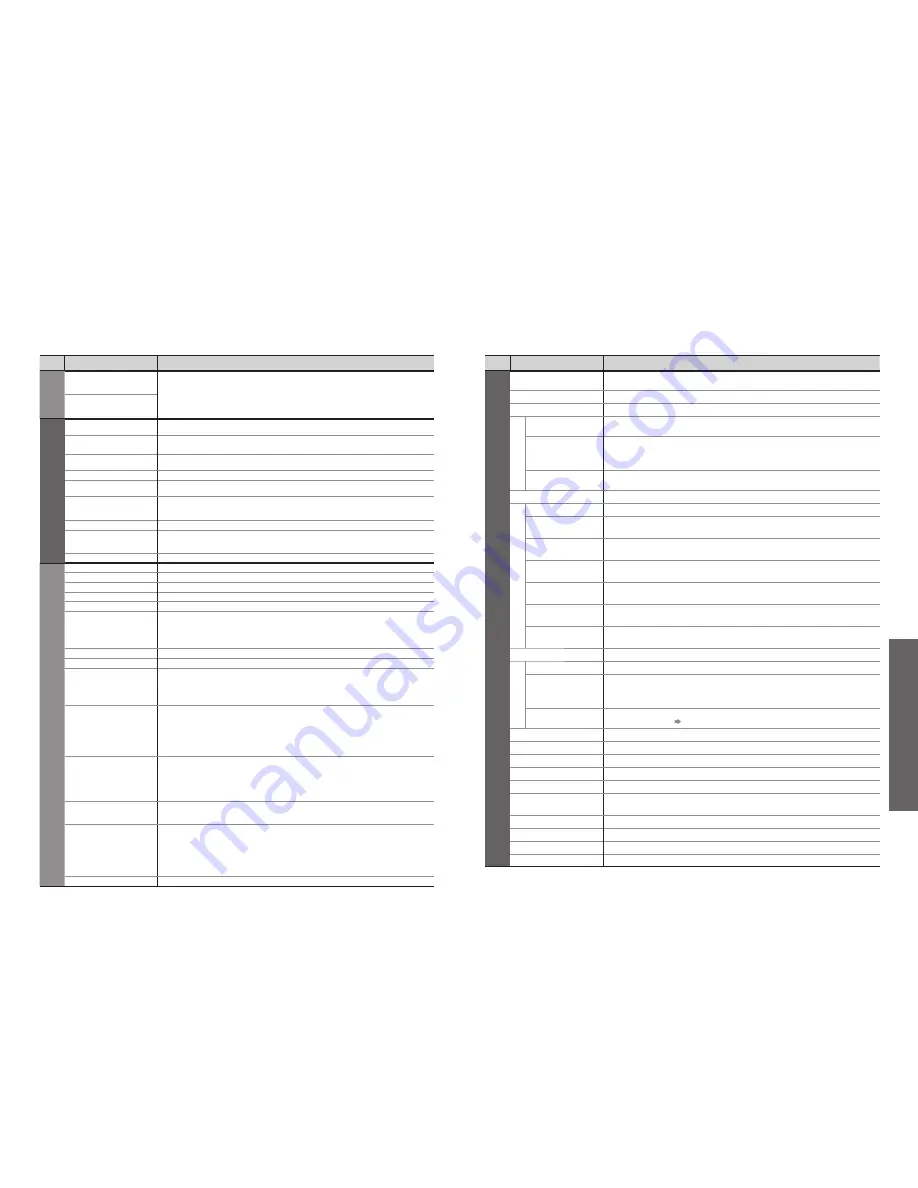
■
Menu list
•
How to Use Menu Functions
(picture, sound quality
, etc.)
How to Use Menu Functions
■
Menu list
•
A different menu will be displayed while PC or SD Card is used.
(p. 31 and p. 33)
•
Only available items can be selected.