


Advanced
Connection
Function
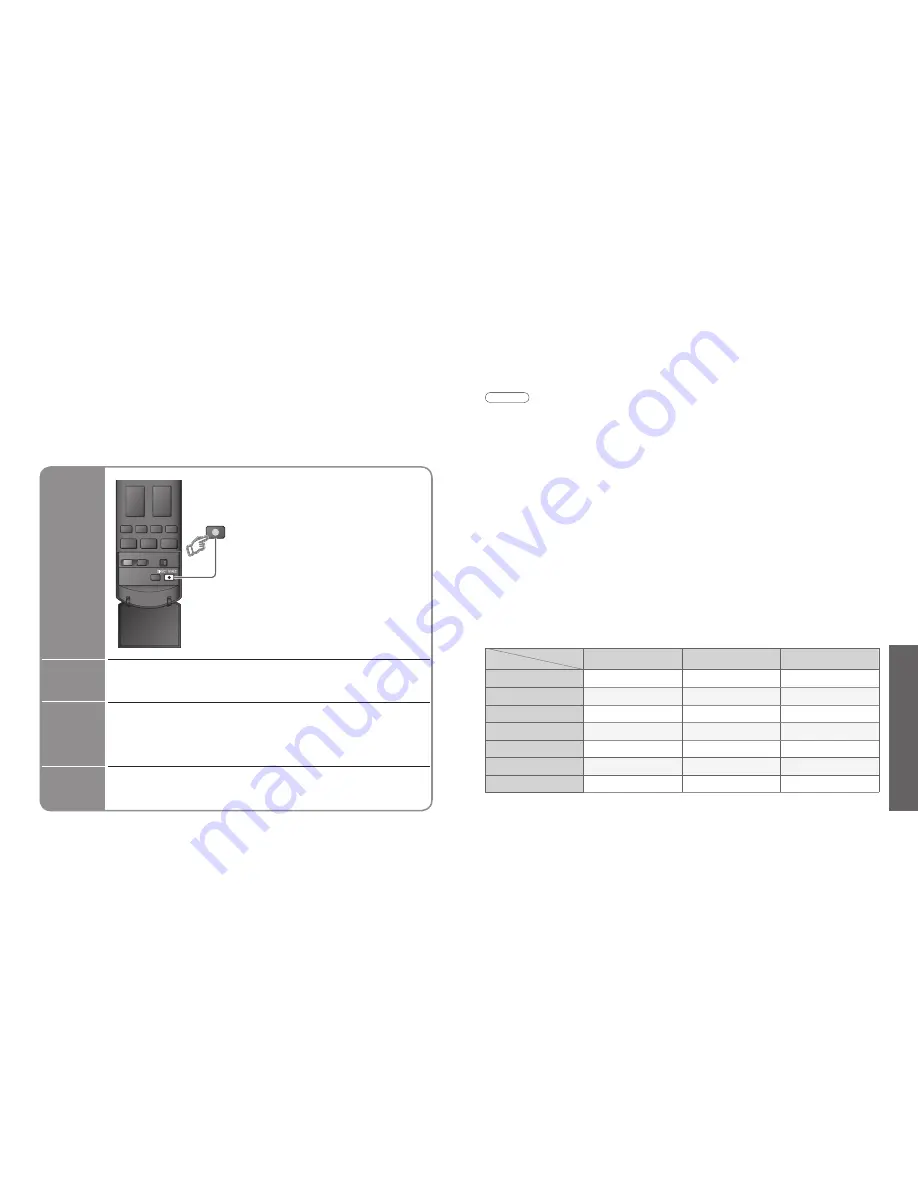
VIERA Link and Q-Link
VIERA Link only
Q-Link only
Easy playback
O
O
O
Power on link
O
O
O
Power off link
O
O
O
Speaker control
O
(not via SCART)
O
-
Easy control only with
VIERA remote control
O
(not via SCART)
O
-
Direct TV Recording
O
(not via HDMI)
-
O
Channel download
O
(not via HDMI)
-
O
(HDMI)
(SCART)
(HDMI)
(SCART)
30
31
•
HDMI Functions
•
Q-Link Functions
Q-Link Functions
Q-Link connects the TV and VCR / DVD recorder, enables easy recording and playback.
■
Condition
■
Features available
Some recording equipments are not applicable. Read the manuals of the equipment.
Information
/ Message
Recording information or if recording is not possible, a message is displayed.
(Only when the programme number is “0” or “AV mode” for some equipment.)
Power
on link
and Easy
playback
When VCR or DVD recorder starts playback or direct navigator / function menu
for the equipment are activated, the TV is turned on and input mode is switched
automatically so that you can view the content. (Only when TV is in Standby mode.)
Power off
link
When TV is set to Standby mode, the recording equipment is also automatically
set to Standby. (Only when the videocassette or DVD is not active.)
•
Use the VCR / DVD recorder with the following logos:
“Q-Link”, “NEXTVIEWLINK”, “DATA LOGIC”, “Easy Link”, “Megalogic”, or “SMARTLINK”
•
Connect the equipment to this TV’s AV1 or AV2 terminal via a “fully-wired” SCART cable. (p. 34)
•
Q-Link terminal setup in Setup menu (Q-Link, AV1 / AV2 out). (p. 21)
What you
see is
What you
record
DIRECT TV REC
Direct TV Recording:
Recording the current programme in VCR / DVD recorder
immediately.
•
When Direct TV Recording is performed, the
recording equipment is automatically turned on if it
is in Standby mode.
•
The recording equipment is recording from its own
tuner. You can turn the TV off during recording.
•
If you turn the TV off during recording from an AV
source, the recording will be stopped.
• “DATA LOGIC” (a trademark of Metz Corporation)
• “Megalogic” (a trademark of Grundig Corporation)
• “Easy Link” (a trademark of Philips Corporation)
• “SMARTLINK” (a trademark of Sony Corporation)
Read the manuals of the equipment too.
■
Download channel settings
•
Perform Auto Setup. (p. 22)
When
fi
rst using this TV, see “Auto Setup”. (p. 10)
•
Perform download to the equipment. (p. 21)
(
∗
1): The HDMI logo is displayed on HDMI-compliant equipment.
(
∗
2): Enquire at your local digital equipment retailer shop.
HDMI (high-de
fi
nition multimedia interface) allows you to enjoy high-de
fi
nition digital images and high-
quality sound by connecting the TV and the equipment.
HDMI-compatible equipment (
∗
1) with an HDMI or DVI output terminal, such as a set top box or a DVD
player, can be connected to the HDMI terminal using an HDMI compliant (fully wired) cable.
About connections, see “External Equipment” (p. 34).
Note
•
HDMI is the world’s
fi
rst complete digital consumer AV interface complying with a non-compression standard.
•
If the external equipment has only a DVI output, connect to the HDMI1 terminal via a DVI to HDMI adapter cable (
∗
2).
•
When the DVI to HDMI adapter cable is used, connect the audio cable to the audio input terminal (HDMI1: use
COMPONENT-AUDIO terminals).
•
Audio settings can be made on the “HDMI1 Input” menu screen. (p. 20)
•
Applicable audio signal sampling frequencies (2ch L.PCM): 48 kHz, 44.1 kHz, 32 kHz
•
HDMI2 / 3 terminals are for digital audio signal only.
•
Use with a PC is not assumed.
•
If the connected equipment has an aspect adjustment function, set the aspect ratio to “16:9”.
•
These HDMI connectors are “type A”.
•
These HDMI connectors are compatible with HDCP (High-Bandwidth Digital Content Protection) copyright
protection.
•
An equipment having no digital output terminal may be connected to the input terminal of either “Component”,
“S-VIDEO”, or “Video” to receive analogue signals.
•
The HDMI input terminal can be used with only the following image signals:
480i, 480p, 576i, 576p, 720p, 1080i and 1080p. Match the output setting of the digital equipment.
•
For details of the applicable HDMI signals, see p. 39.
HDMI Functions
■
Summary of Control functions
Connecting with an HDMI cable to Panasonic equipment with VIERA Link function, you can control the equipment
(p. 32). You can use VIERA Link and Q-Link functions together.


