Panasonic Viera TX-32LX700F Скачать руководство пользователя страница 15

Advanced

INPUT

OPTION SD CARD

EXIT

RETURN

100-0002

Filename

Date

Pixel

100-0001

1/17

10/23/2006

1600 x 1200

100-0004

100-0003

100-0001

100-0008

100-0007

100-0006

100-0005

100-0012

100-0011

100-0010

100-0009

Photo View Mode

Select

View

EXIT
Select
RETURN

Reading

Slide show

28

29

V

iewing from card (Photos)

Rotate

Rotate

Select

Slide show

View

EXIT

List


Slide show


red

• 

For details, 

see p. 29

Viewing from card

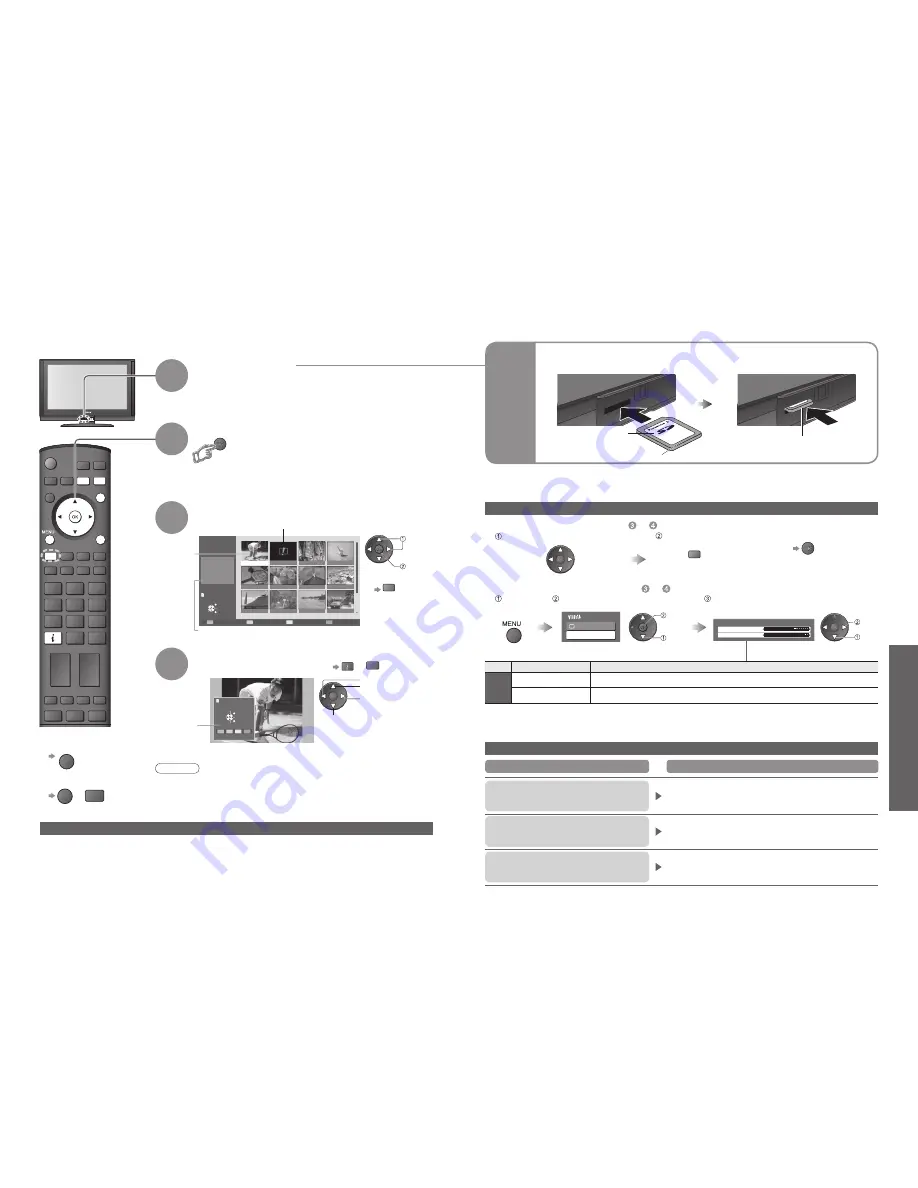
The still images recorded by the digital camera will be displayed.

View

4

Insert the SD Card

• 

Warning message for output signal is displayed.

Select the photo to be viewed

3

Displayed one at a time

1

2

Enter SD mode (Photo View Mode)

 select

 view

Operation 

guide

(Thumbnail screen)

Caution

• 

During the operation, no signals are output from the monitor output terminals.

• 

“Date” shows the date on which the recording was made by the digital camera. It 

shows “**/**/****” when recordings are made without date signal.


To return to 

thumbnail screen


RETURN


To return to TV


EXIT

 or 

SD CARD

SD

Card

Label surface

(Photos)

Push until a click is heard


To remove


To insert

Press the centre of the card

Error display 

(images that could not be loaded, etc.)

Selected 

photo


To display the operation guide   


or


OPTION 

Cautions in handling SD Card

• 

Do not remove the card while the TV is accessing data (this can damage card or TV).

• 

Do not touch the pins on the back of the card.

• 

Do not subject the card to a high pressure or impact.

• 

Insert the card in the correct direction (otherwise, card may be damaged).

• 

Electrical interference, static electricity, or erroneous operation may damage the data or card.

• 

Back up the recorded data at regular intervals in case of deteriorated or damaged data or erratic operation of the 

TV. (Panasonic is not liable for any deterioration or damage of recorded data.)

Selected photo 

information is displayed

Main Menu

Picture

Viewing Setup

red


Start Slide show (operate in step 


or


Slide show settings (operate in step 


or


Slide show

  Select the photo for the 

fi

 rst view

  Display the 

menu

 Select “Viewing Setup”

 Select the functions and set

• 

“Picture Menu” (p. 20)

Menu

Item

Adjustments / Con

fi

 gurations (alternatives)

Viewing 

Setup

Interval

Select slide show interval 

(5 / 10 / 15 / 30 / 60 / 90 / 120 seconds)

Repeat

Slide show repeat

 (Off / On)

 set

 select


To pause   

On screen messages

No valid 

fi

 le to play

• 

The card has no data.

Cannot read 

fi

 le

• 

The 

fi

 le is broken or unreadable.

• 

The TV does not support the format.

(For the applicable formats and data, see p. 38.)

Is SD Card in?

• 

Insert a SD card.

Message

Meaning / Action

Interval

5 seconds

Repeat

Off

Viewing Setup

 access

 select

To previous photo

Rotate 90

˚

 (anti-clockwise)

To next photo

Rotate 90

˚

(clockwise)

  Start Slide show

• 

For details on SD Cards (p. 38)

Содержание Viera TX-32LX700F

Страница 1: ...inappropriate waste handling Please contact your local authority for further details of your nearest designated collection point Penalties may be applicable for incorrect disposal of this waste in acc...

Страница 2: ...s How to Use Menu Functions 18 picture sound quality etc Editing and Setting Channels 22 Control Channel Audience 24 Restore Settings 25 Input Labels 26 Displaying PC Screen on TV 27 Viewing from card...

Страница 3: ...care Wipe the surface clean using a soft dry cloth Major contamination Dampen a soft cloth with clean water or water containing a small amount of neutral detergent Then wring the cloth and wipe the su...

Страница 4: ...ampers as necessary When using the optional accessory follow the option s assembly manual to fix cables Increases or decreases the programme position by one When a function is already displayed press...

Страница 5: ...al equipment and cables shown are not supplied with this TV Please ensure that the unit is disconnected from the mains socket before attaching or disconnecting any leads Example 1 Connecting aerial Ex...

Страница 6: ...mote control to turn On the TV or turn the TV to standby mode Power LED On 3 To edit channels Editing and Setting Channels p 22 ON SCREEN HELP Instructions box Open the main menu Return to the previou...

Страница 7: ...position by the remote control p 12 or p 14 Swap again blue blue in a short time Other useful functions Operate after Display the current programme status OPTION Check or change the current programme...

Страница 8: ...Select VCR to operate Panasonic VCR or DVD equipment Select DVD to operate Panasonic DVD equipment or Player home theatre Standby Set to Standby mode Turn on Play Playback videocassette DVD Stop Stop...

Страница 9: ...e automatic updating To resume HOLD Store frequently viewed pages Store frequently viewed pages in the colour bar List mode only press and hold As page is displayed The number changes to white Corresp...

Страница 10: ...ose from among alternatives Adjust using the slide bar store or access Required by some functions 1 Displays the next screen Go to the next screen To change menu pages up down select Overview VIERA Li...

Страница 11: ...ted HDMI1 Input Select to fit the input signal Auto Digital Analogue p 31 Auto Automatic detection of digital or analogue sound source Digital HDMI cable connection Analogue HDMI DVI adapter cable con...

Страница 12: ...the tuning of an individual channel affected by weather conditions etc Manual Tuning Set channel manually after Auto Setup If a VCR is connected with only the RF cable select programme position 0 stor...

Страница 13: ...w PIN PIN Control channel audience Child Lock Child Lock Service List Change PIN Access Wed 12 05 04 10 46 Child Lock Service List BBC 1 THREE 7 E4 14 CBBC 70 Nwk 72 BBCi 80 Radio 85 Cymru 90 Service...

Страница 14: ...f 2 Input Labels AV1 DVD AV2 AV2S AV2 AV2S AV3 AV3S AV3 AV3S COMPONENT COMPONENT PC PC HDMI1 HDMI1 HDMI2 HDMI2 HDMI3 HDMI3 26 27 Displaying PC Screen on TV Input Labels To return to TV Displaying PC S...

Страница 15: ...the card while the TV is accessing data this can damage card or TV Do not touch the pins on the back of the card Do not subject the card to a high pressure or impact Insert the card in the correct di...

Страница 16: ...Link a trademark of Philips Corporation SMARTLINK a trademark of Sony Corporation Read the manuals of the equipment too Download channel settings Perform Auto Setup p 22 When first using this TV see...

Страница 17: ...TV enters standby mode automatically by Off Timer function or auto power standby function select set Preparations Setup the equipment to enable this function Read the manuals of the equipment About c...

Страница 18: ...VIDEO or S VIDEO AUDIO Recommended Connection Headphones Camcorder Game equipment Types of connectable equipment to each connector External Equipment To adjust volume Headphone Volume in the Sound Men...

Страница 19: ...widescreen mode If Auto aspect does not detect a widescreen signal then this advanced TV enhances the picture for optimum viewing pleasure The text shown on the screen indicates how Auto aspect deter...

Страница 20: ...5 00 1 280 1 024 60 Hz 63 98 60 02 1 366 768 60 Hz 48 39 60 04 Macintosh13 640 480 35 00 66 67 Macintosh16 832 624 49 73 74 55 Macintosh21 1 152 870 68 68 75 06 Mark Applicable input signal COMPONENT...

Страница 21: ...problem If problem still persists please contact your local Panasonic dealer for assistance White spots or shadow images noise Check the position direction and connection of the aerial Neither image n...

Страница 22: ...p p 75 C 0 286 V p p 75 AUDIO L R RCA PIN Type 2 0 5 V rms COMPONENT VIDEO Y 1 0 V p p including synchronization PB PR 0 35 V p p AUDIO L R RCA PIN Type 2 0 5 V rms Others HDMI1 2 3 TYPE A Connectors...

Отзывы: