background image

Se

tup

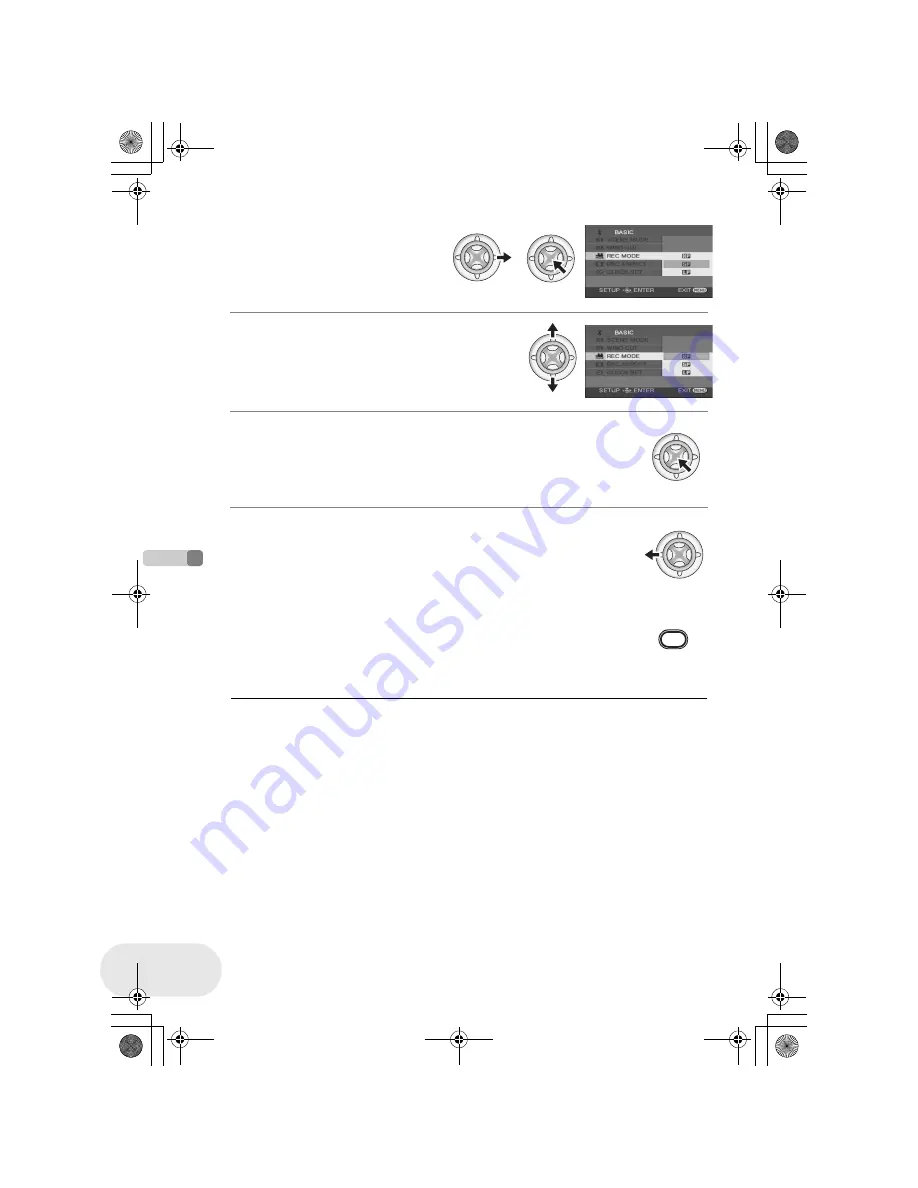
Using the menu screen

44

LSQT1025

5 Move the joystick right or 

press the joystick.

6 Move the joystick up or down in order to 

select the desired item.

7 Press the joystick to enter the selection.

To get back to the previous screen

Move the joystick left.

To exit the menu screen

Press the MENU button.

MENU

The menu screen does not appear during recording 
or playing. You cannot start other operations while 
the menu screen appears.

LSQT1025(ENG).book  44 ページ  2006年2月4日 土曜日 午後6時10分

Содержание VDR-D250GN

Страница 1: ...Video Camera Model No VDR D300GN VDR D250GN The illustration shows VDR D300 VDR D250 does not have a built in flash Before use please read these instructions completely VDR D300 LSQT1025 A LSQT1025 ENG book 1 ページ 2006年2月4日 土曜日 午後6時10分 ...

Страница 2: ...ectric shock or product damage do not expose this equipment to rain moisture dripping or splashing and ensure that no objects filled with liquids such as vases shall be placed on the equipment AC Adaptor The rating plate is on the underside of the AC Adaptor IEC 60825 1 2001 CAUTION This product contains a laser diode of higher class than 1 To ensure continued safety do not remove any covers or at...

Страница 3: ...gistered trademark of Leica microsystems IR GmbH and DICOMAR is a registered trademark of Leica Camera AG Microsoft Windows and DirectX are either registered trademarks or trademarks of the Microsoft Corporation in the United States and or other countries IBM and PC AT are registered trademarks of International Business Machines Corporation of the U S Intel Pentium and Celeron are the registered t...

Страница 4: ... recording 50 Recording motion pictures 52 Changing the recording mode of the motion picture 54 Recording still pictures 55 Number of pixels and picture quality for still picture recording 58 Various recording functions 60 Zoom in out function 60 Recording yourself 62 Backlight compensation function 63 Fade in fade out function 64 Soft skin mode 66 Tele macro function 67 Colour night view function...

Страница 5: ...g with a computer 118 What you can do with a computer 118 Contents on provided CD ROM 119 Operating environment 121 End User License Agreement 124 Installation 125 Installing DVD RAM Driver 125 Installing DVD MovieAlbumSE 127 Installing DVDfunSTUDIO 128 Reading the operating instructions of the software applications 129 Software application uninstallation 129 Connection and recognition 130 Connect...

Страница 6: ... previously recorded scene Easy playback l 81 Recorded scenes are displayed as thumbnails You can easily search for the scenes you want to watch Editing scenes l 87 91 You can create an original video playlist by collecting your favourite scenes together and then easily dub this video to a VCR or a DVD recorder hard disk LSQT1025 ENG book 6 ページ 2006年2月4日 土曜日 午後6時10分 ...

Страница 7: ...to play back the scenes recorded with this unit on it If you have a DVD recorder with hard disk you can dub scenes recorded on a disc with this unit to the hard disk Using with a computer l 118 You can enjoy editing scenes with the software on the supplied CD ROM and creating original DVD Video discs LSQT1025 ENG book 7 ページ 2006年2月4日 土曜日 午後6時10分 ...

Страница 8: ...before using this unit Battery pack AC adaptor DC cable AV S cable AC cable Remote control Button type battery Free style remote control VDR D300 only Lens cap VDR D250 only Shoulder strap USB cable CD ROM Disc cleaning cloth LSQT1025 ENG book 8 ページ 2006年2月4日 土曜日 午後6時10分 ...

Страница 9: ...U21 2040 mAh Wide conversion lens VW LW3707M3E Tele conversion lens VW LT3714ME Filter kit VW LF37WE Video DC light VW LDC10E Light bulb for video DC light VZ LL10E Stereo microphone VW VMS2E Tripod VW CT45E 8 cm DVD RAM disc single sided LM AF30E 8 cm DVD RAM disc double sided LM AF60E 8 cm DVD RW disc single sided LM RW30E 8 cm DVD RW disc double sided LM RW60E 8 cm DVD R disc single sided LM RF...

Страница 10: ...aptor sometimes noise may be heard depending on microphone type In that case please switch to battery for power supply and noise will stop 11 Viewfinder l 16 12 Delete button l 87 98 100 13 LCD monitor open part OPEN l 16 14 Battery DC cable holder l 26 29 15 Power switch OFF ON l 29 16 Status indicator l 29 17 Mode dial l 35 18 Joystick l 36 Move up down left or right to select items Press the ce...

Страница 11: ...26 30 Speaker 31 LCD monitor l 16 32 Mode select switch AUTO MANUAL FOCUS l 51 75 33 Power LCD button POWER LCD l 48 34 Reset button RESET l 154 35 Disc eject lever DISC EJECT l 32 36 Disc computer access lamp ACCESS PC l 32 131 37 Disc compartment l 32 38 Grip belt l 12 39 Shoulder strap fixture l 12 Due to limitations in LCD production technology there may be some tiny bright or dark spots on th...

Страница 12: ...ion 1 Flip the belt 2 Adjust the length 3 Fix the belt Put the strap through the fixture 1 and through the stopper 2 so it will not come off Extend part 3 by at least 2 cm Put the opposite end of the strap through A and attach it in the same way Using grip belt 2 1 3 Shoulder strap fixture A 1 2 3 LSQT1025 ENG book 12 ページ 2006年2月4日 土曜日 午後6時10分 ...

Страница 13: ... the other accessories on the hood Except for the lens cap Refer to the operating instructions for the Filter Kit When fitting the tele conversion lens VW LT3714ME optional or the wide conversion lens VW LW3707M3E optional first remove the lens hood Refer to the operating instructions for the tele conversion lens or the wide conversion lens When 2 lens accessories such as the ND filter and tele co...

Страница 14: ...ncluded in the Filter Kit 1 Pass the end of the lens cap cord through the belt 2 Pass the lens cap through the loop made by itself 3 To fit or remove the lens cap hold both sides of the lens cap with the tips of your finger and thumb During recording The lens cap removed can be attached to the lens cap fixture Fitting the lens cap Supplied VDR D250 only Included in the Filter Kit VW LF37WE optiona...

Страница 15: ...erate the unit from the free style remote control for convenience When not using the remote control attach the clip to the grip belt for convenience When you move with remote control attached to a pocket etc take care to avoid falling of the tripod When the tripod is used the card slot cover cannot be opened Insert an SD card before attaching this unit to the tripod l 34 Tripod receptacle LSQT1025...

Страница 16: ...er The viewfinder will be activated If the LCD monitor is opened the viewfinder will be deactivated Using the LCD monitor B A The brightness and colour level of the LCD monitor can be adjusted from the menu l 48 If it is forcibly opened or rotated the unit may be damaged or fail If the LCD monitor is rotated by 180x towards the lens and the viewfinder is extended when recording yourself the LCD mo...

Страница 17: ...utton type battery supplied in the remote control before using it 1 While pressing the stopper A pull out the battery holder 2 Set the button type battery with its i mark facing upward and get the battery holder back in place Using the remote control ZOOM START STOP PHOTO SHOT EXT DISPLAY DATE TIME VOL PLAY STOP SKIP SKIP MENU ENTER PAUSE SEARCH STILL ADV STILL ADV SEARCH 1 2 3 4 6 7 8 9 10 5 A Co...

Страница 18: ...t type recommended by the equipment manufacturer Discard used batteries according to manufacturer s instructions Warning Risk of fire explosion and burns Do not recharge disassemble heat above 100 xC or incinerate Keep the Button Type battery out of the reach of children Never put Button Type battery in mouth If swallowed call your doctor A The remote control is intended for indoor operation Outdo...

Страница 19: ...he unit Plug the free style remote control into the REMOTE MIC terminal as far as it goes About the clip on the backside When you move with the clip fitted to your pocket or elsewhere beware of knocking over the tripod and causing the unit to fall off the table Using the free style remote control VDR D300 only 1 2 3 If the pin plug of the remote control is not inserted securely into the REMOTE MIC...

Страница 20: ...Rewritable disc Rewritable disc One time recording disc 1 1 By formatting the disc it can be used repeatedly l 104 One time recording disc Display on the screen Indication in these instructions RAM RW VR RW V R Functions Deleting recorded scenes Editing on this unit Playback on other products 2 2 DVD players and DVD recorders that support 8 cm discs 3 3 Playback is possible on compatible products ...

Страница 21: ...ecorded on this unit may not be playable on other products Recording on DVD R in DVD Video Recording format is not supported When using DVD RW or DVD R do not perform the following as doing so may make the disc unusable Record on a disc with other products after recording on it with this unit Record on a disc with this unit after recording on it with other products Insert an un finalized disc in a...

Страница 22: ...his unit the screen on the right appears Select YES then press the joystick 2 Select format type then press the joystick 3 When the confirm screen appears select YES then press the joystick When using brand new DVD RW VIDEO DVD Video format VR DVD Video Recording format To change the format type format the disc again l 104 If the disc is formatted then all the data recorded on the disc will be era...

Страница 23: ...d that you use a Panasonic brand SD card When the write protect switch on SD Memory Card is locked no recording deletion or editing will be possible on the card Keep the memory card out of reach of children to prevent swallowing A MultiMediaCard cannot be used on this unit About the miniSD Card Be sure to insert miniSD Cards in the dedicated card adaptor before use Inserting a card in this unit wi...

Страница 24: ...er hard writing implements Do not use record cleaning sprays benzine thinner static electricity prevention liquids or any other solvent Do not use scratch proof protectors or covers Do not expose the terminals of the card to water garbage or dust Do not drop stack or impact discs Do not place objects on them Do not use the following discs Discs with exposed adhesive from removed stickers or labels...

Страница 25: ...ug of the AC cable is not completely connected to the AC adaptor socket As shown in A there is a gap Charging lamp Lights up Charging Goes off Charging completed Flashing The battery is over discharged discharged excessively In a while the lamp will light up and normal charging will start When the battery temperature is excessively high or low the CHARGE lamp flashes and the charging time will be ...

Страница 26: ...ERY RELEASE lever slide the battery to remove it Hold the battery with your hand so it does not fall Fitting the battery Removing the battery Before removing the battery be sure to set the OFF ON switch to OFF and check that the status indicator is off before removing the battery LSQT1025 ENG book 26 ページ 2006年2月4日 土曜日 午後6時10分 ...

Страница 27: ... 1 hour 25 minutes Charging time and recordable time Battery model number Voltage capacity Charging time Supplied battery CGA DU12 optional 7 2 V 1150 mAh 2 h 25 min CGA DU14 optional 7 2 V 1360 mAh 2 h 45 min CGA DU21 optional 7 2 V 2040 mAh 3 h 55 min VDR D300 When using a DVD RAM disc Battery model number Voltage capacity Recording mode Maximum continuously recordable time Intermittent recordab...

Страница 28: ...n 1 h 25 min LP 3 h 15 min 3 h 5 min 1 h 35 min 1 h 30 min Along with the reduction of the battery capacity the display will change If the battery discharges then will flash The recordable time will become shorter in the following cases When you use both the viewfinder and the LCD monitor simultaneously while rotating the LCD monitor frontward to record yourself using the 0 Lux colour night view f...

Страница 29: ... the lens cap fitted the automatic white balance adjustment l 161 may not function properly While pressing the button A set the OFF ON switch to ON The status indicator B lights and the power turns on VDR D300 only In disc recording mode or card recording mode the lens cover opens When the unit is turned on for the first time a message asking you to set the date and time will appear Select YES and...

Страница 30: ... procedure to check that there are no problems with the disc This takes approximately 25 seconds with DVD RAM If you want to start using the unit as soon as you turn on the power do the following 1 Turn on the power 2 After READING DISC disappears from the screen turn off the power You can start recording approximately 8 seconds after you turn on the power again Depending on the condition of the d...

Страница 31: ...rns on To turn off the power Close the LCD monitor and retract the viewfinder The status indicator goes off and the power turns off The power will not turn off unless the LCD monitor is closed and the viewfinder is retracted The power will not turn off while recording on a disc even if the LCD monitor is closed and the viewfinder is retracted How to turn the power on and off with the LCD monitor v...

Страница 32: ...s after the ACCESS PC lamp blinks the cover of the disc compartment will open slightly 2 Open the cover of the disc compartment by hand and insert remove the disc Inserting disc Fit the disc onto the spindle in the centre A Recording playback side B Pickup lens Removing disc While pressing down on the spindle grasp the edge of the disc and gently lift it out 3 Push the section marked PUSH CLOSE on...

Страница 33: ...ide an error message will appear Remove the disc and reinsert it with its recording playback side facing the inside Do not allow the recording playback side to become dirty or scratched Do not remove the battery pack or disconnect the AC adaptor while removing the disc or until power is completely turned off If you do the cover will not open If this happens reattach the battery pack or reconnect t...

Страница 34: ...rning the SD card Electrical noise static electricity or failure of this unit or the SD card may damage or erase the data stored on the SD card We recommend saving important data on a computer Card access lamp When this unit accesses the SD card reading recording playback erasing etc the access lamp lights up If the following operations are performed when the access lamp is lit then the SD card or...

Страница 35: ...aph to the position shown in the illustration Disc recording mode l 52 Use this to record motion pictures on a disc Disc playback mode l 81 Use this to play back motion pictures on a disc Card recording mode l 55 Use this to record still pictures on an SD card Card playback mode l 85 Use this to play back still pictures on an SD card Do not forcefully turn the dial LSQT1025 ENG book 35 ページ 2006年2月...

Страница 36: ... it Menu screen operations l 43 Rotate the mode dial to select or 1 Press the centre of the joystick and icons will be displayed on the screen When the centre of the joystick is pressed again the indication disappears Each time the joystick is moved down the indication changes 2 Move the joystick up left or right to select an item Basic operations 1 Select by moving up 2 Select by moving down 3 Se...

Страница 37: ...ck and press the joystick The selected scene is played back on the full screen The operation icon is automatically displayed on the screen 2 Move the joystick up down left or right to operate Each time the centre of the joystick is pressed the operation icon appears or disappears Operations during playback LSQT1025 ENG book 37 ページ 2006年2月4日 土曜日 午後6時10分 ...

Страница 38: ...de Icon Direction Function Page 1 3 3 Backlight compensation 63 2 Fade 64 1 Help mode 41 2 3 2 Soft skin mode 66 1 Tele macro 67 3 3 3 Colour night view 0 Lux colour night view 68 In manual mode 4 4 3 White balance 78 2 Iris or gain value 80 1 Shutter speed 80 In manual focus mode 5 5 21 Manual focus adjustment 77 1 3 NEXT 2 3 NEXT 3 3 NEXT 4 4 NEXT 5 5 NEXT LSQT1025 ENG book 38 ページ 2006年2月4日 土曜日 ...

Страница 39: ...rd skip during playback 81 1 Forward slow frame playback during pause 82 Card recording mode Icon Direction Function Page 1 2 3 Backlight compensation 63 Ø 2 Self timer 69 1 Help mode 41 2 2 2 Soft skin mode 66 1 Tele macro 67 In manual mode 3 3 3 White balance 78 2 Iris or gain value 80 1 Shutter speed 80 In manual focus mode 4 4 21 Manual focus adjustment 77 1 2 NEXT 2 2 NEXT 3 3 NEXT 4 4 NEXT L...

Страница 40: ...ils 85 E 2 Playback previous picture 85 D 1 Playback next picture 85 Card playback mode When SLIDE SHOW is selected Icon Direction Function Page 1 3 Slide show start pause 85 4 Stop playback and show thumbnails 85 E 2 Playback previous picture during pause 85 D 1 Playback next picture during pause 85 LSQT1025 ENG book 40 ページ 2006年2月4日 土曜日 午後6時10分 ...

Страница 41: ...on during the recording pause 2 Move the joystick right to select 3 Move the joystick up left or right to select the desired icon An explanation of the selected icon is displayed on the screen Each time the joystick is moved down the indication changes To exit the help mode Press the MENU button or select EXIT When the help mode is used functions cannot be set 1 3 NEXT 1 3 NEXT EXIT 1 3 NEXT EXIT ...

Страница 42: ...itching the language You can switch the language on the screen display or the menu screen 1 Press the MENU button then select LANGUAGE and press the joystick 2 Select English and press the joystick LSQT1025 ENG book 42 ページ 2006年2月4日 土曜日 午後6時10分 ...

Страница 43: ...ing on the position of the mode dial Do not switch the mode dial when the menu is displayed 2 Move the joystick up or down in order to select the desired top menu A 3 Move the joystick right or press the joystick The submenu B is displayed 4 Move the joystick up or down in order to select the submenu item C Current settings on menus MENU A B C LSQT1025 ENG book 43 ページ 2006年2月4日 土曜日 午後6時10分 ...

Страница 44: ...the desired item 7 Press the joystick to enter the selection To get back to the previous screen Move the joystick left To exit the menu screen Press the MENU button MENU The menu screen does not appear during recording or playing You cannot start other operations while the menu screen appears LSQT1025 ENG book 44 ページ 2006年2月4日 土曜日 午後6時10分 ...

Страница 45: ...n unit are used 1 Press the MENU button 2 Select a menu item Use the direction buttons 3 4 2 1 and ENTER button in place of the joystick on the main unit 3 Press the MENU button to exit the menu screen Operating with remote control MENU ENTER MENU ENTER MENU ENTER LSQT1025 ENG book 45 ページ 2006年2月4日 土曜日 午後6時10分 ...

Страница 46: ...dial to select or 1 Press the MENU button then select BASIC CLOCK SET YES and press the joystick 2 Move the joystick left or right to select the item to be set Then move the joystick up or down to set the desired value The year will change as follows 2000 2001 2099 2000 The 24 hour system is used to display the time 3 Press the joystick to enter the selection After pressing the MENU button to fini...

Страница 47: ... sure to check the time before recording If the time display becomes the built in lithium battery has run down Use the following steps to charge the battery When turn on the power for the first time after charging a message asking you to set the date and time will appear Select YES and set the date and time To recharge the built in lithium battery Connect the AC adaptor or attach the battery to th...

Страница 48: ... on the LCD monitor The entire LCD monitor will become approx twice as bright as the normal Adjusting the brightness and colour level EVF To adjust the brightness of the viewfinder close the LCD monitor and extend the viewfinder to activate it When the LCD monitor is rotated by 180 towards the lens the brightness and colour level of the LCD monitor cannot be adjusted These settings will not affect...

Страница 49: ...witches to the standard picture quality The effect will vary depending on the scene recorded The picture quality on the viewfinder will not be affected This function is automatically set to DYNAMIC when the brightness of the LCD monitor is increased the indication appears on the LCD monitor and cannot be set to NORMAL independently This will not affect the images to be recorded When the LCD monito...

Страница 50: ... belt 3 Do not cover the microphones or sensors with your hands 4 Keep your arms near your body 5 Slightly open your legs When you are outdoors record pictures with the sunlight behind you If the subject is backlit it will become dark in the recording Basic camera positioning 4 5 1 2 3 LSQT1025 ENG book 50 ページ 2006年2月4日 土曜日 午後6時10分 ...

Страница 51: ... prevents unnecessary recording when you forget to pause recording and walk with the unit tilted upside down while recording continues If the unit continues to be tilted upside down from the normal horizontal position while recording on a disc it is automatically put into recording pause Turning the AGS function on off Rotate the mode dial to select Press the MENU button then select SETUP AGS ON o...

Страница 52: ... 71 before recording the images or when watching them on the connected TV l 111 VDR D250 only Remove the lens cap before turning the unit on If the unit is turned on with the lens cap fitted the automatic white balance adjustment may not function properly 1 Turn the unit on 2 Rotate the mode dial to select VDR D300 only The lens cover opens automatically 3 Open the LCD monitor or extend the viewfi...

Страница 53: ...ing capacity for recording on a disc you may not be able to record 999 scenes Sound is recorded in Dolby Digital from the internal stereo microphone on the front of the unit Take care not to block this microphone Each time the unit enters the recording pause mode the counter display will be reset to 0h00m00s While motion picture recording is in progress the recording will not stop even if the LCD ...

Страница 54: ...ing the recording mode of the motion picture Recording modes and recordable time available for the motion picture Recording mode Recordable time on single side XP High quality Approx 18 min SP Normal Approx 37 min LP Long play Approx 75 min Mosaic pattern noise may appear on a playback image in the following cases When there is a complicated pattern in the background When the unit is moved too muc...

Страница 55: ... LCD monitor or extend the viewfinder 4 Press the PHOTO SHOT button halfway in order to adjust focusing For auto focusing only The shutter speed and the iris gain value are fixed and the unit focuses on the subject automatically VDR D300 only If you set O I S to ON then the image stabilizer function will be more effective MEGA optical image stabilizer will be displayed The shutter chance mark is i...

Страница 56: ...recordable still pictures on an SD card l 166 When the PICTURE SIZE is set to other than the mega pixel recording mode is set The sound cannot be recorded If the write protection switch on the SD card is set to LOCK it cannot be used for recording The PHOTO SHOT button on the remote control and the free style remote control cannot be pressed halfway If set PICT QUALITY to mosaic pattern noise may ...

Страница 57: ...nce mark does not appear in manual focus mode When the subject is not easily focused focus on the subject manually You can record still pictures on the card even if the shutter chance mark does not appear but pictures may be recorded without being focused The shutter chance mark does not appear or has difficulty displaying in the following cases When the zoom magnification is high When the unit is...

Страница 58: ...ng VDR D300 Icon Aspect Number of pixels 4 3 2048k1512 4 3 1280k960 4 3 640k480 16 9 1920k1080 VDR D250 Icon Aspect Number of pixels 4 3 1760k1320 4 3 1280k960 4 3 640k480 16 9 1760k992 When this unit is purchased PICTURE SIZE is set to VDR D300 VDR D250 The sides of pictures recorded with a 16 9 aspect ratio may be cut at printing Check before printing 3 1M 1M 0 3M 2 2 3M 1M 0 3M 1 7 2 1 7 LSQT10...

Страница 59: ...picture quality are recorded Priority is given to the number of still pictures recorded Still pictures are recorded in normal picture quality You can add a shutter sound when recording still pictures Press the MENU button then select ADVANCED SHTR EFFECT ON or OFF and press the joystick This function s default setting is ON Switching the shutter effect on off LSQT1025 ENG book 59 ページ 2006年2月4日 土曜日...

Страница 60: ...stabilizer function l 72 When distant subjects are brought closer they are focused at about 1 m VDR D300 1 2 m VDR D250 or more When the zoom magnification is 1k this unit can focus on a subject approx 3 5 cm VDR D300 4 cm VDR D250 away from the lens Macro function The zoom speed varies depending on the range over which the zoom lever is moved The zoom speed does not vary when operating with the r...

Страница 61: ...M RW VR RW V R Interlocked with the zooming operation the microphone will collect sounds clearly far away with the tele shot or those in the vicinity with the wide angle shot Rotate the mode dial to select Press the MENU button then select ADVANCED ZOOM MIC ON and press the joystick Digital zoom function OFF Optical zoom only Up to 10k 25k Up to 25k 700k Up to 700k The larger the digital zoom magn...

Страница 62: ...s a normal recording Extend the viewfinder to see the picture while recording When the recording aspect is 16 9 the image displayed on the viewfinder screen is squeezed horizontally but this is normal and not indicative of any trouble Recording yourself When the LCD monitor is rotated towards the lens side the icon will not be displayed even if you press the joystick Only some indications will app...

Страница 63: ...oystick down to display the icon shown in the illustration 2 Move the joystick up to select ª The image on the screen will become brighter To return to normal recording Select ª again Backlight compensation function This is for protecting a backlit subject from being darkened 1 3 NEXT 1 3 NEXT If you turn off the power or operate the mode dial the backlight compensation function is cancelled LSQT1...

Страница 64: ... Start recording Fade in When you start recording the image audio disappears completely and the image audio gradually appears After recording the fade in part finishes the fade setting is cancelled To fade out 1 During recording press the joystick Then move the joystick down to display the icon shown in the illustration Fade in fade out function Fade in The image and audio gradually appear Fade ou...

Страница 65: ...select the colour for fade in out The colour which appears in fading pictures can be selected Press the MENU button then select ADVANCED FADE COLOUR WHITE or BLACK and press the joystick If you turn off the power the fade function is cancelled While the fade in fade out function is selected it takes several seconds to display the image when you start recording It also takes several seconds to paus...

Страница 66: ...icon shown in the illustration 2 Move the joystick left to select To cancel the soft skin mode Select again Soft skin mode This makes skin colours appear softer for a more attractive appearance 2 3 NEXT 2 3 NEXT If the background or anything else in the scene has colours similar to the skin colour they will also be smoothed If the brightness is insufficient the effect may not be clear LSQT1025 ENG...

Страница 67: ...o 10k To cancel the tele macro function Select again Tele macro function This is for bringing only what you want to record into focus to take close ups VDR D300 The unit can focus on the subject at a distance of approx 50 cm VDR D250 The unit can focus on the subject at a distance of approx 40 cm 2 3 NEXT 2 3 NEXT If a sharper focus cannot be achieved adjust the focus manually l 77 In the followin...

Страница 68: ...unction Move the joystick left or right to bring the subject into focus manually l 77 3 In the case of 0 Lux colour night view function Extend the viewfinder and rotate the LCD monitor towards the lens side When the LCD monitor is reversed the screen is lit in white Extend the viewfinder and view the images while recording The light of the LCD monitor reaches approx 1 2 m or less To cancel the col...

Страница 69: ...he self timer is cancelled If you press the PHOTO SHOT button halfway and then fully the subject is focused when the button is pressed halfway When you press the PHOTO SHOT button fully the subject is focused just before recording To stop the timer midway through Press the MENU button The self timer setting is cancelled Self timer recording This is for recording shots of yourself as well 1 2 NEXT ...

Страница 70: ...CUT OFF and press the joystick Wind noise reduction function This is for reducing the wind noise coming into the microphone when recording This function s default setting is ON Depending on the wind strength the wind noise is reduced If this function is activated in strong winds the stereo effect may be reduced When the wind weakens the stereo effect will be restored This does not work with an ext...

Страница 71: ...mode dial to select Press the MENU button then select BASIC REC ASPECT 16 9 and press the joystick Recording images with a 4 3 aspect ratio Rotate the mode dial to select Press the MENU button then select BASIC REC ASPECT 4 3 and press the joystick Wide mode This is for selecting the screen s aspect ratio when recording motion pictures The default setting is 16 9 LSQT1025 ENG book 71 ページ 2006年2月4日...

Страница 72: ...ess the joystick Image stabilizer function This is for reducing image shakes during recording This function s default setting is ON VDR D300 only In the card recording mode pressing the PHOTO SHOT button halfway increases the effect of the image stabilizer function MEGA optical image stabilizer When a tripod is used we recommend that you turn the image stabilizer off In the following cases the ima...

Страница 73: ...ghtness If it determines that the flash is necessary the indication lights up in yellow When the ß ßi ßj indication or the ßA ßAi ßAj indication is displayed the flash can be lit If the indication is flashing or not displayed the flash cannot be lit The available range of the flash is approx 1 m to 2 5 m in dark places Pictures will appear dark or reddish when they are recorded by using the flash ...

Страница 74: ...L desired item and press the joystick ßj If the brightness is too high ßd0 In normal recording ßi If the brightness is insufficient Red eye reduction function The flash is activated 2 times Do not move until the second flash is finished Use this when you take pictures of people in dark places Red eye phenomenon may appear depending on the recording conditions To adjust the brightness of the flash ...

Страница 75: ...ect BASIC SCENE MODE desired item and press the joystick Scene mode This is for recording in various situations Display Mode Recording conditions 5 Sports To record sports scenes or scenes where there are quick motions Portrait To make people stand out against the background Low light To make the scene brighter in dark conditions Spotlight To make the subject under a spotlight look more attractive...

Страница 76: ...image may change If you record a subject illuminated with strong light or a highly reflective subject vertical lines of light may appear If the brightness is insufficient the sports mode does not function The 5 display flashes If this mode is used indoors the screen may flicker Portrait mode If this mode is used indoors the screen may flicker If so change the scene mode setting to OFF Low light mo...

Страница 77: ...he icon shown in the illustration appear 3 Move the joystick left or right to bring the subject into focus When focused with a wide angle the subject may not be in focus when zoomed in First zoom in on the subject and then focus on it To restore to the automatic adjustment Press the AUTO MANUAL FOCUS switch down again to the FOCUS position You can also restore the auto focusing by setting the AUTO...

Страница 78: ...ode To restore to the automatic adjustment Set the white balance mode to You can also restore the automatic adjustment by setting the AUTO MANUAL FOCUS switch to AUTO White balance This is for recording in natural colours MNL 4 4 NEXT MNL 4 4 NEXT MNL BACK Display Mode Recording conditions Auto white balance adjustment Indoor mode for recording under incandescent lamps Incandescent lights halogen ...

Страница 79: ...k when the white balance is set in the manual adjustment mode When the black balance is adjusted the screen will temporarily be black The black balance cannot be adjusted manually 1 Black balance adjustment in progress Flashes 2 White balance adjustment in progress Flashes 3 Adjustment completed Lights up To set the white balance manually MNL BACK MNL BACK A 1 2 3 When the display flashes white th...

Страница 80: ...00 1 25 to 1 2000 VDR D250 1 25 to 1 500 OPEN OPEN 1 100 100 1 100 OPEN MNL BACK A B When setting both the shutter speed and the iris gain value set the shutter speed and then set the iris gain value Manual shutter speed adjustment Avoid recording under fluorescent light mercury light or sodium light because the colour and brightness of the playback image may change If you increase the shutter spe...

Страница 81: ...ck If you move and hold the joystick up or down you can advance 8 scenes at a time The screen will not change at this time but the scene numbers and scroll bar display will change so release the joystick when you have arrived at the page with the scene you want to display 3 Press the joystick The selected scene is played back on the full screen The operation icon is automatically displayed on the ...

Страница 82: ...be heard except during normal playback If pause play is continued for 5 minutes the screen returns to the thumbnails When the amount of time recorded on the scene is short playback may not be possible The thumbnails of motion pictures that cannot be played back are displayed in shades of blue and white The power will not turn off when the LCD monitor and the viewfinder are closed and retracted Whe...

Страница 83: ...ess the button 2 Press the E or D button Adjust the speaker volume during playback Move the volume lever to change the volume level The further the indicator moves to the right towards the i end the higher the volume level becomes When the adjustment is completed the volume setting display will disappear Frame by frame playback PLAY STOP SKIP SKIP PAUSE SEARCH STILL ADV STILL ADV SEARCH PLAY STOP ...

Страница 84: ...a motion picture is stopped R appears on the thumbnail view of the stopped scene If playback is stopped at any point during a motion picture while RESUME PLAY is set to OFF the next time the motion picture is played back it will be from the beginning Playing back motion pictures by date Even if scenes are recorded on the same day they are grouped separately in the following cases When the number o...

Страница 85: ... and hold the joystick up or down you can advance 8 files at a time The screen will not change at this time but the file numbers and scroll bar display will change so release the joystick when you have arrived at the page with the file you want to display 3 Press the joystick The selected file is played back on the full screen The operation icon is automatically displayed on the screen 4 Move the ...

Страница 86: ...y degrade or not play back data recorded on this unit Playing back still pictures as a slide show Do not operate the mode dial during the slide show While this unit accesses the SD card the access lamp is lit do not remove the SD card It takes time to display the file depending on the number of pixels of the file The thumbnails of still pictures that cannot be played back are displayed in shades o...

Страница 87: ...W Video format and DVD R cannot be deleted Rotate the mode dial to select 1 Press the button during playback 2 When the confirmation message appears select YES then press the joystick Deleting scenes This is for deleting scenes recorded on discs Deleting scenes one at a time LSQT1025 ENG book 87 ページ 2006年2月4日 土曜日 午後6時10分 ...

Страница 88: ...be set in succession 3 Only when SELECT is selected in step 1 Press the button 4 When the confirmation message appears select YES then press the joystick Only when SELECT is selected in step 1 To continue deleting other scenes Repeat steps 2 4 To complete editing Press the MENU button To delete an unwanted part of a scene divide the scene first and then delete the unnecessary part l 89 In case of ...

Страница 89: ...e is played back 3 When you reach the area where you want to divide the scene move the joystick down to set the dividing point Using slow motion playback or frame by frame playback makes it easy to search for the point where you want to divide the scene l 82 83 4 When the confirmation message appears select YES then press the joystick To continue dividing other scenes Repeat steps 2 4 To complete ...

Страница 90: ...wish to combine scenes that are not next to each other or scenes with different recording dates first create a playlist and then combine the scenes on the playlist l 92 97 3 When the confirmation message appears select YES then press the joystick To continue combining other scenes Repeat steps 2 3 To complete editing Press the MENU button Combining scenes This function is only for combining two co...

Страница 91: ...by making a playlist If you create or delete playlists the original scenes will not be modified Editing scenes on a playlist will not affect the original scenes What is a playlist Recorded scenes Playlist The maximum number of items on a disc per side Playlists 99 Playlist scenes 999 If original scenes are deleted the portion of playlists created with these scenes is also deleted LSQT1025 ENG book...

Страница 92: ...ncelled Up to 8 scenes can be set in succession The scenes are registered in the playlist in the order that they were selected After creating a playlist the order of the scenes in it can be changed by MOVE function l 95 4 Press the MENU button 5 When the confirmation message appears select YES then press the joystick The thumbnail view screen of the created playlist is displayed To add another sce...

Страница 93: ... displayed as thumbnails 3 Select the scene to start playback then press the joystick To select a different playlist When the first scene is selected in the playlist thumbnail view screen move the joystick left The screen returns to the PLAYLIST VIEW step 2 To return to showing the original scenes Press the MENU button then select PLAY SETUP PLAY MODE VIEW ALL or BY DATE and press the joystick Pla...

Страница 94: ...y a yellow frame When the joystick is pressed again the selected scene will be cancelled Up to 8 scenes can be set in succession The scenes are added to the playlist in the order that they were selected The order of the scenes in the playlist can be changed by MOVE function l 95 5 Press the MENU button 6 When the confirmation message appears select YES then press the joystick The thumbnail view sc...

Страница 95: ...e joystick 3 Select MOVE then press the joystick 4 Select the scene to be moved then press the joystick The selected scene is encircled by a yellow frame and the position to insert is shown by a red bar 5 Select the position to insert the scene then press the joystick To continue moving other scenes in the playlist Repeat steps 4 5 To complete editing Press the MENU button Moving scenes LSQT1025 E...

Страница 96: ...t the scene to be divided then press the joystick The selected scene is played back 5 When you reach the area where you want to divide the scene move the joystick down to set the dividing point Using slow motion playback or frame by frame playback makes it easy to search for the point where you want to divide the scene l 82 83 6 When the confirmation message appears select YES then press the joyst...

Страница 97: ...he joystick 2 Select the playlist to be edited then press the joystick 3 Select COMBINE then press the joystick 4 Select the scene to be combined then press the joystick The selected scene and the next scene are combined 5 When the confirmation message appears select YES then press the joystick To continue combining other scenes Repeat steps 4 5 To complete editing Press the MENU button Combining ...

Страница 98: ... the button during playback 2 When the confirmation message appears select YES then press the joystick Deleting multiple scenes from the thumbnail display Select playlist playback mode l 93 steps 1 and 2 1 Press the MENU button then select EDIT and press the joystick 2 Select the playlist to be edited then press the joystick Deleting scenes LSQT1025 ENG book 98 ページ 2006年2月4日 土曜日 午後6時10分 ...

Страница 99: ... when SELECT is selected in step 3 Press the button 6 When the confirmation message appears select YES then press the joystick Only when SELECT is selected in step 3 To continue deleting other scenes Repeat steps 4 6 To complete editing Press the MENU button Deleting scenes on a playlist will not increase the remaining capacity for recording The playlist itself is deleted if you delete all the sce...

Страница 100: ...ed Rotate the mode dial to select 1 Press the button during playback 2 When the confirmation message appears select YES then press the joystick Deleting still pictures This is for deleting still picture files recorded on SD cards Deleting files one at a time LSQT1025 ENG book 100 ページ 2006年2月4日 土曜日 午後6時10分 ...

Страница 101: ...confirmation message appears select YES then press the joystick Only when SELECT is selected in step 1 To continue deleting other files Repeat steps 2 4 To complete editing Press the MENU button Deleting still picture files recorded on an SD card by other products A still picture file other than JPEG that cannot be played back on this unit may be erased Deleting multiple files from the thumbnail d...

Страница 102: ... Press the MENU button then select PLAY SETUP LOCK YES and press the joystick 2 Select the file to be protected then press the joystick display appears and the selected file is locked Press the joystick again to release the lock setting You can also select multiple files in succession To complete the settings Press the MENU button Locking still pictures This is for preventing still picture files f...

Страница 103: ... also select multiple files in succession To complete the settings Press the MENU button To cancel all DPOF settings Press the MENU button then select PLAY SETUP DPOF SET CANCEL ALL and press the joystick When the confirmation message appears select YES then press the joystick What is DPOF DPOF stands for Digital Print Order Format This enables picture printing information to be written onto an SD...

Страница 104: ... Formatting discs and cards Formatting discs This is for initializing discs In the case of a double sided disc format each side It may not be possible to format a disc with many scratches or dirt Such discs cannot be used During formatting do not turn this unit off When you format the disc use a battery with sufficient battery power or the AC adaptor Formatting DVD RAM We recommend formatting on t...

Страница 105: ...rmatting is complete press the MENU button to exit the message screen Formatting an SD card This is for initializing cards Use this unit to format SD cards If an SD card is formatted on other products such as a computer the time spent for recording may become longer and you may not be able to use the SD card Depending on the type of SD card being used it may take time to format During formatting d...

Страница 106: ... VR format discs DVD RAM It is not necessary to finalize DVD RAM DVD RW VR format Finalizing a DVD RW VR format increases its compatibility with other products DVD RW VR format after finalization can be recorded and edited in the same way as DVD RW VR format before finalization Do not finalize a disc recorded on this unit using any other device In the case of a double sided disc finalize each side...

Страница 107: ...ess the MENU button to exit the message screen Un finalizing a DVD RW This is for un finalizing a DVD RW Video format so that it can be used for recording DVD RW VR format cannot be un finalized DVD RW VR format after finalization can be recorded and edited in the same way as DVD RW VR format before finalization DVD R cannot be un finalized When you un finalize the disc use a battery with sufficie...

Страница 108: ...ETUP DISC PROTECT and press the joystick 2 When the confirmation message appears select YES then press the joystick To release disc protection 1 Press the MENU button then select SETUP DISC PROTECT and press the joystick 2 When the confirmation message appears select YES then press the joystick If the disc has been protected on another device it may not be possible to release the protection on thi...

Страница 109: ...as the number of recorded scenes the remaining space and whether or not the disc is finalized or protected is displayed Rotate the mode dial to select Press the MENU button then select SETUP INFORMATION YES and press the joystick To exit the information screen Press the MENU button LSQT1025 ENG book 109 ページ 2006年2月4日 土曜日 午後6時10分 ...

Страница 110: ...t is connected 4 Start playback on this unit The image and audio are output on the TV If the image or audio from this unit is not output on the TV Check that the plugs are inserted as far as they go Check the connected terminal Check the TV s input setting input switch For more information please read the operating instructions for the TV Playback on TV A AV S cable supplied Insert the plugs as fa...

Страница 111: ...ay not be displayed correctly For more information please read the operating instructions of your TV Press the MENU button then select SETUP TV ASPECT 4 3 and press the joystick Example of images with a 16 9 aspect ratio on a regular TV 4 3 This function s default setting is 16 9 To display the on screen information on the TV The information displayed on the screen operation icon and time code etc...

Страница 112: ...es that support 8 cm DVD RAM or DVD RW VR format See the operating instructions for DVD recorder player DVD RW VR format may have to be finalized In this case finalize the disc on this unit l 106 You cannot record images that allow One time only recording on a 8 cm disc Playing back a DVD RW Video format or a DVD R Do not insert a disc that has not been finalized into a DVD recorder player the dis...

Страница 113: ...mat may have to be finalized In this case finalize the disc on this unit l 106 Do not insert a DVD RW Video format or DVD R that has not been finalized into a DVD recorder the disc may be unusable Also a message asking you to format the disc may appear on the DVD recorder Do not format the disc If your DVD recorder has an SD card slot you can write the still picture files recorded on an SD card wi...

Страница 114: ...ctures 2 Turn on this unit then rotate the mode dial to select 3 Change the input channel on the video device and TV The channel set will differ depending on the terminal to which the unit is connected 4 Start playback on this unit Then start recording on the connected device See the operating instructions of the video device for details To stop dubbing Stop recording on the connected device Then ...

Страница 115: ...n select SETUP USB FUNCTION PictBridge and press the joystick Press the MENU button to exit the menu screen 2 Connect this unit and a printer The indication appears on this unit s screen If the indication does not appear or continues to flash disconnect and then reconnect the USB cable or check the printer SD card and settings on this unit Do not use any other USB cables except the supplied one Op...

Страница 116: ...et in succession by repeating steps 3 and 4 5 Press the MENU button to display the PictBridge menus 6 Select the date print setting on DATE PRINT If the printer is not capable of date printing this setting is unavailable 7 Select the paper size setting on PAPER SIZE You cannot set paper sizes not supported on the printer STANDARD Size specific to the printer 4t5 INCH L size 5t7 INCH 2L size 4t6 IN...

Страница 117: ...the following operations during printing These operations disable proper printing Disconnecting the USB cable Removing the SD card Switching the mode dial Turning off the power Check the settings for the paper size quality of print etc on the printer The sides of pictures recorded when VDR D300 VDR D250 is set may be cut at printing Check before printing When using the printer with a trimming feat...

Страница 118: ...unit if you use software other than that supplied with this unit What you can do with a computer Can do Software used Playing back on a computer DVD MovieAlbumSE supplied Copying a disc DVD MovieAlbum CopyTool supplied Editing motion pictures DVD RAM only DVD MovieAlbumSE supplied Creating a DVD Video disc DVD MovieAlbumSE supplied and DVDfunSTUDIO supplied Can do Software used Playing back on a c...

Страница 119: ...mSE with this unit it is possible to perform playback and editing of the DVD RAM or DVD RW VR format It is also possible to transfer exported data to DVDfunSTUDIO Playing back and editing DVD RAM and DVD RW VR format A Playback area B Thumbnails Disc contents are shown C Editing buttons Editing can only be performed on a DVD RAM DVD MovieAlbum CopyTool This is used when creating a copy of a VR for...

Страница 120: ...e the motion pictures exported from DVD MovieAlbumSE in the DVD menu and edit the menu design C Burning button The contents start being written to disc 3 A DVD Video disc is created Playback is possible on a DVD player that supports 8 cm DVD Video Acrobat Reader To view the installed operating instructions Adobe Acrobat Reader 5 0 or later is required If the Adobe Acrobat Reader is not already ins...

Страница 121: ...osoft Windows XP Professional Personal computer IBM PC AT compatible personal computer OS Microsoft Windows 2000 Professional Microsoft Windows XP Home Edition Microsoft Windows XP Professional CPU Intel Pentium III 450 MHz or higher 1 GHz or higher recommended or Intel Celeron 633 MHz or higher including compatible CPU Intel Pentium III 1 GHz or higher recommended for Windows XP RAM 128 MB or mor...

Страница 122: ...ternal DVD RAM DVD RW VR format compatible drive DVDfunSTUDIO 2 4 Personal computer IBM PC AT compatible personal computer OS Microsoft Windows 2000 Professional Service Pack 4 Microsoft Windows XP Home Edition Service Pack 2 Microsoft Windows XP Professional Service Pack 2 CPU Intel Pentium III 800 MHz or higher RAM 256 MB or more 512 MB or more recommended Display High Colour 16 bit or more Desk...

Страница 123: ...is software is not compatible with Microsoft Windows 3 1 Windows 95 Windows 98 Windows ME Windows NT and 64 bit operating system This software is not compatible with a multi CPU environment This software is not compatible with a multi boot environment If your computer does not satisfy the above system requirements an error may occur when writing data to disc Set the display resolution to 1024k768 ...

Страница 124: ...ng or Disassembly Licensee may not reverse engineer decompile or disassemble the Software except to the extent either of them is permitted under law or regulation of the country where Licensee resides Matsushita or its distributors or dealers will not be responsible for any defects in the Software or damage to Licensee caused by Licensee s reverse engineering decompiling or disassembly of the Soft...

Страница 125: ...Menu screen will appear If the Setup Menu screen does not appear double click the CD ROM drive icon in My Computer 2 Click DVD RAM Driver The software application may not run properly if you cancel the installation at any point e g by pressing Cancel 3 Click Driver and Formatter Setup If an Information or Question message appears continue to follow the on screen messages to install it 4 Click Next...

Страница 126: ... to reboot will appear Click Yes If any trouble has occurred while installing DVD RAM Driver When the Block is selected in the Driver Signing Options in the System Properties the installation procedure will not complete Select Warn and try again To check and change the setting select start Settings Control Panel Performance and Maintenance System and select Driver Signing of the Hardware tab About...

Страница 127: ...ironment you may be required to install DirectX 9 0b If so click Yes and install it If you install the software in a computer that is not compatible with DirectX 9 0b or 9 0c the computer may not work properly If you are unsure whether or not your computer is compatible contact the maker of your computer 3 Click Next 4 Select PAL for the TV system click Next 5 Click Next Continue to follow the on ...

Страница 128: ...nment you may be required to install DirectX 9 0b If so click Yes and install it If you install the software in a computer that is not compatible with DirectX 9 0b or 9 0c the computer may not work properly If you are unsure whether or not your computer is compatible contact the maker of your computer 3 Click Next 4 Select PAL Europe for the TV system click Next 5 Click Next Continue to follow the...

Страница 129: ...start All Programs Programs Panasonic DVDfunSTUDIO Operating instructions Follow the steps below to uninstall any software applications that you no longer require 1 Select start Settings Control Panel Add or Remove Programs Applications 2 Select the software application to be deleted then click Change Remove Change or Remove or Add Remove Proceed with the uninstallation by following the on screen ...

Страница 130: ... RW Video format and DVD R on this unit before using them on the computer Un finalized discs will not be recognized by the computer Connect this unit to the AC adaptor 1 Insert a disc or card with recorded images in the unit turn on the unit and then select the unit s operation mode When using a disc Select When using a card Select 2 Only in card playback mode Press the MENU button then select SET...

Страница 131: ...ed to a computer it is recognized as an external drive Depending on the operating environment of the computer the shape of the drive icon and the drive name Example E will differ In disc playback mode When accessing the disc Windows XP Optical disc drive is displayed in My Computer Windows 2000 Removable Disk and optical disc drive are displayed in My Computer When a DVD RAM or DVD RW VR format is...

Страница 132: ... this unit to read the SD card Always use this unit to format SD cards When data not supported by this unit has been recorded on a computer it will not be recognized by this unit 1 Double click the icon in task tray Hardware disconnect dialogue appears Depending on your computer s settings this icon may not be displayed 2 Select USB Mass Storage Device and click Stop 3 Verify MATSHITA DVD RAM LMXK...

Страница 133: ...31 USB Device is displayed at DVD CD ROM drives USB Mass Storage Device is displayed at Universal Serial Bus controllers Windows 2000 Professional MATSHITA DVD RAM LMXK1931 USB Device is displayed at DVD CD ROM drives MATSHITA DVD RAM LMXK1931 USB Device is displayed at Disc drives USB Mass Storage Device is displayed at Universal Serial Bus controllers When using a card USB Mass Storage Device is...

Страница 134: ...ns The End User License Agreement is displayed when the software is first started so read carefully through its terms and conditions then click I agree Connect this unit to the AC adaptor 1 Insert a DVD RAM or DVD RW VR format with recorded images in the unit turn on the unit and then rotate the mode dial to select 2 Connect this unit and a computer Do not use any other USB cables except the suppl...

Страница 135: ...gs displayed on the screen 7 When export is complete a message will appear Check the small box for Eject the disc being used and then click Yes DVD MovieAlbumSE automatically closes and DVDfunSTUDIO automatically starts When starting DVD MovieAlbumSE the Mount Information dialogue box may appear or the recorded images may not be shown If this occurs try the following procedure If there are multipl...

Страница 136: ...ive icon for this unit and select Eject Title names set using DVD MovieAlbumSE cannot be displayed on this unit Also the names of playlists created on this unit cannot be displayed on DVD MovieAlbumSE If you export an image recorded in 16 9 aspect ratio with DVD MovieAlbumSE it is saved as a 4 3 aspect image that has been squeezed horizontally If you then use the exported image with DVDfunSTUDIO i...

Страница 137: ... l 48 EVF SET l 48 INITIAL SET l 139 JOYSTICK LED l 140 DEMO MODE l 140 LANGUAGE l 42 Still picture recording menus BASIC SCENE MODE l 75 PICTURE SIZE l 58 PICT QUALITY l 59 CLOCK SET l 46 ADVANCED ß FLASH l 73 RED EYE l 74 ßw FLASH LEVEL l 74 O I S l 72 REC LAMP l 139 SHTR EFFECT l 59 SETUP DISPLAY l 139 DATE TIME l 47 DATE FORMAT l 47 POWER SAVE l 139 BEEP SOUND l 139 LCD AI l 49 LCD SET l 48 EV...

Страница 138: ...l 106 UN FINALIZE l 107 DISC PROTECT l 108 INFORMATION l 109 DISPLAY l 139 DATE l 82 DATE FORMAT l 47 POWER SAVE l 139 BEEP SOUND l 139 LCD AI l 49 LCD SET l 48 EVF SET l 48 TV ASPECT l 111 JOYSTICK LED l 140 LANGUAGE l 42 Still picture playback menus DELETE SELECT l 101 ALL l 101 PLAY SETUP PLAY MODE l 86 LOCK l 102 DPOF SET l 103 SETUP DISPLAY l 139 DATE TIME l 47 DATE FORMAT l 47 FORMAT CARD l ...

Страница 139: ...nit to a computer or printer via the USB cable BEEP SOUND OFF ON This allows operations such as starting and ending recording to be signaled by a beep When OFF is set no beep is heard when an operation such as recording is started or ended 1 Beep When you start recording When you turn on the power When this unit is recognized by the computer or the printer etc 2 Beeps When you pause recording When...

Страница 140: ...this to ON without inserting a disc or an SD card this unit is automatically set to the demonstration mode for introducing its functions If any button is pressed or operated the demonstration mode is cancelled If no operations take place for approx 10 minutes the demonstration mode automatically starts To terminate the demonstration mode insert a disc or an SD card or set this to OFF For normal us...

Страница 141: ...ing time 15 30 15 12 2006 Date time indication Red Recording writing to a disc Green Recording pause Wide mode Auto mode Manual mode MF Manual focus 2t Zoom magnification indication ª Back light mode Image stabilizer Power LCD 16 9 AUTO MNL 1 100 Shutter speed OPEN F2 0 F number 0dB Gain value Soft skin mode Tele macro Fade White Fade Black Colour night view function 0 Lux colour night view functi...

Страница 142: ...Aj Flash VDR D300 only Red eye reduction VDR D300 only White Green Shutter chance mark Ø Self Timer recording MEGA OIS VDR D300 only AWB MEGA Number of recording pixels for still pictures VDR D300 2048k1512 1920k1080 VDR D250 1760k1320 1760k992 VDR D300 VDR D250 1280k960 640k480 White Green Red Card can be recorded to Recognizing the card Recording accessing the card Still picture quality R 100 Re...

Страница 143: ...hen a printer compatible with PictBridge is connected Accessing the card When connected to a computer 1 DPOF already set to more than 1 Locked still pictures Number of recording pixels for still pictures VDR D300 2048k1512 1920k1080 VDR D250 1760k1320 1760k992 VDR D300 VDR D250 1280k960 640k480 The picture size is not displayed for still pictures recorded with other products that have different pi...

Страница 144: ...co jp pavc global cs e_cam This website is in English only CANNOT RECORD IN AGS MODE The AGS function is activated l 51 CANNOT RECORD THIS DISC IS FINALIZED A finalized DVD RW Video format or DVD R has been inserted After finalizing the discs become play only and cannot record If you un finalize a DVD RW Video format it can be used for recording l 107 CANNOT RECORD DISC IS FULL The disc is full or...

Страница 145: ...tart the unit l 154 CHANGE TO MANUAL MODE You are attempting to use a function that cannot be used simultaneously CANCEL NIGHT VIEW MODE TURN OFF POWER LCD CANNOT SET With DVD RW Video format and DVD R if the number of dates displayed becomes 99 when PLAY MODE is set to BY DATE you cannot switch the wide setting CHANGE MODE TO USE USB The USB cable is connected in the recording mode DISCONNECT USB...

Страница 146: ...epending on the error About recovery DISC ERROR HAS OCCURRED REPAIR DISC NOW When you repair the disc use a battery with sufficient battery power or the AC adaptor Depending on the condition of the data it may not be possible to completely repair the data If the disc is removed without it being repaired you will no longer be able to playback the scenes recorded before the power went off Do not rep...

Страница 147: ...the iris gain is set Soft skin mode Set and cancel While recording to a disc Tele macro Set and cancel Help mode Image stabilizer When the colour night view function is used VDR D250 only In card recording mode VDR D250 only Functions Conditions which disable the functions Flash VDR D300 only In disc recording mode Zoom microphone An external microphone is used Wind noise reduction Scene mode When...

Страница 148: ...to the other The recording time indicated on the disc package is the total time for both sides You will need to eject the disc and turn it over to record on both sides Can DVD R only be recorded to once only Recording can be started and stopped until the disc is full However the data recorded on the DVD R cannot be erased Is playback possible on a DVD player By finalizing a DVD RW Video format or ...

Страница 149: ...vieAlbumSE DVD RW VR format DVD RW Video format DVD R Editing is not possible on a computer Is it possible to copy data to a computer DVD RAM DVD RW VR format Use DVD MovieAlbum CopyTool or the File Export function in DVD MovieAlbumSE Before using DVD RW VR format on a computer be sure to finalize it on this unit DVD RW Video format DVD R Copying data to a computer is not possible SD card Copy wit...

Страница 150: ...RY is displayed the battery has run down Charge the battery l 25 Battery runs down quickly Is the battery fully charged Charge it with the AC adaptor l 25 Are you using the battery in an extremely cold place The battery is affected by ambient temperature In cold places the operating time of the battery becomes shorter Has the battery worn out The battery has a limited life If the operating time is...

Страница 151: ...apsed time indication is not shown If you set SETUP DISPLAY OFF indications other than warnings and date indications disappear Recording does not start although power is supplied to this unit and the disc or card is correctly inserted Is the DVD RAM or the DVD RW VR format write protected Release the protection l 108 If the DVD RAM or DVD RW VR format was protected on another device release the pr...

Страница 152: ...re you trying to record a scene which is hard to bring into focus in auto focus mode There are some recording subjects and surroundings for which the auto focus does not operate correctly l 162 If so use the manual focus mode to adjust the focus l 77 Is the night view function set When the night view function is working focusing shifts into the manual mode Sound is not played back from the built i...

Страница 153: ...d s write protect switch is set to LOCK then deletion is disabled l 23 The images on the SD card do not look normal The data may be destroyed It may have been destroyed by static or electromagnetic waves Store important data on a computer or other products as well Even if a disc or a card is formatted it cannot be used Either this unit or the disc or card may be damaged Please consult a dealer Use...

Страница 154: ...rding mode Set it to a playback mode If it is set to card playback mode disconnect the USB cable set USB FUNCTION to PC CONNECT and then reconnect the USB cable Select another USB terminal on the computer Check the operating environment l 121 Turn on the power to this unit When DVD MovieAlbumSE is started the Mount Information dialogue box appears You inserted an incompatible disc A disc other tha...

Страница 155: ...ve icon and execute Eject Or use the software s eject button to eject the disc After files are exported from DVD MovieAlbumSE a confirmation message is displayed about ejecting the disc Select Eject the disc being used Cannot write to DVD RAM Cannot format a disc with the DVD RAM Driver Windows XP only Deleting the unit name from the Device Manager and then connecting the unit and the computer aga...

Страница 156: ...chemicals onto the unit If the unit is sprayed with such chemicals its body may be marred and the surface finish may peel off Do not leave rubber or plastic products in contact with the unit for a long time When you use the unit in a sandy or dusty place such as a beach do not let sand or fine dust get into the body and terminals of the unit Also keep the unit away from sea water Sand or dust may ...

Страница 157: ... is charged The battery should be stored in the vinyl bag so metal does not come into contact with the terminals The battery should be stored in a cool place free from humidity with as constant temperature as possible Recommended temperature 15 C to 25 C Recommended humidity 40 to 60 Extremely high temperatures or low temperatures will shorten the life of the battery If the battery is kept in high...

Страница 158: ...llowing phenomena may occur Block noise in playback image Momentary stop of playback image Sound interrupted during playback or abnormal sound Thumbnail display with shades of blue and white Disc cannot correctly be recognized Delay between video and audio When recording images this unit may avoid the portions of disc where recording is not possible due to dust scratches etc It will pause at such ...

Страница 159: ...When the unit has become very cold for example due to storage in a cold area its LCD monitor will be slightly darker than usual immediately after the power is turned on The normal brightness will be restored when the unit s internal temperature rises About the SD card LCD monitor viewfinder Extremely high precision technology is employed to produce the LCD Monitor screen featuring a total of appro...

Страница 160: ...of rain When this unit is in a very humid place where the air is thick with steam e g a heated swimming pool When this unit is taken to a location with a significant temperature difference such as from a cold place to a hot place If for example you have used this unit for recording on a ski slope and are taking it into a heated room place the unit inside a plastic bag remove as much of the air fro...

Страница 161: ... of the effective range of automatic white balance adjustment the image will become reddish or bluish Even within the effective range of automatic white balance adjustment the automatic white balance adjustment may not function properly if there is more than one light source For light outside the functional automatic white balance adjustment range use the manual white balance adjustment mode White...

Страница 162: ...arly when recording something on the opposite side of a road with heavy traffic a vehicle that happens to pass by may be brought into focus Recording a subject that is surrounded by objects with glossy surfaces or by highly reflective objects Since whatever is shiny or glistens is brought into focus it is hard to focus on the subject to be recorded The focus may become blurry when recording subjec...

Страница 163: ...RW DVD Video format DVD RW DVD R Image sensor 1 6z 3CCD image sensor Total 800 Kk3 Effective pixels VDR D300 Moving picture 630 Kk3 4 3 540 Kk3 16 9 Still picture 710 Kk3 4 3 540 Kk3 16 9 VDR D250 Moving picture 400 Kk3 4 3 380 Kk3 16 9 Still picture 530 Kk3 4 3 400 Kk3 16 9 Lens Auto Iris F1 8 to F2 8 Focal length VDR D300 3 0 mm to 30 0 mm VDR D250 2 45 mm to 24 5 mm Macro Full range AF Filter d...

Страница 164: ...ard reader writer function No copyright protection support USB 2 0 compliant Hi Speed PictBridge compliant Motion picture transfer Flash VDR D300 only GN 4 8 Dimensions excluding projecting parts VDR D300 Approx 63 mm W k 87 mm H k 138 mm D VDR D250 Approx 63 mm W k 87 mm H k 136 mm D Mass without supplied battery lens cap and a disc VDR D300 Approx 585 g VDR D250 Approx 555 g Operating temperatur...

Страница 165: ...AM LP 2 5 Mbps VBR Approx 75 min recordable time on a single sided DVD RAM Audio compression Dolby Digital Dolby AC3 16 bit 48 kHz 2 ch Recording media SD Memory Card 8 MB 16 MB 32 MB 64 MB 128 MB 256 MB 512 MB 1 GB 2 GB Maximum Compression JPEG Design rule for Camera File system based on Exif 2 2 standard DPOF corresponding Picture size VDR D300 2048k1512 1920k1080 16 9 1280k960 640k480 VDR D250 ...

Страница 166: ...5 120 98 155 256 MB 160 250 210 330 512 MB 320 490 410 650 1 GB 630 990 820 1290 2 GB 1290 2010 1680 2630 VDR D250 Picture size 1760k1320 1760k992 Picture quality 8 MB 4 7 7 11 16 MB 10 18 18 28 32 MB 24 40 40 61 64 MB 51 83 83 125 128 MB 99 160 160 240 256 MB 210 330 330 510 512 MB 410 660 660 1010 1 GB 820 1330 1330 2010 2 GB 1680 2700 2700 4100 3 1M 2 2 3M 1 7 LSQT1025 ENG book 166 ページ 2006年2月4...

Страница 167: ...n in the table are approximations VDR D300 and VDR D250 Picture size 1280k960 640k480 Picture quality 8 MB 8 14 45 95 16 MB 21 34 100 200 32 MB 47 75 220 440 64 MB 97 155 440 880 128 MB 185 300 880 1760 256 MB 390 620 1760 3520 512 MB 780 1230 3520 7040 1 GB 1550 2470 7040 14080 2 GB 3160 5030 14080 28160 1M 0 3M LSQT1025 ENG book 167 ページ 2006年2月4日 土曜日 午後6時10分 ...

Страница 168: ...Backcover LSQT1025 A F0206Nt0 2300 A A Matsushita Electric Industrial Co Ltd Web site http www panasonic co jp global LSQT1025 ENG book 168 ページ 2006年2月4日 土曜日 午後6時10分 ...

Отзывы: