background image

14

Getting Started

First-time Operation

1  

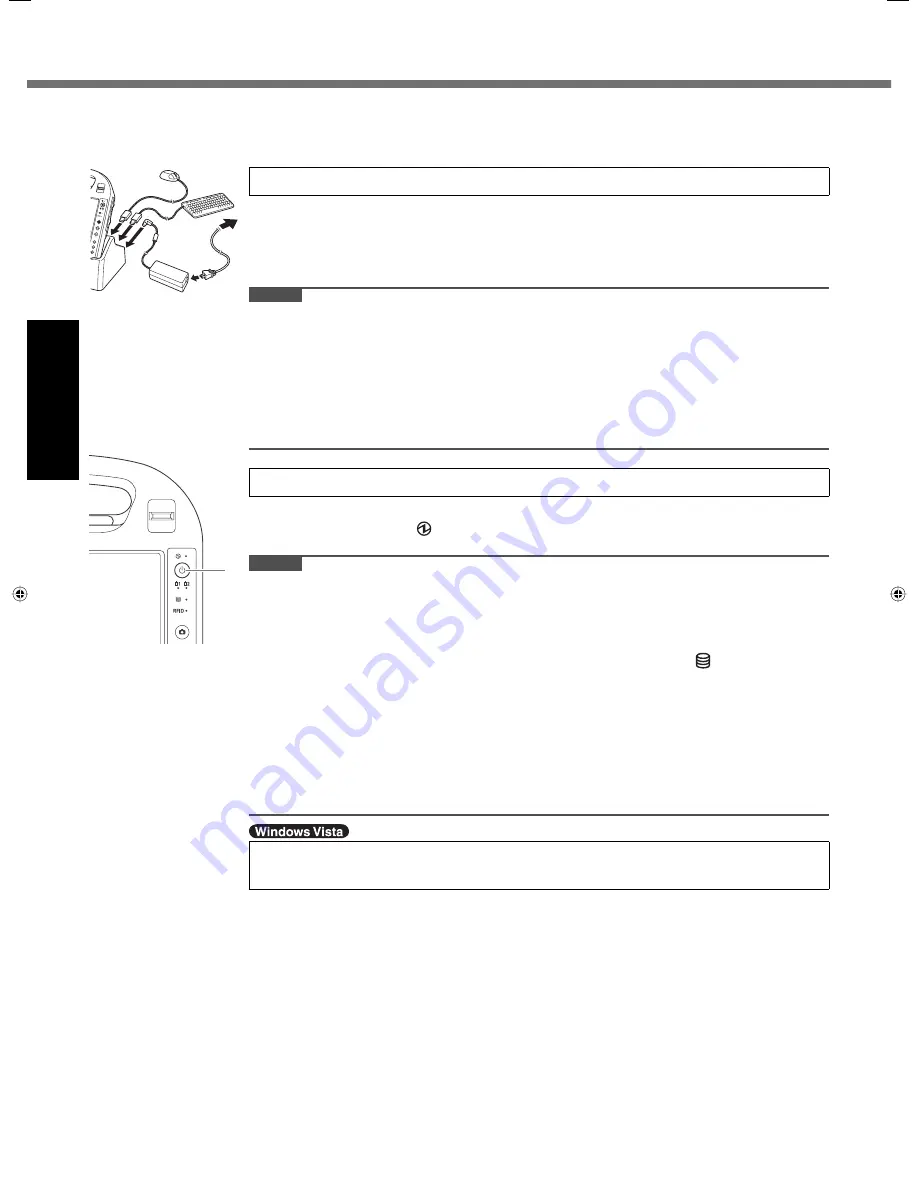
Set your computer to the Cradle.

  Set the computer to the cradle, and connect the external keyboard and mouse to the 

cradle.


Connect the AC adaptor to the Cradle and a power outlet.


The battery charging starts automatically. 

CAUTION

  Do not remove the computer from the Cradle until the “Setting up the computer” 

procedure is completed.

  When using the computer for the 

fi

 rst time, do not connect any peripheral device except 

the battery pack, Cradle, keyboard, mouse and AC adaptor.

  Handling the AC adaptor

  Problems such as sudden voltage drops may arise during periods of thunder and lightning. 

Since this could adversely affect your computer, an uninterruptible power source (UPS) is 
highly recommended unless running from the battery pack alone.

Turn on the computer.

A

 Press the power switch (A).

The power indicator   lights.

CAUTION

  Do not press the power switch repeatedly.

  The computer will forcibly be turned off if you press and hold the power switch for 4 

seconds or longer.

  Once you turn off the computer, wait for 10 seconds or more before you turn on the 

computer again.

  Do not perform the following operation until the hard disk drive indicator   turns off.

  Connecting or disconnecting the AC adaptor

  Pressing the power switch

  Touching the screen, external keyboard or external mouse

  When the CPU temperature is high, the computer may not start up to prevent overheating 

of the CPU. Wait until the computer cools down, and then turn the power on again. If the 

computer does not power on even after cooling down, contact Panasonic Technical 

Support.

  Any changes from the default setting of the Setup Utility must not be made until the 

“Setting up the computer” procedure is completed.


<For MUI OS model>


Select OS language.

A

 Select OS language on “Select Language” screen and click [OK].

The language setting will start by clicking [OK] on the con

fi

 rmation screen. You can 

return to the “Select Language” screen by clicking [Cancel]. 
The language setting will be complete in about 20 minutes.

B

 Click [OK] on the termination screen.

The power of the computer goes off by clicking [OK].

C

 Turn on the computer.

 Carefully choose your language because you cannot change it later. If you set a wrong 

language, you need to reinstall Windows (  page 21).

  Setting up the computer

A

Содержание Toughbook CF-H1ADBBZCM

Страница 1: ...ntenance 19 Reinstalling Software 21 Troubleshooting Troubleshooting Basic 23 Appendix LIMITED USE LICENSE AGREEMENT 27 Specifications 28 Please read these instructions carefully before using this pro...

Страница 2: ...ording to the keyboard used e g Delete instead of Del Some illustrations are simplified to help your understanding and may look different from the actual unit If you do not log on as an administrator...

Страница 3: ...FETY PLEASE READ THE FOLLOWING TEXT CAREFULLY This appliance is supplied with a moulded three pin mains plug for your safety and convenience A 3 amp fuse is fitted in this plug Should the fuse need to...

Страница 4: ...example mobile phones Because this product operates within the guidelines found in radio frequency safety standards and recommendations we believe this product is safe for use by consumers These stand...

Страница 5: ...lasting operations are in progress Operation of any electrical equipment in potentially explosive atmospheres can constitute a safety hazard Your Personal Computer or Handheld Computer incorporating w...

Страница 6: ...nt please contact your dealer or supplier for further information Information on Disposal in other Countries outside the European Union These symbols are only valid in the European Union If you wish t...

Страница 7: ...shock If a malfunction occurs immediately turn the power off and unplug the AC plug and then remove the battery pack Then contact your technical support office Do Not Touch This Product and Cable When...

Страница 8: ...ot Subject the AC Adaptor to Any Strong Impact Using the AC adaptor after a strong impact such as being dropped may result in electric shock short circuit or fire Take a Break of 10 15 Minutes Every H...

Страница 9: ...or more charge or discharge use the battery pack until the remaining battery level becomes 30 to 40 and store it in a cool dry place This computer prevents overcharging of the battery by recharging on...

Страница 10: ...eference Manual Battery Power Battery 2 status Reference Manual Battery Power Hard disk drive status RFID RFID Reader status Reference Manual RFID Reader G DC IN Jack H Power Switch I Battery 2 Case J...

Страница 11: ...a magnet and magnetic products at the battery cover Avoid leaving metallic object or magnetic media in contact with these areas Only for model with wireless WAN IMEI International Mobile Equipment Ide...

Страница 12: ...SE AGREEMENT before breaking the seal on the computer s packaging page 27 Inserting the Battery Packs Insert the battery pack to 2 battery cases 1 ASlide the battery cover and open it BInsert the batt...

Страница 13: ...follows When AC adaptor is connected When the screen is off Approx 9 5 W In sleep standby Approx 1 1 W The battery pack is fully charged or not being charged and the computer is off Approx 0 9 W About...

Страница 14: ...er wait for 10 seconds or more before you turn on the computer again Do not perform the following operation until the hard disk drive indicator turns off Connecting or disconnecting the AC adaptor Pre...

Страница 15: ...ing this computer under the sun the screen becomes easily viewable by changing the wallpaper to the white wallpaper ARight click on the desktop and click Personalize Desktop Background BSelect Solid C...

Страница 16: ...erface strings remain in English even if the user s UI is set to another language For more information refer to c windows mui relnotes txt If you change the language in Languages Language used in menu...

Страница 17: ...to Windows Do not log on to Windows by the Guest account To change the partition structure You can shrink a part of an existing partition to create unallocated drive space from which you can create a...

Страница 18: ...Dashboard then click Reference Manual AClick start Reference Manual Alternatively press A2 button to start Panasonic Dashboard then click Reference Manual Important Tips The Important Tips will provi...

Страница 19: ...the computer on airplane follow the airline s instructions When carrying a spare battery put it in a plastic bag to protect its terminals Be careful of computer drop resulting from the hand strap dam...

Страница 20: ...ent strong alkaline agent benzene or thinner since it may adversely affect the surface causing discoloration etc Do not use commercially available household cleaners and cosmetics as they may contain...

Страница 21: ...9 At the confirmation message select Yes and press Enter 5 Press F10 At the confirmation message select Yes and press Enter The computer will restart 6 Press F2 or Del while Panasonic boot screen is d...

Страница 22: ...If the password is requested enter the Supervisor Password 16 Perform the steps 3 4 and 6 for setting up the computer pages 14 to 16 17 Start the Setup Utility and change the settings as necessary 18...

Страница 23: ...do not have a password reset disk reinstall page 21 and set up Windows and then set a new password Remove disks or other media Press any key to restart or a similar message appears If a device is con...

Страница 24: ...saved data will be lost You disconnected the AC adaptor and the battery pack while the computer was in sleep standby If the computer s power supply is disconnected in sleep standby unsaved data will b...

Страница 25: ...play one of the screens becomes disordered Simultaneous display cannot be used until Windows startup is complete during Setup Utility etc When using the Extended Desktop use the same display colors fo...

Страница 26: ...n and add the check mark to Show navigation bar before starting full screen mode If you started full screen mode without above setting set the computer to the Cradle and connect the external keyboard...

Страница 27: ...nnection with your transfer of the single Product which was accompanied by the Programs to such other party At the time of such a transfer you must also transfer all copies whether in printed or machi...

Страница 28: ...side to side Ambient Light Immunity Artificial Lighting Sunlight 100 000lx 9290 ft candles Interface Expansion Bus Connector Dedicated 19 pin female Pointing Device Touchscreen Digitizer Button Camer...

Страница 29: ...1 1 KB 1 024 bytes 1 MB 1 048 576 bytes 1 GB 1 073 741 824 bytes 2 A segment of the main memory is allotted automatically depending on the computer s operating status The size of the Video Memory cann...

Страница 30: ...30 MEMO...

Страница 31: ...31...

Страница 32: ...d other office equipment The program backs the development and dissemination of products with functions that effectively reduce energy consumption It is an open system in which business proprietors ca...

Отзывы: