background image

Initial Setup 

Operating the TV

8

 Initial Setup

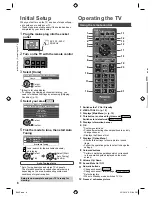
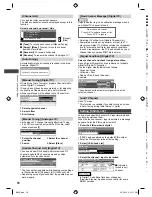
When you first turn on the TV, a series of steps will pop-
up to guide you to setup your TV.


These steps are not necessary if the setup has been 
completed by your local dealer.

Plug the mains plug into the socket 
outlet

AC 220 - 240 V, 
50/60 Hz

Turn on the TV with the remote control

Select [Home]

Please select your viewing environment.

Home

Shop

OK

 Confirm

 Select


[Shop] is for shop display. 


To change the viewing environment later on, you 
need to initialise all settings by accessing [Shipping 
Condition]


(p. 15).

 Select your area 

New South Wales / Australian Capital Territory

Victoria

Queensland

South Australia

Western Australia
Northern Territory

Tasmania

Select State / Territory

OK

 Confirm

 Select

Tick the mode to tune, then start Auto 
Tuning

TV Signal Selection

Digital TV
Analogue TV

Start Auto Tuning

:  tune (search for the available channels)
:  skip tuning

OK

 Tick

 Select

OK

 Confirm

  Select [Start 

Auto Tuning]

Auto Tuning starts


Auto Tuning searches and stores TV channels.
The stored channels and sorted channel order vary 
depending on the area, broadcasting system and 
conditions of signal reception.

Setup is now complete and your TV is ready for 
viewing.

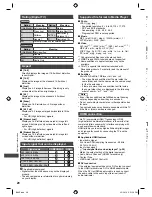
Operating the TV

Using the remote control

MENU

VIERA

TOOLS

TEXT STTL GUIDE

CH

EXIT

POWER

INFO

RETURN

OPTION

INPUT

R

G

Y

B

ASPECT

MUTE

STILL

LAST VIEW

VOL

OK

1

13

14
15
16

17

18

19

20

21

3

2

4
5

6

7
8

9

10

11

12

1

Switches the TV On / Standby

2

VIERA TOOLS   (p. 10)

3

Displays [Main Menu]   (p. 12)

4

This button is not used for this model 
Switches to teletext mode 

5

 Displays Information banner

6

OK


Confirms selections.


Press after selecting channel positions to quickly 
change channel.


Displays the Channel List.

7

Displays [Option Menu]


Shortcuts to settings for some picture / sound 
items.


Follow the operation guide to select / change the 
settings.

8

Coloured buttons


Performs multiple operations which correspond 
to the operation guide displayed on the menu 
screen.

9

Volume Up / Down

10

 Sound Mute On / Off

11

Numeric buttons


Changes channel. 


Changes channel / teletext pages. 


Sets characters.


When in Standby mode, switches TV On.

12

Freezes / unfreezes picture

2
2

B6AZ.indd   8

B6AZ.indd   8

2/1/2013   3:51:04 PM

2/1/2013   3:51:04 PM

Содержание TH-L32B6A

Страница 1: ...y before operating this product and retain them for future reference The images shown in this manual are for illustrative purposes only Some illustrations are presented as conceptual images and may be different from the actual products Illustrations shown may be different between models and countries Transport only in upright position CHC TQB4GC1063 1 B6AZ indd 1 B6AZ indd 1 2 1 2013 4 42 10 PM 2 ...

Страница 2: ...d non commercial activity and or was obtained from a video provider licensed to provide AVC Video No license is granted or shall be implied for any other use Additional information may be obtained from MPEG LA LLC See http www mpegla com This product incorporates the following software 1 the software developed independently by or for Panasonic Corporation 2 the software owned by third party and li...

Страница 3: ... and ensure that the TV does not hang over the edge of the base Important information If the TV is not positioned in a sufficiently stable location it can be potentially hazardous due to falling Many injuries particularly to children can be avoided by taking simple precautions such as Using cabinets or stands recommended by the manufacturer of the TV Only using furniture that can safely support th...

Страница 4: ...om the wall socket when the TV is not in use for a prolonged period of time Battery for the Remote Control Caution Incorrect installation may cause battery leakage corrosion and explosion Replace only with the same or equivalent type Do not mix old and new batteries Do not mix different battery types such as alkaline and manganese batteries Do not use rechargeable batteries Ni Cd etc Do not burn o...

Страница 5: ...embly screws from the TV 2 Pull out the pedestal from the TV 3 Remove the assembly screws from the bracket Inserting remote s batteries Note the correct polarity or Press the hook and lift the cover Wall mounting the TV optional Choosing to wall mount the TV shall be done at the owner s risk and expense Always use a qualified installer to perform a TV wall bracket installation Incorrect installati...

Страница 6: ...n infrared sensor Otherwise distortion of image sound may occur or operation of other equipment may be interfered Also read the manual of the equipment being connected Terminals ANALOGAUDIO viaAV1 AV1 IN AUDIO OUT DIGITAL AUDIO OUT ANT AUDIO VIDEO COMPONENT R R L L PR CR PB CB Y VIDEO USB AV2 IN VIDEO L AUDIO R ARC 2 1 3 5 6 7 4 AV2 IN VIDEO O O L AUDIO R AV1 IN AUDIO VIDEO COMPONENT R L PR CR PB ...

Страница 7: ...can also make similar connections via AV2 IN Speaker system ARC HDMI cable Amplifier with speaker system TV Use HDMI 2 for connecting an amplifier that has ARC Audio Return Channel function As for an amplifier without ARC function use DIGITAL AUDIO OUT or AUDIO OUT To enjoy the sound from the external equipment in multi channel sound e g Dolby Digital 5 1ch connect the equipment to the amplifier F...

Страница 8: ...es TV channels The stored channels and sorted channel order vary depending on the area broadcasting system and conditions of signal reception Setup is now complete and your TV is ready for viewing Operating the TV Using the remote control MENU VIERA TOOLS TEXT STTL GUIDE CH EXIT POWER INFO RETURN OPTION INPUT R G Y B ASPECT MUTE STILL LAST VIEW VOL OK 1 13 14 15 16 17 18 19 20 21 3 2 4 5 6 7 8 9 1...

Страница 9: ...nu system When pressing 1 2 3 buttons the control panel guide appears on the right side of the screen for 3 seconds to highlight the pressed button 4 Mains power On Off switch Use to switch the mains power 5 Remote control signal receiver 6 Ambient sensor Senses brightness to adjust picture quality when Ambient Sensor in the Picture Menu is set to On p 13 7 Power LED Red Standby Green On The LED b...

Страница 10: ...es Bodyshock Half Ton Sayid confronts Ben s spy on the freighter and Ben urges daughter Alex to flee Locke s camp in order to survive an impending attack TV ONE 20 00 Current channel s programme listing Current day date Current programme Parental rating captioning information Description Follow the operation guide to operate the Freeview Guide Using VIERA TOOLS You can access some special features...

Страница 11: ... Collage Drift Gallery or Cinema or when Transition Effect is set to Motion Depending on the photo size it may not be fully enlarged to fill the screen e g portrait style picture Burst Playback Selects whether to display burst photos in a fast paced slideshow mode Off On This function is not available when Frame is set to Drift Gallery or Cinema or when Transition Effect is set to Motion Interval ...

Страница 12: ...e selected file only Select the folder Select the file Play OK OK R Option Menu Contains Music Setup menu to set up play mode Repeat Folder Playback repeat within the selected folder One Playback repeat on the selected one file Using the Menu Functions 1 Display the menu MENU Example Menu Item Setting 1 2 0 0 0 0 Mode Standard Bass Treble Equaliser Auto Gain Control Surround Volume Correction Spea...

Страница 13: ...ion Settings Film Cadence Mode Improves vertical resolution for movie images On Off This function is available for the interlaced signal 1080p Pixel Direct For 39 50 models only Reproduces the original image quality in detail for 1080p HDMI input signal On Off HDMI Content Type Adjusts the picture settings of each HDMI input according to the selected content type Graphics Photos Auto Off Auto Auto...

Страница 14: ...o Use this normally Mono When stereo signal cannot be received M1 M2 Available while mono signal is transmitted For Analogue TV Digital Audio Preference Selects the initial setting for audio tracks Dolby D MPEG Dolby D HE AAC Dolby D The priority is given to Dolby Digital MPEG The priority is given to MPEG HE AAC The priority is given to HE AAC Dolby Digital is the method of coding digital signals...

Страница 15: ...automatically set to Standby On Off Standby Power Save Controls the connected equipment to reduce power consumption in Standby On Off This function is available when VIERA Link is set to On and Power off Link is set to On Intelligent Auto Standby Makes non watched or non used HDMI connected equipment go into Standby mode to reduce the power consumption On Off This function is available when VIERA ...

Страница 16: ...ive a notification message when a new Digital TV channel is found New channels found Press OK to update channel list Press EXIT to ignore Selecting OK will perform Update Channel List Sometimes mainly during summer at night the TV may pickup distant TV stations outside your broadcast due to favourable short term ionosphere conditions In such circumstances the TV does not add any new channel when y...

Страница 17: ...ons VIERA Link VIERA Link HDAVI Control connects the TV and the equipment with VIERA Link function and enables easy control playback energy saving creating home theatre etc without complicated setting This TV supports HDAVI Control 5 function But available features are depending on the connected equipment s version of HDAVI Control Please read the manual of the equipment to confirm the version VIE...

Страница 18: ... the TV via an HDMI cable Type of the equipment Maximum number Recorder DIGA Recorder etc 3 Player DVD Player Blu ray Disc Player HD Video Camera LUMIX Camera Digital Camera Player theatre Blu ray Disc theatre etc 3 Audio system Player theatre Blu ray Disc theatre Amplifier etc 1 Tuner Set top box etc 4 VIERA Link Menu 1 Display VIERA TOOLS and select VIERA Link VIERA TOOLS VIERA Link VIDEO MUSIC ...

Страница 19: ... terminal To enjoy the sound from the DIGA Recorder in multi channel sound connect an HDMI cable from the DIGA Recorder to the Amplifier Note These functions may not work properly depending on the connected equipment Image or sound may not be available for the first few seconds when input mode is switched HDAVI Control 5 is the newest standard as of December 2011 for HDAVI Control compatible equip...

Страница 20: ... wmv MP4 f4v m4v mp4 FLV flv 3GPP 3gp 3g2 TS mts m2ts tp trp ts tts PS mod mpg mpeg vob vro Copy protected files cannot be played back WMA Pro and WMA Lossless are not supported Some subtitles or chapter functions may not be available This TV supports this container recorded with Panasonic products For details read the manual of the products Subtitles MicroDVD SubRip TMPlayer srt sub txt The video...

Страница 21: ... Set Noise Reduction in the Picture Menu to remove noise p 13 Check nearby electrical products car motorcycle fluorescent lamp No image is displayed Check the settings of Contrast Brightness or Colour in the Picture Menu p 13 Check the TV is in AV mode If the TV is in AV mode check the selected input mode match the output of the external equipment p 9 Blurry or distorted image no sound or low volu...

Страница 22: ... from some PAL Video recorders VCR M NTSC Playback from M NTSC Video recorders VCR NTSC Playback from NTSC Video recorders VCR Dimensions W H D With Pedestal mm 741 515 184 896 602 217 1 139 739 275 TV only mm 741 450 78 896 537 85 1 139 674 89 Mass Net With Pedestal kg 7 10 18 TV only kg 6 9 15 Aerial input Standard Belling Lee connector VHF UHF Operating Conditions Temperature 0 C 35 C Humidity ...

Страница 23: ... address of the nearest Authorised Service Centre Send or take the product to a Panasonic Authorised Service Centre together with your proof of purchase receipt as a proof of purchase date Please note that freight and insurance to and or from your nearest Authorised Service Centre must be arranged by you Note that home or pick up delivery service is available for the following products in the majo...

Страница 24: ...s plug from the socket outlet Regular care Gently wipe the surface of the display panel cabinet and pedestal by using a soft cloth Wipe the mains plug with a dry cloth at regular intervals Moisture and dust may lead to fire or electrical shock For stubborn dirt First clean the dust on the surface Dampen a soft cloth with clean water or diluted neutral detergent 1 part detergent to 100 parts water ...

Отзывы: