Panasonic TH-84LQ70LU Скачать руководство пользователя страница 46

English

46

  Screensaver 
(For preventing image retention)

 Do not display a still picture, especially in 4:3 mode, for 
any length of time.
 If the display must remain on, a Screensaver should be 
used.


 Screensaver

 Start

 10:00

 Time

 Mode

 Off

 Side panel

 Off


 Screensaver settings

 Screensaver operation

 When the Screensaver is operating, the following 5 
patterns are displayed full screen for 5 seconds each, 
and it will be repeated.
 Black →

 Dark grey 

 Grey 

 Light grey 

 White 


Light grey 

 Grey 

 Dark grey

 Note

● 

 When the Screensaver is operating, the screen 
brightness will be reduced, but it is not a malfunction.

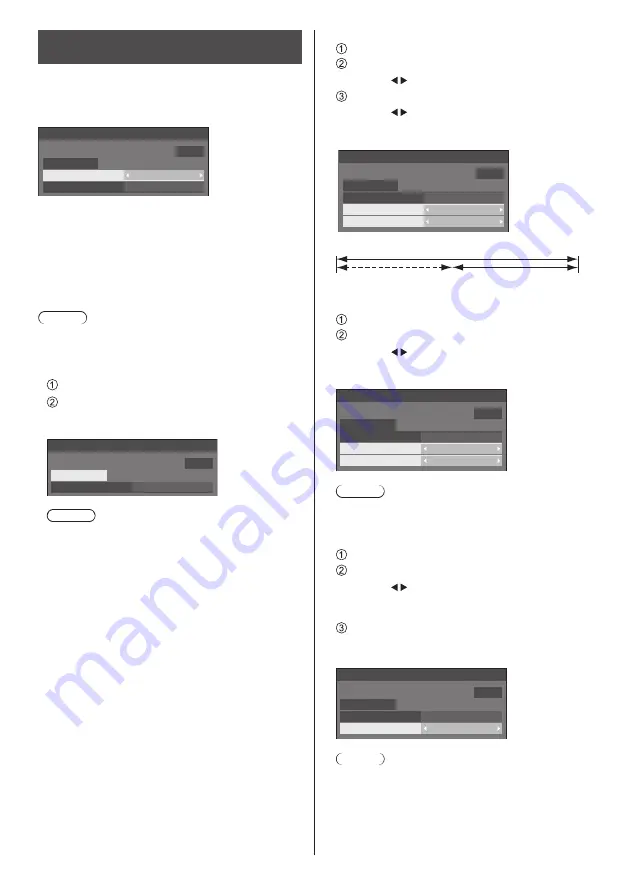
 To start Screensaver now

   Select [On] in [Mode].
   Select [Start] and press <ENTER>.

● 

 The menu screen will disappear and the 
Screensaver will be activated.


 Screensaver

 Start

 10:00

 Time

 Mode

 On

 Note

● 

 To stop the Screensaver under On, press the 
<RETURN> button or any buttons on the main unit.

● 

 When the display is turned off, the Screensaver will 
be deactivated.


 To set interval of Screensaver

   Select [Interval] in [Mode].
   Set [Periodic time].

● 

 Press     to change the time by 15 minutes.

   Set [Operating time].

● 

 Press     once to change the time by 1 minute. 
Keep pressing down to change the time by 15 
minutes.


 Screensaver

 Start

 10:00

 Time

 Mode

 Interval

 Periodic time
 Operating time

 0:00
 0:00

 Periodic time

 Deactivated.

 Operating time

 To set start and finish time of Screensaver

   Select [Time designation] in [Mode].
   Set [Start time] and [Finish time].

● 

 Press     once to change the time by 1 minute. 
Keep pressing down to change the time by 15 
minutes.


 Screensaver

 Start

 10:00

 Time

 Mode

 Time designation

 Start time
 Finish time

 0:00
 0:00

 Note

● 

 Please set [Time] before setting [Start time] and 
[Finish time]. (see page 51)

 To turn the power off after Screensaver

   Select [Standby after SCR saver] in [Mode].
   Set [Screensaver duration].

● 

 Press     once to change the time by 1 minute. 
Keep pressing down to change the time by 15 
minutes.

   Select [Start] and press <ENTER>.

● 

 Screensaver will be activated and the power will 
be turned off (Standby) at the time set.


 Screensaver

 Start

 10:00

 Time

 Mode

 Standby after SCR saver

 Operating time

 0:00

 Note

● 

 [Screensaver duration] can be set from 0:00 to 
23:59.
 When this is set to [0:00], [Standby after SCR 
saver] will not be activated.

Содержание TH-84LQ70LU

Страница 1: ...LQ70U 84 inch model TH 98LQ70U 98 inch model TH 84LQ70LU 84 inch model TH 98LQ70LU 98 inch model TH 84LQ70W 84 inch model TH 98LQ70W 98 inch model TH 84LQ70LW 84 inch model TH 98LQ70LW 98 inch model English Please read these instructions before operating your set and retain them for future reference ...

Страница 2: ...Display To obtain maximum benefit from your set please read these Instructions before making any adjustments and retain them for future reference Retain your purchase receipt also and note down the model number and serial number of your set in the space provided on the rear cover of these instructions Visit our Panasonic Web Site http panasonic com ...

Страница 3: ...en display to 1 screen display 31 Switching the input of 4 screen display 32 On Screen Menu Displays 33 Adjusting Position 34 Auto setup 34 Sound Adjustment 36 Picture Adjustments 37 Picture Profiles 39 Saving profiles 40 Loading profiles 41 Editing profiles 41 Setup menu 43 4 Input multi display settings 43 Signal 43 Screensaver For preventing image retention 46 ECO mode settings 47 Input label 4...

Страница 4: ...with dry cloth 7 Do not block any ventilation openings Install in accordance with the manufacturer s instructions 8 Do not install near any heat sources such as radiators heat registers stoves or other apparatus including amplifiers that produce heat 9 Do not defeat the safety purpose of the polarized or grounding type plug A polarized plug has two blades with one wider than the other A grounding ...

Страница 5: ...North America could void the user s authority to operate this device FCC Declaration of Conformity Model No TH 84LQ70U TH 98LQ70U TH 84LQ70LU TH 98LQ70LU Responsible Party Panasonic Corporation of North America Two Riverfront Plaza Newark New Jersey 07102 5490 Contact Source Panasonic System Communications Company of North America 1 877 655 2357 CANADIAN NOTICE This Class B digital apparatus compl...

Страница 6: ...nds recommended by the manufacturer of the display Only using furniture that can safely support the display Ensuring the display is not overhanging the edge of the supporting furniture Not placing the display on tall furniture for example cupboards or bookcases without anchoring both the furniture and the display to a suitable support Not standing the displays on cloth or other materials placed be...

Страница 7: ...t a location with minimal vibration and which can support the weight of the unit Dropping or falling of the unit may cause injury or malfunction Do not place any objects on top of the Display If foreign objects or water get inside the Display a short circuit may occur which could result in fire or electric shock If any foreign objects get inside the Display please consult your local Panasonic deal...

Страница 8: ...ot watching or if you turn the power of the video equipment on off but it is not a malfunction To prevent the spread of fire keep candles or other open flames away from this product at all times CAUTION If problems or malfunction occur stop using immediately If problems occur unplug the power supply plug Smoke or an abnormal odour come out from the unit No picture appears or no sound is heard occa...

Страница 9: ...o may shorten the life of the internal parts and result in malfunctions Do not install the unit where it is 2 400 m 7 874 ft and higher above sea level Failure to do so may shorten the life of the internal parts and result in malfunctions About space when installing 84 inch model When using the pedestal optional accessory leave a space of 10 cm 3 15 16 or more at the top left and right and 15 cm 5...

Страница 10: ... may be adversely affected or the coating may peel off Furthermore do not leave it for long periods in contact with articles made from rubber or PVC Usage of a chemical cloth Do not use a chemical cloth for the panel surface Follow the instructions for the chemical cloth to use it for the cabinet Wired LAN When setting up the Display at a place where electric statistic occurs often take a sufficie...

Страница 11: ...TH 98LQ70LW TXFMX031SHW TXFMX011SHW TXFMX021SHW These accessories will be used by professional installers when they install the unit Eyebolt cap 1 TMME375 1 Eyebolt 1 M12 Panasonic badge 1 Panasonic badge attachment plate 1 Allen wrench 1 M16 Attention Store small parts in an appropriate manner and keep them away from young children The part numbers of accessories are subject to change without not...

Страница 12: ...ttery replacement is necessary when remote control acts sporadically or stops operating the Display set 6 Do not burn or breakup batteries 7 Batteries must not be exposed to excessive heat such as sunshine fire or the like Important notice when attaching the fixing brackets 98 inch model When attaching the optional fixing brackets to 98 inch model attach the stand hooks to the positions as shown i...

Страница 13: ...the time of shipment and then attach the supplied Panasonic badge to the position as shown in the picture above When removing the badge remove with care using resinous scraper etc When adhesive remained wipe off with soft cloth Resinous scraper To attach the Panasonic badge use the supplied Panasonic badge attachment plate As shown in the picture below temporarily tack the Panasonic badge attachme...

Страница 14: ...e AC cord be absolutely sure to disconnect the AC cord plug at the socket outlet first Cable fixing Note One clamper is supplied with this unit In case of securing cables at five positions please purchase it separately If you need more clampers purchase them from your dealer Available from the customer service 84 inch model 98 inch model Keep pushing both side snaps hole 1 Attach the clamper Inser...

Страница 15: ...page 22 DIGITAL LINK is technology that enables signals such as audio and video to be transmitted using twisted pair cables For details see page 64 5 AV IN HDMI 1 HDMI 2 HDMI Input Terminal Supports 4K picture Connect to video equipment with 4K signal output or video equipment such as VCR or DVD player etc see page 16 6 AV IN HDMI 3 HDMI 4 HDMI Input Terminal Connect to video equipment such as VCR...

Страница 16: ... 2 terminal 4K video device with 1 terminal output cannot be connected to HDMI 3 and HDMI 4 terminals Support 4K picture HDMI cable not supplied 4K video device with 1 terminal output BD Recorder etc DVD Player etc 4K picture is not supported 4K input with 2 terminals Dual Link Connect one 4K video device with 2 terminal output both to HDMI 1 and to HDMI 2 terminals 4K video device with 2 terminal...

Страница 17: ...D S Clock T M D S Clock Shield T M D S Clock CEC SCL SDA DDC CEC Ground 5V DC Hot Plug Detect DVI D IN terminal connection Note Additional equipment and cables shown are not supplied with this set Use the DVI D cable complying with the DVI standard Image deterioration may occur depending on the length or the quality of the cable Shared with PC IN DVI D video cable Within 5 m not supplied Stereo mi...

Страница 18: ...such as for the standard picture positions and sizes have already been stored in this unit You can add up to eight PC input signal types that are not included in the list Computer signals which can be input are those with a horizontal scanning frequency of 15 to 110 kHz and vertical scanning frequency of 48 to 120 Hz The display resolution is a maximum of 1 440 1 080 dots when the aspect mode is s...

Страница 19: ...3 12 11 2 Pin No Signal Name R PR CR G Y B PB CB NC not connected GND Ground GND Ground GND Ground GND Ground 5 V DC GND Ground NC not connected SDA HD SYNC VD SCL DisplayPort terminal connection DisplayPort cable not supplied PC with DisplayPort output Note Please use DisplayPort 1 2 compliant cable Depending on the types of cable or mini connector adaptor used 4K picture may not be displayed In ...

Страница 20: ...t the Display can be controlled by a computer which is connected to this terminal Male Female D sub 9p RS 232C Straight cable not supplied COMPUTER etc Note Use the RS 232C straight cable to connect the computer to the Display The computer shown is for example purposes only Additional equipment and cables shown are not supplied with this set The computer will require software which allows the send...

Страница 21: ...mmand the parameters and lastly an ETX signal in that order If there are no parameters then the parameter signal does not need to be sent STX C1 C2 C3 P1 P2 P3 P4 P5 ETX Start 02h 3 character command 3 bytes Colon Parameter s 1 5 bytes End 03h Command Command Parameter Control details PON None Power ON POF None Power OFF AVL Volume 00 63 AMT 0 Audio MUTE OFF 1 Audio MUTE ON IMS None Input select t...

Страница 22: ...e available only when a dual input terminal board is attached Consult your local Panasonic dealer for detail instructions on command usage DIGITAL LINK terminal connection A twisted pair cable transmitter such as the Panasonic Digital Interface Box ET YFB100G uses twisted pair cables to transmit inputted video and audio signals and these digital signals can be input to the Display via the DIGITAL ...

Страница 23: ... Stereophonic sound code not supplied Audio equipment Note Audio equipment and the cable shown are not supplied with this set To output sound from AUDIO OUT Terminal of the unit be sure to set Output select in the Sound menu to AUDIO OUT see page 36 ...

Страница 24: ...er indicator is red 2 Remote control sensor 3 Brightness Sensor Detects the brightness in the viewing environment see page 47 INPUT MENU VOL ENTER 1 SLOT 1 SLOT 2 Connect to Terminal Board optional accessories see page 7 2 External Input Terminal Connect to video equipment PC etc see page 16 3 ENTER Unit Configures the item on menu screen Switches aspect mode see page 33 While the item is selected...

Страница 25: ...operation Indicator Flashes when remote control buttons are pressed 16AUTO SETUP Automatically adjusts the position size of the screen see page 34 17MULTI DISPLAY Switches 1 screen display and 4 screen display see page 31 18RETURN Used to return to the previous menu see page 34 19RECALL Displays the current setting status of Input mode Aspect mode etc see page 28 20VOL VOL Adjusts sound volume lev...

Страница 26: ... at the socket outlet first 3 Press the Main Power On Off switch on the unit to turn the set on Power On Power Indicator Green Picture is displayed When the power of the unit is ON remote control operation is possible To turn the power ON OFF with the remote control Press the POWER ON button to turn the Display on Power Indicator Green Picture is displayed Press the STANDBY button to turn the Disp...

Страница 27: ...s are set the screens won t be displayed when switching on the unit next time After the setting the items can be changed in the following menus OSD language see page 53 Day Time settings see page 51 Display orientation see page 52 High altitude mode see page 52 Power ON message The following message may be displayed when turning the unit power ON No activity power off Precautions No activity power...

Страница 28: ...HDMI 4K Interface see page 52 Note Displays the signal name as set in Input label see page 49 Outputs the sound as set in Audio input select in the Options menu see page 58 Input will not be switched unless Input lock is set to Off see page 59 Image retention image lag may occur on the LCD display panel when a still picture is kept on the panel for an extended period To prevent such a problem usin...

Страница 29: ...oor Press MUTE appears on the screen and the sound is muted Press again to reactivate the sound It is also reactivated when the power is turned on off or the volume level is changed While MUTE is active is displayed as a reminder after operation In ENGLISH US OSD language is displayed as MUTE OFF TIMER The Display can be preset to switch to stand by after a fixed period 30 min 60 min 90 min The se...

Страница 30: ...their original aspect ratio The left and right edges of the pictures are masked by side panels Zoom1 Letterbox pictures with a 16 9 aspect ratio are enlarged vertically and horizontally to fill the screen The top and bottom edges of the pictures are cut off Zoom2 Letterbox pictures with a 16 9 aspect ratio are enlarged vertically and horizontally to fill the screen The top and bottom edges as well...

Страница 31: ...d set in Sound 4 Input multi display audio select will be output see page 36 When displaying 4K picture with 4 terminal input from HDMI 1 to HDMI 4 match the Picture adjustment values of the 4 inputs since those of the each input are reflected However there are cases where the lines are visible on the borders of the screens see page 37 Changing 4 screen display to 1 screen display While displaying...

Страница 32: ...4 screens the input unable to be switched will be greyed out Input combination of 4 screens It is possible to select 1 input from each of the following 4 groups A to D A B C D A to D can be displayed on any quarter of the screen A HDMI1 HDMI2 DisplayPort DIGITAL LINK B HDMI1 HDMI2 DisplayPort DIGITAL LINK C HDMI3 D HDMI4 DVI D PC Note It is possible to display an image from 1 input in 4 screen dis...

Страница 33: ...al input and menu setting Picture menu Setup menu 80 50 50 50 50 0 Picture Default Default Picture mode Normal Backlight Contrast Brightness Colour Hue Sharpness Gamma 2 2 Colour temperature 6500K FRAME CREATION Memory save Memory load Memory edit Off Setup Network settings 4 Input multi display settings Signal Screensaver ECO mode settings Input label Function button settings On Off timer setting...

Страница 34: ...GB When inputting a digital signal HDMI DVI D DisplayPort A PC format signal enables this setting This setting is enabled when the signal is not PC format or Over scan see page 35 is Off H size V size is not automatically adjusted While displaying the picture of the corresponding signal select Auto setup and press ENTER Using Remote Control Press AUTO SETUP When Auto Setup does not work Invalid is...

Страница 35: ...ition when black parts of the image have no detail due to underexposure or are tinged with green Optimum value for Clamp Position adjustment When black parts have no detail due to underexposure blackout Value that causes least blackout is the optimum When black parts are tinged with green Value that cancels the greenishness without causing blackout is the optimum Over scan Turn image over scan On ...

Страница 36: ...lect the audio output SPEAKERS Internal speakers AUDIO OUT AUDIO OUT terminal output When AUDIO OUT is selected only Balance can be selected The other menus are greyed out and cannot be selected Audio volume and Balance settings are memorized separately for each output Sound mode Normal Emits the original sound Dynamic Accentuates sharp sound Clear Attenuates human voice Bass Adjusts low pitch sou...

Страница 37: ...urce or environment where this unit is used Normal For viewing in standard evening lighting environments Dynamic For viewing in brighter environments Cinema For use in viewing tone focused pictures with brightness reduced The setting are memorised separately for each input terminal Set Backlight to Colour temperature for each Picture mode In ENGLISH US OSD language Normal is displayed as STANDARD ...

Страница 38: ...for light red areas 0 colour temperature high to 255 colour temperature low G gain Adjusts the white balance for light green areas 0 to 255 B gain Adjusts the white balance for light blue areas 0 colour temperature low to 255 colour temperature high R bias Adjusts the white balance for dark red areas 120 colour temperature high to 120 colour temperature low G bias Adjusts the white balance for dar...

Страница 39: ... FRAME CREATION Memory save Memory load Memory edit Off Memory save see page 40 Memory load see page 41 Memory edit see page 41 1 2 3 MEMORY1 MEMORY2 MEMORY3 4 MEMORY4 5 MEMORY5 6 MEMORY6 7 MEMORY7 8 MEMORY8 Overview of Picture Profiles Original picture Adjust picture see page 37 Custom picture Example Save the picture adjustment values in the MEMORY1 profile Memory save Original picture Example L...

Страница 40: ...EMORY8 Memory save appears for a profile in which the picture adjustments have already been saved 4 Select Ok with and press ENTER Memory save Save the adjusted value in MEMORY1 Ok Cancel 5 Enter a profile name with Entering characters see page 74 A B C D E F G H I J K L M N O P Q R S T U V W X Y Z a b c d e f g h i j k l m n o p q r s t u v w x y z 0 1 2 3 4 5 6 7 8 9 _ ˆ MEMORY1 Memory name inpu...

Страница 41: ...re stored in memory according to the selected input terminal Editing profiles Delete or rename profiles as follows Deleting profiles 1 In the Picture menu select Memory edit with and press ENTER Memory save Memory load Memory edit 2 Select Memory delete with and press ENTER Memory edit Memory delete Memory name change 3 Select the profile to delete with and press ENTER 1 2 3 MEMORY1 MEMORY2 MEMORY...

Страница 42: ... K L M N O P Q R S T U V W X Y Z a b c d e f g h i j k l m n o p q r s t u v w x y z 0 1 2 3 4 5 6 7 8 9 _ ˆ MEMORY1 Memory name input Ok Cancel All delete Delete Space 5 When you finished entering the profile name select Ok with and press ENTER Ok Cancel To cancel renaming the profile select Cancel ...

Страница 43: ...s will be available INPUT upper left INPUT lower right Set the inputs to display in 4 screen display Note The mode set in 4 Input multi display settings are maintained even when the unit is turned on or off Network settings Set to communicate with computers via Network see page 53 For details about PJLink and Network see page 64 Signal For Digital 60 0 Hz 108 0 MHz 1125 1080 60i 33 7 kHz Signal Si...

Страница 44: ...ends on the angle of view or display resolution condition Note After making this setting be sure to make each adjustment such as Auto setup on the Position menu as necessary see page 34 Signal range Switches the dynamic range according to the input signals below HDMI1 to HDMI4 DIGITAL LINK DisplayPort SLOT SDI1 to SDI4 Video 16 235 If the input signal is the video range Example HDMI terminal outpu...

Страница 45: ...y 33 7 kHz 60 0 Hz 108 0 MHz 1125 1080 60i HDMI1 HDMI2 48 1 kHz 59 6 Hz 64 6 MHz 1024x768 60Hz 48 1 kHz 59 6 Hz 64 6 MHz 1024x768 60Hz 48 1 kHz 59 6 Hz 64 6 MHz 1024x768 60Hz HDMI3 HDMI4 Signal Upper left H Freq V Freq Dot Clock Freq Signal Format Upper right H Freq V Freq Dot Clock Freq Signal Format Lower left H Freq V Freq Dot Clock Freq Signal Format Lower right H Freq V Freq Dot Clock Freq Si...

Страница 46: ...ode Set Periodic time Press to change the time by 15 minutes Set Operating time Press once to change the time by 1 minute Keep pressing down to change the time by 15 minutes Screensaver Start 10 00 Time Mode Interval Periodic time Operating time 0 00 0 00 Periodic time Deactivated Operating time To set start and finish time of Screensaver Select Time designation in Mode Set Start time and Finish t...

Страница 47: ... signal power off Custom Off Off Off Off Off Off Off Disable Using Remote Control When ECO is pressed the ECO mode setting changes ECO mode On ECO mode On The following fixed values are set to the menu of power consumption reduction Individual setting is not available Power save On HDMI1 power management On HDMI2 power management On HDMI3 Power management On HDMI4 power management On PC power mana...

Страница 48: ...ower is turned off standby the power indicator lights up orange When pictures HD VD sync signals are subsequently detected Power is turned on the power indicator lights up green Note This function is effective when Sync in Signal is set to Auto and Component RGB in select is set to RGB and during normal viewing see page 44 DVI D power management When this function is set to On it operates under th...

Страница 49: ...I4 Skip SDI1 SDI4 is displayed when a 3G SDI Terminal Board with Audio TY TBN03G is installed Skip When INPUT is pressed the input will be skipped Function button settings Assigns specific functions to the numeric buttons 0 to 9 The buttons can be used as shortcut keys by assigning frequently used operations 1 Switch Function group with SDI2 PC DVI D DIGITAL LINK DisplayPort HDMI4 HDMI3 HDMI2 HDMI...

Страница 50: ... the function display when numeric buttons are pressed Set this for each function group On Displays the function list for the numeric buttons Off Does not display the function list Operation starts when numeric buttons are pressed Note When FUNCTION GROUP is pressed Function button guide will be displayed regardless of the On Off settings To use shortcut numeric buttons 1 Press FUNCTION GROUP or 0...

Страница 51: ... Power off time Off Note Please set Time first see page 51 Day Time settings Set day and the current time They are not set when 99 99 is displayed 18 00 99 99 Day Time settings Set MONDAY Time Day MONDAY Time Set Day and Time Select Day or Time Set Day or Time Press once to change the time by 1 minute Keep pressing down to change the time by 15 minutes 18 00 99 99 Day Time settings Set MONDAY Time...

Страница 52: ...will be set to use the unit where it is below 1 400 m 4 593 ft above sea level On Cooling fan control will be set to use the unit at high altitudes 1 400 m 4 593 ft and higher and below 2 400 m 7 874 ft above sea level Note When using the unit where it is 1 400 m 4 593 ft and higher and below 2 400 m 7 874 ft above sea level make sure to set to On Failure to do so may shorten the life of the inter...

Страница 53: ...ings for the LAN established via the LAN terminal of the Display or twisted pair cable transmitter can be configured Select LAN setup with and press ENTER 192 168 0 8 255 255 255 0 192 168 0 1 1024 0 LAN setup Save DHCP Off Auto IP address Subnet mask Gateway Port DUPLEX Network ID MAC address DHCP IP address Subnet mask Gateway Press to set On Off of DHCP and press ENTER When Off is selected IP a...

Страница 54: ...The name of the Display that is shown on the network can be changed Select Name change with and press ENTER A B C D E F G H I J K L M N O P Q R S T U V W X Y Z a b c d e f g h i j k l m n o p q r s t u v w x y z 0 1 2 3 4 5 6 7 8 9 _ ˆ Name0000 Name change Ok Cancel All delete Delete Space Up to 8 characters can be set for Display name Entering characters see page 74 Network control Set when contr...

Страница 55: ...ors that have occurred The display colours are red yellow or green depending on the number Signal quality Display Colours Reception Status 12dB or below Green Good 11 to 8dB Yellow Bad 7dB or above Red Terrible The number is represented by yellow or red if the LAN cable is disconnected or the cable is not shielded This signal quality shows figures between the twisted pair cable transmitter that is...

Страница 56: ...de Display ID Controller ID function Serial ID function RS 232C LAN information timing LAN control protocol Protocol 1 Off Off Enable Normal 3 3 Options Power on screen delay DVI D power management mode HDMI power management mode Clock display Power on message No activity power off Power on message Power management Auto setup Manual On On Off Standard mode Off Standard mode 4 Select the item to se...

Страница 57: ...d number 1 64 On this screen setting status for each program number is displayed You can set up to 64 command numbers for 1 programme 4 Select Program with and then switch programme number 1 7 with 5 Select the command number to set with The command numbers to be displayed on the screen are 8 commands Press to switch page 6 Press ENTER The following screen will be displayed IMS SL1 1 12 34 02 Week...

Страница 58: ...ignal is automatically selected Select the item with Select the set point with Input search Input search Primary input Secondary input Off Input search Off When there is no signal the input is not switched automatically All inputs Searches all inputs and switches to an input with a signal Input search is executed in the following order Example When the current input is PC PC SDI1 DVI D Priority Se...

Страница 59: ... volume setting before opening the Options menu if you adjust the volume when Initial VOL level is On and cursor is on the menu To adjust sound volume level Press VOL VOL Note When Maximum VOL level is On the volume can only be adjusted between 0 and your maximum range see page 59 Maximum VOL level Adjusts the maximum volume Off The sound volume level can be set up to 63 maximum On The sound volum...

Страница 60: ...me screen can be greatly increased Off Disables the local dimming function On Enables the local dimming function Off timer function Enables disables Off timer function Enable Enables the Off timer function Disable Disables the Off timer function Note When Disable is set the Off timer is cancelled Initial power mode Sets the power mode of the unit for when the power recovers from failure or after p...

Страница 61: ...ignal error No signal error timing On 5min On 10min On No signal warning When set to On the display sends out the no signal warning No signal warning timing Set up the detecting time for no signal warning Range 01 60 Interval 1 minute No signal error When set to On the display sends out the no signal error No signal error timing Set up the detecting time for no signal error Range 01 90 Interval 1 ...

Страница 62: ...ts the operational mode of HDMI Power management Standard mode Activates power management when synchronization signals are not detected Low power mode Activates power management also when 5V DC in HDMI terminal is not detected Clock display Sets to display hide the clock Off Hides the clock On Displays the clock Note The clock is displayed at the lower left of the screen when RECALL button is pres...

Страница 63: ...nly when Power management function is On see page 47 Initialization When both main unit buttons and remote control buttons are disabled due to the Button lock Controller user level and Controller ID function settings set all the values Off so that all the buttons are enabled again Press VOL Unit together with RETURN and hold for more than 5 seconds Shipping is displayed and the lock is released wh...

Страница 64: ...pter About Web Browser Web Browser is necessary to use WEB control Compatible OS Windows XP Windows Vista Windows 7 Windows 8 Mac OS X v10 4 v10 5 v10 6 OS X v10 7 v10 8 Compatible Web Browser Internet Explorer 7 0 8 0 9 0 10 0 Safari 4 x 5 x 6 x Mac OS Example of network connection Note To use the network function set each item in Network control and make sure to set Network control to On see pag...

Страница 65: ...Display using the twisted pair cable transmitter receiver of other manufacturer do not use another twisted pair cable transmitter between the twisted pair cable transmitter of other manufacturer and this device The images and sounds may be interrupted or become unstable If possible lay the cable extended and not coiled in order to minimize both external and internal noise Lay out cables of the twi...

Страница 66: ...SDI3 input SDI1 SDI3 13 SDI2 input SDI4 input SDI2 SDI4 When installed 3G SDI Terminal Board with Audio to both SLOT 1 and SLOT 2 12 SDI1 input SDI1 13 SDI2 input SDI2 14 SDI3 input SDI3 15 SDI4 input SDI4 Command Control INPT Input switch query The numbers from 12 to 15 depend on the installed SLOT 31 HDMI1 input HDMI1 32 HDMI2 input HDMI2 33 HDMI3 input HDMI3 34 HDMI4 input HDMI4 35 DisplayPort ...

Страница 67: ...ation query Returns version number CLSS Class information query Returns 1 PJLink security authentication When using PJLink with security authorization either of the password set for administrator privileges and the password set for user privileges with Web browser control can be used as the password for PJLink see page 69 When using PJLink without security authorization set use without the passwor...

Страница 68: ...ing on the software version Please refer to description in HELP etc of the software Windows Windows 7 is used as an example Disable proxy server settings 1 Display Internet Properties window Click Start Control Panel Network and Internet Internet Options If the on screen display looks different please set View by to Category 2 Click the Connections tab and then LAN Settings 3 Deselect the Use auto...

Страница 69: ...ies will ask customers their password directly Even if you are asked directly please do not reveal your password Operating with Web Browser Description of each section After logging in the TOP screen of the Web browser control is displayed Menu items are displayed When a button is clicked setup screen of each item is displayed BASIC CONTROL The following BASIC CONTROL screen is displayed OPTION CO...

Страница 70: ...ed of the LAN environment NETWORK ID Set the ID to identify this unit The available setting range is 0 99 SAVE Save the each set value Note To use a DHCP server make sure the DHCP server is started While a DHCP server is used IP ADDRESS SUBNET MASK and GATEWAY values cannot be entered When the set values are changed successfully NETWORK SETTING CHANGED message and the changed set items are display...

Страница 71: ...peration is not available Operation buttons on the menu screen Operates on the menu screen Image quality adjustments Operate items related to image quality Back Returns to the previous page Tools page Click Tools on the operation page Control System Sets the information required for the communication with the controller that is connected to the Display User Password Sets the password for the user ...

Страница 72: ...ess Resolution Displays the resolution of the Display Power Status Displays the status of the power Source Displays the selected video input Exit Returns the operation page Help page Click Help on the operation page The Help Desk screen is displayed Help Desk Sends or receives messages to the administrator who uses Crestron Connected ...

Страница 73: ...ontrol press ID SET 100 ID Set Display ID Controller ID 4 Press one of 0 9 Sets the tens digit 5 Press one of 0 9 Sets the units digit The steps from 3 to 5 need to be done within 5 seconds Adjustable ID number range is 0 100 Example To set the ID to 1 After step 3 press 0 and then 1 To set the ID to 12 After step 3 press 1 and then 2 To set the ID to 100 After step 3 press 1 0 0 Cancelling the se...

Страница 74: ...Y PICTURE as an example 1 Select All delete with and press ENTER MEMORY1 All text is deleted To delete individual characters select Delete 2 Select M with and press ENTER M Repeat this process to enter the next character 3 Select Space with and press ENTER MY As shown in step 2 select the characters to enter PICTURE 4 When you finished entering the profile name select Ok with and press ENTER A B C...

Страница 75: ...PC 28 IMS S1A Input select SLOT 1A 29 IMS S1B Input select SLOT 1B 30 IMS S2A Input select SLOT 2A 31 IMS S2B Input select SLOT 2B 32 SSU 4IM2HM1 Input select during 4 Input multi display Upper right HDMI1 33 SSU 4IM2HM2 Input select during 4 Input multi display Upper right HDMI2 34 SSU 4IM2HM3 Input select during 4 Input multi display Upper right HDMI3 35 SSU 4IM2HM4 Input select during 4 Input m...

Страница 76: ...multi display Lower right DIGITAL LINK 54 SSU 4IM4DV1 Input select during 4 Input multi display Lower right DVI D 55 SSU 4IM4PC1 Input select during 4 Input multi display Lower right PC 56 57 POF Power OFF 58 PON Power ON 59 SSU 4IM0 4 Input multi display Off 60 SSU 4IM1 4 Input multi display On 61 SSC MOD0 Screen Saver Mode Off 62 SSC MOD3 Screen Saver Mode On 63 VMT 0 Picture Mute OFF 64 VMT 1 P...

Страница 77: ... 25 18 800 600 SVGA 37 88 60 32 40 00 1 024 768 XGA 48 36 60 00 65 00 1 280 768 47 70 60 00 80 14 6 1 366 768 48 39 60 04 86 71 6 1 280 1 024 SXGA 63 98 60 02 108 0 1 600 900 60 00 60 00 108 0 1 920 1 080 67 50 60 00 148 5 1 920 1 200 UXGA 74 04 59 95 154 0 4K signal 3 840 24p 2 54 00 24 00 297 0 3 840 25p 56 25 25 00 297 0 3 840 30p 2 67 50 30 00 297 0 4 096 24p 2 54 00 24 00 297 0 3 840 50p 112 ...

Страница 78: ...itch Shipping condition You can reset the settings the adjusted values of the following menus to the factory settings Picture Sound Setup Position Options Remote control 1 Press SETUP to display the Setup menu 2 Select OSD language with and press ENTER for more than 3 seconds The following screen will be displayed Options Display serial number Shipping 3 Select Shipping with and press ENTER Shippi...

Страница 79: ... remote control designed specifically for use with the unit is being used The unit cannot be operated by any other remote control Check whether the option other than Off is selected in Controller user level in the Options menu see page 60 Check whether Controller ID function in Options menu is set to On see page 60 Check whether ID MODE switch is set to ON see page 73 Controller ID function functi...

Страница 80: ...ommand see page 21 with the DIGITAL LINK equipment s SERIAL terminal is Network control in Network settings set to On and DIGITAL LINK mode set to DIGITAL LINK RS 232C see page 54 The LAN is uncontrollable Check whether the connection has been made properly see page 64 When controlling with the Web Browser Control or the command control check whether Network control is set to On see page 54 DIGITA...

Страница 81: ...ed The edges of the images flicker Due to the characteristics of the system used to drive the panel the edges may appear to flicker in the fast moving parts of the images This is normal and not indicative of malfunctioning There may be red spots blue spots green spots and black spots on the screen This is a characteristic of liquid crystal panels and is not a problem The liquid crystal panel is bu...

Страница 82: ...5 mm diagonal 73 2 W 41 2 H 84 0 diagonal 98 inch model 2 159 mm W 1 214 mm H 2 477 mm diagonal 85 0 W 47 8 H 97 5 diagonal No of pixels 8 294 400 3 840 W 2 160 H Dimensions W H D TH 84LQ70U TH 84LQ70W 1 949 mm 1 141 mm 99 mm 76 7 44 9 3 9 TH 98LQ70U TH 98LQ70W 2 233 mm 1 288 mm 122 mm 87 9 50 7 4 8 TH 84LQ70LU TH 84LQ70LW 1 949 mm 1 141 mm 92 mm 76 7 44 9 3 7 TH 98LQ70LU TH 98LQ70LW 2 233 mm 1 28...

Страница 83: ...INK LAN For RJ45 network and DIGITAL LINK connections compatible with PJLink Communication method RJ45 100BASE TX Sound Speakers 120 mm 40 mm 2 pcs AUDIO OUT Stereo mini jack M3 0 5 Vrms Output Variable to 0 dB 1 kHz 0 dB input 10 k load Audio Output 20 W 10 W 10 W 10 THD Remote Control Transmitter Power source DC 3 V battery AAA R03 UM4 type 2 Operating range Approx 30 m 90 ft when operated direc...

Страница 84: ...ng materials mentioning features or use of this software must display the following acknowledgement This product includes software developed by the University of California Berkeley and its contributors 4 Neither the name of the University nor the names of its contributors may be used to endorse or promote products derived from this software without specific prior written permission THIS SOFTWARE ...

Страница 85: ...ccompanying documents mean that used electrical and electronic products and batteries should not be mixed with general household waste For proper treatment recovery and recycling of old products and used batteries please take them to applicable collection points in accordance with your national legislation and the Directives 2002 96 EC and 2006 66 EC By disposing of these products and batteries co...

Отзывы: