2-17
4.3.4. Adjustment Procedure
q
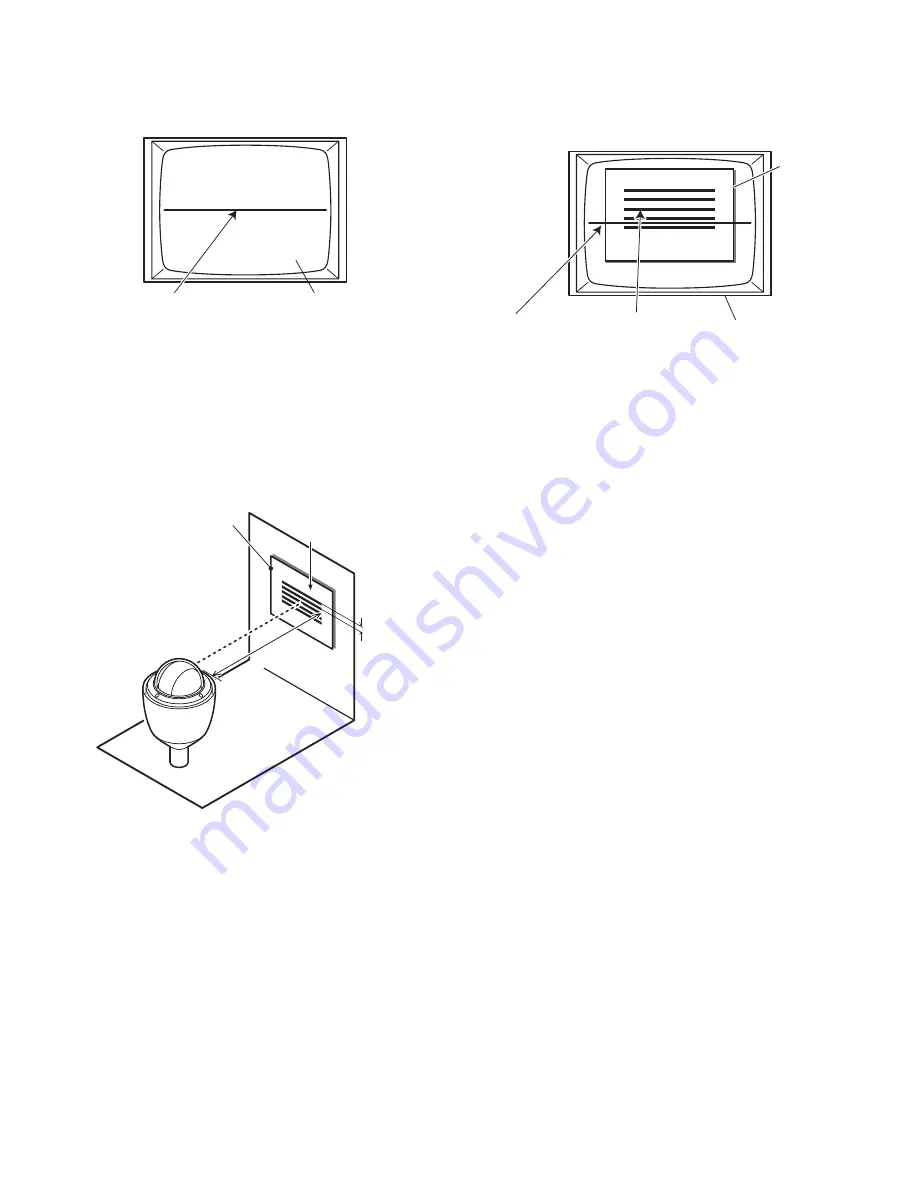
Draw the horizontal line on the center of the Video
Monitor Screen as shown in Fig. 4-3-2.
w
Select the item "
1. PAN/TILT POSITON-1
" with the
ARROW
key and press the
ENTER
key.
e
Wait until the camera stops moving. (Then camera moves
180° pan and 180° tilt.)
r
Draw the horizontal five lines of 1 mm interval on the
paper as shown in Fig. 4-3-3.
t
Set the camera from white paper 1.5 m ± 100 mm away
as shown in Fig. 4-3-3.
y
Adjust the focus becoms fine.
Horizontal Line
Monitor Screen
1.5 m
±
100 mm
Horizontal Line
White Paper
1 mm
u
Move the
white paper position
so that the center line on
the white paper overlays with the line on the Video
Monitor as shown in Fig. 4-3-4.
i
Press the
ENTER
key.
o
Wait until the camera stops moving. (Then camera moves
180° pan and 180° tilt.)
!0
Adjust the
lens position
using E.V.R. Adjustment Kit so
that the center line on the white paper overlays with the
line on the Video Monitor as shown in Fig. 4-3-4.
!1
Press the
ENTER
key. (Then camera don't move and
auto adjust tilt position.)
!2
Press the
ENTER
key.
!3
Wait until the camera stops moving. (Then camera moves
180° pan and 180° tilt.)
!4
Move the tilt position towards the horizontal line level
using the E.V.R. Adjustment Kit.
!5
Confirm the horizontal line stops at the center line of the
Video Monitor.
!6
If the horizontal line stops at the center line, press the
ESC
key and repeat above adjustment steps
w
-
!5
.
!7
After completing the adjustment, press the
QUIT (F3)
key.
!8
If you want to save, press the
Y
key, and then press the
ENTER
key. Type
xxxxxxxx.EV2 B40 19FF
Give an
appropriate file name for
xxxxxxxx
within 8 letters, but do
not use
CW97C
. Then press the
ENTER
key to finish the
adjustment procedure.
!9
If you don't want to save, press the
N
key, and then press
the
ENTER
key to finish the adjustment procedure.
Horizontal Line
Video Monitor
White
Paper
Center Line
Fig. 4-3-4
Fig. 4-3-2
Fig. 4-3-3


