Panasonic SCRT50 - HOME THEATER Скачать руководство пользователя страница 5

5

2

SURROUND

Lch

SURROUND

Lch

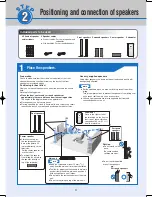
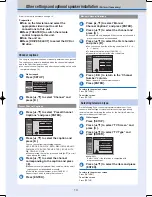
Connect the speaker cables to the main unit and speakers.

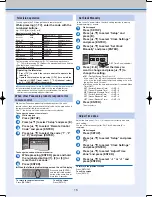
Notes on speaker use


You can damage your speakers and shorten their useful life if you play sound at high 

levels over extended periods.


Reduce the volume in the following cases to avoid damage:

–When playing distorted sound.
–When the speakers are reverberating due to a record player, noise from FM 

broadcasts, or continuous signals from an oscillator, test disc, or electronic instrument.

–When adjusting the sound quality.
–When turning the unit on or off.

If irregular coloring occurs on your television

The supplied speakers are designed to be used close to a television, but the picture 
may be affected with some televisions and setup combinations.

If this occurs, turn the television off for about 30 minutes.

The television’s demagnetizing function should correct the problem. If it persists, move 
the speakers further away from the television.

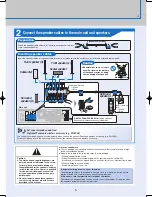
Inserting speaker cables

Front speaker (L)

Front speaker (R)

Surround  
speaker (L)

Surround  
speaker (R)

Center speaker

Subwoofer


Be careful not to cross (short-
circuit) or reverse the polarity 
of the speaker wires as doing 
so may damage the speakers.

White

Blue

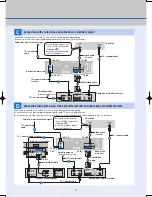
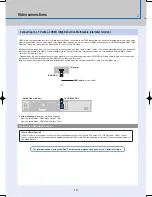
Set your surround sound free!
Optional Panasonic wireless accessory (e.g. SH-FX60)

You can enjoy surround speaker sound wirelessly when you use the optional Panasonic wireless accessory (e.g. SH-FX60). 
For details, please refer to the operating instructions for the optional Panasonic wireless accessory. 

Attach the speaker cable stickers (included) to each speaker cable to 
make connection easier.

Speaker cable sticker

Insert the wire fully.

Preparation

Insert the speaker cables into speaker cable terminal in accordance with the stickers you just attached and the diagram below.

Caution

Main unit

Blue

White

Click!

DIGITAL TRANSCEIVER  slot

 for the optional 

Panasonic wireless accessory (

 below)

Caution

 The main unit and supplied speakers are 

only to be used as indicated in this setup. 
Failure to do so may lead to damage to 
the amplifi er and/or the speakers, and may 
result in the risk of fi re. Consult a qualifi ed 
service person if damage has occurred 
or if you experience a sudden change in 
performance.

 Do not attempt to attach these speakers 

to walls using methods other than those 
described in this manual.

Insert the wire 
fully.

White

Blue

RQT8656-P.indd   5

RQT8656-P.indd   5

2006/02/28   16:52:09

2006/02/28   16:52:09

Содержание SCRT50 - HOME THEATER

Страница 1: ...ections Plug in Auto Tuning Television operation Speaker installation options Other settings and optional speaker installation Perform if necessary All necessary steps of setup are completed Please see the Operations Guide for recording and playback operation 14 Selecting television type 14 Channel captions 15 When other Panasonic products respond to this remote control 15 Back cover Set Clock Man...

Страница 2: ...t refer to back cover Preparation Attach the stand to the base Insert the stand into the base while gently pulling on the end of the cable Base Cable The speaker height can be adjusted Min 110 cm 431 4 Max 135 cm 535 32 Attach the speaker to the stand Feed the speaker cable the shorter part into the bottom of the speaker and through the slot at the rear Thread the cable through the middle hole of ...

Страница 3: ...attaching to a concrete wall or a surface that may not have strong enough support Improper attachment may result in damage to the wall or speakers To prevent the speaker from falling over thread the string not included from the wall to the speaker as shown and tie tightly Loosen the screws until the speaker can slide up and down the stand Raise the speaker to the desired height and then retighten ...

Страница 4: ... cable stickers 4 Speaker cables 2 short cables For center speaker and subwoofer 2 long cables For surround speakers Front speakers Surround speakers Center speaker Subwoofer Place the speakers Front speakers Center speaker Vibration caused by the center speaker can disrupt the picture if it is placed directly on the television Put the center speaker on a rack or shelf To prevent the speaker from ...

Страница 5: ...ul not to cross short circuit or reverse the polarity of the speaker wires as doing so may damage the speakers White Blue Set your surround sound free Optional Panasonic wireless accessory e g SH FX60 You can enjoy surround speaker sound wirelessly when you use the optional Panasonic wireless accessory e g SH FX60 For details please refer to the operating instructions for the optional Panasonic wi...

Страница 6: ... one that best suits you Connecting to a TV with an HDMI High Definition Multimedia Interface terminal page 10 Before doing any connection turn off all equipment and read the appropriate operating instructions Peripheral equipment and optional cables are sold separately unless otherwise indicated Connection with a television A Back of the main unit To RF OUT Television To OUT Television To OUT To ...

Страница 7: ... cable Cable from wall or antenna signal 75 coaxial cable 75 coaxial cable You need to subscribe to a cable TV service to enjoy viewing their programming Consult your service provider regarding appropriate cable TV box or satellite receiver The connection will allow the video cassette recorder to be used for playback and recording when this unit is turned off Audio Video cable 75 coaxial cable Inc...

Страница 8: ...axial cable Included 75 coaxial cable 75 coaxial cable 75 coaxial cable 75 coaxial cable 75 coaxial cable The S VIDEO OUT terminal achieves a more vivid picture than the VIDEO OUT terminal Actual results depend on the television S Video cable Component Video cable These terminals can be used for either interlace or progressive output Operations Guide page 21 and provide a purer picture than the S ...

Страница 9: ...able Flat Twin lead 300 cable from the antenna 300 75 transformer 75 300 transformer 75 coaxial cable VHF or UHF VHF UHF band separator 75 coaxial cable VHF UHF from the antenna UHF VHF VHF UHF band separator 75 coaxial cable VHF UHF band mixer Use one of the following connections to suit the antenna lead to the unit s RF IN terminal and the 75 coaxial cable to the antenna terminals on the equipme...

Страница 10: ...nding on the unit images may not display properly or at all when connecting with a DVI HDMI switching cable Audio cannot be output Please use an HDMI cable that has the HDMI logo as shown on the cover Do not connect any kind of audio video distribution devices between the main unit and the TV such as an amplifier etc HDMI cable not included To HDMI IN To HDMI AV OUT Television Back of the main uni...

Страница 11: ...wer even when it is turned off approx 3 6 W To save power when the unit is not to be used for a long time unplug it from the household AC outlet Set the unit to standby mode and remove the AC power supply cord after BYE disappears from the unit s display You will need to reset some memory items in the unit after plugging Click Red White To household AC outlet AC 120 V 60 Hz Black The included AC p...

Страница 12: ...he television and select the appropriate video input to suit the connections to this unit About Quick Start function If you set Quick Start to on you can start recording to DVD RAM about 1 second after you press to turn the unit on and then sequentially press REC The following happens when you have selected On Power consumption in standby mode increases because power is supplied to the unit Press ...

Страница 13: ...l is deleted The setting of the clock and channel is cleared when you perform the procedure below Scheduled recording settings are also cleared The unit turns off The language selection screen is displayed The Set Clock Manually screen is automatically displayed when there is an error while setting the clock automatically you have selected Input in step 7 while setting page 12 The unit then procee...

Страница 14: ... Repeat steps 4 and 5 to enter other channels Press ENTER Selecting television type Do the following if you connect a progressive television or if you connect a different type of television after choosing a type during initial setup just after turning the unit on for the first time Select the item that matches your television Press to select TV Screen and press Press to select TV Type and press EN...

Страница 15: ...GMT 10 DST Time Zone below Press ENTER Press to select the item you want to change and press to change the setting The clock starts Press to select Adjust Time Zone and press ENTER Press to select 1 or 1 and press ENTER While pressing TV enter the code with the numbered buttons You can operate the TV through the unit s remote control When other Panasonic products placed nearby affect this unit s r...

Страница 16: ...hickness plus 7 mm to 10 mm plus 9 32 to 13 32 5 mm 3 16 pitch 0 8 mm 1 32 60 mm 23 8 Attach the stands to these metal screw holes Speaker stand not included In this position the speaker will likely fall if moved to the left or right e g Center speaker Panasonic Consumer Electronics Company Division of Panasonic Corporation of North America One Panasonic Way Secaucus New Jersey 07094 http www pana...

Отзывы: