background image

RQT7834

8

S.WOOFER

S.WOOFER

H.BASS

H.BASS

Discs

Repeat play

CD


MP3

Remote control only
Press [REPEAT] during play.

” is displayed.

To cancel repeat play

Press [REPEAT] to clear “

” .

Note

You can use repeat mode with program play (

see left) and Play

Mode (

page 7) functions.

Marking a track

CD


MP3

You can mark one track each on the discs loaded so that you can
start play from them later.

To mark a track

1

During play or stop

Select your desired track.

(

page 6, “Basic play – Skip/Search”).

2

Hold down [MARKER] until “STORING” blinks on the
display.

The selected track is stored in the marker of the current disc.

 Note

If a track is already stored in the marker, it will be replaced next time
you store a new track in the same marker.

To recall a marked track number in the current disc

During play or stop

Press [MARKER] to recall a marker.

Play starts from the track recalled.

Note

“NO MARKER” indicates that the marker in the current disc is empty.

The marker memory is cleared when you open the disc tray.

You cannot use this function during program play or random play.

Program play

CD


MP3

You can program up to 24 tracks.

Remote control only

CD

Preparation:

 Press [

:

:

:

:

:

/

J

J

J

J

J

, CD] and then [

L

, CLEAR].

1

Press [PROGRAM].

“PGM” appears.

2

Press [DISC] and then [1]–[5] to select the disc.

3

Select the tracks with the numbered buttons.

To select a 2-digit track, press [

>

10] once then the two digits.

Repeat steps 2 and 3 to program other tracks.

4

Press [

:

/

J

, CD] to start play.

MP3

Preparation:

1. Press [DISC] and then [1]–[5] to select the disc.
2. Press [

L

, CLEAR].

1

Press [PROGRAM].

“PGM” appears.

2

Press [ALBUM (   or   )] to select the album.

To select an album directly, press the numbered buttons
after pressing [ALBUM (   or   )].

To select a 2-digit album, press [

>

10] once then the two digits.

To select a 3-digit album, press [

>

10] twice then the three digits.

3

Press [

 g

, REW/

3

] or [

f

4

/FF] to select the track.

To select a track directly, press the numbered buttons after
pressing [

 g

, REW/

3

] or [

f

4

/FF].

To select a 2-digit track, press [

>

10] once then the two digits.

To select a 3-digit track, press [

>

10] twice then the three digits.

4

Press [ENTER].

Repeat steps 2 ~ 4 to program other tracks.

5

Press [

:

/

J

, CD] to start play.

To exit program mode

Press [PROGRAM] in the stop mode. 

(You can replay your program

by pressing [PROGRAM] then [

:

/

J

, CD].)

You can do the following while “P” is displayed

To check program contents

Press [

g

, REW/

3

] or [

f

4

/FF].

Every time you press the button:
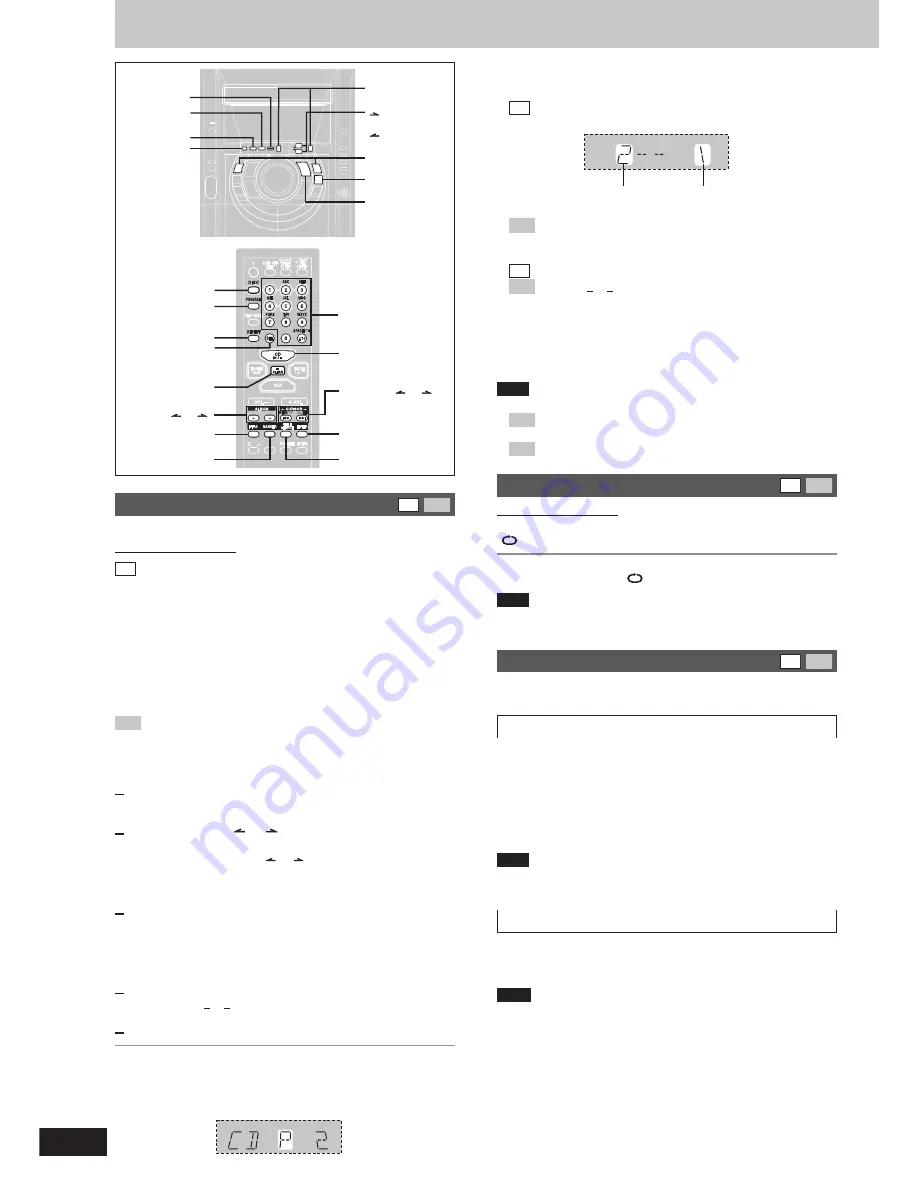
CD

 The track number and program order are displayed:

MP3

Program order is displayed, then album number and track
number.

To add to the program

CD

 Do steps 2 and 3.

MP3

 Do steps 2 ~ 4.

To clear the last track

Press [DEL].

To clear all tracks

Press [

L

, CLEAR].

While “CLEAR ALL” is blinking, press the button again to clear all tracks.

 Note

You cannot program CD-DA together with MP3 tracks.

MP3

 The program memory is cleared when you change a disc or

open the disc tray.

MP3

 You cannot program more than one disc for MP3.

:

/

J

, CD

ENTER

Numbered
buttons

L

, CLEAR

ALBUM (

 or 

)

TITLE SEARCH

CURSOR (

 or 

),

g

, REW/

3

,

f

4

/FF

INTRO

MARKER

DEL

DISC

PROGRAM

REPEAT

Track number

Program order

ENTER

TITLE

SEARCH

MARKER

DELETE

CURSOR,

CURSOR 

f

, ALBUM/

CHARA,

, ALBUM/

CHARA

g

/REW/

3

,

f

/FF/

4

L

, STOP

:

/

J

, CD

Содержание SC-AK630K - Nitrix Mini System

Страница 1: ...d tracks Play Mode function 7 Program play 8 Repeat play 8 Marking a track 8 INTRO function Album scan 9 Title search function 9 Radio 10 Cassettes 11 Setting the time 11 Timers 12 Sound quality sound field 13 Other functions 13 External unit connections 13 Using an external unit 13 Using headphones not included 13 Auto off function 13 Convenient functions 13 Troubleshooting guide 14 Specification...

Страница 2: ...fe level BEFORE your hearing adapts To establish a safe level Start your volume control at a low setting Slowly increase the sound until you can hear it comfortably and clearly and without distortion Once you have established a comfortable sound level Set the dial and leave it there Taking a minute to do this now will help to prevent hearing damage or loss in the future After all we want you liste...

Страница 3: ...as been spilled or objects have fallen into the apparatus the apparatus has been exposed to rain or moisture does not operate normally or has been dropped IMPORTANT SAFETY INSTRUCTIONS Please check and identify the supplied accessories Use numbers indicated in parentheses when asking for replacement parts As of February 2005 Only for U S A To order accessories refer to Accessory Purchases on the b...

Страница 4: ... left L side in the same way Blue Gray Red SB WAK630 Subwoofer Red Red Gray Black Blue Black Black Red Black Super tweeter Main unit Front speaker left Subwoofer Use only the supplied speakers The combination of the main unit and speakers provide the best sound Using other speakers can damage the unit and sound quality will be negatively affected Notes on speaker use You can damage your speakers a...

Страница 5: ...SS S WOOFER 13 0 Dimmer Play timer record timer button DIMMER rPLAY REC 12 13 1 CD display Clock timer button CD DISP CLOCK TIMER 7 11 2 Numbered character buttons X X X X X10 1 9 0 A Z SPACE 7 10 3 CD skip search tape fast forward rewind tune preset channel select time adjust cursor buttons g REW 3 CURSOR f 4 FF CURSOR 8 11 Muting button MUTING 13 5 Preset EQ select button PRESET EQ 13 Front pane...

Страница 6: ...r you recorded them MP3 information CD Do not use irregularly shaped discs attach extra labels and stickers use discs with labels and stickers that are coming off or with adhesive exuding from under labels and stickers attach scratch proof covers or any other kind of accessory write anything on the disc clean discs with liquids Wipe with a soft dry cloth use discs printed with label printers avail...

Страница 7: ...ay Press L CLEAR When playback ends The current play mode will be retained in memory until it is changed even if the unit is turned off Final disc For example if play starts from disc 4 disc 3 will be the final disc Order of progression Disc 4z5z1z2z3 L MP3 When NOT MP3 ERROR1 appears on the display An unsupported MP3 format is being played The unit will skip that track and play the next one Note ...

Страница 8: ...C and then 1 5 to select the disc 2 Press L CLEAR 1 Press PROGRAM PGM appears 2 Press ALBUM or to select the album To select an album directly press the numbered buttons after pressing ALBUM or To select a 2 digit album press 10 once then the two digits To select a 3 digit album press 10 twice then the three digits 3 Press g REW 3 or f 4 FF to select the track To select a track directly press the ...

Страница 9: ...c for 10 seconds each Remote control only Preparation Press J CD and then L CLEAR 1 Press INTRO INTRO function starts INTRO function is cancelled after playing the first track in the last album on the current disc 2 While your desired album is playing press J CD Play continues from the first track of the album To stop during the process press INTRO or L CLEAR Note You cannot use this function duri...

Страница 10: ...PLAY MODE again to cancel the mode MONO is also cancelled if the frequency is changed To receive FM broadcasts allocated in 0 1 MHz steps Main unit only Hold down TUNER BAND The display changes in a few seconds to show the current minimum FM frequency Continue to hold down the button until the minimum frequency changes The step is changed Repeat the above to change the step back Note After changin...

Страница 11: ...rotected cassette Cover the hole with adhesive tape To erase a tape 1 Press TAPE and then L STOP 2 Insert the recorded tape into deck 2 Ensure there is no tape in deck 1 3 Press a REC Selection of tapes for recording Use normal position tapes High position and metal position tapes can be used but this unit will not be able to record or erase them correctly Preparation Wind up the leader tape so re...

Страница 12: ...hange the settings when the unit is on To change the play record times Do steps 1 2 and 4 To change the source or volume 1 Press SHIFT rPLAY REC to clear the timer indicator from the display 2 Make changes to the source or volume 3 Do steps 3 to 4 To check the settings Press SHIFT CLOCK TIMER while the unit is on to select rPLAY or rREC The settings are shown in the following order Play timer on t...

Страница 13: ...r AUX Press SHIFT AUTO OFF AUTO OFF is shown on the display The setting is maintained even if the unit is turned off If you select tuner or AUX as the source AUTO OFF goes out It comes on again when you select disc or tape To cancel Press SHIFT AUTO OFF again Convenient functions To dim the display panel Remote control only Press DIMMER The display is dimmed and the indicators are turned off The A...

Страница 14: ...he antenna are incorrect If you are using an indoor antenna change to an outdoor antenna The TV antenna wire is too close to the unit Separate the antenna wire of the TV set from the unit Poor quality sound Recording is not possible Clean the heads If the erasure prevention tabs have been removed cover the holes with adhesive tape The display is wrong or play won t start Cannot perform all disc ra...

Страница 15: ...t operate normally or exhibits a marked change in performance or e The unit has been dropped or the cabinet damaged 2 Servicing Do not attempt to service the unit beyond that described in these operating instructions Refer all other servicing to authorized servicing personnel 3 Replacement parts When parts need replacing ensure the servicer uses parts specified by the manufacturer or parts that ha...

Страница 16: ... a Factory Servicenter or other Authorized Servicer or damage that is attributable to acts of God THERE ARE NO EXPRESS WARRANTIES EXCEPT AS LISTED UNDER LIMITED WARRANTY COVERAGE THE WARRANTOR IS NOT LIABLE FOR INCIDENTAL OR CONSEQUENTIAL DAMAGES RESULTING FROM THE USE OF THIS PRODUCT OR ARISING OUT OF ANY BREACH OF THIS WARRANTY As examples this ex cludes damages for lost time travel to and from ...

Отзывы: