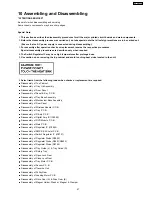
Be careful when disassembling and servicing.
Some chassis components may have sharp edges.
Special Note:
10 Assembling and Disassembling
“ATTENTION SERVICER”
1. This section describes the disassembly procedures for all the major printed circuit boards and main components.
2. Before the disassembly process was carried out, do take special note that all safety precautions are to be carried out.
(Ensure that no AC power supply is connected during disassembling.)
3. For assembly after operation checks or replacement, reverse the respective procedures.
Special reassembly procedures are described only when required.
4. The Switch Regulator IC may have high temperature after prolonged use.
5. Use caution when removing the top cabinet and avoid touching heat sinks located in the unit.
6. Select items from the following index when checks or replacement are required.
•
•
•
•
Disassembly of Top Cabinet
•
•
•
•
Disassembly of Tray Lid Assembly
•
•
•
•
Disassembly of Front Panel
•
•
•
•
Disassembly of Panel & Key P.C.B.
•
•
•
•
Disassembly of Tray Base Assembly
•
•
•
•
Disassembly of Mechanism Base Assembly
•
•
•
•
Disassembly of Rear Panel
•
•
•
•
Disassembly of Wireless Adapter P.C.B.
•
•
•
•
Disassembly of Tray P.C.B.
•
•
•
•
Disassembly of D-Amp P.C.B.
•
•
•
•
Disassembly of Digital Amp IC (IC5000)
•
•
•
•
Disassembly of DVD Module P.C.B.
•
•
•
•
Disassembly of Main P.C.B.
•
•
•
•
Disassembly of Regulator IC (IC2903)
•
•
•
•
Disassembly of SMPS & AC-Inlet P.C.B.
•
•
•
•
Disassembly of Switch Regulator IC (IC5701)
•
•
•
•
Disassembly of Regulator Diode (D5803)
•
•
•
•
Disassembly of Regulator Diode (D5801/D5802)
•
•
•
•
Disassembly of Regulator Diode (D5702)
•
•
•
•
Disassembly of Tray Guide (L) & Tray Guide (R)
•
•
•
•
Disassembly of Rotary Tray
•
•
•
•
Disassembly of Open Lock Gear
•
•
•
•
Disassembly of Close Lock Gear
•
•
•
•
Disassembly of Tray Motor P.C.B.
•
•
•
•
Disassembly of Sensor P.C.B.
•
•
•
•
Disassembly of Traverse Unit
•
•
•
•
Disassembly of Pulley Gear
•
•
•
•
Disassembly of Loading Motor P.C.B.
•
•
•
•
Disassembly of Drive Gear (A) & Drive Gear (B)
•
•
•
•
Disassembly of Magnet Holder, Washer, Magnet & Clamper
47
SA-PT750PL
Содержание SA-PT750PL
Страница 11: ...11 SA PT750PL ...
Страница 17: ...7 5 Using the Music Port 28 17 SA PT750PL ...
Страница 20: ...8 New Features 8 1 About HDMI 8 1 1 What is HDMI 8 1 2 Advanced Digital Pictures 20 SA PT750PL ...
Страница 21: ...8 1 3 Advanced Digital Sound 8 1 4 Easy to Use 8 1 5 HDMI Compatible Products 21 SA PT750PL ...
Страница 50: ...10 2 Main Components and P C B Locations 50 SA PT750PL ...
Страница 67: ...67 SA PT750PL ...
Страница 84: ...SA PT750PL 84 ...
Страница 86: ...SA PT750PL 84 ...
Страница 94: ...SA PT750PL 92 ...
Страница 96: ...94 SA PT750PL ...
Страница 114: ...SA PT750PL 112 ...
Страница 127: ...25 Exploded Views 125 SA PT750PL ...
Страница 128: ...126 SA PT750PL ...
Страница 129: ...25 1 Cabinet Parts Location SA PT750PL 127 ...
Страница 130: ...SA PT750PL 128 ...
Страница 131: ...25 2 Packaging SA PT750PL 129 ...


