background image

23

TV Operation

Closed Caption System

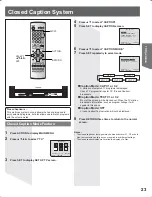
Closed Caption is ...

This multi-use system not only allows the hearing impaired to 

enjoy selected programs, but also allows one to watch programs 

with the volume muted.

1

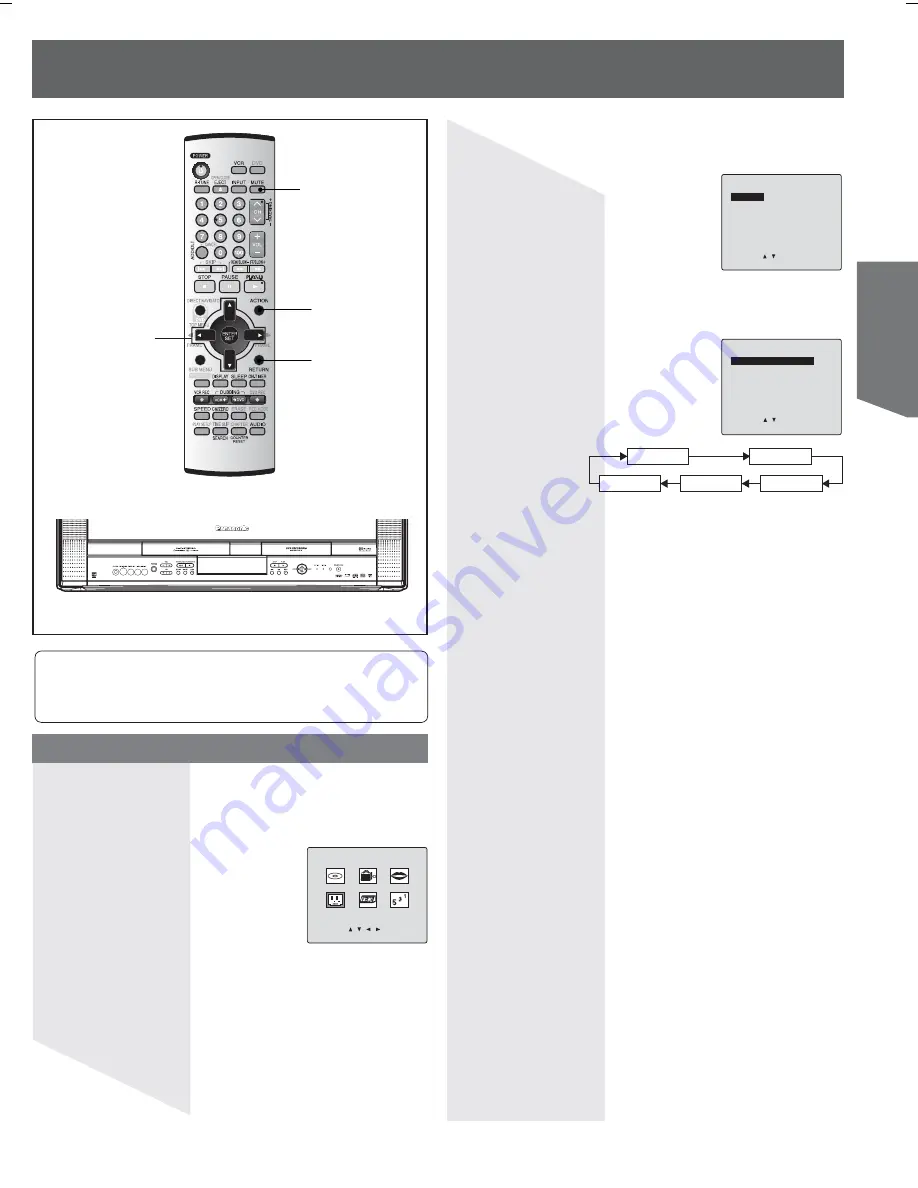
  Press ACTION to display MAIN MENU.

8

  Press RETURN three times to return to the normal 

screen.

2

 Press 

ŸźŻŹ

 to select “TV.”

4

 Press 

Ÿź

 to select “CAPTION”.

5

  Press SET to display CAPTION screen.

6

 Press 

Ÿź

 to select “CAPTION MODE.”

7

  Press SET repeatedly to select mode.

Closed Caption Mode Feature

3

  Press SET to display SET UP TV screen.

„

 Caption Mode: CAP C1 or C2

A narration of selected TV programs is displayed. 
Check TV program listings for CC (Closed Caption) 

broadcasts.

„

 Caption Mode: TEXT C1 or C2

Most of the screen will be blocked out. When the TV station 

broadcasts information, such as program listings, it will 

appear in this space.

„

 Caption Mode: OFF

Closed Caption/Text narration will not be displayed.

Notes:

•  The closed caption or text signal may be broadcast over C1, C2, or both. 

Also, text contents can vary so you may wish to try different settings. 

•  The closed caption display may overlap the display of a Disc.

MUTE

OFF

CAP C1

TEXT C2

CAP C2

TEXT C1

MAIN MENU

DVD

LOCK LANGUAGE

TV

CLOCK

CH

SELECT:

SET:SET

END

:RETURN

SET UP TV

CAPTION

SET UP VIDEO/AUDIO
FRONT DISPLAY

:OFF

DVD VOL ADJUST :+2

SELECT:

SET:SET

END

:RETURN

CAPTION

CAPTION MODE : OFF

CC ON MUTE

: CAP C1

SELECT:

SET:SET

END

:RETURN

ACTION

SELECT

ŸźŻŹ

/

SET

RETURN

Содержание OmniVision PV-DR2714

Страница 1: ...s product or product model meets the ENERGY STAR guidelines for energy efficiency Please read these instructions carefully before attempting to connect operate or adjust this product Please save this manual Spanish Quick Use Guide is included Guía para rápida consulta en español está incluida LSQT0840 A Getting Started TV Operation Disc Operation Information VCR Operation TV VCR Operation Getting ...

Страница 2: ... may tip or fall if not situated on a stable surface if pushed or during an earthquake Use a strong rope or chain not included to fasten the unit firmly to a strong wall support Be sure to read the following cautions carefully Always grasp bottom and front of unit as shown for proper balance To avoid injury to hands always hold unit by area shown with arrow when resting it on a flat surface Never ...

Страница 3: ... http www eiae org FCC WARNING ANY UNAUTHORIZED CHANGES OR MODIFICATIONS TO THIS EQUIPMENT WOULD VOID THE USER S AUTHORITY TO OPERATE AVERTISSEMENT AFIN DE PRÉVENIR TOUT RISQUE D INCENDIE OU DE CHOCS ÉLECTRIQUES NE PAS EXPOSER CET APPAREIL À LA PLUIE OU À UNE HUMIDITÉ EXCESSIVE CAUTION LASER RADIATION WHEN OPEN DO NOT STARE INTO BEAM Inside of product CAUTION UNIT IS A CLASS I LASER PRODUCT HOWEVE...

Страница 4: ... IF EXPOSED TO RAIN MOISTURE OR STRONG IMPACT unplug unit and have it inspected by a qualified service technician before use 3 ELECTRICAL STORMS During a lightning storm or before leaving unit unused for extended periods of time disconnect all equipment from the power source as well as the antenna and cable system 4 WHEN UNIT IS PLUGGED IN DO NOT OPERATE IF liquid has spilled into unit unit was dr...

Страница 5: ... using the VCR 28 Recording Television Programs 29 Timer Recording 30 Playing VCR 32 V Chip Control Features 35 Display Feature 39 Before using the Disc 40 DVD Functions Windows and Status Messages 41 Function List 42 Recording Television Programs 44 Timer Recording 46 Various Recording 48 Playing Discs 50 Various PlayBack 51 Using On Screen Menus 55 Editing the Recorded Programs Using the Direct ...

Страница 6: ...D Video is played This means that you may not be able to control play of a disc with some operations described in these operating instructions Read the disc s instructions carefully This unit can play CD R CD RW audio recording disc recorded with CD DA digital audio or MP3 Finalize the disc after recording A process that allows play on compatible equipment This unit cannot record onto CD R or CD R...

Страница 7: ...ay automatically starts when inserted in the unit 4 4 2 0 DVD R discs One time recording discs recordable until the disc is full You can record up to 8 hours in EP 8 Hour mode By finalizing the disc you can play it in a DVD player as DVD Video Play only pp 65 74 You cannot record digital broadcasts that allow One time only recording This unit is compatible with 1x 4x recording speed discs Capacity...

Страница 8: ...ritable YES NO Edit YES YES 1 Play on other players YES 2 YES 3 Recording broadcasts that allow one copy YES 5 NO 1 You can erase enter name and change thumbnail Available space does not increase after erasing 2 Only on DVD RAM compatible players 3 After finalizing the disc pp 65 74 5 CPRM p 74 compatible discs only Which should I use DVD RAM or DVD R The precision parts in this unit are readily a...

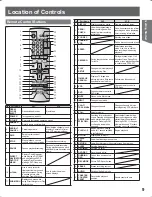
Страница 9: ...pe 15 DUBBING VCR Dubs a disc source onto a tape 16 SPEED Selects tape recording mode Also use to confirm tape recording mode during playback 17 CM ZERO During playback skips ahead 1 minute During playback skips 1 to 3 minutes of tape During Stop mode moves playback position to counter zero 0 00 00 18 PLAY SETUP Changes the initial playback settings during Play 19 TIME SLIP SEARCH Displays TV imag...

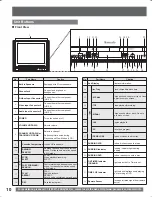
Страница 10: ...n Still mode 11 STOP EJECT STOP Stops playback recording EJECT Ejects the tape 12 FAST FORWARD SEARCH Fast forwards tape and searches next scene Increases slow motion speed in Still mode 13 PLAY REPEAT PLAY Begins playback REPEAT Sets to see a recording over and over 14 REC Records a program No Part Name Caption 15 Sub Display Displays information 16 DVD Disc Tray Place compatible discs here 17 SK...

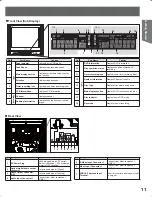
Страница 11: ...al digital audio output connector Outputs audio signal Digital 3 Audio Output Connector L R Outputs audio signal Analog 4 Audio Input Connector 1 Connect from other component LINE 1 1 2 3 7 5 6 4 No Part Name Caption 9 DVD DVD Information Displays DVD information 10 Disc operation status Displays condition of playback recording 11 Timer recording icon Lights when a timer recording is set 12 Number...

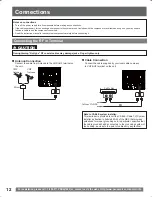
Страница 12: ...cting a component to the system are not included with the component or available as an option you may need to fashion a cable to suit the component concerned Read the instruction manual for each system component carefully before connecting it Notes on connections Connecting the RF in Terminal Note to CABLE system installer This reminder is provided to call the CABLE Cable TV System Installer s att...

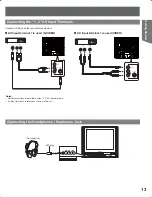
Страница 13: ...erminal 1 is used S VIDEO Connecting the 1 2 AV Input Terminals Notes Similar connections are available at the 1 2 AV input terminals AV Input terminal 2 is located on the front of the unit AV Input terminal 1 is used VIDEO UDIO 54 2 M3 plug Connecting the Headphones Earphones Jack Not supplied ...

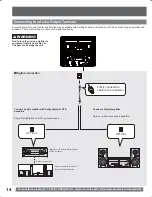
Страница 14: ...og Connect an AV amplifier with Dolby Digital or DTS decoders Digital connection Connecting the Audio Output Terminal Please see amplifier manual for speaker requirements Speakers example Amplifier with built in Dolby Digital or DTS decoders Firmly connect the cable to the connector OPTICAL OPTICAL Connect a Digital amplifier Enjoy Dolby Digital or DTS surround sound Smart one line connection is p...

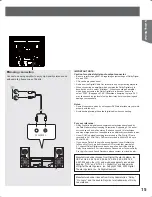
Страница 15: ...on technique developed by the Dolby Laboratories Licensing Corporation Supporting 5 1 channel surround sound as well as stereo 2 channel sound this technique enables a large quantity of sound data to be efficiently recorded on a disc Linear PCM is a signal recording format used in CDs While CDs are recorded in 44 1 kHz 16 bit DVDs are recorded in 48 kHz 16 bit up to 96 kHz 24 bit If you have a Dol...

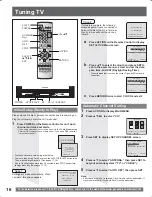
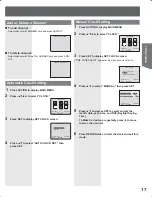
Страница 16: ...ng Initial Setup To eject a tape during Auto Set press the unit STOP EJECT button twice Then make settings manually See pages 17 18 If Auto Clock Set takes more than 30 minutes press STOP and perform settings manually See pages 17 18 EJECT STOP POWER STOP EJECT 1 Press POWER on the Remote Control or unit Auto channel and clock set starts If you use a cable box turn it on and set it to the Public B...

Страница 17: ...LOCK CH SELECT SET SET END RETURN 4 Press Ÿź to select MANUAL then press SET TIME ZONE ADJUST appears only when auto clock is set 2 Press ŸźŻŹ to select CLOCK 3 Press SET to display SET CLOCK screen 1 Press ACTION to display MAIN MENU 5 Press Ÿź and press SET to select and set the month date year time and DST Daylight Saving Time To Make Corrections repeatedly press Ż to move to error then correct...

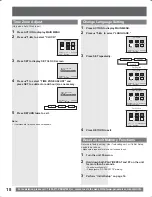
Страница 18: ...re a tape and or disc is not inserted in unit 1 Turn the unit Power on 2 Hold down both PLAY REPEAT and FF on the unit for more than 5 seconds The power will shut off Please ignore NO CASSETTE warning 3 Perform Initial Setup on page 16 English Spanish French 1 0 1 Note If set manually time zone does not appears 1 Press ACTION to display MAIN MENU MAIN MENU DVD LOCK LANGUAGE TV CLOCK CH SELECT SET ...

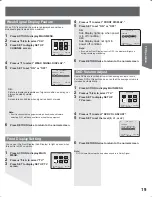
Страница 19: ...BLE AUTO SET WEAK SIGNAL DISPLAY OFF SELECT SET SET END RETURN SET UP TV CAPTION SET UP VIDEO AUDIO FRONT DISPLAY OFF DVD VOL ADJUST 2 SELECT SET SET END RETURN Weak Signal Display Feature 1 Press ACTION to display MAIN MENU 2 Press ŸźŻŹ to select TV 3 Press SET to display SET UP TV screen MAIN MENU DVD LOCK LANGUAGE TV CLOCK CH SELECT SET SET END RETURN 4 Press Ÿź to select FRONT DISPLAY 5 Press ...

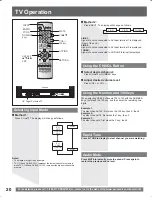
Страница 20: ...NER LINE 1 Signal of source connected to AV Input terminal 1 is displayed Rear of the unit LINE 2 Signal of source connected to AV Input terminal 2 is displayed TUNER Signal of source connected to VHF UHF terminal is displayed TV CH69 CABLE CH125 LINE2 TV CH2 CABLE CH1 When selecting CABLE channels 100 to 125 with the NUMBER keys first press the 100 key and then enter the remaining two digits Pres...

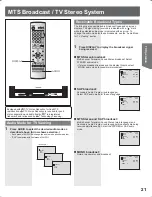
Страница 21: ...rrow shows selection Each press of AUDIO will change the audio mode as shown below SAP is selected with first press of AUDIO MONO broadcast Normal monaural sound broadcast Example Equipped with TV Noise Reduction for true MTS reproduction TV Noise Reduction is required for good stereo separation and audio fidelity is a registered trademark and is licensed by Technology Licensing MTS Stereo and SAP...

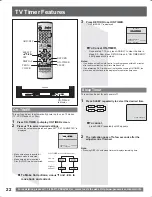
Страница 22: ... END briefly appears on screen 1 Press ON TIMER to display ON TIMER screen 2 Press Ÿź to select desired settings When the setup is completed and press SET SET COMPLETED is displayed To Make Corrections use Ÿź and Ż Ź to move back and correct 3 Press RETURN to set ON TIMER ON TIMER SET is displayed This unit can be set for auto power off 1 Press SLEEP repeatedly to select the desired time To cancel...

Страница 23: ...ed Check TV program listings for CC Closed Caption broadcasts Caption Mode TEXT C1 or C2 Most of the screen will be blocked out When the TV station broadcasts information such as program listings it will appear in this space Caption Mode OFF Closed Caption Text narration will not be displayed Notes The closed caption or text signal may be broadcast over C1 C2 or both Also text contents can vary so...

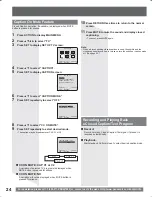
Страница 24: ... 7 Press SET repeatedly to select OFF 8 Press Ÿź to select CC ON MUTE 9 Press SET repeatedly to select desired mode The caption may be broadcast over CAP C1 or C2 Caption On Mute Feature Recording and Playing Back a Closed Caption Text Program NO CAP C1 CAP C2 Record Record normally Closed Caption Text signal if present is recorded automatically Playback Start playback Perform steps to select desi...

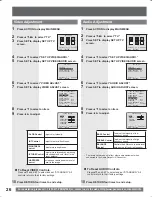
Страница 25: ...ress ŸźŻŹ to select TV 3 Press SET to display SET UP TV screen 4 Press Ÿź to select SET UP VIDEO AUDIO 5 Press SET to display SET UP VIDEO AUDIO screen MUSIC Sound suited to music Factory setting SPEECH Sound suited to dialogue NORMAL AUTO Audio AGC Auto Gain Control The sound level is automatically adjusted to suit the program source Low Standard High Volume level TV TV CD AUDIO MENU NORMAL Volum...

Страница 26: ...UST 7 Press SET to display AUDIO ADJUST screen 8 Press Ÿź to select an item 9 Press ŻŹ to adjust To Reset AUDIO Controls Press Ÿź and SET to select and set STANDARD All controls return to their factory settings BASS Control To adjust the intensity of low frequency sound TREBLE Control To adjust the intensity of high frequency sound BALANCE Control Controls the difference in audio level between the...

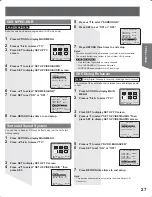
Страница 27: ...GUAGE TV CLOCK CH SELECT SET SET END RETURN SET UP TV CAPTION SET UP VIDEO AUDIO FRONT DISPLAY OFF DVD VOL ADJUST 2 SELECT SET SET END RETURN SET UP VIDEO AUDIO VIDEO MENU NORMAL VIDEO ADJUST AUDIO MENU MUSIC AUDIO ADJUST DVD MPEG DNR OFF SURROUND OFF DVD D ENHANCER OFF SELECT SET SET END RETURN 3 Press SET to display SET UP TV screen 4 Press Ÿź to select SET UP VIDEO AUDIO then press SET 5 Press ...

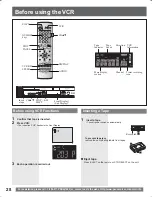
Страница 28: ...SPLAY STOP PAUSE AUDIO VCR REC SPEED Insert a tape CHŸź REC STOP EJECT VCR CHŸź NUMBER keys Before using VCR Functions 1 Confirm that tape is inserted 2 Press VCR The indication VHS flashes in the Front Display 3 Each operation is carried out Inserting a Tape Tape Indicator Tape Speed Direction VCR Information Main display section Channel Timer recording icon Eject tape Press EJECT on the remote o...

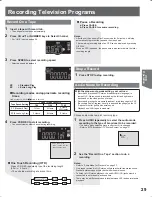
Страница 29: ...dcast TV Stereo System on page 21 2 See the Record On a Tape section to do a recording STEREO SAP MONO Record On a Tape Audio Mode for Recording 1 Press STOP to stop recording Stop a Record Normal Rec 0 30 1 00 1 30 2 00 3 00 4 00 With the proper audio mode setting your unit can Record and playback MTS stereo broadcast main language in stereo Hi Fi Stereo sound is recorded on the left and right au...

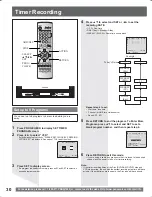
Страница 30: ...E for outside source Speed SP EP Set up to 8 Programs You can set up to 8 programs to be recorded while you are away P DT START STOP CH SPD 1 2 3 4 SELECT SET SET END RETURN P DT START STOP CH SPD 1 10 9 00a12 00p 08 SP 2 3 4 SET COMPLETED CANCEL ADD DLT SELECT SET SET END RETURN 4 Press Ÿź to select and SET or ŻŹ to set the recording DATE 1 31 One time DAILY day Monday Friday WEEKLY SU SA Same ti...

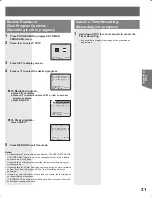
Страница 31: ...LEASE PREPARE FOR VCR TIMER REC appears Be sure a cassette with record tab is loaded and the unit is in Stop mode If the start times of two programs overlap the lower numbered program will have priority If the start time for a Timer Recording comes up during a normal recording or One Touch Recording page 29 the Timer Recording will not be performed If there is a power interruption of more than one...

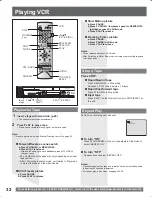
Страница 32: ...everse scene search Still Freeze picture a Press PAUSE b Press PLAY to release Slow Motion picture a Press PAUSE b Press FF SLOW increases speed or REW SLOW decreases speed in Still mode c Press PLAY to release Frame by Frame picture a Press PAUSE b Press PAUSE in Still mode c Press PLAY to release Stop a Tape Notes These features work best in EP mode After 3 minutes in Still or Slow mode unit sto...

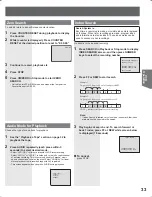
Страница 33: ...e made program index and information are also included These index marks can be used to access or scan recordings 2 Press AUDIO repeatedly each press within 5 seconds to select desired mode Select HIFI L R to listen to a regular Hi Fi Stereo recording Select HIFI L or HIFI R to listen only to the left or right channel of a stereo recording This is commonly used for Karaoke music on one channel and...

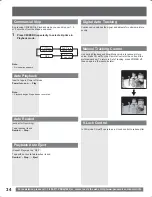
Страница 34: ...ts for optimum picture quality Use during Playback and Slow Motion mode to reduce picture noise Press CH Ÿź on the Remote Control or the unit until the picture clears up To return to Auto Tracking press POWER off then on again a few seconds later In Still mode CH Ÿź operate as a V Lock control to reduce jitter Digital Auto Tracking Manual Tracking Control V Lock Control 1 Press CM ZERO repeatedly ...

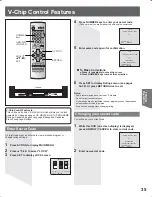
Страница 35: ...make the correction 2 Press ŸźŻŹ to select LOCK 3 Press SET to display LOCK screen Enter Secret Code Changing your secret code You will need your current code 1 While this OSD on screen display is displayed press ADD DLT CANCEL to clear current code 2 Enter new secret code V Chip Control Feature is This unit has a built in V Chip Control which allows you to block unwanted TV usage based on US MOVI...

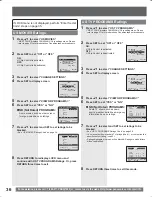
Страница 36: ...LOCKED TV Y7 FV TV G TV PG V S L D TV 14 V S L D TV MA V S L CONTAINS NO RATING SELECT SET SET END RETURN VIEW NR PROGRAMS YES TV Y UNLOCKED TV Y7 FV TV G TV PG V S L D TV 14 V S L D TV MA V S L FOR ALL CHILDREN SELECT SET SET END RETURN 1 Press Ÿź to select US MOVIES NEXT PAGE displays CANADIAN V Chip settings menu Please refer to page 37 for more details on Canadian tapes or broadcasts If LOCK m...

Страница 37: ...ETURN 10 Press RETURN to redisplay LOCK menu and continue with Canadian French Language Ratings Or press RETURN three times to exit Canadian French Language Ratings 1 Press Ÿź to select NEXT PAGE 2 Press SET to display screen 3 Press Ÿź to select CANADIAN FRENCH 4 Press SET to set ON or OFF ON V Chip Control is activated OFF V Chip Control is deactivated 5 Press Ÿź to select CHANGE SETTINGS 6 Pres...

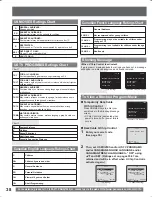
Страница 38: ...material may be inappropriate for children under 13 R RESTRICTED Children under 17 must be accompanied by a parent or adult NC 17 OVER AGE 17 ONLY No one 17 and under admitted X ADULTS ONLY Canadian French Rating US Rating If a program or movie exceeds the ratings you have set a message will appear on a black background and sound is muted When V Chip Control is activated Blocking Message CH 08 PRO...

Страница 39: ...urrent Time 7 Rec Time Remaining OTR mode only see page 29 8 Recording Mode See page 29 4 Receivable Broadcast Types See page 21 6 Channel 1 4 5 7 6 CH 08 STOP TV VCR Status Clock Display Blue Screen Display Channel Function Display 3 No broadcast signal in TV mode Only when Weak Signal Display is set to OFF See page 19 or blank tape is played for 5 minutes Power turns off Note This feature is can...

Страница 40: ...the tray Insert inside the tray s guide Non cartridge disc Insert label up with the arrow facing in Cartridge disc Notes Load double sided discs so the label for the side you want to record play is facing up When using 8 cm 3 DVD RAM remove the disc from the cartridge and insert it making sure you align it with the groove Inserting a Disc Disc tray Before using the Disc DVD OPEN CLOSE Disc Tray Fr...

Страница 41: ...n Stop mode to display MAIN MENU 2 Press ŸźŻŹ to select DVD then press ENTER The DVD Function Window cannot be opened unless the time is set Opening the DVD Function Window automatically places unit into DVD mode 3 Press ŸźŻŹ to select an item and press ENTER Functions displayed depend on the type of disc e g DVD RAM Function The same operation with Remote Control Button Pages DIRECT NAVIGATOR DIR...

Страница 42: ...the created play lists PLAY LIST 61 Play the created chapters of Play List PLAY LIST 60 Recording Timer Recording 46 47 Flexible Recording 45 Play from the beginning of the title you are recording Chasing playback 48 Simultaneous Recording and Play 48 Review the recorded images while recording Time Slip 48 49 Disc Type Available Function Page RAM Erase or Edit a program with DIRECT NAVIGATOR PLAY ...

Страница 43: ...humbnail picture in the Title View 59 Disc Type Available Function Page DVD R Disc Setting Enter the Disc name 63 Select whether to show the top menu after finalizing the disc 64 A process that makes play of a recorded DVD R possible on equipment that can play such media Finalize 65 DVD V Playback Start from a selected item using NUMBER keys 52 Fast forward and rewind Search 51 Skip a program or t...

Страница 44: ...to select the recording mode see next page 4 Press DVD REC to start recording You cannot change the channel or recording mode during recording You can change the audio being received by pressing AUDIO during recording To specify a time to stop recording During recording Press DVD REC on the unit or the Remote Control to select the recording time Each time you press the button This does not work du...

Страница 45: ...ided disc is sum total of both sides of disc When appears on the screen while a button is being pressed it means that the corresponding operation is prohibited by the unit or the disc Choose audio mode to match recording type 1 Press AUDIO repeatedly to select the audio mode according to the disc of broadcast to be recorded The Audio mode selected stays in effect until it is changed Refer to MTS B...

Страница 46: ...KLY SAT Enter Name Press ŻŹ to select Enter Name and press ENTER p 66 4 Press Ź to move through the items and change the items with Ÿź 1 58 SP Remaining Recording Time 3 29 MON 12 53 00 PM TIMER RECORDING MODE OFF ON CHANNEL DATE 64 New Timer Program 5 10 PM 4 20 PM SP CHECK OK NO 01 3 29 MON Press ENTER to store new program 1 58 SP Remaining Recording Time 3 29 MON 12 53 00 PM TIMER RECORDING MOD...

Страница 47: ... 29 MON 12 53 00 PM TIMER RECORDING MODE OFF ON CHANNEL DATE New Timer Program CHECK NO Press ENTER to store new program To change a program Press Ÿź to select the program and press ENTER Press ŻŹ to move through the items and change the items with Ÿź then press ENTER To delete a program Press Ÿź to select the program and press CANCEL You cannot delete programs that are currently recording To put ...

Страница 48: ...n To stop timer recording First press STOP to stop play Then exit DIRECT NAVIGATOR Wait 2 seconds Hold down STOP for a few seconds Notes Sound is not output while fast forwarding During simultaneous recording and play you cannot edit or erase with the Direct Navigator or play lists If you start play while the unit is on standby for timer recording recording starts when the time you set is reached ...

Страница 49: ...ecorded on the video cassette is not output on the unit in play it is not recorded e g Connecting the L2 input terminals To skip unwanted parts Press PAUSE to pause recording Press again to restart recording To stop recording Press STOP This unit If the audio output of the other equipment is monaural connect to L MONO The S VIDEO terminal achieves a more vivid picture than the VIDEO terminal Other...

Страница 50: ...e television 1 Press ŸźŻŹ to select the item and press ENTER Some items can also be selected using the NUMBER keys To return to the menu screen Press TOP MENU or SUB MENU e g 5 0 ĺ 5 15 1 ĺ 5 Front Display Sub Display Disc Tray PAUSE PLAY 1 3 SUB MENU ŸźŻŹ TOP MENU STOP NUMBER keys OPEN CLOSE To cancel the resume function Normal play only Press STOP while the unit remembers the position The positi...

Страница 51: ...o Search Audio PLAY 1 3 on page 68 Press PLAY 1 3 to return to normal speed Skipping 1 Press SKIP Ź Ź ǿ or SKIP ǿ Ż Ż during play or while paused On the unit press Ź Ź ǿ or ǿ Ż Ż Each press increases the number of skips Preparation Insert a disc that has been recorded on Play SUB MENU 07 08 10 10 27 Mon 8 10 27 Mon Previous Next Select DIRECT NAVIGATOR Title View DVD RAM 02 02 If you enter a numbe...

Страница 52: ...turn to normal speed Press PLAY 1 3 Frame by frame viewing 1 Press FRAME ǿǿŹ or FRAME Żǿǿ while paused To return to normal speed Press PLAY 1 3 Notes Each press shows the next frame Press PLAY 1 3 to restart play Whether pictures are advanced by Field or Frame is selected automatically see page 68 Displaying the television image as a picture in picture 1 Press TIME SLIP during play The unit displa...

Страница 53: ... compatible files Selected group no Total group no If the group has no track is displayed as group number When appears on the screen while a button is being pressed it means that the corresponding operation is prohibited by the unit or the disc Using menus to play MP3 1 Press TOP MENU during stop or play G Group no T Track no in the group TOTAL Track no Total track no in all groups Using the tree ...

Страница 54: ...AUDIO OUT terminal and Dolby Digital is set to Bitstream If this occurs Change Dolby Digital to PCM p 69 or Bitstream Connect also with an audio cable pp 14 15 and change the input on the receiver 1 Press CHAPTER during play CHAPTER lights on the Front Display for a few seconds Press SKIP Ź Ź ǿ or SKIP ǿ Ż Ż to skip to the start of a chapter You cannot activate this function when recording and pla...

Страница 55: ...A French NOR Norwegian KOR Korean DEU German DAN Danish MAL Malay ITA Italian POR Portuguese VIE Vietnamese ESP Spanish RUS Russian THA Thai NLD Dutch JPN Japanese Others see pages 67 69 ŸźŻŹ RETURN PLAY SETUP Sound track Sound track language DVD V See A below Audio attribute RAM DVD R DVD V See B on page 56 Karaoke vocal on and off DVD V Solo Duet Subtitle Subtitle language DVD V See A below Chan...

Страница 56: ...gs of SAP broadcasts 1 1 ch will be displayed You can only select subtitles soundtracks and angles if they are recorded on the disc Some discs allow changes to soundtracks subtitles and angles only by using the disc s menus If the subtitles overlap closed captions recorded on discs turn the subtitles off LPCM Digital DTS MPEG Signal type k kHz Sampling frequency b bit Number of bits ch channel Num...

Страница 57: ...ot be restored to its original state Make certain before proceeding You cannot edit during recording 3 Press SUB MENU then Ÿź to select the operation and press ENTER If you select Edit press Ÿź to select the operation and press ENTER To show other pages Press ŸźŻŹ to select Previous or Next and press ENTER You can also press SKIP Ź Ź ǿ or SKIP ǿ Ż Ż to show other pages Multiple editing Select with...

Страница 58: ...ase after erasing short titles The available recording time on DVD R does not increase when you erase titles Properties DVD R RAM Information e g time and date is shown DVD R RAM Multiple editing is possible p 57 Note The full name is shown in the Properties screen but if you enter a long name only part of it is shown in the title list Edit ĺ Enter Name DVD R RAM Refer to Entering text on page 66 ...

Страница 59: ...o change to another point in the same title Select Change with Ÿź and press PLAY 1 3 and then repeat Steps 3 4 4 Press Ÿź to select Exit and press ENTER The displayed scene is changed at this point 1 Do Steps 1 5 on pages 57 58 2 Press ŻŹ to select Erase and press ENTER Even if you erase the chapter the original title is not erased Erase Chapter RAM Multiple editing is possible p 57 RAM Divide Cha...

Страница 60: ...Ź to select the source title and press ź Preparation Release protection before proceeding Cartridge p 7 Disc p 63 DVD Play back Record Dubbing Edit Set up DISC PROTECTION OFF CARTRIDGE PROTECTION OFF DVD RAM DIRECT NAVIGATOR TIMER RECORDING FLEXIBLE RECORDING SETUP PLAY LIST DISC SETTING SKIP STOP ACTION ENTER RETURN ŸźŻŹ SUB MENU ERASE PAUSE 1 Press ACTION to display MAIN MENU and select DVD then...

Страница 61: ...an also select a playlist from the chapter view by entering a 2 digit number with the numeric buttons e g 5 0 ĺ 5 15 1 ĺ 5 Whenever a number greater than the total number of play lists is entered Create is selected To show other pages Press ŸźŻŹ to select Previous or Next and press ENTER You can also press SKIP Ź Ź ǿ or SKIP ǿ Ż Ż to show other pages To stop play list play Press STOP The play list...

Страница 62: ...his Play List Play list operations 1 Do Steps 1 5 on page 61 RAM Multiple editing is possible p 61 Erase 2 Press ŻŹ to select Erase and press ENTER The play list is erased Once a play list has been erased it is irretrievable Check carefully before proceeding Properties Play list information e g time and date is shown RAM Edit ĺ Create Refer to Creating play lists on pages 60 61 RAM 2 Press ŻŹ to s...

Страница 63: ... RAM Disc p 63 RAM DVD R RAM 3 Press Ÿź to select the operation and press ENTER After this operation follow the desired operation To stop partway Press RETURN Disc Name 4 Press Ÿź to select Disc Name and press ENTER in Step 3 above 5 Refer to Entering text on page 66 The disc name is displayed in the DVD Functions window Disc Protection This allows you to protect discs from accidental erasure The ...

Страница 64: ...rotection Erase all titles Format disc Titles 11 Used 0 22 Free 5 38 EP DVD R On Select First play Top Menu Title 1 RAM A message appears when formatting is finished Notes Do not turn the unit off or disconnect the AC power supply cord while the message Formatting the disc is on the TV This can render the disc unusable This can take up to max 70 minutes DVD RAM If it takes more than 2 minutes you ...

Страница 65: ... while the message Finalizing the disc is on the television This will render the disc unusable Finalizing takes up to 15 minutes You can only finalize DVD R that were recorded on this unit You cannot record on DVD R that have been finalized After finalizing The disc becomes play only and you can no longer record or edit it DVD R finalized on this unit may not be playable on other DVD players due t...

Страница 66: ...ish entering the title by selecting SET and pressing ENTER Returns to the previously displayed screen This feature allows you to enter a name title Page Title 58 Title timer recording 46 47 Play list 62 Disc 63 Entering Text Repeat this step to enter other characters NUMBER keys CANCEL STOP SET ŸźŻŹ PAUSE ERASE ENTER RETURN 5 6 7 8 J M P T K N Q U L O R V S 7 7 7 RAM Characters Title 64 44 Play li...

Страница 67: ...anguage Ratings Recording Time in EP Mode Level 8 EP 8H SET UP Disc Video Audio TV Screen Menus tab 4 Press Ÿź to select the Setting items and press ENTER Language Ratings Recording Time in EP Mode Level 8 EP 8H SET UP Disc Video Audio TV Screen Items 5 Press Ÿź to select the Setting Contents and press ENTER EP 6H EP 8H Recording Time in EP Mode SET UP Disc Video Audio TV Screen Options To return ...

Страница 68: ...ty recording of the received picture On High quality recording is achieved by precise separation of the Y luminance and C color of the received picture signal Off Set to Off to reduce ghost images when recording pictures with fast motion Does not work with S Video input pictures Hybrid VBR Resolution The picture recorded to a DVD RAM can be smoothed out Automatic The resolution is automated to pro...

Страница 69: ... the TV when you watch 16 9 images DVD RAM on a 4 3 standard aspect TV 4 3 Titles played as recorded Pan Scan Video recorded for a widescreen is played with the sides cut off if the Pan Scan format is specified at the time of recording Letterbox Video recorded for a widescreen is played in the letterbox style When appears on the screen while a button is being pressed it means that the correspondin...

Страница 70: ... recorded on a disc 1 onto a tape with one stroke of the button In One Touch Dubbing all contents on the disc are automatically dubbed onto the tapes If you want to transfer dubbing from the desired point see Manual Dubbing on next page 1 Available discs for transfer dubbing onto tape are DVD RAM and DVD R Most DVD videos cannot be dubbed because they are copy guarded STOP DVD VCR REC VCR ĸ PLAY P...

Страница 71: ... dubbing of the program recorded on the disc 1 to the tape In One Touch Dubbing all contents on the disc are automatically dubbed onto the tapes 1 Available discs for transfer dubbing onto tape are DVD RAM and non finalized DVD R Most DVD videos cannot be dubbed because they are copy guarded To end dubbing Press STOP When playback source side ends and unit enters Stop mode or if dubbing is stopped...

Страница 72: ... one stroke of the button In One Touch Dubbing programs are automatically dubbed onto the disc from the playback location on the tape If you want to transfer dubbing from the desired point see Manual Dubbing on next page 1 Only DVD RAM and non finalized DVD R discs can be used for transfer dubbing from a tape see page 7 Note Copy protected VHS tapes cannot be dubbed to a disc STOP DVD REC ĺ DVD PL...

Страница 73: ...sfer dubbing of the program recorded on the tape to the disc 1 1 Only DVD RAM and non finalized DVD R discs can be used for transfer dubbing from a tape Note Copy protected VHS tapes cannot be dubbed to a disc Only the following operations are allowed while transferring dubbing Turning unit ON OFF by pressing POWER Stopping transfer dubbing by pressing STOP Selecting input mode by pressing INPUT C...

Страница 74: ...is 60 fields per second two fields making up one frame Finalize A process that makes play of a recorded CD R CD RW or DVD R etc possible on equipment that can play such media You can finalize DVD R on this unit You cannot record onto or edit finalized discs Formatting Formatting is the process of making media such as DVD RAM recordable on recording equipment You can format the DVD RAM on this unit...

Страница 75: ...ed by the unit or disc On the Sub Display HARD ERR If there is no change after turning the unit on and off consult the dealer where the unit was purchased NO READ The disc is dirty or badly scratched The unit cannot record play or edit You have used a DVD RAM PD lens cleaner and it has finished Press OPEN CLOSE to eject the disc SLF CHECK There was a power failure or the AC plug was disconnected w...

Страница 76: ... 16 18 Clock display is flashing 12 00P Clock is wrong Set clock 16 18 Front Display is dim Check the Front Display setting 19 Front display VHS tape counter value does not change On a blank section of tape the value stays fixed while the seconds portion is displayed as follows Also if the tape is dirty or damaged or if unit is malfunctioning the display above may appear Please consult your retail...

Страница 77: ... Subtitles appear only when available on disc 55 Select ON at the Subtitle language section to display subtitles 55 Alternative audio soundtrack or subtitle language cannot be selected Alternative language cannot be selected with discs which do not contain more than one language 55 For some discs alternative language cannot be selected with the AUDIO or SUB TITLE button Try selecting it from the D...

Страница 78: ... 5 1 Ch surround sound of dolby digital DST etc What equipment do I need This unit alone is not enough You will need 6 speakers and if a digital connection an amp equipped with dolby digital or DST recorder Can I play DVD Video purchased abroad You can play them if the video standard is NTSC Only if the regional code includes ALL or 1 Check the package Can a DVD Video that does not have a region n...

Страница 79: ...ff Approx 0 9 W Television System EIA Standard NTSC color Speaker 2 pieces 5 W Operating Temperature 5 C 35 C 41 F 95 F Operating Humidity 10 75 Weight 49 kg 108 0 lbs Dimensions W x H x D 760 mm 29 7 8Ǝ x 645 mm 25 3 8Ǝ x 511 mm 20 1 8Ǝ Recording discs DVD RAM 12 cm 5Ǝ 4 7 GB 12 cm 5Ǝ 9 4 GB 8 cm 3Ǝ 2 8 GB DVD R 12 cm 5Ǝ 4 7 GB 8 cm 3Ǝ 1 4 GB for General Ver 2 0 12 cm 5Ǝ 4 7 GB for General Ver 2 ...

Страница 80: ...re will be no charge for parts You must carry in or mail in your product or arrange for in home service as applicable during the warranty period If non rechargeable batteries are included they are not warranted This warranty only applies to products purchased and serviced in the United States or Puerto Rico This warranty is extended only to the original purchaser of a new product which was not sol...

Страница 81: ...the warrantor PARTS AND SERVICE INCLUDING COST OF AN IN HOME SERVICE CALL WHERE APPLICABLE WHICH ARE NOT COVERED BY THIS LIMITED WARRANTY ARE YOUR RESPONSIBILITY Customer Services Directory As of October 2003 Obtain Product Information and Operating Assistance locate your nearest Dealer or Servicenter purchase Parts and Accessories or make Customer Service and Literature requests by visiting our W...

Страница 82: ...ajustarlo De la misma manera seleccione y ajuste la fecha año hora y DST hora de verano Presione Ż repetidamente para mover el cursor Presione Ÿ ź para realizar la corrección c Presione RETURN dos veces para arrancar el reloj y salir CH AUTO SET PROCEEDING AUTO CLOCK SET PROCEEDING CANCEL STOP 10 25 2004 MON 11 45AM DST ON SETTING CH 10 AUTO CLOCK SET COMPLETED AUTO CLOCK SET IS INCOMPLETE PLEASE ...

Страница 83: ...tra Long Pkay Se exhibe la velocidad seleccionada Grabación de una cinta a Presione PAUSE b Presione PAUSE para retomar la grabación Pausar una grabación Grab normal 0 30 1 00 1 30 2 00 3 00 4 00 Método 1 Presione CH Ÿź La exhibición cambiará de la siguiente manera Método 2 TV CA69 CABLE CA125 LINEA1 LINEA2 LINEA1 SINTONIZADOR LINEA2 LINEA1 Se exhibe la señal de la fuente conectada al terminal de ...

Страница 84: ...ma Para borrar un programa a Presione Ÿź para seleccionar el programa deseado b Presione SET para exhibir c Presione Ÿź para seleccionar y presione SET o ŻŹ para ajustar un programa nuevo d Presione RETURN a Presione Ÿź para seleccionar el programa deseado b Presione ADD DLT P FE INIC PARADA CA VEL 1 10 9 00a12 00p 08 SP 2 DI 11 00a11 30a125 SP 3 12 8 00p 9 30p L1 EP 4 CANCELAR ADD DLT ELEGIR FIJA...

Страница 85: ... ej 5 5 15 1 ĺ 5 DVD R RAM 3 Presione Ÿź para seleccionar Nuevo programa y a continuación presione ENTER 1 58 SP Tiempo grabación restante 3 29 LUN 12 53 00 PM GRABACION TEMP MODO DES ACT CANAL FECHA 64 Nuevo programa 5 20 PM 4 10 PM SP VERIF Habilitar N 01 3 29 LUN Pulsar ENTER para introducir un nuevo programa La línea resaltada estará preparada para la programación 1 Presione PROG CHECK para mo...

Страница 86: ...as de número Por ejemplo 5 0 ĺ 5 15 1 ĺ 5 Repr SUB MENU 07 08 10 10 27 Lun 8 10 27 Lun Ant Sig Seleccionar DIRECT NAVIGATOR Vista titulo DVD RAM 02 02 Si introduce un número mayor que el número total de títulos se seleccionará el último título DVD R RAM Iconos de la pantalla de DIRECT NAVIGATOR Título protegido Título que no se grabó durante la protección de grabación emisiones digitales etc Títul...

Страница 87: ...ĺ 5 Grupo seleccionado Para mostrar otras páginas Presione ŸŹ para seleccionar Ant o Sig y presione ENTER Después de especificar en una lista todas las pistas de un grupo aparecerá la lista del grupo siguiente Para salir de la pantalla Presione RETURN o TOP MENU a Presione Ź para visualizar la pantalla con estructura de árbol mientras se muestra la lista de archivos Presione ŸźŻŹ para seleccionar ...

Страница 88: ...leccionar Cerrar y presione ENTER 4 Presione ŻŹ para seleccionar Sí y presione ENTER 5 Presione ŻŹ para seleccionar Iniciar y presione ENTER La finalización se iniciará Cuando la finalización haya terminado aparecerá un mensaje 6 Presione ENTER DVD R CONF DISCO Títulos 11 Usado 0 22 Espacio 5 38 EP Cerrar Sí No Este proceso durará xx minutos aprox Es correcto cerrar el disco DVD R CONF DISCO Títul...

Страница 89: ... o apagar la unidad pulsando POWER la copia continuará aunque la unidad se apague Cambiar el modo de audio pulsando AUDIO PRESIONAR DUBBING POR 3S PARA INICIAR DOBLAJE VCRȲDVD EP XP 1 Con el VCR y el DVD en el modo detenido mantenga presionado el botón ĺDVD durante unos 3 segundos después de que aparezca el cuadro de diálogo siguiente en la pantalla La grabación se detendrá automáticamente cuando ...

Страница 90: ...s 55 Disc menu 55 Play menu 56 Connecting the 1 2 AV Input Terminals 13 Connecting the Audio Output Terminal 14 Connecting the Headphones Earphones Jack 13 Connecting the RF in Terminal 12 Create chapters 54 Creating play lists 60 D Digital Auto Tracking 34 Disc Setting Procedure 63 Disc Name 63 Disc Protection 63 Finalize 65 Format Disc 64 Select First play 64 Disc Tray 10 Displaying the televisi...

Страница 91: ...ms titles to play 51 Set Up to 16 Programs DVD 46 Add a program 46 Check change or delete a program 47 Set Up to 9 Programs 30 Skipping 51 Skipping a minute forward CM Skip DVD 51 Skipping the specified time Time Slip 52 Sleep Timer 22 Slow motion playback DVD 52 Slow Motion picture Tape 32 Starting from a selected item 52 Starting play from where you stopped it Resume Function 50 Status messages ...

Страница 92: ...oration of America One Panasonic Way Secaucus New Jersey 07094 Panasonic Sales Company PSC Division of Matsushita Electric of Puerto Rico Inc Ave 65 de Infantería Km 9 5 San Gabriel Industrial Park Carolina Puerto Rico 00985 Printed in Indonesia LSQT0840 A S0804 0 P LSQT0840 A ...

Отзывы: