background image

Camera Mode

-20-

Camera Mode

Recording

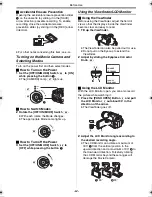
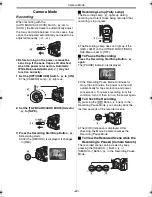
When recording with the 
[AUTO/MANUAL/FOCUS] Switch 

(36)

 set to 

[AUTO], the Movie Camera automatically adjust 
the focus and white balance. In some cases, they 
cannot be adjusted automatically and need to be 
adjusted manually. (

-27-

,

-29-

)

Before turning on the power, remove the 
Lens Cap. If the Lens Cap is still attached 
when the power is turned on, Automatic 
White Balance Adjustment (

-27-

) may not 

function correctly.

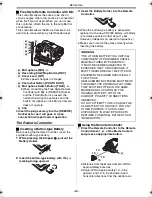
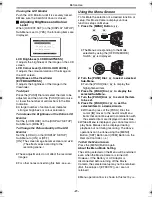
1

Set the [OFF/ON/MODE] Switch 

(49)

 to [ON].

The [CAMERA] Lamp 

(47)

 lights up.

2

Set the [TAPE/CARD/CARD MODE] Selector 

(35)

 to [TAPE].

3

Press the Recording Start/Stop Button 

(48)

.

Recording starts.

After the [RECORD] is displayed, it changes 
to [REC].

AUTO MANUAL

FOCUS

(36)

CAMERA

VCR

CARD PB

OF

F ON MODE

(47)

(49)

TAPE

CARD

CARD

MODE

(35)

(48)

RECORD

REC

ª

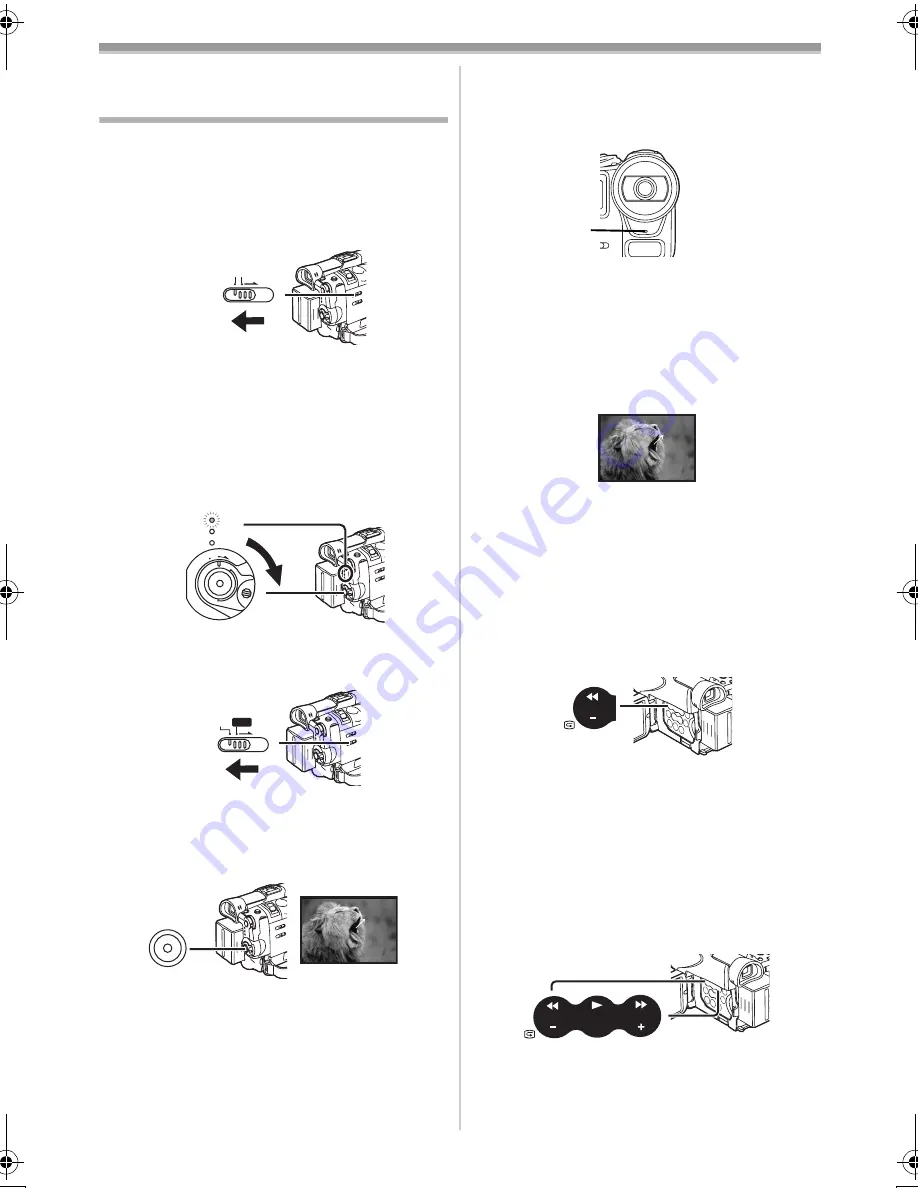
Recording Lamp (Tally Lamp)

The Recording Lamp 

(41)

 lights up during 

recording and alerts those being recorded that 
recording is in progress.

The Recording Lamp does not light up if the 
[REC LAMP] on the [OTHER FUNCTIONS1] 
Sub-Menu is set to [OFF].

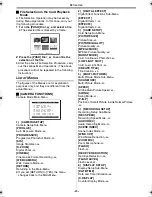
ª

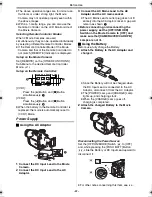
To Pause the Recording

Press the Recording Start/Stop Button 

(48)


again.

The [PAUSE] Indication is displayed.

If the Recording Pause Mode continues for 
more than 6 minutes, the power is turned off 
automatically for tape protection and power 
conservation. To resume recording from this 
condition, turn off, then turn on the power again.

ª

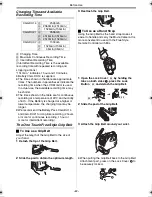
To Check the Recording

By pressing the [

S

] Button 

(8)

 briefly in the 

Recording Pause Mode, you can play back the 
last few seconds of the recorded scene.

The [CHK] Indication is displayed. After 
checking, the Movie Camera resumes the 
Recording Pause Mode.

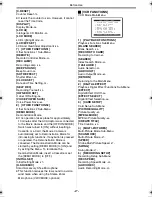
ª

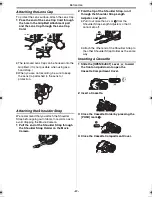
To View the Recorded Scene while the 
Recording Is Paused (Camera Search)

The recorded scene can be viewed by keep 
pressing the [SEARCH

j

] Button 

(8)

 or 

[SEARCH

i

] Button 

(10)

 in the Recording Pause 

Mode.

(41)

PAUSE

PAUSE

SEARCH

(8)

BACK

LIGHT

SEARCH

SEARCH

(8)


(10)

70B-ENG.book  20 ページ  2003年3月27日 木曜日 午前11時53分

Содержание NV-GS70B

Страница 1: ...Digital Video Camera Operating Instructions Model No NV GS70B Before use please read these instructions completely VQT0C80 ...

Страница 2: ...e fuse If the plug contains a removable fuse cover you must ensure that it is refitted when the fuse is replaced If you lose the fuse cover the plug must not be used until a replacement cover is obtained A replacement fuse cover can be purchased from your local Panasonic Dealer IF THE FITTED MOULDED PLUG IS UNSUITABLE FOR THE SOCKET OUTLET IN YOUR HOME THEN THE FUSE SHOULD BE REMOVED AND THE PLUG ...

Страница 3: ...t or vice versa For this reason check the compatibility of the equipment in advance Keep the Memory Card out of reach of children to prevent swallowing Pages for reference Pages for reference are indicated by dashes either side of a number for example 00 Use only the recommended accessories ª WARNING To prevent electric shock do not remove the cover or back there are no user serviceable parts insi...

Страница 4: ...Setting Date and Time 19 Internal Lithium Battery Recharge 19 LP Mode 19 Audio Recording Mode 19 Camera Mode Recording 20 Quick Start 21 Photoshot 21 Self timer Recording 22 Zoom In Out Functions 23 Digital Zoom Function 23 Image Stabilizer Function 24 Fade In Out Functions 24 Backlight Compensation Function 25 Night View Functions 25 Soft Skin Function 25 Wind Noise Reduction Function 26 Cinema F...

Страница 5: ...ard 41 Recording on a Card 41 Playing Back a Card 45 Recording Pictures on a Card to a Tape 47 Slide Show 47 Editing a Slide Show 48 Creating a Title 49 Adding a Title 49 Writing Printing Data on a Card 50 Protecting the Files on a Card 50 Deleting the Files Recorded on a Card 51 Formatting a Card 52 With a PC USB Connection Kit 53 Using as a Web Camera 53 Using a Card in a Personal Computer 53 Ot...

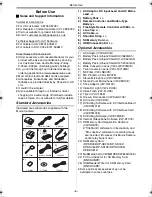
Страница 6: ... and AC Mains Lead 11 2 Battery Pack 11 3 Remote Controller and Button Type Battery 9 4 Free Style Remote Controller with Mic 10 5 Lens Cap 13 6 AV Cable 38 7 Shoulder Strap 13 8 SD Memory Card 41 9 USB Connection Kit 53 Optional Accessories 1 AC Adaptor VW AD10B 2 Battery Pack Lithium CGA DU07 680mAh 3 Battery Pack Lithium CGA DU14 1360mAh 4 Battery Pack Lithium CGA DU21 2040mAh 5 Wide Conversion...

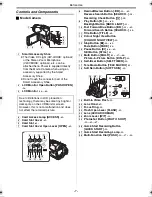
Страница 7: ...PUSH CLOSE COLOUR NIGHT VIEW SEARCH FADE STILL 8 9 10 11 12 13 14 15 16 17 18 8 Rewind Review Button 6 33 45 Reverse Search Button SEARCHj 20 Recording Check Button S 20 9 Play Button 1 33 45 Backlight Button BACK LIGHT 25 10 Fast Forward Cue Button 5 33 45 Forward Search Button SEARCHi 20 11 Title Button TITLE 49 12 Colour Night View Button COLOUR NIGHT VIEW 25 13 Stop Button 33 45 Fade Button FA...

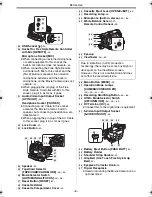
Страница 8: ...ector Switch AUTO MANUAL FOCUS 20 26 37 Reset Button RESET 57 38 Cassette Holder 39 Cassette Compartment Cover 13 REMOTE MIC PLUG IN POWER AV IN OUT PHONES 32 33 29 30 31 34 35 36 37 38 39 40 41 42 43 40 Cassette Eject Lever OPEN EJECT 13 41 Recording Lamp 20 42 Microphone built in stereo 23 26 43 White Balance Sensor 27 Remote Control Sensor 10 44 Eyecup 45 Viewfinder 14 69 46 Menu Button MENU 15...

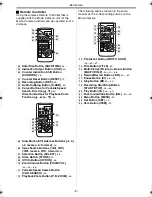
Страница 9: ...TI P IN P PHOTO SHOT START STOP A DUB PLAY PAUSE FF W STILL ADV MENU ITEM SET 6 1 5 E D VAR SEARCH P B ZOOM 58 59 60 61 62 63 64 ZOOM INDEX INDEX SELECT STORE STOP K L OSD COUNTER V REW STILL ADV OFF ON P B DIGITAL DATE TIME RESET TITLE T W s VOL r REC MULTI P IN P PHOTO SHOT START STOP A DUB PLAY PAUSE FF W STILL ADV MENU ITEM SET 6 1 5 E D VAR SEARCH P B ZOOM 65 66 67 68 69 70 71 72 The followin...

Страница 10: ...ry with the i marking facing upward 85 86 87 88 89 90 1 3 Insert the Battery Holder into the Remote Controller When the button type battery is exhausted replace it with a new CR2025 battery A battery is normally expected to last about 1 year However it depends on operation frequency Make sure to match the poles correctly when inserting the battery ª Using the Remote Controller 1 Direct the Remote ...

Страница 11: ...nect the DC Input Lead to the Movie Camera 2 Connect the DC Input Lead to the AC Adaptor INDEX INDEX SELECT STOP K L STILL ADV T W PAUSE STILL ADV 6 1 5 E D 2 1 1 3 Connect the AC Mains Lead to the AC Adaptor and the AC mains socket The AC Mains Lead s outlet plug does not fit entirely into the AC Adaptor socket A gap will remain as shown 1 Before connecting or disconnecting the power supply set t...

Страница 12: ...rding 2 hours or more for continuous recording 1 hour or more for intermittent recording The One Touch Free Style Grip Belt ª To Use as a Grip Belt Adjust the length of the Grip Belt to the size of your hand 1 Detach the tip of the Grip Belt 2 Slide the pad to obtain the optimum length CGA DU14 A 2h45min B 2h50min 2h10min C 1h25min 1h5min CGA DU21 A 3h55min B 4h15min 3h15min C 2h10min 1h40min CGA ...

Страница 13: ... of doors to record so as to avoid dropping the Movie Camera 1 Pull the end of the Shoulder Strap through the Shoulder Strap Holder on the Movie Camera 2 Fold the tip of the Shoulder Strap run it through the Shoulder Strap Length Adjuster and pull it Pull it out more than 2 cm 1 from the Shoulder Strap Length Adjuster so that it cannot slip off Attach the other end of the Shoulder Strap to the oth...

Страница 14: ...ON MODE 49 OFF ON MODE 49 1 Using the Viewfinder LCD Monitor ª Using the Viewfinder Before using the Viewfinder adjust the field of view so that the displays inside the Viewfinder become clear and easy to read 1 Tilt up the Viewfinder The Viewfinder can also be pulled out for use Do not pull on the Eyecup to extend the Viewfinder 2 Adjust by sliding the Eyepiece Corrector Knob 56 ª Using the LCD M...

Страница 15: ... LCD BRIGHTNESS LCD COLOUR LEVEL EVF BRIGHTNESS Using the Menu Screen To facilitate the selection of a desired function or setup this Movie Camera displays various function setups on Menus 1 Press the MENU Button 46 The Menu corresponding to the Mode selected by using the OFF ON MODE Switch 49 is displayed 2 Turn the PUSH Dial 28 to select a desired Sub Menu Turn the PUSH Dial 28 to display the hi...

Страница 16: ...ain Menu PICTURE No 25 100 0012 CAMERA FUNCTIONS PRESS MENU TO EXIT 1 CAMERA SETUP 2 DIGITAL EFFECT 3 CARD SETUP 5 RECORDING SETUP 6 DISPLAY SETUP 7 OTHER FUNCTIONS1 8 OTHER FUNCTIONS2 4 MULTI PICTURES 2 DIGITAL EFFECT Digital Effect Functions Sub Menu EFFECT1 Digital Effects 1 30 EFFECT2 Digital Effects 2 30 3 CARD SETUP Card Setup Sub Menu PICTURE SIZE Picture Size 42 PICTURE QUALITY Picture Qua...

Страница 17: ...iting the Menu To terminate the Demonstration Mode insert a Cassette or set the DEMO MODE to OFF INITIAL SET Initial Setting Mode 57 H SHOE MIC Smart Accessory Shoe Microphone This function reduces the low sound to avoid a wind noise when using the Stereo Zoom Microphone VW VMH3E optional ª VCR FUNCTIONS VCR Mode Main Menu 1 PLAYBACK FUNCTIONS Playback Functions Sub Menu BLANK SEARCH Blank Search ...

Страница 18: ...Y SELECTION Selecting and Deleting a File 51 CARD FUNCTIONS PRESS MENU TO EXIT 1 DELETE CARD FILE 2 CARD EDITING 3 DISPLAY SETUP 4 OTHER FUNCTIONS DELETE ALL FILES Deleting All Files 51 DELETE TITLE BY SELECTION Selecting and Deleting a Title 51 2 CARD EDITING Editing a File Sub Menu RECORD TO TAPE Recording to Tape 47 FILE SEARCH Searching a File 46 FILE LOCK Setting the Lock 50 SLIDE SHOW Settin...

Страница 19: ...NU PUSH WB SHUTTER IRIS VOL JOG 46 28 CLOCK SET PRESS MENU TO RETURN YEAR 2003 MONTH 10 DAY 08 HOUR 14 MIN 30 1 Connect the AC Adaptor to the Movie Camera with the power turned off and then connect to the AC Mains socket After charging for 4 hours the built in lithium battery can power the clock for approximately 3 months LP Mode A desired recording speed can be selected with REC SPEED on the RECO...

Страница 20: ...ghts up during recording and alerts those being recorded that recording is in progress The Recording Lamp does not light up if the REC LAMP on the OTHER FUNCTIONS1 Sub Menu is set to OFF ª To Pause the Recording Press the Recording Start Stop Button 48 again The PAUSE Indication is displayed If the Recording Pause Mode continues for more than 6 minutes the power is turned off automatically for tap...

Отзывы: