background image

Before Use

-60-

Make sure to match the poles correctly when 
inserting the battery.

ª

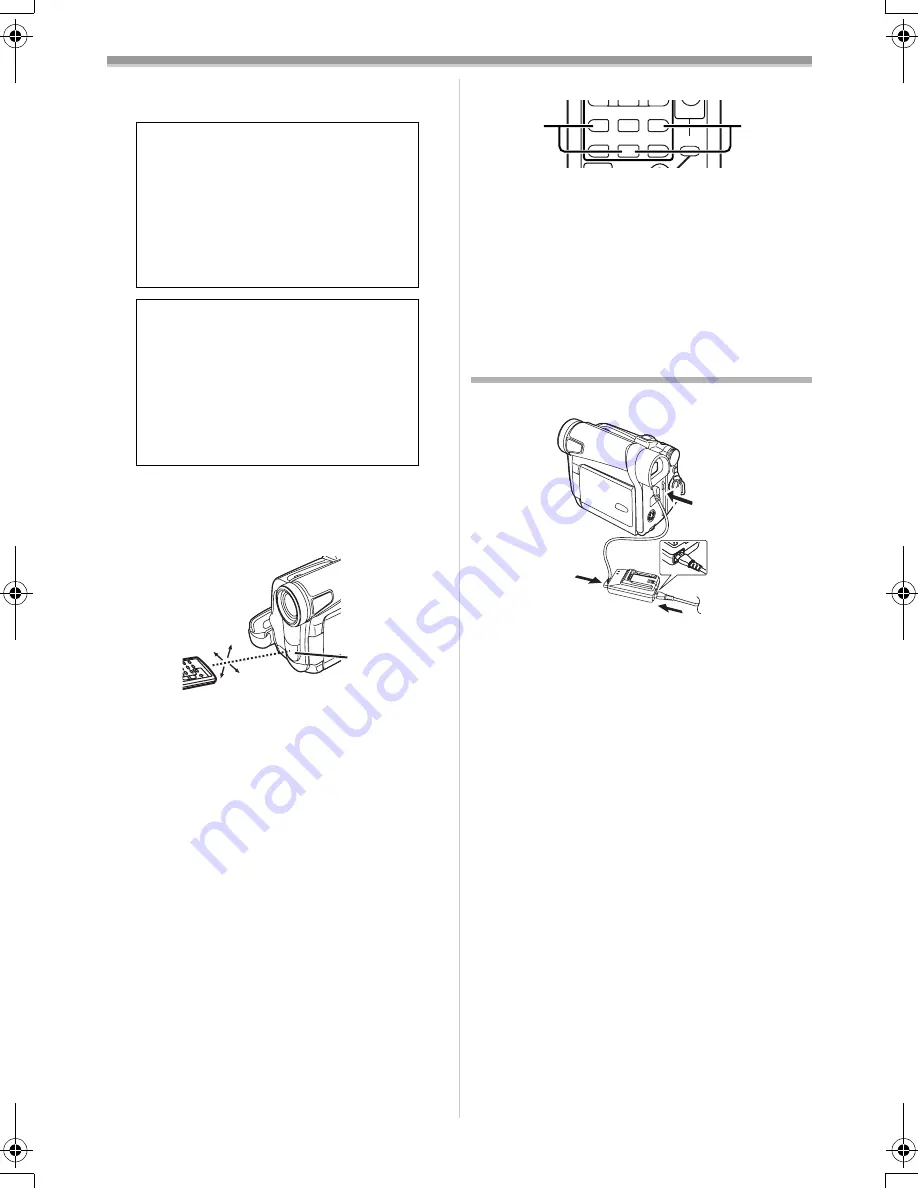
Using the Remote Controller

1

Direct the Remote Controller at the Remote 
Control Sensor 

(31)

 of the Movie Camera 

and press an appropriate button.

Distance from the Movie Camera: Within 
approximately 5 metres

Angle: Within approximately 15

o

 in the 

vertical and horizontal directions from the 
central axis

The above operating ranges are for indoor use. 
Outdoors or under strong light, the Movie 
Camera may not operate properly even within 
the above ranges.

Selecting Remote Controller Modes

When 2 Movie Cameras are used 
simultaneously, they can be operated individually 
by selecting different Remote Controller Modes.

If the Remote Controller Mode of the Movie 
Camera and that of the Remote Controller do 
not match, [REMOTE] Indication is displayed.

Setup on the Movie Camera:

Set [REMOTE] on the [INITIAL] Sub-Menu to the 
desired Remote Controller Mode. (

-67-

)

CAUTION

Danger of explosion if battery is 
incorrectly replaced. Replace only 
with the same or equivalent type 
recommended by the equipment 
manufacturer. Discard used batteries 
according to manufacturer’s 
instructions.

WARNING

Risk of fire, explosion and burns. Do 
not recharge, disassemble, heat 
above 100

x

C or incinerate. Keep the 

Button-Type battery out of the reach 
of children. Never put Button-Type 
battery in mouth. If swallowed call 
your doctor.

15˚

15˚

15˚

15˚

(31)

Setup on the Remote Controller:

[VCR1]:

Press the [

D

] Button and [

] Button 

simultaneously. 

1

[VCR2]:

Press the [

E

] Button and [

] Button 

simultaneously. 

2

When the battery in the Remote Controller is 
replaced, the mode is automatically reset to 
[VCR1] Mode.

Power Supply

ª

Using the AC Adaptor

1

Connect the DC Input Lead to the 
[DC/C.C.IN] Socket on the Movie Camera.

2

Connect the DC Input Lead to the AC 
Adaptor.

3

Connect the AC Mains Lead to the AC 
Adaptor and the AC mains socket.

The AC Mains Lead’s outlet plug does not fit 
entirely into the AC Adaptor socket. A gap will 
remain as shown 

1

.

Before connecting or disconnecting the 
power supply, set the [OFF/ON] Switch on 
the Movie Camera to [OFF] and make sure 
that Power Lamp is not lit.

ª

Using the Battery

Before use, fully charge the Battery.

We recommend using Panasonic’s Battery.

We cannot guarantee the quality of this Movie 
Camera when batteries of other companies are 
used.

INDEX

INDEX

SELECT

STOP

K

L

STILL ADV

T

W

PAUSE STILL ADV

6

1

5

;

E

D

P.B. ZOOM

2

1

1

1

2

3

15GC-ENG.book  60 ページ  2004年2月5日 木曜日 午後12時16分

Содержание NV-GS11

Страница 1: ...нструкция по эксплуатации 数码摄像机 Digital Video Camera Model No NV GS11GC GK NV GS15GC GK 使用前 请完整阅读本说明书 Before use please read these instructions completely Перед пользованием прочтите пожалуйста эту инструкцию полностью LSQT0781 A R ...

Страница 2: ...版权保护技术 并且被日本和美国 的专利技术和知识产权所保护 要想使用这些版 权保护技术 必须得到 Macrovision 公司的授 权 禁止分解或改装摄像机 Windows 是美国 Microsoft 公司的商标或注册商 标 SD 徽标是商标 使用说明书中的所有其它公司和产品名称都是各 个公司的商标或注册商标 由于本设备使用时会变热 请在空气流通的 地方进行操作 不要将此设备安置在狭窄的 空间内 例如书柜或类似地方 要降低起火 电击或产品损坏的危险 请勿 将本设备暴露于雨中 潮湿 滴水或溅水的 环境 并确保勿将盛满液体的物品 如花瓶 放在本设备上 摄像机 标牌位于摄像机的下面 AC 适配器 标牌位于 AC 适配器的下面 录制在 MultiMediaCard 或 SD 记忆卡上的文件 本摄像机可能无法回放由其它设备录制和创建的 文件 反之亦然 为此 在使用前请检查设备的 兼容性 让记忆卡远离...

Страница 3: ...色彩拍摄 22 手动调节白平衡 22 手动快门速度调节 23 手动光圈调节 24 手动焦距调节 24 数码特效功能 25 回放模式 回放磁带 27 查找要回放的场景 27 慢动作回放 28 静态回放 静态前进回放 28 索引搜索功能 28 回放变焦功能 29 回放数码特效功能 30 回放卡 仅 NV GS15 型 30 幻灯放映 仅 NV GS15 型 31 创建标题 仅 NV GS15 型 31 添加标题 仅 NV GS15 型 32 将打印数据写入卡中 仅 NV GS15 型 32 保护卡上的文件 仅 NV GS15 型 33 删除在卡上录制的文件 仅 NV GS15 型 33 格式化卡 仅 NV GS15 型 33 在电视上回放 34 编辑模式 从磁带上录制到卡中 仅 NV GS15 型 35 从卡上将图像录制到磁带中 仅 NV GS15 型 35 配音 35 复制到 S VHS 或...

Страница 4: ...707N2E 7 长焦转换镜头 VW LT2714N2E 8 ND 滤镜 VW LND27E 9 MC 保护镜 VW LMC27E 10 立体声麦克风 VW VMS2E 11 直流摄影灯 VW LDC10E 12 直流摄影灯的灯泡 VZ LL10E 13 座式适配器 VW SK11E 14 三脚架 VW CT45E 15 DV 电缆 VW CD1E 16 DV 编辑软件 带 DV 接口卡 VW DTM41E 1 3 7 6 9 8 4 5 2 下列各项仅适用于 NV GS15 型 17 SD 记忆卡 RP SD008 RP SD016 RP SD032 RP SD064 RP SD128 RP SDH256 RP SDH512 18 MultiMediaCard 多媒体卡 VW MMC8E VW MMC16E 19 用于 SD 记忆卡的 PC 卡适配器 BN SDABPE 20 用于 SD...

Страница 5: ...0 19 倒带 倒带搜索按钮 6 27 30 20 菜单按钮 MENU 12 21 模式选择器开关 AUTO MANUAL FOCUS 16 22 22 镜头遮光罩 47 23 镜头 24 麦克风 内置立体声 19 21 25 眼罩 由于 LCD 生产技术所限 在 LCD 监视器屏 幕上会有一些微小的亮点或暗点 但这并非 故障 不会影响录制的图像 22 23 24 25 26 磁带盒架 27 磁带盒盖 10 28 USB 插孔 38 29 DV 端子 DV 37 可将该端子连接至数码视频设备 30 内置 LED 摄影灯 18 31 白平衡传感器 22 遥控传感器 7 32 音频 视频输入 输出插孔 AV IN OUT 34 自由式遥控器插孔 REMOTE 耳机插孔 PHONES 将AV电缆接入此插孔将启动摄像机的内置扬 声器 但如果连接了耳机等 扬声器将停 用 将 AV 电缆的针式插头连接...

Страница 6: ... 54 复位按钮 RESET 50 55 录制按钮 REC 36 37 56 配音按钮 A DUB 35 57 用于变速搜索功能的指针按钮 π 28 用于回放变焦功能的方向按钮 π 29 58 慢动作 静态前进按钮 E D E 向后 D 向前 28 59 索引搜索按钮 9 向后 9 向前 29 60 选择按钮 SELECT 30 61 存储按钮 STORE 30 62 开 关按钮 OFF ON 30 63 变焦 音量按钮 ZOOM VOL 19 27 29 64 变速搜索按钮 VAR SEARCH 28 65 菜单按钮 MENU 12 ZOOM INDEX INDEX SELECT STORE STOP K L OSD DISPLAY V REW STILL ADV OFF ON P B DIGITAL DATE TIME RESET TITLE T W s VOL r REC MULTI...

Страница 7: ... OFF ON P B DIGITAL DATE TIME RESET TITLE T W s VOL r REC MULTI P IN P PHOTO SHOT START STOP A DUB PLAY PAUSE FF W STILL ADV ENTER 6 1 5 E D VAR SEARCH MENU P B ZOOM 66 67 72 75 76 73 74 68 69 70 71 77 78 79 80 1 2 插入钮扣型电池 注意使有 i 印记的面朝上 3 把电池座插入遥控器 当钮扣型电池电力耗尽时 请换上新的 CR2025 电池 电池在正常情况下可以使用大约 1 年 但具体使用时间取决于使用频率 安装电池时 要确保极性正确匹配 ª 使用遥控器 1 将遥控器直接对准摄像机的遥控传感器 31 并按 相应的按钮 与摄像机的距离 大约 5 米之内 角度 应保持相对于中心轴线的垂直...

Страница 8: ...能保证该摄像 机的品质 1 将电池装入 AC 适配器并充电 由于DC输入线与AC适配器连接时无法对电池 充电 所以请断开它们 POWER 指示灯和 CHARGE 指示灯亮起 充电开始 INDEX INDEX SELECT STOP K L STILL ADV T W PAUSE STILL ADV 6 1 5 E D P B ZOOM 2 1 1 1 2 3 当 CHARGE 指示灯熄灭时 说明已完成充 电 当给过放电的电池充电时 一开始 CHARGE 指示灯会闪亮 但电池仍可正常充电 当电池 的温度太高或太低时 CHARGE 指示灯将闪 亮 充电时间要比平时长 2 把充过电的电池安装到摄像机上 取出电池 将 OFF ON 开关 43 设置为 OFF 在滑动 BATTERY RELEASE 杆 49 的同时 滑动电池 以将其取出 当安装或取出电池时 将 OFF ON 开关设置 为 OFF ...

Страница 9: ...手持带 可以根据手的大小来调节手持带的长度 1 打开手持带 2 可以根据手的大小来调节手持带的长度 3 重新装好手持带 NV GS11 NV GS15 CGR D08R CGR D08S A 1h B 2h10min 1h45min C 1h5min 55min CGR D16S A 2h B 4h20min 3h30min C 2h10min 1h45min CGP D28S A 3h15min B 7h40min 6h C 3h50min 3h 重新安装镜头盖时 为了保护镜头表面 请安装镜头盖 1 镜头盖和镜头盖线已预先安装在手执带上 2 将镜头盖吊带的末端穿过镜头盖上的连接眼 然后将镜头盖穿过其自己结成的环 并拉紧 当不使用镜头盖时 朝箭头方向拉出镜头盖吊 带 1 在不拍摄期间 为了保护镜头 请确保镜头盖盖 在镜头上 2 当取下镜头盖时 请用力按住旋钮 安装肩背带 我们建议您在出门拍...

Страница 10: ...于拍摄图像 插入或取出卡片之前 必须关闭摄像机 否则 摄像机可能无法正常工作 或导致卡片上 所录数据的丢失 OPEN EJECT 38 PUSH 1 R E C SAVE 1 ª 插入卡 1 滑动 OPEN 杆 3 打开卡槽盖 5 2 握住记忆卡 使其缺角朝向正确 1 然后将其 插入卡槽 4 3 将卡槽盖 5 关紧 取出卡 打开卡槽盖并按卡的中心 然后将其垂直拔出 取出卡之后 关闭卡槽盖 当卡完全插入时 如果将卡强力取出 摄像机可 能被损坏 ª 卡存取指示灯 14 当摄像机访问卡 读取 录制 回放或删除 时 卡存取指示灯亮起 卡存取指示灯亮时 切勿打开卡槽盖 拔出卡 关闭摄像机电源或转动 Mode Dial 否则将损坏 卡和所录制的数据 并导致摄像机出现故障 打开摄像机 ª 如何接通电源 1 在按下按钮 1 的同时 将 OFF ON 开关 43 设 置为 ON POWER 指示灯 40 亮...

Страница 11: ...5 10 2004 12 30 45 15 10 2004 12 30 45 15 10 2004 35 ª 使用 LCD 监视器 在 LCD 监视器打开时 可以边拍摄边查看 1 将手指按在 OPEN4 钮 1 上 并朝箭头方向 拉出 LCD 监视器 2 取景器不能启动 LCD监视器最大可以打开120o 如果将LCD监 视器打开至 120o 则操作菜单或回放图像变 得十分方便 2 根据所需拍摄角度 调整 LCD 监视器的角度 LCD监视器从垂直位置向上的最大旋转角度为 180o 1 从垂直位置向下的最大旋转角度为 90o 2 如果强力将 LCD 监视器旋转到这些 范围之外 将损坏摄像机 关闭 LCD 监视器 推动 LCD 监视器 直到牢靠地锁定为止 确定卡槽盖已关闭 仅 NV GS15 型 ª 调整亮度和色彩级别 当 LCD EVF 子菜单上的 LCD EVF SET 设置为 YES 时 ...

Страница 12: ...按钮 选择一个文件 20 39 NV GS11 NV GS15 所选文件标有外框 2 按 ENTER 按钮 17 确认文件的选择 执行完上述文件选择步骤之后 可进行各种菜单 操作 上述步骤在下面的说明中不再重复 菜单列表 菜单图示仅用于介绍 与实际菜单有所不同 ª TAPE RECORDING MENU 磁带录制模式 1 CAMERA 相机设置子菜单 PROG AE 自动曝光模式 22 SIS 影像稳定器 20 D ZOOM 数码变焦 19 SHTR EFFECT 仅 NV GS11 型 快门特效 17 可以添加如同松开快门时的声音 SELF TIMER 自拍器拍摄 19 USB FUNCTION USB 功能模式 38 如果按 6 按钮 菜单将返回上一级屏幕 2 DIGITAL 数码设置子菜单 EFFECT1 数码特效 1 25 EFFECT2 数码特效 2 25 MULTI MODE ...

Страница 13: ...带或将 DEMO MODE 设置为 OFF AV JACK AV 插孔 48 REMOTE 遥控器模式 8 BEEP SOUND 嘟嘟声 42 CLOCK SET 日期和时间设置 15 INITIAL SET 初始设置模式 41 ª TAPE PLAYBACK MENU 磁带回放模式 1 PLAYBACK 回放功能子菜单 SEARCH 索引搜索模式 29 12bit AUDIO 音频选择器 35 AUDIO OUT 音频输出模式 44 USB FUNCTION USB 功能模式 38 2 AV IN OUT 音频 视频输入 输出设置子菜单 AV JACK AV 插孔 35 A DUB INPUT 配音输入 35 DV OUT 模数转换输出 45 3 DIGITAL 回放数码设置子菜单 EFFECT ON 数码特效开 关 30 EFFECT SEL 数码特效选择 30 TITLE IN 仅 ...

Страница 14: ...DISPLAY LCD EVF INITIAL CAMERA SHTR EFFECT SELF TIMER PROG AE SELECT NEXT MENU EXIT DISPLAY 显示模式 41 DATE TIME 日期和时间指示 41 5 LCD EVF 调整亮度和色彩级别 LCD EVF 子菜单上的所有项目均和 TAPE RECORDING MENU 的 LCD EVF 子 菜单中的各项相同 6 INITIAL 初始设置子菜单 AV JACK AV 插孔 48 REMOTE 遥控器模式 8 BEEP SOUND 嘟嘟声 42 CLOCK SET 日期和时间设置 15 INITIAL SET 初始设置模式 41 ª PICTURE PLAYBACK MENU 仅 NV GS15 型 图像回放模式 1 DELETE 删除文件子菜单 FILE BY SEL 选择并删除一个文件 33 AL...

Страница 15: ...用 24 小时制 内部锂电池充电 内部锂电池维持时钟的运转 当 0 指示闪烁 时 表示内部锂电池的电能将耗尽 20 SELECT SETUP MENU EXIT 1YEAR 2004 MONTH 10 DAY 8 HOUR 14 MIN 30 CLOCK SET 1 在将电源关闭的情况下 将 AC 适配器连接到摄 像机 然后再连接到 AC 电源插座 充电 4 小时后 内置锂电池可为时钟供电约 3 个月 LP 模式 利用 RECORDING 子菜单上的 REC SPEED 可以选择所需的录制速度 如果选择 LP 模式 则摄录时间将比 SP 模式长 1 5 倍 虽然使用 LP 模式录制时影像质量不会下降 但回 放时会出现马赛克干扰 或者某些正常功能受到 限制 用LP模式录制的内容与其它设备不能完全兼容 用 LP 模式不能进行配音 35 音频录制模式 使用 RECORDING 子菜单上的 AUD...

Страница 16: ... ª 自拍 打开 LCD 监视器并将其向前转 向镜头一侧 可以在拍摄时使摄像机监视器前的对象成为拍摄 目标 当打开 LCD 监视器时 取景器自动停用 然而 当 LCD 监视器转向前面时 还可以在取景器中 显示影像 如果您喜欢在 LCD 监视器中取景 就好像是在镜 子里看影像一样 请将 LCD EVF 子菜单上的 SELF REC 设置为 MIRROR 这样 影像就 被正常录制 不会出现左右互换 AUTO MANUAL FOCUS 21 录制到磁带 1 将 OFF ON 开关 43 设置为 ON POWER 指示灯 40 亮起 2 将模式旋钮 39 设置为磁带录制模式 3 按拍摄开始 停止按钮 42 录制开始 在显示 RECORD 后 它将变为 REC 4 再次按拍摄开始 停止按钮 42 暂停拍摄 显示 PAUSE 指示 运动 静止同步录制模式 的录制 仅 NV GS15 型 即使模式旋钮调...

Страница 17: ...卡录制 模式 无论使用什么功能 要激活渐进功能 当同时录制磁带和卡时 渐进功能不能激活 录制静态图像到磁带上 拍照 仅 NV GS11 型 可以通过摄像机镜头录制静态图像 1 在拍摄暂停模式中 按 PHOTO SHOT 按钮 36 20 15 PHOTO SHOT 36 摄像机拍摄了大约 7 秒钟的静态图像 然后切 换回拍摄暂停模式 如果将 CAMERA 子菜单上的 SHTR EFFECT 设置为 ON 便可以添加如同松开快门时的影 像和声音 拍照录制的影像质量会稍差一些 ª 连续拍照 如果将 CAMERA 子菜单上的 SHTR EFFECT 设置为 ON 并且按住 PHOTO SHOT 按钮 摄像机将以 0 7 秒为间隔连续拍照静态图像 直 到松开按钮 屏幕闪烁 同时录下快门的咔嗒声 录制静态图像到卡上 拍照 仅 NV GS15 型 可以从摄像机将静态图像录制到记忆卡上 1 设置模式旋钮...

Страница 18: ...CTURE QUALITY FINE NORMAL ECONOMY 16 MB 100 200 400 32 MB 220 440 880 64 MB 440 880 1760 128 MB 880 1760 3520 256 MB 1760 3520 7040 512 MB 3520 7040 14080 20 PHOTO SHOT 36 LIGHT 13 2 按 LIGHT 按钮 13 2 将增亮模式设置为关闭 使用此模式可消除鬼影 3 按 LIGHT 按钮 13 3 LED 摄影灯关闭 再次按 LIGHT 按钮返回到 1 有关此项目的其它注释 请参阅 42 快速启动 按 QUICK START 按钮 41 摄像机将在接通电 源后约 1 3 秒内即做好拍摄准备 1 按 QUICK START 按钮 41 快速启动拍摄灯 41 将亮起 2 将 OFF ON 开关 43 设置为 OFF 快...

Страница 19: ...为 1k 时 摄像机可以聚焦于距镜 头约 20 毫米的物体 用这个功能可以拍摄昆虫等 小目标 20 PHOTO SHOT 36 W T VOL JOG 37 1tW 5tW 24tW T T T ª 使用变焦麦克风功能 使用变焦操作时 麦克风的方向角度和灵敏度随 着所录声音而变化 设置 TAPE RECORDING MENU RECORDING ZOOM MIC ON 此时会出现 Z MIC 指示 有关此项目的其它注释 请参阅 43 数码变焦功能 当要对处于 1k 到 24k 放大率的正常变焦范围之 外的目标进行特写镜头拍摄时 可使用此功能 使用数码变焦功能 可以选择 60k 到 800k 的放 大率 1 设置 TAPE RECORDING MENU CAMERA D ZOOM 60k 或 800k 60k 数码变焦到 60k 800k 数码变焦到 800k 2 将 W T 杆 37 推向...

Страница 20: ...目的其它注释 请参阅 43 淡入 淡出功能 淡入 采用淡入功能 在一幕场景开始时 在黑屏幕上 可逐渐显现影像并放出声音 1 在拍摄暂停模式中 按住 FADE 按钮 18 影像渐渐淡出 20 PHOTO SHOT 36 42 18 2 在影像完全消失后 按拍摄开始 停止按钮 42 开始拍摄 3 在开始录制后约3 秒钟 松开 FADE 按钮 18 影像再次渐渐显现 淡出 采用淡出功能 可使影像和声音逐渐消失 最终 在一幕场景的末尾显现一个黑屏幕 1 录制过程中 按住 FADE 按钮 18 影像渐渐淡出 2 在影像完全消失后 按拍摄开始 停止按钮 42 停止拍摄 3 松开 FADE 按钮 18 静态图像不能淡入或淡出 逆光补偿功能 此功能用于防止目标在逆光环境中拍摄的过于黑 暗 逆光是指从拍摄目标背后照过来的光线 1 按 BACK LIGHT 按钮 12 ª 指示闪烁 然后保持显示 42 18 ...

Страница 21: ...T SKIN 按钮 8 此时会出现 指示 为获得最佳效果 建议拍摄半身像 以便拍摄对 象胸部以上全部进入屏幕 取消肌肤柔和功能 按 SOFT SKIN 按钮 ª 7 C NIGHT VIEW 8 SOFT SKIN SOFT SKIN 消除风干扰功能 此功能可以消除摄录过程中风吹在麦克风上所造 成的杂音 1 设置 TAPE RECORDING MENU RECORDING WIND CUT ON 此时会出现 WIND CUT 指示 取消消除风干扰功能 设置 TAPE RECORDING MENU RECORDING WIND CUT OFF 有关此项目的其它注释 请参阅 43 电影功能 此功能用于以类似电影屏幕的样式拍摄影像 1 设置 TAPE RECORDING MENU RECORDING CINEMA ON 在屏幕的上方和下方出现黑色遮幅 取消电影模式 设置 TAPE RECORDI...

Страница 22: ...置 为 AUTO 有关此项目的其它注释 请参阅 43 AUTO MANUAL FOCUS 21 20 1 3 2 4 5 自然色彩拍摄 白平衡 由于场景或光线条件所限 自动白平衡调节模式 可能无法实现自然色彩 在这种情况下 可以手 动调节白平衡 如果在镜头盖未取下的情况下打开摄像机 可能 无法正常使用自动白平衡调节功能 请在取下镜 头盖之后再打开摄像机 1 将 AUTO MANUAL FOCUS 开关 21 设置为 MANUAL 此时会出现 MNL 指示 2 按 ENTER 按钮 17 此时会出现 AWB 指示 3 按 5 按钮 16 或 6 按钮 19 选择所需的 白平衡模式 1 自动白平衡调节 AWB 2 先前手动设置的白平衡设置 1 3 户外模式 z 4 室内模式 在白炽灯下拍摄 恢复自动调节 按 5 按钮 16 或 6 按钮 19 直到 AWB 指示出现 或将 AUTO MANUA...

Страница 23: ...勿用手遮挡白平衡传感器 因为白平衡 将不能正常工作 AUTO MANUAL FOCUS 21 19 17 16 MNL 1 31 在超出自动白平衡调节的有效范围时 影像将显 得偏红或偏蓝 即使在自动白平衡调节的有效范 围内 如果有一个以上光源 自动白平衡调节也 可能无法正常工作 在这种情况下 请调节白平 衡 1 此摄像机的自动白平衡调节的有效范围 2 蓝天 3 阴天 下雨 4 电视机屏幕 5 太阳光 6 白色荧光灯 7 日出后 2 小时或日落前 2 小时 8 日出后 1 小时或日落前 1 小时 9 卤光灯 10 白炽灯 11 日出或日落 12 烛光 有关此项目的其它注释 请参阅 43 手动快门速度调节 此功能在拍摄快速移动物体时很有用 1 将 AUTO MANUAL FOCUS 开关 21 设置为 MANUAL 此时会出现 MNL 指示 2 3 4 5 6 7 8 9 10 11 12 1...

Страница 24: ...6 AUTO MANUAL FOCUS 21 MNL 1 50 F2 4 19 17 16 3 按 5 按钮 16 或 6 按钮 19 调节光圈 光圈调节的范围 CLOSE 关闭 F16 F2 0 OP 打开 i0dB OPi18dB 选择的数值越接近 CLOSE 影像将变得越暗 选择的数值越接近 OPi18dB 影像将变得越 亮 idB 前的数值表示增亮值 如果此数值太大 影 像质量会下降 恢复自动调节 将 AUTO MANUAL FOCUS 开关设置为 AUTO 有关此项目的其它注释 请参阅 44 手动焦距调节 在自动调焦不能正常工作的情况下 可以手动调 节焦距 1 将 AUTO MANUAL FOCUS 开关 21 设置为 MANUAL 此时会出现 MNL 指示 2 滑动 AUTO MANUAL FOCUS 开关 21 到 FOCUS 此时会出现 1MF 指示 手动调焦模式 3 按 ...

Страница 25: ...ULTI 2 P IN P 10 SLIM 11 NEGA 12 SEPIA 13 B W 14 SOLARI 选择所需的数码特效 设置 TAPE RECORDING MENU DIGITAL EFFECT1 或 EFFECT2 所需的数码特效 取消数码特效 设置 TAPE RECORDING MENU DIGITAL EFFECT1 或 EFFECT2 OFF 如果关闭摄像机 则取消 EFFECT2 设置 有关此项目的其它注释 请参阅 44 ª 多画面模式 频闪多画面模式 可以捕捉和拍摄 9 幅小的连续静态图像 手动多画面模式 可以手动捕捉和拍摄 9 幅小的静态图像 1 设置 TAPE RECORDING MENU DIGITAL EFFECT1 MULTI 2 设置 TAPE RECORDING MENU DIGITAL MULTI MODE STROBE 或 MANUAL 3 按 M...

Страница 26: ...小的静态 图像 有关此项目的其它注释 请参阅 44 ª 擦去模式和混合模式 擦去模式 象拉窗帘一样 上次摄录场景的静态图像逐渐变 为新场景的动态影像 混合模式 当新场景中的动态影像渐现时 上次摄录场景的 静态影像渐隐 1 设置 TAPE RECORDING MENU DIGITAL EFFECT1 WIPE 或 MIX 此时出现 WIPE 或 MIX 指示 20 MULTI P IN P 10 WIPE WIPE WIPE MIX MIX MIX 20 2 按拍摄开始 停止按钮 42 开始拍摄 3 按拍摄开始 停止按钮 42 暂停拍摄 最后一个场景保存在存储器中 WIPE 或 MIX 指示变为 B 或 C 4 按拍摄开始 停止按钮 42 重新开始拍摄 上一场景的最后影像逐渐变为新场景 有关此项目的其它注释 请参阅 44 42 ...

Страница 27: ...V GS15 19 17 18 ª 调节音量 要调节音量时 请推动 W T 杆 37 来显示 VOLUME 指示 请向 T 推动 W T 杆可增大音 量 或向 W 推动 W T 杆可减小音量 调节结 束后 VOLUME 指示消失 要使用遥控器调节音量 请按 T 或 W 按钮来显 示 VOLUME 指示 按 T 按钮可增大音量 或 按 W 按钮可减小音量 调节结束后 VOLUME 指示消失 在回放变焦模式下 不能使用遥控器调节音量 29 有关此项目的其它注释 请参阅 44 查找要回放的场景 ª 快进搜索 倒带搜索回放 如果在回放中按 5 按钮 16 或 6 按钮 19 将变为快进搜索回放 A 或倒带搜索回放 B 如果按住此按钮不放 则变为快进搜索回放或倒 带搜索回放 直到松开为止 ª 变速搜索功能 可以改变快进搜索回放或倒带搜索回放的速度 1 回放过程中 按 1 按钮 17 会出现 1k 指...

Страница 28: ...EX SELECT STOP K L V REW STILL ADV W s PLAY PAUSE FF W STILL ADV 6 1 5 E D P B ZOOM 73 58 58 静态回放 静态前进回放 摄像机可以进行静态图像回放和逐帧向前回放 1 按 1 按钮 73 2 按 按钮 70 在静态回放模式下停止回放影像 3 按遥控器上的 E 按钮或 D 按钮 58 每按一次 E 按钮 静态图像向后退方向行 进 每按一次 D 按钮 静态图像向前进方向 行进 如果连续按其中任一按钮 静态图像将 连续地每次行进 1 帧 直到松开此按钮 恢复正常回放 按 1 按钮 73 ª 用变焦杆回放 在静态回放模式中 推动摄像机的 W T 杆 37 可以使静态图像每次向前或向后行进一帧 如果持续推动杆 静态图像会连续不断地前进 如果摄像机被留置在静态回放模式下的时间超过 6 分钟 摄像机将切换到停止模式 ...

Страница 29: ...多可以选择 9 个场景号 INDEX 20 INDEX INDEX SELECT STOP K L V REW STILL ADV W s V PLAY PAUSE FF W STILL ADV 6 1 5 E D P B ZOOM 59 59 S 1 连续索引搜索 如果按 9 按钮或 按钮 59 2 秒或更长 时间 则搜索连续进行 相邻搜索间间隔数秒 要取消连续索引搜索 请按 1 按钮 73 或 按钮 71 有关此项目的其它注释 请参阅 44 回放变焦功能 在回放中 影像的一部分最大可放大 10 倍 1 回放时 按遥控器上的 P B ZOOM 按钮 75 影像的中心部分可放大约 2 倍 更改变焦放大率 2 按遥控器上的 W 按钮或 T 按钮 63 更改放大 比例 更改影像的放大区域 3 按遥控器上指向要放大区域的箭头按钮 π 57 取消回放变焦功能 按遥控器上的 P B ZOOM 按钮 ...

Страница 30: ...X S C STOP K L V REW STILL ADV W s V PLAY PAUSE FF W STILL ADV 6 1 5 E D P B ZOOM 73 SELECT STORE OFF ON P B DIGITAL ENTER VAR SEARCH MENU 60 62 INDEX INDEX S C STOP K L V REW STILL ADV W s V PLAY PAUSE FF W STILL ADV 6 1 5 E D P B ZOOM 73 SELECT STORE K L OFF ON P B DIGITAL ENTER VAR SEARCH MENU 60 61 62 正在使用擦去或混合特效时 如果按 OFF ON 按钮 62 特效将在此时暂停 再次按 OFF ON 按钮 62 可恢复此特效 有关此项目的其它注释 请参阅 44 回放卡 仅 NV GS1...

Страница 31: ...题 仅 NV GS15 型 可以在卡上创建标题和记录 1 录制模式 将模式旋钮 39 设置为磁带录制模式或卡录制 模式 将镜头对准用于创建标题的影像 1 磁带回放模式 搜索用于创建标题的影像 并将摄像机设置为 静态回放模式 2 设置 CARD CREATE TITLE YES 3 按 PHOTO SHOT 按钮 36 标题被存储 要再次拍照 请选择 RETURN 4 选择 LUMINANCE 并按 ENTER 按钮 17 然 后按 5 按钮 16 或 6 按钮 19 调整标 题的对比度 然后按 ENTER 按钮 17 5 按 5 按钮 16 或 6 按钮 19 调整颜色 然 后按 ENTER 按钮 17 此时不显示影像的黑暗部分 1 而明亮部分的 色彩以黑 蓝 绿 青 红 洋红 黄和白色 的顺序变化 此后 不显示影像的明亮部分 2 黑暗部分的色彩以上述顺序变化 6 选择 RECORDING...

Страница 32: ...7 有关此项目的其它注释 请参阅 44 20 MULTI P IN P 10 1 USR00002 TTL 将打印数据写入卡中 仅 NV GS15 型 DPOF 设置 可以将要打印的影像数量等 DPOF 设置打印数据 DPOF 设置 写入卡中 DPOF 表示数码打印 指令格式 1 将模式旋钮 39 设置为图像回放模式 2 设置 PICTURE PLAYBACK MENU EDITING DPOF SET YES VARIABLE 不打印全部影像时 请选择 ALL 0 3 选择所需的图像 然后按 ENTER 按钮 17 所选图像标有图框 显示 DPOF1 设置的打印数量 4 按 5 按钮 16 或 6 按钮 19 选择要打印的 图像号 然后按 ENTER 按钮 17 指示 2 显示在图像设置上 40 5 重复步骤 3 和 4 完成设置后按 MENU 按钮 20 检验 DPOF 设置 在步骤 ...

Страница 33: ...或多个文件 请重复此步骤 3 按 PHOTO SHOT 按钮 36 出现确认信息 20 FILE LOCK ENTER MENU EXIT 640 640 640 640 640 640 1 20 PHOTO SHOT 36 4 选择 YES 并按 ENTER 按钮 17 所选文件即从卡上删除 如果选择 NO 则取消文件选择 选择并删除全部文件 1 设置 PICTURE PLAYBACK MENU DELETE ALL FILES YES 出现确认信息 2 选择 YES 并按 ENTER 按钮 17 这样将删除图像回放模式的全部文件 不能删除已锁定的文件 如果卡片上有许多文件 删除时可能需要几分 钟 格式化卡 仅 NV GS15 型 如果摄像机不能读取卡中数据 可将其格式化重 新使用 格式化将删除卡中录制的全部数据 1 设置 PICTURE PLAYBACK MENU EDITING CA...

Страница 34: ...连接到电视机的视 频和音频输入插孔中 使用 AV 电缆 1 与电视机相连 如果电视机 有 S Video 插孔 请同时连接 S Video 电缆 2 将 AV 电缆的针式插头插入 AV IN OUT 插孔 时 需尽量将其插到底 使指示出现在电视屏幕上 按遥控器上的 OSD 按钮 52 有关此项目的其它注释 请参阅 45 1 2 VIDEO IN AUDIO IN S VIDEO IN AV IN OUT MIC PHONES REMOTE ZOOM OSD DISPLAY DATE TIME RESET TITLE PHOTO SHOT START STOP 52 ...

Страница 35: ...不能使用配音 15 1 设置 TAPE PLAYBACK MENU AV IN OUT AV JACK IN OUT 2 继续上述的设置 选择 A DUB INPUT MIC 或 AV IN 使用外部设备时 设置为 AV IN 使用外部 或内置麦克风时 设置为 MIC 3 在需要添加新声音的地方 按遥控器上的 按 钮 70 4 按遥控器上的 A DUB 按钮 56 5 要开始配音 按遥控器上的 按钮 70 取消配音 按遥控器上的 按钮 70 摄像机再次回到静态回放模式 回放 12 位配音录制的声音 设置 TAPE PLAYBACK MENU PLAYBACK 12bit AUDIO ST2 或 MIX ST1 只回放原始声音 ST2 只回放配音 MIX 同时回放原始声音和配音 在听取预先录制的声音时配音 暂停配音后 将 PLAYBACK 子菜单上的 12bit AUDIO 设置为 ST2 ...

Страница 36: ...PHONES REMOTE 录制其它设备的内容 将摄像机与其它设备如插图所示连接 然后执行 以下步骤 1AV 电缆 2S Video 电缆 不随附 摄像机 1 设置 TAPE PLAYBACK MENU AV IN OUT AV JACK IN OUT 2 插入一个未录制的磁带 其它设备 3 插入一个已经录制的磁带 开始回放 摄像机 4 按 REC 按钮的同时 55 按 1 按钮 73 或者按 REC 按钮 6 时 按摄像机上的 BACK LIGHT 按钮 12 当在卡上录制时 按 PHOTO SHOT 按钮 仅 NV GS15 型 5 按 按钮 70 或 按钮 71 停止录制 其它设备 6 按停止按钮 停止回放 有关此项目的其它注释 请参阅 45 1 2 AV IN OUT S VIDEO OUT VIDEO OUT AUDIO OUT MIC PHONES REMOTE 20 INDE...

Страница 37: ...进行复制 播放机 录像机 1 插入磁带并设置为磁带回放模式 播放机 2 按 1 按钮 73 开始回放 录像机 3 按 REC 按钮的同时 55 按遥控器上的 1 按钮 73 或按 REC 按钮 6 的同时 按 BACK LIGHT 按钮 12 录制开始 停止复制 按 按钮 70 或 按钮 71 有关此项目的其它注释 请参阅 45 1 INDEX INDEX STOP K L V REW STILL ADV T W s VOL r REC MULTI P IN P A DUB PLAY PAUSE FF W STILL ADV 6 1 5 E D P B ZOOM 55 73 70 71 ...

Страница 38: ...置 CAMERA 或 PLAYBACK USB FUNCTION WEB CAMERA 与 DV STUDIO 共同使用时 设置 CAMERA 或 PLAYBACK USB FUNCTION DV STUDIO 进入 WEB CAMERA Mode 网络相机模式 或 DV STUDIO Mode 数码摄像机演播室模式 4 将随附的 USB 电缆连接到 插孔 28 5 启动 Windows Messenger 或 DV STUDIO DV STUDIO MODE 可用于 Windows98 Second Edition Me XP 网络相机模式不能和 Windows XP 一起使用 用作网络相机时 不能录制到磁带或卡上 也不 能显示标题 有关操作环境 安装 连接和步骤的详细信息 请参阅 USB 连接工具的使用说明 在个人计算机上使用卡 仅 NV GS15 型 使用用本摄像机录制在卡上的数据时...

Страница 39: ...SR00001 jpg USR00001 ttl 等 的数据 DCIM IM01CDPF PRIVATE VTF 等是 文件夹结构中的必需项目 它们与实际操作无 关 在卡录制模式下 摄像机会自动将文件号 IMGA0001 JPG 等 随影像一起保存 文件号 随每个影像一起录制时 其号码是连续的 使用没有指示功能的软件时 将不显示日期等指 示数据 根据所用的软件不同 可能不会正确显 示日期和时间 SD 记忆卡标签上标出了其存储容量 该容量相 当于保护和管理版权所需容量和作为摄像机 个 人计算机或其它设备的一个常规内存的可用容量 的总量 可用作常规内存的容量 8 MB 卡 约 6 800 000 字节 MISC PRIVATE VTF 100CDPFP TITLE DCIM IM01CDPF MISC TITLE 100CDPFP DCIM ...

Страница 40: ...程序自动曝光 22 º 海滩及雪地模式 程序自动曝光 22 REC 录制 16 PAUSE 暂停录制 16 自拍器拍摄 19 回放 27 静态回放 28 PC 快进 快进搜索回放 27 倒带 倒带搜索回放 27 慢动作回放 28 静态前进回放 28 索引搜索 28 CHK 拍摄检查 16 A DUB 配音 35 A DUB 暂停配音 35 BLANK 空白搜索 17 R 重复回放 44 2k 变速搜索 27 1 500 手动调节快门速度时 出现此指 示 24 SLIDE 幻灯播放 31 SLIDE 暂停幻灯播放 31 F2 4 手动调节 F 值时 出现此指示 24 AWB 自动白平衡模式 22 1 白平衡调节模式 22 z 户外模式 22 室内模式 在白炽灯下拍摄 22 C NIGHT VIEW 彩色夜视功能 21 Z MIC 变焦麦克风 19 WIND CUT 消除风干扰 21 æ 渐进...

Страница 41: ...SAVE 时 试 图在磁带上录制图像 当意外删除保护滑块设置到 SAVE 时 试 图在磁带上进行配音或数码复制 未插入磁带 10 6 LOW BATTERY 电池电量太低 请重新充电 8 0 内置电池电量太低 15 NEED HEAD CLEANING 摄像头有污垢 46 2END TAPE END 录制中磁带已到头 REMOTE CHECK REMOTE MODE 选择了错误的遥控器模式 7 UNPLAYABLE TAPE OTHER FORMAT 试图回放采用不同电视制式录制的磁带 UNABLE TO A DUB LP RECORDED 由于原始内容以 LP 模式录制 所以不能进 行配音 INCOMPATIBLE TAPE 此磁带不兼容 PUSH THE RESET SWITCH 检测到装置中有问题 按 RESET 按钮 5 49 这样可解决问题 CARD FULL 卡中存储容量不足 ...

Страница 42: ...钮后 可能会再拍摄一 个静态图像 无法同时使用连续拍照和标题功能 将 SELF TIMER 设置为 ON 时 本机将根据 BURST MODE 设置 摄录最大可录数量的图 像 当使用由其它设备格式化的卡时 录制图像的时 间间隔会变大 如果多次重复录制或删除图像 录制图像的时间 间隔会变大 在这种情况下 请在个人计算机上 备份您的重要数据 然后在本摄像机上格式化您 的卡 根据卡片不同 拍摄画面的间隔可能会变大 我 们建议您使用 Panasonic SD 记忆卡 ª 使用内置 LED 摄影灯拍摄 物体应距摄像机 1 5 米之内 使用 LED 摄影灯会缩短电池时间 当不使用时 请将 LED 摄影灯关闭 要避免直接向摄影灯里看 如果 LED 摄影灯和安装的转换镜头一起使用 在 屏幕上会出现轻微的晕影效果 在边缘周围有暗 影 同时使用夜视功能可以使环境更加明亮 LED 摄影灯只是用来照亮在暗光区内被...

Страница 43: ... 电影功能 使用电影模式并不会加宽摄录角度 如果在宽屏 16 9 格式的电视机上回放用电影模 式录制的磁带 会自动调整回放影像的大小 以 适应电视机的屏幕格式 有关详细信息 请参考 电视机的使用说明书 在电视机屏幕中显示这些影像时 某些情况下将 不显示日期 时间指示 根据电视机的不同 图像质量可能会有所下降 显示标题时 将取消电影模式 无法同时使用电影模式和标题创建 使用电影模式时不能使用 EFFECT1 的 MULTI 和 P IN P 根据所用的软件 导入的电影图像可能不会正确 显示 ª 程序自动曝光 如果选择了任何一种程序自动曝光模式 则无法 调节快门速度 23 或光圈 24 使用夜视功能取消任何一种程序自动曝光模式 使用闪光功能 将会取消任何程序 AE 方式 运动模式 在常规回放过程中 影像的运动看上去可能 不是很流畅 因为回放影像的色彩和亮度会变化 所以请 避免在荧光灯 汞灯或钠...

Страница 44: ...PLAYBACK 子菜单上的 AUDIO OUT 设 置 可以选择声音 STEREO 立体声 主声和次声 L 左声道声音 主声 R 右声道声音 次声 在为以 12bit 在 RECORDING 子菜单上的 AUDIO REC 选择 录制的磁带配音时 如果 将 12bit AUDIO 设置为 MIX 其回放声音则 变成立体声 无论 AUDIO OUT 设置是什么 ª 索引搜索功能 在磁带开头可能无法进行索引搜索 如果 2 个场景索引信号之间的时间间隔短于 1 分 钟 场景索引搜索可能不会正常进行 ª 回放变焦功能 在回放变焦模式下不能用遥控器调节音量 如果关闭摄像机电源 或者操作模式旋钮 则自 动取消回放变焦模式 即使使用了回放变焦功能 从 DV 端子 5 输出 的影像也不会被放大 放大影像时 影像质量会下降 在回放变焦过程中 不能用遥控器更改变速搜索 功能 ª 回放数码特效功能 回放过程中...

Страница 45: ...音的数据导入 PC 时 根据软件可能只能导入原始声音 ST1 ª 录制其它设备的内容 录制到卡上 仅 NV GS15 型 如果将模式旋钮设置为卡录制模式 就可以对外 部输入信号使用拍照功能 影像的 4 个边缘可能会出现黑色条纹 模数转换 摄像机与其它数码影像设备通过DV端子连接时 可通过 DV 端子将其它外部设备以模拟形式录制 的影像输出到数码影像设备 要从DV端子输出其它设备发送的模拟视频信号 请将 AV IN OUT 子菜单上的 DV OUT 设置为 ON 通常情况下请将 DV OUT 设置为 OFF 如果将其设置为 ON 可能会影响影像 的质量 ª 使用 DV 电缆进行录制 数码复制 无论设置如何 数码复制将自动进行 方式与回 放磁带的音频录制模式相同 录制监视器上的图像可能会受到干扰 但不影响 所录制的影像 即使已经使用了回放数码特效 回放变焦或回放 添加标题 这些效果也不会从 D...

Страница 46: ...T TAPE 信息 仅在插入了磁 带时 在此情况下 请按以下步骤执行 以黄色闪亮 有一点露水附着在磁头或磁带上 以红色闪亮 有露水附着在磁头或磁带上 1 如果插入了磁带 请取出 打开磁带盒架需要 20 秒钟 这并不是故障 2 在磁带盒盖关闭的情况下放置摄像机 使其冷 却或升温 直至达到环境温度 当 3DEW 以黄色闪亮时 不能使用磁带录制 回放模式 将摄像机放置大约 30 分钟 但当磁带未插入时 可以使用卡录制模式或 图像回放模式 当 3DEW 以红色闪亮时 电源灯闪亮约1分钟 然后摄像机自动关闭 将其放置大约 2 到 3 小时 3 再次打开摄像机 将它设置到磁带录制 回放模 式 然后检查水汽凝结指示是否消失 特别是在冷的地方 露水可能会冻结 在这种情 况下 水汽凝结指示消失前可能需要更多的时间 即使在显示水汽凝结指示之前也要注意观察水汽 凝结情况 根据情况 水汽凝结指示可能不会出现 当水...

Страница 47: ...每半年就将磁带快进到末尾 再倒至开头一 次 如果磁带 1 年或更长时间没有快进或倒带 则由于膨胀 收缩等原因 温度和湿度的变化可 能会造成磁带变形 损坏的磁带会自己粘在一 起 请勿将磁带放在高磁性物质或设备附近 磁带表面覆盖着一层极微细的磁性粒子 信号即 录制在这些粒子上 带磁性的项链 玩具等具有 超乎想象的磁力 它们可能会删除录制的内容 或对影像和声音造成干扰 卡 仅 NV GS15 型 正在读取卡时 请勿取出卡 关闭电源 或让它 受到震动或挤压 请勿将卡放在高温 阳光直射或容易产生电磁波 或静电的地方 切勿弯曲或掉落卡 否则会损坏卡或卡中录制的 内容 使用后 请确保将卡从摄像机中取出 使用后 请将随附的 SD记忆卡存放在密封袋中 请勿用手指触摸卡背面的端子 请勿让脏物 灰 尘或水进入卡 ª LCD 监视器 取景器 镜头遮光罩 LCD 监视器 在温度变化很大的地方 LCD 监视器上可能会...

Страница 48: ...得不准确 0 在慢动作回放模式下 时间码指示计数器可能 反向不是常数 但这并不是故障 2 磁带剩余时间指示与实际磁带剩余时间不一致 如果连续录制了不足 15 秒钟的场景 则不能正 确显示磁带剩余时间 在有些情况下 磁带剩余时间指示所显示的时 间比实际要短 2 至 3 分钟 回放 图像 1 即使按了 1 按钮也不能回放图像 0 模式旋钮是否设置到回放模式 如果没有 就 不能使用回放功能 27 2 在快进搜索 倒带搜索或慢动作回放过程中 影像上出现马赛克杂斑 这种现象是数码视频系统的固有特征 这并不 是故障 3 虽然摄像机已与电视机正确连接 但仍看不到 回放影像 在电视机上选择了 视频输入 吗 请阅读电 视机的使用说明书 然后选择与连接所用的输 入插孔相对应的频道 根据您的电视机类型 即使您已将摄像机直接 连接至电视机 也可能不会显示任何图像 在 此种情况下 请将 AV IN OUT 或 IN...

Страница 49: ...性 由于本机采用了数码系统来录制影像或声音数据 所以它不兼容使用模拟录制系统的常规 S VHS 或 VHS 设备 磁带的尺寸和形状也不同 与输出信号的兼容性 由于从 AV 信号输出插孔输出的 AV 信号是模拟信 号 与常规视频系统相同 所以 本机可与 S VHS VHS 视频或电视机连接来进行回放 ª 焦距 自动焦距调节 自动调焦系统通过前后移动摄像机中的调焦镜头 可将目标拉进焦距范围内 从而看到清晰的目标 但是 自动调焦系统不能正常用于以下拍摄目标 或摄录环境 此时请使用手动调焦模式来代替 1 拍摄一端距摄像机近而另一端距摄像机远的目 标时 由于自动调焦在影像的中心调整焦距 因而 无法对既有前景又有后景的目标准确对焦 2 摄录不干净或有灰尘的玻璃后的目标时 由于焦点在不干净的玻璃上 因而不能对玻 璃后的目标对焦 3 拍摄黑暗环境中的目标 由于透过镜头的光信号减少很多 因而摄像 机不能正确...

Страница 50: ...一个所需位置时 1 设置 DISPLAY C DISPLAY MEMORY 2 在稍后开始回放时的磁带位置 将磁带计数器 重新设置为零 6 13 3 开始回放或录制 4 回放或录制完成后 将摄像机设置为磁带回放模式 5 倒转磁带 磁带自动停在计数器设置为零的位置附近 配音过程中自动停止编辑 1 设置 DISPLAY C DISPLAY MEMORY 2 在要停止编辑的位置将磁带计数器重置为零 3 在要开始配音的位置回放静态图像 4 开始配音 35 配音会在计数器设置为零的位置自动停止 ...

Страница 51: ...75 ohm 音频输入电平 线路 316 mV 10 kohm 或更高 电源 DC 7 9 7 2 V 功耗 拍摄 2 6 W 使用取景器时 3 3 W 使用 LCD 监视器时 麦克风输入 麦克风灵敏度 50 dB 0 dB 1 V Pa 1 kHz 立体声 微型插孔 USB 卡读 写器功能 仅 NV GS15 型 USB 2 0 兼容 最大 12 Mbps 不支持版权保护 数码接口 DV 输入 输出端子 IEEE1394 4 针 尺寸 约 69 宽 k87 高 k112 长 mm 重量 约 410 g 不包括电池和 DV 磁带 约 490 g 包括 CGR D08R 和 DVM60 工作温度 0oC 40oC 工作湿度 10 80 卡记忆功能 录制介质 仅 NV GS15 型 MultiMediaCard 4 MB 8 MB 16 MB SD 记忆卡 8 MB 16 MB 32 MB 6...

Страница 52: ...决于拍摄目标 表中所示数字为近似值 SD 记忆卡 可选件 可录制静态图像的最大数量 PICTURE QUALITY FINE NORMAL ECONOMY 8 MB 45 95 190 16 MB 100 200 400 32 MB 220 440 880 64 MB 440 880 1760 128 MB 880 1760 3520 256 MB 1760 3520 7040 512 MB 3520 7040 14080 ...

Страница 53: ... AC Adaptor The rating plate is on the underside of the AC Adaptor Carefully observe copyright laws Recording of pre recorded tapes or discs or other published or broadcast material for purposes other than your own private use may infringe copyright laws Even for the purpose of private use recording of certain material may be restricted The Movie Camera uses copyright protected technologies and is...

Страница 54: ...9 Audio Recording Mode 69 Recording Mode About Recording 70 Recording on a Tape 70 Recording a Still Picture on a Tape Photoshot NV GS11 only 71 Recording a Still Picture on a Card Photoshot NV GS15 only 72 Recording with the Built in LED Video Light 72 Quick Start 73 Self timer Recording 73 Zoom In Out Functions 73 Digital Zoom Function 74 Image Stabilizer Function 74 Fade In Out Functions 74 Bac...

Страница 55: ...g a Card NV GS15 only 89 Playing Back on Your TV 90 Editing Mode Recording from a Tape onto a Card NV GS15 only 91 Recording Pictures from a Card onto a Tape NV GS15 only 91 Audio Dubbing 91 Copying on an S VHS or a VHS Cassette 92 Recording the Contents of Other Equipment 92 Using the DV Cable for Recording 93 With a PC Importing still pictures onto a PC NV GS15 only 94 Using as a Web Camera or w...

Страница 56: ...Adaptor VW AD9E B 2 Battery Pack Lithium CGR D08S 800mAh 3 Battery Pack Lithium CGR D16S 1600mAh 4 Battery Pack Lithium CGP D28S 2800mAh 5 Car Battery Charger VW KBD2E 6 Wide Conversion Lens VW LW2707N2E 7 Tele Conversion Lens VW LT2714N2E 8 ND Filter VW LND27E 9 MC Protector VW LMC27E 10 Stereo Microphone VW VMS2E 11 Video DC Light VW LDC10E 1 3 7 6 9 8 4 5 2 12 Light Bulb for Video DC Light VZ L...

Страница 57: ...3 21 15 16 17 18 19 6 8 Soft Skin Button SOFT SKIN 76 9 Reset Button RESET 98 109 10 Multi Button MULTI 80 86 Picture in Picture Button P IN P 81 11 Speaker 82 12 Backlight Button BACK LIGHT 75 13 Light Button LIGHT 72 14 Card Access Lamp NV GS15 only 63 15 Pause Button 83 Still Button STILL 71 16 Fast Forward Cue Button 5 82 86 17 Play Button 1 82 86 Enter Button ENTER 65 18 Stop Button 82 86 Fad...

Страница 58: ...Start Stop Button 70 43 Power Switch OFF ON 64 70 103 Due to limitations in LCD production technology there may be some tiny bright or dark spots on the Viewfinder screen However this is not a malfunction and does not affect the recorded picture 39 40 41 42 43 34 35 36 37 38 NV GS15 NV GS11 44 44 DC Input Socket DC C C IN 60 45 Shoulder Strap Holders 62 46 Grip Belt 62 47 Battery Holder 48 S Video...

Страница 59: ...N P B DIGITAL DATE TIME RESET TITLE T W s VOL r REC MULTI P IN P PHOTO SHOT START STOP A DUB PLAY PAUSE FF W STILL ADV ENTER 6 1 5 E D VAR SEARCH MENU P B ZOOM 66 67 72 75 76 73 74 68 69 70 71 ª Free Style Remote Controller This controller allows the scene to be shot from various angles high to low and is also convenient when the Tripod is used When the controller is not in use attach the clip to ...

Страница 60: ... batteries according to manufacturer s instructions WARNING Risk of fire explosion and burns Do not recharge disassemble heat above 100xC or incinerate Keep the Button Type battery out of the reach of children Never put Button Type battery in mouth If swallowed call your doctor 15 15 15 15 31 Setup on the Remote Controller VCR1 Press the D Button and Button simultaneously 1 VCR2 Press the E Button...

Страница 61: ... sure to start the car engine before you connect the Car Adaptor Cord otherwise the fuse may blow For other notes concerning this item see 98 Charging Time and Available Recording Time A Charging Time B Maximum Continuous Recording Time C Intermittent Recording Time Intermittent Recording Time is the available recording time with repeated recording and stopping actions 1h10min indicates 1 hour and...

Страница 62: ...Lens Cap pull the Lens Cap Cord in the direction of the arrow 1 When you are not recording be sure to cover the Lens with the Lens Cap for protection 2 When you remove the Lens Cap press the knobs firmly Attaching the Shoulder Strap We recommend that you attach the Shoulder Strap before going out of doors to record so as to avoid dropping the Movie Camera 1 Pull the end of the Shoulder Strap throu...

Страница 63: ...e sure to turn off the Movie Camera Otherwise the Movie Camera may not function properly or it may cause the loss of recorded data in a Card ª Inserting a Card 1 Slide the OPEN Lever 3 to open the Card Slot Cover 5 2 While holding the Memory Card with its cut corner facing right 1 insert it into the Card Slot 4 3 Close the Card Slot Cover 5 securely Removing the Card Open the Card Slot Cover and p...

Страница 64: ... you want to connect the Movie Camera to your Personal Computer 43 40 1 43 1 39 NV GS15 NV GS11 PC Using the Viewfinder LCD Monitor ª Using the Viewfinder Before using the Viewfinder adjust the field of view so that the displays inside the Viewfinder become clear and easy to read 1 Pull the Viewfinder 2 Adjust by turning the Eyepiece Corrector Knob 35 To Use the Viewfinder at the Same Time as the ...

Страница 65: ...NU EXIT LCD EVF SETUP Using the Menu Screen To facilitate the selection of a desired function or setup this Movie Camera displays various function setups on Menus When operating the menu with the Viewfinder set LCD EVF EVF ON AUTO ON or rotate the LCD monitor by 180o 1 Press the MENU Button 20 The Menu corresponding to the Mode selected by using the Mode Dial 39 is displayed 2 Press the Button to ...

Страница 66: ...TION PROG AE SELECT NEXT MENU EXIT TAPE RECORDING MENU DIGITAL DISPLAY LCD EVF INITIAL RECORDING CAMERA SIS D ZOOM SELF TIMER SHTR EFFECT USB FUNCTION PROG AE SELECT NEXT MENU EXIT NV GS15 NV GS11 USB FUNCTION USB Functions Mode 94 If you press 6 Button the menu changes back to the previous screen 2 DIGITAL Digital Setup Sub Menu EFFECT1 Digital Effects 1 79 EFFECT2 Digital Effects 2 80 MULTI MODE...

Страница 67: ... 12bit AUDIO AUDIO OUT SEARCH SELECT NEXT 1 MENU EXIT USB FUNCTION TAPE PLAYBACK MENU AV IN OUT DIGITAL RECORDING DISPLAY LCD EVF INITIAL PLAYBACK 12bit AUDIO AUDIO OUT SEARCH SELECT NEXT MENU EXIT USB FUNCTION NV GS15 NV GS11 A DUB INPUT Audio Dubbing Input 91 DV OUT Analog Digital Conversion Output 103 3 DIGITAL Playback Digital Setup Sub Menu EFFECT ON Digital Effect On Off 85 EFFECT SEL Digita...

Страница 68: ...LAYBACK MENU EDITING DISPLAY LCD EVF INITIAL DIGITAL DELETE ALL FILES TITLE BY SEL FILE BY SEL SELECT NEXT MENU EXIT TITLE BY SEL Selecting and Deleting a Title 89 2 EDITING Editing a File Sub Menu FILE LOCK Setting the Lock 89 DPOF SET Setting DPOF 88 CARD FORMAT Formatting a Card 89 3 DIGITAL Playback Digital Setup Sub Menu TITLE IN Adding a Title 87 4 DISPLAY Display Setup Sub Menu All of the i...

Страница 69: ...months LP Mode A desired recording speed can be selected with REC SPEED on the RECORDING Sub Menu If LP Mode is selected the recording time becomes 1 5 times longer than that of SP Mode Although the image quality does not decrease with the LP Mode recording mosaic pattern noise may appear on a playback image or some normal functions may be restricted The contents that are recorded in LP Mode are n...

Страница 70: ...he Movie Camera is connected to a personal computer with a USB Cable Standby mode is not available ª Recording Yourself By opening the LCD Monitor and rotating it frontward to the lens side you can let the subject in front of the Movie Camera monitor the shot while recording is in progress AUTO MANUAL FOCUS 21 When the LCD Monitor is opened the Viewfinder is disabled automatically However when the...

Страница 71: ...s the PHOTO SHOT Button 6 20 15 ª Progressive Photoshot When the æ Indication is displayed Progressive Photoshot Function works You can record still pictures as frame still pictures with higher quality by this function The Progressive Photoshot Function may not be activated depending on the function you use 97 NV GS15 only To record still pictures with higher quality we recommend setting to the Ca...

Страница 72: ...B 440 880 1760 128 MB 880 1760 3520 256 MB 1760 3520 7040 512 MB 3520 7040 14080 39 PHOTO SHOT 36 PICTURE 20 ª Continuous Photoshot The still pictures can be recorded on a Card at a regular intervals 1 Set CARD RECORDING MENU CARD BURST MODE ON The Indication appears 2 Press the PHOTO SHOT Button 36 When ON is selected the still pictures can be recorded in approximately 0 5 second intervals until ...

Страница 73: ... Recording Lamp is not lit For other notes concerning this item see 99 GAINUP 1 2 3 QUICK START 41 41 43 Self timer Recording When you set the self timer the recording starts automatically after 10 seconds 1 Set TAPE RECORDING MENU or CARD RECORDING MENU NV GS15 only CAMERA SELF TIMER ON The Indication appears 2 Press the PHOTO SHOT Button 36 The Indication flashes and the recording starts after 1...

Страница 74: ...ication from 60k up to 800k 1 Set TAPE RECORDING MENU CAMERA D ZOOM 60k or 800k 60k Digital zooming to 60k 800k Digital zooming to 800k 2 Push the W T Lever 37 towards W or towards T to zoom in or out Z MIC Z MIC 20 60tW T D ZOOM W T VOL JOG 37 To Cancel the Digital Zoom Function Set TAPE RECORDING MENU CAMERA D ZOOM OFF For other notes concerning this item see 100 Image Stabilizer Function If the...

Страница 75: ... the subject from being recorded too darkly when backlit Backlight is the light that shines from behind the subject being recorded 1 Press the BACK LIGHT Button 12 The ª Indication flashes and then is displayed The entire screen becomes brighter To Resume Normal Recording Press the BACK LIGHT Button For other notes concerning this item see 100 Night View Functions Colour Night View Function This f...

Страница 76: ...n 1 Set TAPE RECORDING MENU RECORDING CINEMA ON 8 SOFT SKIN SOFT SKIN 20 WIND CUT 20 Black bars appear at the top and bottom of the screen To Cancel the Cinema Mode Set TAPE RECORDING MENU RECORDING CINEMA OFF For other notes concerning this item see 100 Recording in Special Situations Programme AE You can select optimal automatic exposure under specific recording situations 1 Set the AUTO MANUAL ...

Страница 77: ...lly 1 3 Outdoor Mode z AUTO MANUAL FOCUS 21 19 17 16 1 1 1 1AWB 1 3 2 4 4 Indoor Mode recording under incandescent lamp To Resume Automatic Adjustment Press the 5 Button 16 or 6 Button 19 until the AWB Indication appears Or set the AUTO MANUAL FOCUS Switch to AUTO Adjusting White Balance Manually White Balance Adjustment recognizes the colour of light and adjusts so that white will appear pure whi...

Страница 78: ...ight bulb 11 Sunrise or sunset 12 Candlelight For other notes concerning this item see 101 31 2 3 4 5 6 7 8 9 10 11 12 10000K 9000K 8000K 7000K 6000K 5000K 4000K 3000K 2000K 1000K 1 Manual Shutter Speed Adjustment Useful for recording fast moving subjects 1 Set the AUTO MANUAL FOCUS Switch 21 to MANUAL The MNL Indication appears 2 Press the ENTER Button 17 until the Shutter Speed Indication appear...

Страница 79: ...ch 21 to MANUAL The MNL Indication appears 2 Slide the AUTO MANUAL FOCUS Switch 21 to FOCUS MNL 1 50 F2 4 19 17 16 AUTO MANUAL FOCUS 21 AUTO MANUAL FOCUS 21 The 1MF Indication Manual Focus Mode appears 3 Press the 5 Button 16 or 6 Button 19 to adjust the focus If you keep pressing the 5 Button or 6 Button the speed of adjusting becomes faster To Resume Automatic Adjustment Set the AUTO MANUAL FOCU...

Страница 80: ...d record 9 consecutive small still pictures Manual Multi Picture Mode You can manually capture and record 9 small still pictures 11 NEGA 12 SEPIA 13 B W 14 SOLARI 1 Set TAPE RECORDING MENU DIGITAL EFFECT1 MULTI 2 Set TAPE RECORDING MENU DIGITAL MULTI MODE STROBE or MANUAL 3 Press the MULTI Button 10 If MANUAL is selected press the MULTI Button at each scene you want to capture Deleting All the Cap...

Страница 81: ...ew scene Mix Mode While the moving image of a new scene fades in the still image of the last recorded scene gradually fades out 1 Set TAPE RECORDING MENU DIGITAL EFFECT1 WIPE or MIX The WIPE or MIX Indication appears 2 Press the Recording Start Stop Button 42 to start recording 3 Press the Recording Start Stop Button 42 to pause the recording MULTI P IN P 10 WIPE WIPE WIPE MIX MIX MIX 20 42 The la...

Страница 82: ...ush the W T Lever 37 to display the VOLUME Indication Push the W T Lever towards T to increase the volume or push the W T Lever towards W to decrease the volume The VOLUME Indication goes off after the adjustment is finished To adjust the volume with the Remote Controller press the T or W Button to display the VOLUME Indication Press the T Button to increase the volume or press the W Button to dec...

Страница 83: ...roximately 1 5th of the normal speed Scenes recorded in the LP Mode are played back at approximately 1 3rd of the normal speed To Resume Normal Playback Press the 1 Button 73 If the Movie Camera is left in the Slow Playback Mode for more than 12 minutes the Movie Camera switches to the Stop Mode to protect the video heads from excessive wear and tear Still Playback Still Advance Playback This Movi...

Страница 84: ...BACK MENU PLAYBACK SEARCH PHOTO 2 Press the 9 Button or Button 59 on the Remote Controller INDEX 20 INDEX INDEX SELECT STOP K L V REW STILL ADV W s V PLAY PAUSE FF W STILL ADV 6 1 5 E D P B ZOOM 59 59 With each press of the corresponding button still pictures recorded in Photoshot Mode are searched Sounds are played back for approximately 4 seconds ª Scene Index Search 1 Set TAPE PLAYBACK MENU PLA...

Страница 85: ...W s VOL r REC MULTI P IN P PHOTO SHOT START STOP A DUB PLAY FF W 6 1 5 63 INDEX INDEX S C STOP K L V REW STILL ADV W s V PLAY PAUSE FF W STILL ADV 6 1 5 E D P B ZOOM 73 SELECT STORE OFF ON P B DIGITAL ENTER VAR SEARCH MENU 60 62 To Cancel the Digital Effect Press the SELECT Button 60 on the Remote Controller and clear the digital effect indication ª Wipe Mode and Mix Mode 1 Press the 1 Button 73 2...

Страница 86: ...ected file is marked with a frame 100 0001 3 2 1 39 MULTI P IN P 10 PICTURE 1 2 3 No 25 100 0014 640 640 640 640 640 640 4 Press either the ENTER Button 17 or the MULTI Button 10 The selected file is shown on the entire screen For other notes concerning this item see 102 Slide Show NV GS15 only The recorded still pictures in the Card can be played back like a Slide Show 1 Set the Mode Dial 39 to P...

Страница 87: ...n 17 5 Press the 5 Button 16 or 6 Button 19 to adjust the colour and press the ENTER Button 17 39 15 20 PHOTO SHOT 36 1 2 The dark portion of the image is missing 1 and the colours of the bright portion change in order of black blue green cyan red magenta yellow and white after which the bright portion of the image is missing 2 and the colours of the dark portion change in the above order 6 Select...

Страница 88: ...be printed can be written to the Card DPOF means Digital Print Order Format 1 Set the Mode Dial 39 to Picture Playback Mode 2 Set PICTURE PLAYBACK MENU EDITING DPOF SET YES VARIABLE When all images are not printed select ALL 0 39 DPOF SETTING ENTER MENU EXIT 2 1 20 3 Select a desired picture and press the ENTER Button 17 The selected picture is marked with a frame The number of prints set by DPOF ...

Страница 89: ... wish to delete and press the ENTER Button 17 The selected picture is marked with a frame To erase 2 files or more repeat this step 20 FILE LOCK ENTER MENU EXIT 640 640 640 640 640 640 1 20 3 Press the PHOTO SHOT Button 36 A verification message appears 4 Select YES and press the ENTER Button 17 The selected file is deleted from the Card If NO is selected the file selection is cancelled To Select ...

Страница 90: ...viewed on your TV screen Before connecting them turn off the power of both the Movie Camera and TV 1 Connect the AV IN OUT Socket of the Movie Camera and the Video and Audio Input Sockets of the TV Connect to the TV with the AV Cable 1 make a connection with the TV If the TV has an S Video Socket connect the S Video Cable 2 too When plugging the pin plug of the AV cable into the AV IN OUT Socket p...

Страница 91: ...oshot index signals are automatically recorded For other notes concerning this item see 103 Audio Dubbing You can add music or narration to the recorded Cassette If the tape recorded in the 16bit Mode is dubbed with the Audio Dubbing function the original sound is erased If you wish to preserve the original sound use the 12bit Mode when recording Audio Dubbing cannot be performed on a recording ma...

Страница 92: ...S or a VHS Cassette Dubbing After connecting the Movie Camera and the VCR as illustrated start the following procedures 1 AV Cable 2 S Video Cable not supplied 1 2 VIDEO IN AUDIO IN S VIDEO IN AV IN OUT MIC PHONES REMOTE Be sure to press the OSD Button 58 on the Remote Controller prior to copying so that no indications are visible Otherwise the displayed tape counter and function indications are a...

Страница 93: ... this Movie Camera to other digital video equipment that has a DV Input Output Terminal with a DV Cable VW CD1E optional 1 dubbing can be done in the digital format Player Recorder 1 Insert the Cassette and set to Tape Playback Mode 20 INDEX INDEX STOP K L V REW STILL ADV T W s VOL r REC MULTI P IN P A DUB PLAY PAUSE FF W STILL ADV 6 1 5 E D P B ZOOM 55 73 70 71 1 Player 2 Press the 1 Button 73 to...

Страница 94: ...pe Playback Mode 3 When using as a Web Camera Set CAMERA or PLAYBACK USB FUNCTION WEB CAMERA 39 28 When using with DV STUDIO Set CAMERA or PLAYBACK USB FUNCTION DV STUDIO It enters WEB CAMERA Mode or DV STUDIO Mode 4 Connect the supplied USB Cable to Socket 28 5 Start the Windows Messenger or DV STUDIO DV STUDIO MODE can be used with Windows98 Second Edition Me XP WEB CAMERA Mode can be used with ...

Страница 95: ...n the Card Recording Mode the Movie Camera automatically saves file numbers IMGA0001 JPG etc along with the images The file numbers are recorded with each image as consecutive numbers When using software without an indication function indication data such as date are not displayed Depending on the software in use the date and the time may not be displayed correctly The memory capacity indicated on...

Страница 96: ...79 ª Back Light Mode 75 5 Sports Mode Programme AE 76 7 Portrait Mode Programme AE 76 4 Low Light Mode Programme AE 76 PC Ω Spotlight Mode Programme AE 76 º Surf Snow Mode Programme AE 77 REC Recording 70 PAUSE Recording Pause 70 Self Timer Recording 73 Playback 82 Still Playback 83 Fast forward Cue Playback 82 Rewind Review Playback 82 Slow Motion Playback 83 Still Advance Playback 83 Index Searc...

Страница 97: ...ness is insufficient When the Night View Function is ON When the Portrait Mode is used When the Built in LED Video Light lights and the Gain Up mode is set to on 640 640 SVGA XGA SXGA UXGA QXGA PICTURE PICTURE PICTURE PICTURE When using Card Recording Mode NV GS15 only When brightness is insufficient When the Night View Function is ON When the Built in LED Video Light lights and the Gain Up mode i...

Страница 98: ...You are attempting to record pictures of S1 signal with aspect ratio 16 9 by pressing the PHOTO SHOT Button FILE LOCKED You are attempting to erase protected pictures CARD LOCKED The write protection switch on the SD Memory Card is set to LOCK DISCONNECT USB CABLE You are attempting to turn the Mode Dial or turn the Movie Camera off in PC Mode with connecting the USB cable to the Movie Camera Note...

Страница 99: ...he screen Using the Night View Function at the same time will make conditions even brighter The LED Video Light enables to lighten simply the images taken in a dimly lit place However we recommend using it in a bright place in order to obtain the high quality images ª Quick Start During the Quick Start Standby Mode a minute amount of electricity is consumed When the Movie Camera is left in the Rec...

Страница 100: ...CD up to 25 times longer than usual so that the dark scenes that are invisible to the naked eyes can be recorded brightly For this reason a bright dots may be seen but this is not a malfunction The Image Stabilizer Function does not work In this case the Indication flashes The Soft Skin Function and the Backlight Compensation Function cannot be changed ª Wind Noise Reduction Function It does not w...

Страница 101: ... Iris will be cancelled ª Digital Effect Functions If you have set EFFECT2 to B W or SEPIA changing the selected White Balance Mode is not possible 77 Setting the Cinema Mode cancels the Picture in Picture Mode and the Multi Picture Mode During the Digital Still Picture Mode the Digital Effect Functions cannot be set In the following cases using the EFFECT1 on the DIGITAL Sub Menu is not possible ...

Страница 102: ...re recorded on other equipment the picture may not be played back or the quality of pictures may be deteriorated When playing back a nonstandardized file the Folder File Number may not be displayed In the following cases black bars may appear depending on the playback device When playing back a mega pixel still picture with this Movie Camera and recording it onto a tape Changing the picture size t...

Страница 103: ...t the Mode Dial to Card Recording Mode you can use the Photoshot function for external input signals Black streaks may appear at the 4 edges of the image Analog Digital Conversion When the Movie Camera is connected with other digital video equipment through its DV Terminal images recorded in analog form from other external equipment can be output to the digital video equipment through the DV Termi...

Страница 104: ...ormed and the surface finish may peel off Before cleaning detach the Battery or pull out the AC Mains Lead from the AC mains socket Wipe the Movie Camera with a soft dry cloth To remove stubborn stains wipe with a cloth that is soaked in a detergent diluted with water and afterwards finish wiping with a dry cloth For storing or transporting the Movie Camera place it in a bag or case lined with sof...

Страница 105: ...ting hours Using Mini DV Format Digital Video Head Cleaner 1 Insert the Head Cleaner into the Movie Camera in the same manner as a Video Cassette 2 Press the 1 Button and approximately 20 seconds later press the Button Do not rewind the tape 3 Take out the Head Cleaner Insert a Video Cassette and start recording Then play the tape back to check the recorded image 4 If the image is not still clear ...

Страница 106: ...e tape to the beginning If the Cassette is left for more than 6 months with the tape stopped midway the tape sags although it depends on the storage condition Be sure to rewind to the beginning Store the Cassette in its case Dust direct sunlight ultraviolet rays or humidity may damage the tape Dust contains hard mineral particles and dusty Cassettes damage the heads of the Movie Camera and other c...

Страница 107: ... does not affect the recorded picture Before Requesting Repair Problems and Solutions Power 1 The Movie Camera power cannot be turned on Is the power source connected correctly 60 2 The Movie Camera power is turned off automatically When the Recording Pause Mode continues for more than 6 minutes the power is turned off automatically for tape protection and power conservation If the AC Adaptor is u...

Страница 108: ... on your TV nothing may be shown even if you correctly connect the movie camera with your TV In this case set AV JACK on the AV IN OUT or INITIAL Sub Menu to OUT 4 Playback picture is not clear Are the heads of the Movie Camera dirty If the heads are dirty playback image cannot be clear 105 5 Playing back or recording do not function the screen has frozen or the indication has disappeared Turn the...

Страница 109: ...this Movie Camera employs a digital system for recording image and sound data it is not compatible with conventional S VHS or VHS video equipment that employs an analog recording system The size and shape of the Cassettes are also different Compatibility with Output Signals Because AV signal output from the AV signal output socket is analog the same as conventional video systems this Movie Camera ...

Страница 110: ...he previous value The Time Code cannot be reset to zero Unless the Time Code is continuously recorded from the beginning of a tape accurate editing may not be possible To ensure that the Time Code will be recorded with no breaks we recommend the use of the Blank Search Function 71 before recording a new scene ª Memory Stop Function The Memory Stop Function is useful for the following operations Re...

Страница 111: ...16 mV 10 kohm or more Power Source DC 7 9 7 2 V Power Consumption Recording 2 6 W When using Viewfinder 3 3 W When using LCD Monitor Mic Input Mic sensitivity 50 dB 0 dB 1 V Pa 1 kHz Stereo mini jack USB Card reader writer function NV GS15 only USB 2 0 compliant max 12 Mbps No copyright protection support Digital Interface DV Input Output Terminal IEEE1394 4 pin Dimensions Approx 69 W k87 H k112 D...

Страница 112: ...mbers shown in the table are approximations Maximum number of still pictures recordable on an SD Memory Card optional PICTURE QUALITY FINE NORMAL ECONOMY 8 MB 45 95 190 16 MB 100 200 400 32 MB 220 440 880 64 MB 440 880 1760 128 MB 880 1760 3520 256 MB 1760 3520 7040 512 MB 3520 7040 14080 ...

Страница 113: ...Matsushita Electric Industrial Co Ltd Web site http www panasonic co jp global ...

Отзывы: