background image

Menu

DVQX1795 (ENG)

62

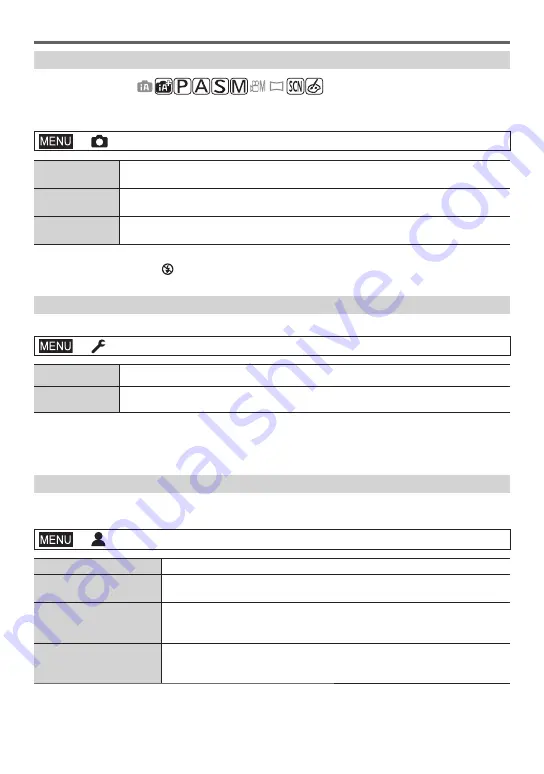
 [Shutter Type]

 Recording mode: 

 You can take pictures using two types of shutter modes: the mechanical shutter and 
electronic shutter.


 → 

 [Rec] → [Shutter Type]

 [AUTO]

 The shutter mode automatically switches based on the recording conditions and 
shutter speed.

 [MSHTR]

 Uses only the mechanical shutter mode to take a picture.
 

Shutter Speed (seconds):

 B (Bulb)

1

, 60 - 1/4000

 [ESHTR]

2

 Uses only the electronic shutter mode to take a picture.

 Shutter Speed (seconds):

 1 - 1/16000


1

  This setting is available only in Manual Exposure Mode.


2

  The flash is fixed to the [   ] (Forced Flash Off) setting.


 [Monitor Display Speed] / [LVF Display Speed]

 Sets the display speed of the monitor or viewfinder.


 → 

 [Setup] → [Monitor Display Speed] / [LVF Display Speed]

 [ECO 30fps]

 Minimises power consumption and the operating time is extended.

 [60fps]

 You can display a moving subject in fluid motion. This setting is ideal for recording 
fast-moving subjects.


 When [Monitor Display Speed] or [LVF Display Speed] (or both) is set to [ECO 30fps], Digital Zoom 
is not available.


 The [Monitor Display Speed]/[LVF Display Speed] setting does not affect the recorded picture.


 [My Menu]

 You can register frequently used menus and display them on [My Menu]. Up to 23 menus 
can be registered.


 → 

 [My Menu] → [My Menu Setting]

 [Add]

 Select and register a menu to be displayed on [My Menu].

 [Sorting]

 Change the order of the menus to be displayed on [My Menu]. Select the 
menu whose order you want to change and set the new location.

 [Delete]

 Delete a registered menu from the [My Menu] display.

 [Delete Item]:

 Select and delete a menu from the displayed menus.

 [Delete All]:

 Delete all displayed menus.

 [Display from My Menu]

 Set a screen to be displayed when the menu screen is displayed.

 [ON]:

 Displays [My Menu]

 [OFF]:

 Displays the last menu used

Содержание Lumix DC-FZ10002

Страница 1: ...No DC FZ10002 Please read these instructions carefully before using this product and save this manual for future use More detailed operating instructions are available in Operating Instructions for advanced features PDF format To read it download it from the website 85 GN ...

Страница 2: ...duce the risk of fire electric shock or product damage Do not expose this unit to rain moisture dripping or splashing Use the recommended accessories Do not remove covers Do not repair this unit by yourself Refer servicing to qualified service personnel The socket outlet shall be installed near the equipment and shall be easily accessible Product identification marking Product Location Digital cam...

Страница 3: ... 8 feet or more Keep this unit as far away as possible from electromagnetic equipment such as microwave ovens TVs video games etc If you use this unit on top of or near a TV the pictures and or sound on this unit may be disrupted by electromagnetic wave radiation Do not use this unit near cell phones because doing so may result in noise adversely affecting the pictures and or sound Recorded data m...

Страница 4: ...DCC8 optional Furthermore do not subject the camera to vibration impact or static electricity The data on the card may be damaged or lost due to electromagnetic waves static electricity or breakdown of the camera or the card We recommend storing important data on a PC etc Do not format the card on your PC or other equipment Format it on the camera only to ensure proper operation The battery is not...

Страница 5: ... 28 Taking pictures with Auto Focus 30 Taking pictures with Manual Focus 32 Focus Brightness Exposure and Colour tone Settings 33 Selecting a Drive Mode Burst Self Timer 37 Recording with the 4K Photo function 38 Adjusting the focus after recording Post Focus Focus Stacking 41 Taking Pictures with Time Lapse Shot Stop Motion Animation 43 Taking Pictures While Adjusting a Setting Automatically Brac...

Страница 6: ...Condensation When the lens the monitor or viewfinder is fogged up Condensation may occur when the camera is exposed to sudden changes of temperature or humidity Avoid these conditions which may make the lens monitor or viewfinder dirty cause mould or damage the camera If condensation does occur turn off the camera and wait about two hours before using it Once the camera adjusts to the surrounding ...

Страница 7: ...ttached to the camera at the time of purchase AC adaptor VSK0815M Shoulder Strap DVPW1002Z Lens hood SYQ0081 USB connection cable K1HY04YY0106 Lens cap Lens cap string 1ZE1DCFZ1000M2Z Cards are optional SD Memory Card SDHC Memory Card and SDXC Memory Card are indicated as card in the text Consult the dealer or your nearest Service Centre if you lose the supplied accessories You can purchase the ac...

Страница 8: ...lter Circular type DMW LPL62 Shoulder Strap DMW SSTG9 The AC adaptor optional can only be used with the designated Panasonic DC coupler optional The AC adaptor optional cannot be used by itself When using an AC adaptor optional use the AC cable supplied with the AC adaptor Part numbers are as of February 2019 These may be subject to change Some optional accessories may not be available in some cou...

Страница 9: ... 12 12 Self timer indicator AF Assist Lamp 13 Flash 47 14 Stereo microphone 15 Hot shoe Hot shoe cover 8 Keep the hot shoe cover out of reach of children to prevent swallowing 16 Flash open lever 47 17 Eye sensor 18 18 Eyecup 19 Viewfinder 18 20 Dioptre adjustment dial 18 21 Fn8 button 27 LVF button 18 22 Drive mode dial 37 23 MIC socket 24 Fn1 button 27 25 Fn2 button 27 26 Fn3 button 27 Zoom Comp...

Страница 10: ...MI socket You can view pictures on a TV screen by connecting your camera to your TV with the HDMI micro cable 41 USB CHARGE socket 15 42 Card Battery door 14 30 31 32 33 34 35 36 37 38 39 40 41 42 44 43 45 46 43 DC coupler cover 8 Always use a genuine Panasonic AC adaptor DMW AC10G optional 8 When using an AC adaptor ensure that the Panasonic DC coupler DMW DCC8 optional and AC adaptor DMW AC10G o...

Страница 11: ...eed Class and UHS Speed Class are the speed standards regarding continuous writing Confirm the SD speed by checking the card label or other card related materials Rec Format Rec Quality Speed class Label example AVCHD All Class 4 or higher MP4 FHD HD 4K High Speed Video UHS Speed Class 3 When recording in 4K Photo Post Focus UHS Speed Class 3 Latest information https panasonic jp support global cs...

Страница 12: ...attach the lens cap to the camera 2 Attach the lens cap Pinch here to attach or detach the cap Keep the lens cap string out of reach of children to prevent swallowing Attaching the Shoulder Strap We recommend attaching the shoulder strap when using the camera to prevent it from dropping Perform steps to and then attach the other side of the shoulder strap Use the shoulder strap around your shoulde...

Страница 13: ...on of the arrow to secure it 3 Continue to rotate the lens hood until you hear a click even if you feel some stiffness and then align the mark on the bottom of the camera Make sure the lens hood is secured properly and its reflection does not fall on images Rotate until the marks are aligned If you attach the lens hood while using the flash the flash light would be blocked by the lens hood causing...

Страница 14: ...y and check that it is locked by lever Card Insert the card all the way firmly until it clicks Do not touch the terminal 3 Close the door Slide the release lever to the LOCK position To remove To remove battery Move lever in direction of arrow To remove card Press the centre of the card Press Pull out Always use genuine Panasonic batteries DMW BLC12E If you use other batteries we cannot guarantee ...

Страница 15: ...e camera is turned off USB CHARGE socket This terminal is located at the bottom when the camera is in an upright position Always check the direction of the socket and hold the plug straight to insert or remove it If the cable is inserted in the wrong direction the socket could become deformed and cause faulty operation Also do not insert into the wrong socket Doing so may cause damage to this unit...

Страница 16: ... your computer Flashing Charging error 78 Charging time When using the AC adaptor supplied Approx 180 min The charging time indicated above is the time required for charging in case when the battery is completely used up The time required for charging differs depending on conditions of battery usage Charging takes longer in cases when temperatures are either high or low and when the battery has no...

Страница 17: ... use excessive force Doing so may cause damage to this unit When not using the monitor it is recommended that you close it with the screen facing inward to prevent dirt and scratches Setting the clock The clock is not set when the camera is shipped 1 Turn the camera on 2 Press MENU SET 3 Press to select the items year month day hour minute and press to set 4 Press MENU SET 5 When The clock setting...

Страница 18: ...ewfinder the camera returns to monitor display About dioptre adjustment Rotate the dioptre adjustment dial to adjust until you are able to clearly see the characters displayed in the viewfinder If LVF Display Speed is set to ECO 30fps when the viewfinder is used the camera can be operated for a longer period since battery drainage is reduced Holding the camera Do not block the flash AF Assist Lamp...

Страница 19: ...ally optimises the main settings For details on the recording modes refer to 21 2 Press the shutter button halfway press lightly to focus on the subject Shutter speed Aperture value Focus display Green When focus is aligned illuminated When focus is not aligned flashing 3 Press the shutter button fully push the button all the way and take the picture Pictures can be taken only when the image is co...

Страница 20: ...ra s intelligent resolution technology to increase the zoom ratio up to 2x 2 higher than the original zoom ratio with limited deterioration of picture quality 2 Up to 1 5x the original zoom ratio when Picture Size is set to S Digital Zoom Set the Digital Zoom in the Rec Motion Picture menu to ON You can zoom in up to 4x the original zoom magnification When Digital Zoom is used simultaneously with ...

Страница 21: ...rture then take pictures Shutter Priority AE Mode Determine shutter speed then take pictures Manual Exposure Mode Determine aperture and shutter speed then take pictures Creative Video Mode 49 Determine aperture shutter speed and ISO sensitivity then record motion pictures You cannot take still pictures Custom Mode Take pictures using pre registered settings Panorama Shot Mode Take panorama pictur...

Страница 22: ...rom the Custom Operation menu Front dial Rear dial Rotating Selection of items or setting of values is performed during the various settings Front dial Rear dial Allows you to set the aperture shutter speed and other settings when in modes Mode dial Front dial Rear dial Programme Shift Programme Shift Aperture value Aperture value Shutter speed Shutter speed Aperture value Shutter speed These oper...

Страница 23: ...rmation 1 Press DISP button to switch the display During recording You can switch the viewfinder monitor display method Custom Monitor Display LVF Monitor Disp Set LVF Disp Set or Monitor Disp Set viewfinder style Scales down images slightly so that you can better review the composition of the images monitor style Scales images to fill the entire screen so that you can see their details Live View ...

Страница 24: ... Set in the Custom Operation menu you can assign LVF Monitor Disp Style to a function button Each time you press the assigned function button the display style of the monitor or viewfinder whichever is currently in use will change During playback With information Detailed information display 1 Without information Highlight 2 Without information 1 5 100 0001 10 00 1 DEC 2019 1 Press to switch betwe...

Страница 25: ...ers to zoom out Taking Pictures Using the Touch Function 1 Touch 2 Touch an icon Touch AF Touch Shutter The icon switches every time you touch it Touch AF Focuses on the position you touch Touch shutter Focuses on the touched position before recording takes place OFF Touch AF and Touch Shutter are disabled Touch AE You can easily optimise the brightness for a touched position Touch AE Touch the su...

Страница 26: ...n also switch to the next page by rotating the zoom lever 4 Press to select the setting and press MENU SET The setting can also be selected by rotating the rear dial The setting methods vary depending on the menu item 5 Press button repeatedly until the recording or playback screen reappears The menu screen can also be exited by pressing the shutter button halfway You can display an explanation on...

Страница 27: ...ion buttons You can assign frequently used functions to particular buttons Fn1 Fn8 or icons displayed on the screen Fn9 Fn13 1 Set the menu Custom Operation Fn Button Set Settings Setting in REC mode Setting in PLAY mode 2 Press to select the function button you want to assign a function to and press MENU SET You can press DISP button to switch pages 3 Press to select the function you want to assi...

Страница 28: ...uch as the brightness and colour tone while also using for other settings so that you can record pictures more suited to your preferences 29 When iHandheld Night Shot is set to ON and is detected while taking handheld night shots pictures of the night scenery will be taken at a high burst speed and composed into a single picture When iHDR is set to ON and there is for example strong contrast betwe...

Страница 29: ... to set the blurriness of the background Press MENU SET to return to the recording screen Pressing Fn7 button on the setting screen will cancel the setting Setting brightness Press button Rotate the rear dial to compensate the brightness You can change the setting content on the exposure compensation screen from Exposure Comp Disp Setting in the Custom Operation menu Press button again to return t...

Страница 30: ...with AFS AFF in the Rec Motion Picture menu AFC Auto Focus Continuous Subject is moving Sport trains etc While the shutter button is pressed halfway focusing is constantly performed to match the movement of the subject When the subject is moving the focusing is performed by predicting the subject position at the time of recording Movement prediction Setting the tracking sensitivity of the focus po...

Страница 31: ...king pictures of flowers 1 Press button 2 Press to select the item and press MENU SET AF Macro You can take pictures of a subject as close as 3 cm 0 098 feet from the lens by rotating the zoom lever upmost to Wide Macro Zoom Use this setting to get close to the subject and then further enlarge when taking the picture You can take a picture with the Digital Zoom up to 3x while maintaining the dista...

Страница 32: ...nges to the assist screen and an enlarged display appears MF Assist To return the focus position to the centre press DISP button 4 Turn the control ring to adjust focus Rotate to side Focuses on nearby subject Rotate to side Focuses on faraway subject Colour is added to the portions of the image that are in focus Peaking You can check whether the point of focus is to the near side or to the far si...

Страница 33: ...ock is cancelled 3 While you press and hold AF AE LOCK button move the camera to compose the picture you want to take and fully press the shutter button Setting the function of AF AE LOCK Custom Focus Release Shutter AF AE Lock Taking pictures with Exposure Compensation Recording mode Corrects the exposure when there is a backlight or when the subject is too dark or too bright 1 Press button 2 Rot...

Страница 34: ...utomatically set in a range up to 3200 1 depending on the movement and brightness of a subject L 80 2 L 100 2 from 125 to 12800 H 25600 2 ISO sensitivity is fixed at the selected setting 1 When ISO Auto Upper Limit Photo in the Rec menu is set to AUTO 2 Only when Extended ISO in the Custom Exposure menu is ON 3 Press MENU SET to set You can also press the shutter button halfway to set Cannot selec...

Страница 35: ...es higher priority to what is seen by the eye and retains the reddish hue When the white balance is set to AWBc or AWBw the adjustment effect may be similar to that of AWB depending on the light source Adjust to the colour under a clear sky Adjust to the colour under a cloudy sky Adjust to the colour in the shade Adjust to the colour under incandescent lights Adjust to the colour that is optimal f...

Страница 36: ... setting Press the shutter button halfway to return to the recording screen Bracket recording using White Balance Bracket settings are performed based on the fine adjustment values for White Balance and three pictures with different colouring are automatically recorded when the shutter button is pressed once Perform fine adjustments of the White Balance in step of Performing White Balance fine adj...

Страница 37: ...ressed recording takes place after the set time has elapsed Burst function Setting Burst Rate Rec Burst Rate H High speed M Middle speed L Low speed Speed pictures sec AFS MF 12 7 2 AFF AFC 7 Live View during burst recording AFS MF None Available Available AFF AFC Available Number of recordable pictures With RAW files 26 or more Without RAW files 100 or more Taking pictures with self timer Setting...

Страница 38: ...shutter button fully Therefore press the button fully slightly in advance Press and hold Recording is performed 4K Burst S S S S is an abbreviation of Start Stop For capturing unpredictable photo opportunities Burst recording starts when the shutter button is pressed and stops when pressed again Start First Stop Second Recording is performed When you press the Fn6 button while recording you can ad...

Страница 39: ...29 minutes and 59 seconds When using an SDHC memory card files are split into smaller picture files for recording and playback if the file size exceeds 4 GB You can continue to record pictures without interruption If using an SDXC memory card you can record pictures in a single file even if the size is greater than 4 GB When you perform Light Composition or Sequence Composition we recommend using ...

Страница 40: ...which a face or the movement of a subject is detected Up to 10 markers are displayed for each file Example At the scene when a vehicle passes by a balloon bursts or a person turns around Marker operation screen Skips to the marked positions When is touched the marker operation screen appears You can use to skip to a marked position to select a picture Touch to return to the original operation In t...

Страница 41: ...en If there is no focus point on the screen the Focus indicator blinks and you cannot record From halfway pressing the shutter button to completion of recording Do not change the distance to subject or the composition 3 Press the shutter button fully to start recording The focus point changes automatically while recording When the recording progress bar disappears recording automatically ends The ...

Страница 42: ...elect the focus point and save the picture Post Focus 2 Choose a stacking method and touch it Auto Merging Automatically select photos suitable for stacking and combine them into one picture Choose by giving preference to near focus pictures Perform the focus stacking and save the picture Range Merging Combine the pictures with the selected focus position into one picture When selecting Range Merg...

Страница 43: ...Sets the time from recording start time to the next recording start time OFF After recording is finished the next recording is started without any interval Start Time Now Starts the recording by fully pressing the shutter button Start Time Set Press to select the item hour and or minute and to set the start time and press MENU SET Image Count Shooting Interval Select the item digit Setting MENU SE...

Страница 44: ...g recording a message to restart recording will appear when you turn on the camera 6 Touch to end the recording You can also end the recording by selecting Time Lapse Animation in the Rec menu and then pressing MENU SET When Auto Shooting is set to ON select End on the confirmation screen If you select Pause press the shutter button fully to resume recording Creating motion pictures from recorded ...

Страница 45: ...Bracket Press the shutter button to perform recording while adjusting the focus position 46 White Balance Bracket Press the shutter button once to take three pictures with different white balance settings automatically 36 2 Press to select More Settings and then press MENU SET For information on More Settings refer to the page that describes each function Press the shutter button halfway to exit t...

Страница 46: ... Aperture Bracket Recording mode About More Settings step 2 in 45 Image Count 3 5 Takes a specified number of pictures with different aperture values within the range based on the initial aperture value ALL Takes pictures using all aperture values When using burst recording if you press and hold the shutter button recording will be performed until a specified number of pictures are taken Focus Bra...

Страница 47: ...e Forced Flash On Forced On Red Eye The flash is activated every time regardless of the recording conditions Use this when your subject is back lit or under fluorescent light Slow Sync Slow Sync Red Eye Takes brighter pictures such as pictures of subjects against a nightscape by decreasing the shutter speed when firing a flash Ideal for taking pictures of people against a nightscape Using a slower...

Страница 48: ...ative Video Mode 2 Press the motion picture button again to end recording To record 4K motion pictures use a UHS Speed Class 3 card When you record 4K motion pictures the angle of view will be narrower than motion pictures of other sizes To ensure highly accurate focus 4K motion pictures are recorded at reduced Auto Focus speeds It may be difficult to focus on the subject with Auto Focus but this ...

Страница 49: ...ntinue to record motion pictures without interruption Motion pictures with Rec Quality setting of FHD 28M 60p FHD 28M 50p in MP4 Recording stops when the continuous recording time exceeds 29 minutes and 59 seconds MP4 motion pictures with a Rec Quality size of 4K Recording stops when the continuous recording time exceeds 29 minutes and 59 seconds When using an SDHC memory card files are split into...

Страница 50: ...on while recording motion pictures 4 Press the motion picture button or shutter button to stop recording The ISO sensitivity can be set within the following range AUTO 125 to 6400 L 80 to 6400 when Extended ISO is set to ON 4K Live Cropping By cropping your motion picture down from the 4K angle of view to Full High Definition you can record a motion picture that pans and zooms in out while leaving...

Страница 51: ... button or the shutter button after pressing it When the set operating time has elapsed recording automatically ends To end recording midway press the motion picture button or the shutter button again When you want to zoom in out set different angles of view for the cropping start and end frames For example to zoom in set a larger angle of view for the start frame and a smaller angle of view for t...

Страница 52: ...ng motion pictures This unit was designed to play motion pictures using the AVCHD and MP4 formats Motion pictures are displayed with the motion picture icon 1 Press to start playback Touching in the middle of the screen allows you to play back motion pictures Operations during motion picture playback Operation Touch operation Description Play pause Fast rewind 1 Single frame rewind 2 while paused ...

Страница 53: ...ity set to can be enlarged up to 8x Multi Playback Calendar Playback 1 Move the zoom lever toward W side 1 picture screen full screen 12 picture screen 30 picture screen Calendar screen Move the lever to the T side to return 2019 12 SUN MON TUE WED THU FRI SAT 7 6 5 4 3 2 14 13 12 11 10 9 21 20 19 18 17 16 28 27 26 25 24 23 31 30 1 8 15 22 29 Multi Playback Calendar Playback It is possible to swit...

Страница 54: ... All the pictures in the selected picture group are deleted 1 Press button while viewing a picture 2 Use to select Delete Multi Delete All and press MENU SET You can select Delete All Non rating in Delete All if there are pictures that have been set as Rating When Delete Multi is selected 3 Use to select picture and press MENU SET repeat Picture selected To cancel Press MENU SET again OK OK 4 Pres...

Страница 55: ...ed custom setting from Set1 Set2 and Set3 Panorama Shot Direction Picture Size Scene Guide Scene Switch Creative Control Filter Effect Simultaneous Record w o Filter Aspect Ratio Picture Size Quality AFS AFF AF Sensitivity Photo Photo Style Filter Settings Color Space Metering Mode Highlight Shadow i Dynamic i Resolution Flash Red Eye Removal ISO Auto Upper Limit Photo Min Shtr Speed Long Shtr NR ...

Страница 56: ...ay AF MF MF Assist MF Assist Display Operation Fn Button Set ISO Displayed Setting Exposure Comp Disp Setting Q MENU Dial Set Control Ring Operation Lock Setting Video Button Video Rec Button Remote Touch Settings Zoom lever Zoom Compose Assist Monitor Display Auto Review Monochrome Live View Constant Preview Peaking Histogram Guide Line Center Marker Highlight Zebra Pattern Expo Meter MF Guide LV...

Страница 57: ...g My Menu Slide Show Playback Mode Protect Rating Title Edit Face Rec Edit RAW Processing 4K PHOTO Bulk Saving Light Composition Sequence Composition Clear Retouch Text Stamp Resize Cropping Rotate Video Divide Time Lapse Video Stop Motion Video Rotate Disp Picture Sort Delete Confirmation Playback Aspect Ratio Recording mode This allows you to select the aspect ratio of the pictures to suit print...

Страница 58: ...mode Set the compression rate used for storing pictures Rec Quality JPEG Gives priority to picture quality and saves pictures in JPEG file format Saves pictures in JPEG file format using standard picture quality RAW JPEG Saves pictures in both RAW and JPEG file format or simultaneously RAW Saves pictures in RAW file format A RAW still picture is always recorded at 3 2 5472 3648 If you delete a pic...

Страница 59: ...sing rich shades of grey with deep solid black tones L Monochrome D Setting that creates a dynamic monochrome picture with emphasised highlights and shadows Scenery Setting that creates a picture using vivid colours for the blue sky and green Portrait Setting that produces the look of a healthy complexion Custom Setting for using colours and picture quality that were registered in advance Cinelike...

Страница 60: ... is selected Otherwise Saturation is displayed 2 Displayed only when Monochrome L Monochrome or L Monochrome D is selected Press MENU SET Metering Mode Recording mode You can change the metering method used for measuring brightness Rec Motion Picture Metering Mode Metering Mode Brightness measurement position Conditions Multiple Whole screen Normal usage produces balanced pictures Centre weighted ...

Страница 61: ...irection horizontal direction rotation axis vertical rotation and horizontal rotation 5 axis Hybrid Image Stabiliser function ON OFF Silent Mode Recording mode Disabling the beeps and flash at the same time Rec Silent Mode Settings ON OFF This mode will mute sounds from the speaker and disable the flash and AF Assist Lamp The settings for the following functions are fixed Flash Mode Forced Flash O...

Страница 62: ...he operating time is extended 60fps You can display a moving subject in fluid motion This setting is ideal for recording fast moving subjects When Monitor Display Speed or LVF Display Speed or both is set to ECO 30fps Digital Zoom is not available The Monitor Display Speed LVF Display Speed setting does not affect the recorded picture My Menu You can register frequently used menus and display them...

Страница 63: ...oise Reduction i Resolution Sharpness More Settings 3 Press MENU SET to finalise the setting The screen in step 2 reappears To set another item repeat steps 2 to 3 4 Press to select Begin Processing and press MENU SET Setting each item When you select an item the setting screen appears Operation Touch operation Description Drag Used to make adjustments WB K Set Used to display the colour temperatu...

Страница 64: ... DISP Used to return to the setting screen MENU SET Set Used to finalise an adjustment you just made and to return to the item selection screen Set Set If you touch the picture at the centre it will be enlarged If you touch the picture will be reduced to the original size Light Composition Select multiple frames from 4K burst files that you wish to combine Parts of the image that are brighter than...

Страница 65: ...before and lets you select a different image Repeat steps to select more frames to combine up to 40 frames Press to select Save and press MENU SET Range Merging Selecting a range to combine Select the frame of the first picture and then press MENU SET The selection method is the same as in step of Composite Merging setting Select the frame of the last picture and then press MENU SET The picture wi...

Страница 66: ...teps to select more frames to combine from 3 to 40 frames Press to select Save and press MENU SET We recommend using a tripod to take pictures for Sequence Composition The picture will be saved in JPEG format Video Divide A single motion picture can be split into 2 parts This is convenient when you want to keep just the necessary scenes or if you wish to delete unnecessary scenes to increase free ...

Страница 67: ...corded image 73 Synchronising the camera s clock with a smartphone This manual uses the term smartphone for both smartphones and tablets unless it is necessary to distinguish between them For details refer to Operating Instructions for advanced features PDF format Lighting of the WIRELESS connection lamp Blue Lit When the Wi Fi Bluetooth function is ON or connected Blinking When sending picture da...

Страница 68: ...able in English only When downloading the app on a mobile phone network high packet communication fees may be incurred depending on the details of your contract For details about the operating procedure etc refer to Help in the Image App menu When you operate the Image App on the smartphone that is connected to the camera via Wi Fi Help in the Image App may not be displayed depending on the smartp...

Страница 69: ...the time of purchase Wi Fi Password is set to OFF If Wi Fi Password is set to ON on the camera you need to install the profile Install the profile If the smartphone is locked with a passcode enter the passcode to unlock the smartphone Exit the browser Turn on the Wi Fi function in the setting menu On the Wi Fi setting screen select the SSID displayed on the camera The device name selected in step ...

Страница 70: ...tion in the setting menu 2 Select the SSID displayed on the screen of the camera 3 Start Image App When the connection confirmation screen appears on the camera select Yes and press MENU SET Only when making a connection for the first time Wi Fi Password is set to OFF at the time of purchase When you start a Wi Fi connection be sure to verify that the device displayed on the camera s connection co...

Страница 71: ...Select the camera s menu Setup Bluetooth Remote Wakeup ON 3 Set the Camera ON OFF switch to OFF 4 On the smartphone start up the Image App and set the Bluetooth function to a state in which a connection can be made standby state 5 Operate the smartphone Select Select Remote operation The camera automatically turns on allowing it to make a Wi Fi connection automatically iOS devices Depending on the...

Страница 72: ...the on screen message to change the setting Select Take pictures The recorded images are saved in the camera Some settings are not available Using the smartphone to operate the shutter button via a Bluetooth connection only Wireless connectivity required Bluetooth 1 Make a Bluetooth connection to the smartphone 68 2 Operate the smartphone Select Select Shutter Remote Control Take pictures Shutter ...

Страница 73: ...d back at a larger size Saving and sending pictures to web services such as SNS Press and hold the picture and drag it Writing location information of a smartphone on a recorded image Wireless connectivity required Bluetooth The smartphone sends its location information to the camera via Bluetooth and the camera performs recording while writing the acquired location information Preparation Enable ...

Страница 74: ...s about information such as the operating environment or operating method refer to the Operating Instructions for advanced features PDF format or the operating instructions of PHOTOfunSTUDIO PDF format SILKYPIX Developer Studio SE Windows 10 8 1 7 Mac OS X v10 10 v10 11 macOS 10 12 10 14 This software develops and edits RAW file pictures Edited pictures can be saved in a file format such as JPEG o...

Страница 75: ... motion picture Automatic switching between viewfinder and monitor 18 Peaking Highlight Shadow HDR iHDR Multi Exp Electronic shutter The following images are examples of when the display screen is set to monitor style in the monitor In recording 50p Picture taking during motion picture recording Photo Priority Overheat indicator 39 41 48 Quality 58 120fps 100fps High Speed Video AFS Focus Mode 30 ...

Страница 76: ...value 50 Shutter speed 50 ISO sensitivity 50 Sound Rec Level Adj 50 Focus Lights green 19 Recording state Lights up in red 48 Focus Under low illumination Focus Starlight AF Wi Fi connection status Bluetooth connection status 69 Location Logging 73 Histogram Name 2 Travel elapsed days 3 Age in years months 2 Location 3 Current date time 3 Travel destination setting 3 Exposure metre Zoom 20 AF area...

Страница 77: ... 27 Photo Style 59 AWB White Balance 35 White Balance Bracket 36 White Balance Fine Adjustment 36 i Dynamic Metering Mode 60 98 Number of recordable pictures r20 Maximum number of pictures that can be taken continuously RXXmXXs Available recording time 1 1 h m and s indicate hour minute and second 2 This is displayed for about 5 seconds when the camera is turned on if the Profile Setup setting is ...

Страница 78: ... Mode to Single Bracket recording is set 45 If any of the icons ex etc is displayed on the screen bracket recording is set Under Bracket in the Rec menu set Bracket Type to OFF Focus not aligned correctly Subject outside of focus range Focus Release Priority is set to RELEASE 56 Shutter AF is set to OFF 56 AF Lock is set inappropriately 33 If there are fingerprints or dirt on the lens the focus ma...

Страница 79: ...p the recording Wait until the camera cools down Cannot record motion pictures When a large capacity card is used you may not be able to take a picture for a while after you turn on the camera Motion picture recording stops midway When the ambient temperature is high or motion picture is recorded continuously the camera may display and stop the recording Wait until the camera cools down The speed ...

Страница 80: ...tc that uses 2 4 GHz frequency operated nearby Radio waves may get interrupted when used simultaneously Use them sufficiently away from the device When the battery indicator is flashing red the connection with other equipment may not start or the connection may be disrupted A message such as Communication error is displayed When this unit is placed on a metal table or shelf the connection may not ...

Страница 81: ...ng on the destination The lens makes a clicking noise When the camera is turned on or off the lens is moved or an aperture operation is performed such a noise may be heard This is not a malfunction When the brightness changes after a zooming operation or moving the camera the lens may make a noise while adjusting the aperture This is not a malfunction Zooming stops instantaneously When using the E...

Страница 82: ...ide 1 m 3 3 feet Max Tele to AF Macro MF Intelligent Auto Motion picture 3 cm 0 098 feet Max Wide 1 m 3 3 feet Max Tele to Shutter system Electronic shutter Mechanical shutter Minimum Illumination Approx 9 lx when i Low light is used the shutter speed is 1 25th of a second Shutter speed Still picture B Bulb Max approx 120 seconds 60 seconds to 1 4000th of a second When the mechanical shutter is us...

Страница 83: ... Speaker Monaural Recording media SD Memory Card SDHC Memory Card SDXC Memory Card UHS UHS Speed Class 3 Recording file format Still picture RAW JPEG based on Design rule for Camera File system based on Exif 2 31 standard 4K Photo MP4 Motion picture AVCHD Progressive AVCHD MP4 Audio compression format AVCHD Dolby Audio 2 ch MP4 AAC 2 ch Interface MIC Ø3 5 mm jack REMOTE Ø2 5 mm jack HDMI Micro HDM...

Страница 84: ...oth Ver 4 2 Bluetooth Low Energy BLE Frequency range used central frequency 2402 MHz to 2480 MHz AC adaptor Panasonic VSK0815M Information for your safety Input 110 V 240 V 50 60 Hz 0 25 A Output 5 0 V 1 8 A Battery pack lithium ion Panasonic DMW BLC12E Information for your safety Voltage capacity 7 2 V 1200 mAh The symbols on this product including the accessories represent the following AC DC Cl...

Страница 85: ...are licensed under the GNU General Public License Version 2 0 GPL V2 0 4 the software licensed under the GNU LESSER General Public License Version 2 1 LGPL V2 1 and or 5 open source software other than the software licensed under the GPL V2 0 and or LGPL V2 1 The software categorized as 3 5 are distributed in the hope that it will be useful but WITHOUT ANY WARRANTY without even the implied warrant...

Страница 86: ...tance times with the Authorised Service centre that you choose Then send or take the product to a Panasonic Authorised Service Centre together with your proof of purchase receipt Any freight and insurance costs associated with the transport of the product to and or from your nearest Authorised Service Centre must be arranged and paid for by you 7 The warranties hereby conferred do not extend to an...

Страница 87: ...f Apple Inc registered in the U S and other countries iPad iPhone iPod and iPod touch are trademarks of Apple Inc registered in the U S and other countries App Store is a service mark of Apple Inc Google Android and Google Play are trademarks of Google LLC The Bluetooth word mark and logos are registered trademarks owned by Bluetooth SIG Inc and any use of such marks by Panasonic Corporation is un...

Страница 88: ... and Batteries Only for European Union and countries with recycle systems These symbols are only valid in the European Union and countries with recycle systems If you wish to discard this product please contact your local authorities or dealer and ask for the correct method of disposal ...

Отзывы: