background image

6. Copy

38

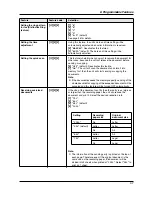
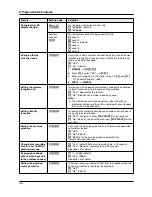
5.

Press 

{A}

 or 

{B}

 repeatedly to display 

COLLATE

ON

.

i

{

START

}

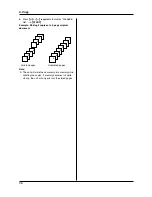
Example: Making 2 copies of a 4-page original 
document

Note:

L

The unit will store the documents into memory while 
collating the copies. If memory becomes full while 
storing, the unit will only print out the stored pages.

Collated pages

Uncollated pages

4

3

2

1

4

3

2

1

1

1

2

2

3

3

4

4

Содержание KXFG2451 - B/W Thermal Transfer

Страница 1: ...o KX FG2451 FOR FAX ADVANTAGE ASSISTANCE REFER TO www panasonic com helpfax for customers in the U S A or Puerto Rico E MAIL TO consumer_fax us panasonic com for customers in the U S A or Puerto Rico PHONE CALL 1 800 HELP FAX 1 800 435 7329 Charge the battery for about 6 hours before initial use This unit is compatible with Caller ID To use this feature you must subscribe to the appropriate servic...

Страница 2: ...ou should complete the instructions on page 18 to page 19 L Note that the images of copied or received documents will remain on the used ink film Use discretion when disposing of the used ink film L Do not rub or use an eraser on the printed side of recording paper as the print may smear Energy Star L As an ENERGY STAR Partner Panasonic has determined that this product meets the ENERGY STAR guidel...

Страница 3: ...tment may require extensive work by an authorized service center E If the unit has been dropped or physically damaged F If the unit exhibits a distinct change in performance 14 During thunderstorms avoid using telephones except cordless types There may be a remote risk of an electric shock from lightning 15 Do not use this unit to report a gas leak when in the vicinity of the leak SAVE THESE INSTR...

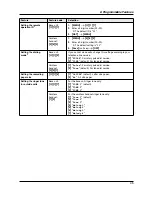
Страница 4: ...s handset near another cordless phone s base unit noise may be heard Move away from the other cordless phone s base unit and closer to your base unit Environment L Keep the unit away from electrical noise generating devices such as fluorescent lamps and motors L The unit should be kept free from dust high temperature and vibration L The unit should not be exposed to direct sunlight L Do not place ...

Страница 5: ...g caller information 27 3 13 Storing caller information into the phonebook 27 Other Features 3 14 Intercom 28 3 15 Transferring a call 28 4 Fax Sending Faxes 4 1 Sending a fax manually 29 4 2 Document requirements 30 4 3 Sending a fax using the phonebook and one touch dial 30 4 4 Broadcast transmission 31 Receiving Faxes 4 5 Selecting the way to use your fax machine 32 4 6 Receiving a fax manually...

Страница 6: ...ams 11 1 Recording paper jams 63 11 2 Document jams 64 Cleaning 11 3 Document feeder recording paper feeder scanner glass cleaning 65 11 4 Thermal head cleaning 66 12 General Information Printed Reports 12 1 Reference lists and reports Base unit only 67 Specifications 12 2 Specifications 67 FCC and Other Information 12 3 FCC and Other Information 69 Limited Warranty 12 4 Limited Warranty 71 Custom...

Страница 7: ...TCA91 KX TCA92 KX TCA98 Allows hands free telephone conversations Belt clip Model No Part No PQKE10393Z6 1 To ensure the unit operates properly we recommend using the Panasonic replacement film The ink film is not reusable Do not rewind and use the ink film again To place an order online for customers in the U S A ONLY Visit our web site http www panasonic com kx fa91 L For questions regarding onl...

Страница 8: ...49 J CALLER ID L To use Caller ID features page 25 K STOP L To stop an operation or programming session L To erase a character number page 18 Press and hold to erase all characters numbers L LOCATOR INTERCOM L To make answer intercom calls page 28 L To locate the cordless handset page 28 L To put a call on hold page 21 M HELP L To print helpful information for reference purposes page 16 N MENU L T...

Страница 9: ...aling when your line has rotary pulse service You can also use tone dial service by changing feature 13 or feature 051 on page 45 F PAUSE REDIAL L To redial one of the last 5 numbers dialed from the cordless handset page 20 L To insert a pause during dialing G MENU L To start programming H OFF L To hang up page 20 21 L To stop an operation or programming I MUTE CLEAR L To mute your voice during a ...

Страница 10: ...2 Document guides 3 Paper tray 4 Metal recording paper guide 5 Paper support 6 Recording paper exit 7 Recording paper entrance 8 Antenna 9 Microphone j Front cover k Document entrance l Document exit m Speaker n Green button Back cover release button o Back cover 1 2 3 8 5 7 4 m n o j k l 9 6 1 Antenna 2 Ringer indicator Message indicator 3 Receiver 4 Microphone 5 Headset jack 6 Speaker 1 2 3 5 6 ...

Страница 11: ...the back cover 4 Insert the blue gear of the ink film roll into the front left slot of the unit 2 and the white gear of the ink film roll into the rear left slot of the unit 3 L The ink film is safe to touch and will not rub off on your hands like carbon paper L Make sure the blue gear 2 and white gear 3 are installed as shown 5 Turn the blue gear 4 in the direction of the arrow until the ink film...

Страница 12: ...r guide 1 then install the paper tray 2 L Make sure the arrows on the paper tray and the unit match To use A4 size paper L When you do not use the A4 paper guide you can attach it to the back of the paper tray for storage Correct Incorrect 6 Tight 1 turn No ink film is wrapped around the blue core Slack Crease Reverse 7 Note L When you use letter paper you do not need to install the A4 paper guide...

Страница 13: ... 16 lb to 24 lb paper Please refer to page 68 for more information on recording paper For superior results we recommend Hammermill Jet Print paper 1 Fan the paper to prevent paper jams 2 Insert the paper gently print side down 1 L Do not force the paper into the paper tray L If the paper is not inserted correctly remove all of the installed paper and re install it gently Otherwise the paper may ja...

Страница 14: ... Panasonic battery See page 7 for accessory information 3 Close the battery cover Attention A nickel metal hydride battery that is recyclable powers the product you have purchased Please call 1 800 8 BATTERY for information on how to recycle this battery 1 11 Headset optional Connecting an optional headset to the cordless handset allows hands free phone conversations We recommend using a Panasonic...

Страница 15: ...harge Place the cordless handset on the cradle of the base unit for about 6 hours before initial use L The unit will beep once the CHARGE indicator 1 will light and Charging will be displayed on the cordless handset display L After the cordless handset is fully charged displaying Charge completed it may be left on the base unit without affecting the life of the battery Note L To ensure the battery...

Страница 16: ...achine and or fax page 34 2 DIST RING With the Distinctive Ring service page 36 3 TEL ONLY Mostly phone calls page 33 4 FAX ONLY Use only as a fax page 34 1 MENU i 0 0 i SET 2 Press SET again to print the quick fax setup guide L If you do not wish to print it press STOP 3 Press 1 to 4 to display the desired setting i SET i MENU Help Button 2 4 Base unit help function The unit contains helpful info...

Страница 17: ...u can select the cordless handset ringer tone from one of 7 patterns for outside calls feature 12 on page 45 Cordless handset receiver volume While using the receiver press V or Speaker volume While using the speakerphone press V or 2 6 Adjusting base unit volume Ringer volume While the unit is idle press A or B L If there are any documents in the document entrance you cannot adjust the volume Con...

Страница 18: ... date and time will be automatically set according to the received caller information L If the time has not previously been set Caller ID will not adjust the clock L You can turn this feature OFF feature 33 on page 47 2 8 Your logo You can program your logo name company name etc so that it appears on the top of each page sent 1 MENU i 0 2 i SET LOGO 2 Enter your logo up to 30 characters See the fo...

Страница 19: ...cter and make the correction L To erase all of the characters press and hold STOP 2 9 Your fax number You can program your fax number so that it appears on the top of each page sent 1 MENU i 0 3 i SET NO 2 Enter your fax number up to 20 digits L To enter a press L To enter a space press L To enter a hyphen press FLASH L To erase a number press STOP 3 SET 4 Press MENU to exit To correct a mistake P...

Страница 20: ...improve sound clarity when the cordless handset is used in an area where there may be interference During an outside call this feature is turned ON automatically when necessary This feature will turn OFF when you hang up or put a call on hold It will not turn OFF automatically during a call You can also turn this feature ON or OFF manually 1 Press MENU during an outside call 2 Press 2 to select Bo...

Страница 21: ...ss LOCATOR L To release the hold press SP PHONE on the base unit or TALK or SP PHONE on the cordless handset L If a call is kept on hold for more than 6 minutes beeps will start to sound After 4 additional minutes on hold the call will be disconnected 3 2 Answering phone calls 3 2 1 With the cordless handset 1 Lift the cordless handset and press TALK or SP PHONE L You can also answer a call by pre...

Страница 22: ...ress MENU repeatedly to display PHONEBOOK SET i 2 Enter the name up to 16 characters see page 18 for instructions i SET 3 Enter the telephone number up to 32 digits i SET L To program other items repeat steps 2 to 3 4 MENU Helpful hints L For your convenience HELP FAX 1 800 435 7329 has been stored in the base unit phonebook If you cannot solve a problem call this number from the base unit page 23...

Страница 23: ...ess 1 or 4 Press B repeatedly to display LISA L To stop the search press STOP L To dial the displayed number press SP PHONE 3 5 Editing a stored item 3 5 1 With the cordless handset 1 Phonebook soft key i Search soft key 2 Press V or repeatedly to display the desired item 3 Edit soft key L If you do not need to edit the name skip to step 5 4 Edit the name For further details see the storing proced...

Страница 24: ...mber erased from a one touch dial key will not be deleted from the phonebook To erase from the phonebook see page 23 3 8 Copying phonebook items One or all phonebook items can be copied to or from the cordless handset and the base unit The destination unit will save the items in its phonebook 3 8 1 To the base unit using the cordless handset Copying one phonebook item 1 MENU 2 Press V or repeatedl...

Страница 25: ...d not to send caller information LONG DISTANCE The caller made a long distance call L If the cordless handset has lost communication with the base unit when a call is received caller information will not be recorded in the cordless handset To confirm caller information using the Caller ID list Base unit only To print manually see page 67 To print automatically after every 30 new calls activate fea...

Страница 26: ...ess handset phonebook follow from step 2 of the cordless handset storing procedure on page 27 L To store the number in the base unit phonebook follow from step 3 of the base unit storing procedure on page 27 3 11 Caller ID number auto edit feature Once you call back an edited number the unit can automatically edit other incoming phone numbers each time you receive a call For example you can use th...

Страница 27: ...ss V or repeatedly to display the desired item i CLEAR i OFF With the base unit 1 CALLER ID 2 Press A or B repeatedly to display the desired item i ERASE i STOP 3 13 Storing caller information into the phonebook 3 13 1 Into the cordless handset 1 Press V or repeatedly to display the desired item L If the number requires editing see page 26 2 Save soft key L If a name has not been received Enter na...

Страница 28: ...COM to answer the page 2 To end the intercom call press OFF With the base unit When the base unit is being paged it will beep 1 Press SP PHONE or INTERCOM to answer the page 2 To end the intercom call press SP PHONE or INTERCOM 3 15 Transferring a call A telephone call can be transferred between the base unit and the cordless handset using the intercom feature 3 15 1 To transfer a call from the co...

Страница 29: ...being fed into the unit Pre dialing a fax number 1 Enter the fax number 2 Insert the document 3 FAX START Sending from memory Quick scan feature To use this feature activate feature 34 page 47 beforehand 1 Insert the document 2 Enter the fax number i FAX START L If the document exceeds the memory capacity transmission will be canceled and this feature will be turned OFF automatically You must send...

Страница 30: ...ne to copy the original document onto A4 or letter sized paper then sending the copied document 4 3 Sending a fax using the phonebook and one touch dial Before using this feature store the desired names and telephone numbers into the base unit s phonebook page 22 and one touch dial page 24 1 Adjust the width of the document guides to fit the actual size of the document 2 Insert the document up to ...

Страница 31: ...peatedly to display the desired item you want to erase L To cancel erasing press STOP 4 SET i SET i STOP 4 4 4 Sending the same document to pre programmed parties 1 Insert the document FACE DOWN 2 If necessary press A or B repeatedly to select the desired resolution page 29 i PHONEBOOK 3 Press A or B repeatedly to display BROADCAST i FAX START L After transmission the unit will automatically print...

Страница 32: ...ception If you do subscribe to a voice mail service set the ring count of your voice mail service to 5 rings or greater How phone calls and faxes are received If the call is a phone call the fax machine will record the caller s message automatically If a fax calling tone is detected the fax machine will receive the fax automatically 4 5 2 Use only as a fax FAX ONLY mode Your situation You have a s...

Страница 33: ...te the answering machine The greeting message will then be played and the other party can then send a fax How to receive calls and faxes with the cordless handset 1 Lift the cordless handset and press TALK or SP PHONE to answer the call 2 When document reception is required a fax calling tone slow beep is heard or no sound is heard press 9 default fax activation code firmly L You can also press FA...

Страница 34: ... the fax function 4 The caller presses the start button to send a fax Changing the ring count in TAM FAX mode You can select from 2 default 3 4 or TOLL SAVER This setting can be changed by feature 06 or feature 061 on page 44 TOLL SAVER The unit answers after 2 rings when new messages have been recorded and after 4 rings when there are no new messages If you call your unit from a remote location t...

Страница 35: ...not wish to receive faxes from them 1 Press MENU repeatedly to display JUNK FAX PROH 2 Press repeatedly to display JUNK LIST SET i SET 3 Press A or B repeatedly to display the item you wish to prevent the fax reception from i SET 4 Press STOP to exit the program To display the junk fax prohibitor list 1 Press MENU repeatedly to display JUNK FAX PROH 2 Press repeatedly to display JUNK LIST DISP i S...

Страница 36: ...Note L Be sure to select a tone Tone 1 to 3 as the cordless handset ringer tone feature 12 on page 45 If you select a melody you will not be able to distinguish lines by their ringers 5 3 Using three or more phone numbers on a single telephone line You may wish to use three or more phone numbers for a single telephone line In order to distinguish which number the call was addressed to a different ...

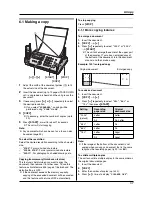
Страница 37: ...OFF L If the document exceeds the memory capacity copying of the exceeded document will be canceled and this feature will be turned OFF automatically To stop copying Press STOP 6 1 1 More copying features To enlarge a document 1 Insert the document 2 COPY i 3 Press A repeatedly to select 150 or 200 i START L The unit will enlarge the center of the upper part of the document To make an enlarged cop...

Страница 38: ...e Making 2 copies of a 4 page original document Note L The unit will store the documents into memory while collating the copies If memory becomes full while storing the unit will only print out the stored pages Collated pages Uncollated pages 4 3 2 1 4 3 2 1 1 1 2 2 3 3 4 4 ...

Страница 39: ...e setting to 60 seconds we recommend that you tell the caller in your TAM FAX greeting message to press 9 before starting the fax transmission If you change the setting from 60 seconds to 16 seconds your current greeting message will be deleted The pre recorded greeting message will be played when a call is received L If you change the maximum recording time of incoming messages to GREETING ONLY f...

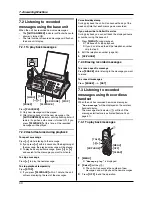
Страница 40: ...nute the unit will resume playing the rest of the messages Voice time day stamp During playback the unit will announce the day of the week and time that each message was recorded If you subscribe to Caller ID service During playback you can call back the displayed name or number using the base unit 1 Press MENU during playback L The base unit stops playback L If you do not need to edit the telepho...

Страница 41: ...pending on the setting of feature 77 page 49 If you have subscribed to a Caller ID service During playback you can call back the displayed name or number using the cordless handset Press Call soft key 2 Note L To edit the number before calling back press Edit soft key 2 repeatedly to select the desired pattern page 26 then press Call soft key 2 TALK or SP PHONE 7 3 3 Erasing recorded messages To e...

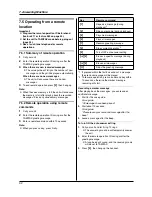
Страница 42: ...ote command within 10 seconds Note L When you press a key press firmly 1 If pressed within the first 5 seconds of a message the previous message will be played 2 To resume operation press a command key within 10 seconds otherwise the marker message recording will start Recording a marker message After playing back the messages you can leave an additional message 1 Wait for the voice guide Voice gu...

Страница 43: ...e slightly different depending on the feature 4 SET 5 To exit programming press MENU Features Cordless handset 8 2 Cordless handset programming 1 MENU 2 Press the code number 0 to 9 and 3 Press the desired command to display the desired setting L This step may be slightly different depending on the feature 4 Save soft key 1 i OFF Note L To exit programming press OFF at any time Features MENU SET 1...

Страница 44: ...s will not be printed 1 ON A confirmation report will be printed after every fax transmission 2 ERROR default A confirmation report will be printed only when a fax transmission fails Changing the ring count in FAX ONLY mode 0 6 1 1 2 2 3 3 default 4 4 Changing the ring count in TAM FAX mode 1 Base unit 0 6 0 TOLL SAVER 2 2 default 3 3 4 4 See page 34 for details Cordless handset 0 6 1 0 Toll saver...

Страница 45: ...ephone line service 1 PULSE For rotary pulse dial service 2 TONE default For tone dial service Cordless handset 0 5 1 1 Pulse For rotary pulse dial service 2 Tone default For tone dial service Setting the recording paper size 1 6 1 LETTER default Letter size paper 2 A4 A4 size paper Setting the ringer tone for outside calls Base unit 1 7 For the base unit ringer tone only 1 TONE 1 default 2 TONE 2...

Страница 46: ...etting 2 ERROR default When the previous fax transmission fails and you wish to re send the document Note L Calling charges may be higher than usual Sending a fax at a specified time 2 5 This feature allows you to take advantage of low cost calling hours offered by your telephone company This feature can be set up to 24 hours in advance of the desired time 0 OFF default 1 ON To send a document 1 I...

Страница 47: ...it will start sending or copying the documents Note L If the document exceeds the memory capacity sending of the whole document or copying of the exceeded document will be canceled and this feature will be turned OFF automatically Receiving oversized documents 3 6 If the size of the document sent by the other party is as large as or larger than the recording paper the unit can reduce the document ...

Страница 48: ...e until you clear the printing problem and make sure the unit is supplied with enough paper to print the stored document Setting friendly reception 4 6 To receive a fax automatically when you answer a call and hear a fax calling tone slow beep 0 OFF You have to press FAX START for fax reception 1 ON default You do not have to press FAX START for fax reception Setting the fax voice guidance 4 7 If ...

Страница 49: ...6 for details Cordless handset 0 4 For the cordless handset auto edit feature only 0 Off 1 On default See page 26 for details Setting the connecting tone 7 6 If you often have trouble when sending faxes this feature allows you to hear connecting tones fax tone ring back tone and busy tone You can use those tones to confirm the status of the other party s machine 0 OFF Deactivates this feature 1 ON...

Страница 50: ... all the phonebook items from the cordless handset to the base unit See page 24 for details Displaying the customer support Internet address The cordless handset can display the Internet address where you can download operating instructions for this product using your computer 1 MENU i Press V or repeatedly to display Customer support i Select soft key L www panasonic com support will be displayed...

Страница 51: ...ill flash when new messages have been recorded page 40 0 Off default 1 On Note L The message indicator will not flash for new messages while the cordless handset is in use L Battery performance may be shortened when using this feature page 15 Registering the cordless handset 0 0 See page 52 for details Feature Feature code Selection ...

Страница 52: ...ess handset is not registered to the base unit register the cordless handset Important L Make sure the base unit and the cordless handset are near each other and not being used 1 Cordless handset MENU i 0 0 L The rest of the procedure must be completed within 1 minute 2 Base unit Press and hold LOCATOR 3 Cordless handset Press OK soft key then wait until the cordless handset beeps ...

Страница 53: ... because of a problem with the other party s fax machine Check with the other party JUNK FAX PROH REJECT L The junk fax prohibitor feature of this unit rejected fax reception MEMORY FULL L The memory is full of received documents due to a lack of recording paper a lack of ink film or a recording paper jam Install paper page 13 install ink film page 11 or remove the jammed paper page 63 NO DOCUMENT...

Страница 54: ...t tried to copy phonebook items page 24 but the copy has been stopped FAX IN MEMORY L See the other displayed message instructions to print out the document Received documents are stored in memory due to a lack of recording paper a lack of ink film or a recording paper jam Install paper page 13 install ink film page 11 or remove the jammed paper page 63 You will lose all faxes in memory if the pow...

Страница 55: ...f the installed paper and re install it gently PHONEBOOK FULL L There is no space to store new items in the phonebook Erase unnecessary items page 23 L The phonebook memory of the cordless handset is already full or became full when copying phonebook items Copying was stopped Press STOP to exit the mode page 24 Erase other stored items in the cordless handset phonebook page 23 then try again PLEAS...

Страница 56: ...dial list is empty Please lift up and try again L A cordless handset button was pressed while the cordless handset was on the base unit Lift the cordless handset and press the button again System is busy Please try again later L The cordless handset has lost communication with the base unit Move closer to the base unit and try again L Another user is listening to messages Try again later Problem C...

Страница 57: ... ink film runs out quickly L Even if there are only a few sentences every page that comes out of the machine is considered a full page L Turn OFF the following features confirmation report feature 04 on page 44 journal report feature 22 on page 46 Caller ID list feature 26 on page 46 The unit beeps L The memory reception alert of feature 44 is ON page 48 and the unit has a document in memory Press...

Страница 58: ...ou cannot store an item in the phonebook while the cordless handset is in talk speakerphone or intercom mode or while listening to messages L Do not pause for over 1 minute while storing I cannot redial by pressing REDIAL L If the last number dialed was more than 48 digits long the number will not be redialed correctly Redial the number manually L The last number dialed may have been a remote func...

Страница 59: ...chine The other party complains that black lines white lines or smudges appear on their received document L The scanner glass or rollers are dirty with correction fluid etc Clean them page 65 Please do not insert a document before correction fluid has dried completely Documents frequently misfeed L Clean the document feeder rollers recording paper feeder and rubber flap page 65 Problem Cause Solut...

Страница 60: ... L If your line has special telephone services such as call waiting the service may have been activated during fax reception Connect the unit to a line that does not have these services I cannot receive documents by pressing 9 on the cordless handset or an extension telephone L You must set remote fax activation to ON feature 41 on page 48 beforehand L You may have changed the remote fax activatio...

Страница 61: ...ent feeder rollers recording paper feeder and rubber flap page 65 Problem Cause Solution I cannot listen to messages from a remote location L Press the remote operation ID code correctly and firmly feature 11 or feature 063 on page 45 L The unit is not in TAM FAX mode Change to TAM FAX mode page 42 The other party complains that they cannot leave a voice message L You may have subscribed to a voic...

Страница 62: ...age 46 is programmed and a power failure prevents the document from being sent at the set time the document will be sent after power is restored L If any fax documents are stored in the memory they will be lost When power is restored a power down report will be printed stating which documents in memory have been erased ...

Страница 63: ...tray beforehand otherwise the paper may misfeed or jam 1 Open the front cover 1 push the green button 2 then open the back cover 3 2 Remove the jammed recording paper 4 3 Turn the blue gear 5 in the direction of the arrow until the ink film is tight 6 and at least one layer of ink film is wrapped around the blue core 7 3 1 2 4 Correct Incorrect 5 6 7 Tight 1 turn No ink film is wrapped around the ...

Страница 64: ...13 11 1 2 When the recording paper was not fed into the unit properly The display will show the following CHECK PAPER Remove the recording paper and straighten Insert the paper then press SET to clear the message 11 2 Document jams 1 Open the front cover Remove the jammed document carefully 1 2 Close the front cover securely Note L Do not pull out the jammed paper forcibly before opening the front...

Страница 65: ...reen button 2 then open the back cover 3 3 Clean the document feeder rollers 4 and rubber flap 5 with a cloth moistened with isopropyl rubbing alcohol and let all parts dry thoroughly Clean the scanner glass 6 with a soft dry cloth Caution L Do not use paper products such as paper towels or tissues 4 Clean the recording paper feeder roller 7 with a cloth moistened with isopropyl rubbing alcohol an...

Страница 66: ...one line cord 2 Open the front cover 1 push the green button 2 then open the back cover 3 3 Remove the ink film 4 4 Clean the thermal head 5 with a cloth moistened with isopropyl rubbing alcohol and let it dry thoroughly Caution L To prevent a malfunction due to static electricity do not use a dry cloth and do not touch the thermal head directly 5 Re install the ink film and close the covers see s...

Страница 67: ...ransmission speed 1 Approx 15 s page 2 Scanning density Horizontal 8 pels mm 203 pels inch Vertical 3 85 lines mm 98 lines inch standard resolution 7 7 lines mm 196 lines inch fine photo resolution 15 4 lines mm 392 lines inch super fine resolution Photo resolution 64 levels Scanner type Contact Image Sensor Printer type Thermal Transfer on plain paper Data compression system Modified Huffman MH M...

Страница 68: ...o not use the following types of paper Paper with cotton and or fiber content that is over 20 such as letterhead paper or paper used for resumes Extremely smooth or shiny paper or paper that is highly textured Coated damaged or wrinkled paper Paper with foreign objects attached such as tabs or staples Paper which has dust lint or oil stains Paper that will melt vaporize discolor scorch or emit dan...

Страница 69: ...dures that could affect the operation of the equipment If this happens the telephone company will provide advance notice in order for you to make necessary modifications to maintain uninterrupted service If trouble is experienced with this equipment for repair or warranty information please contact a Factory Servicenter or other Authorized Servicer If the equipment is causing harm to the telephone...

Страница 70: ...e separation between the equipment and receiver Connect the equipment into an outlet on a circuit different from that to which the receiver is connected Consult the dealer or an experienced radio TV technician for help Some cordless telephones operate at frequencies that may cause interference to nearby TVs and VCRs To minimize or prevent such interference the base of the cordless telephone should...

Страница 71: ... Mail In Service For Carry In or Mail In Service in the United States call 1 800 HELP FAX 1 800 435 7329 For assistance in Puerto Rico call Panasonic Puerto Rico Inc 787 750 4300 or fax 787 768 2910 Limited Warranty Limits And Exclusions This Limited Warranty ONLY COVERS failures due to defects in materials or workmanship and DOES NOT COVER normal wear and tear or cosmetic damage The Limited Warra...

Страница 72: ...oting support Panasonic offers two value based cost effective solutions 1 Panasonic Continued Services 900 fee based support 1 900 FAX HELP 1 900 329 4357 This exceptional service is charged directly to your telephone bill at only 2 49 per minute 2 Panasonic Premier Service Club PPSC 1 800 435 7329 PPSC provides toll free troubleshooting support at only 7 99 for a one time sampler or 23 95 for a o...

Страница 73: ... Servicenter purchase Parts and Accessories or make Customer Service and Literature requests by visiting our Web Site at http www panasonic com consumersupport or E mail us via consumer_fax us panasonic com Contact For in Limited Warranty programming and Troubleshooting Support Fax Advantage assistance and Service Location finder 1 800 HELP FAX 435 7329 For out of Limited Warranty technical and tr...

Страница 74: ...ing time 44 063 Remote operation ID 45 08 Change language 50 11 Ringer volume 17 12 Ringer tone 45 5 Voice enhancer 20 50 A Accessories 7 A4 paper guide 12 Paper support 13 Paper tray 12 Advanced features 46 Auto answer setting 49 Auto talk feature 21 50 B Basic features 44 Battery Charge 15 Installation 14 Replacement 14 Booster 20 BROADCAST LIST 67 Broadcast transmission 31 Button description Ba...

Страница 75: ...ing message 39 Memo message 41 Recording paper 13 68 Recording time Incoming message 44 TAM FAX greeting 48 Redialing Base unit 21 29 30 Cordless handset 20 Redial list 20 Registration 52 Remote operation 42 Remote operation ID 45 Reports Broadcast programming 67 Broadcast sending 31 Caller ID 67 Confirmation 29 Journal 29 67 Phonebook 67 Power down 61 Printer test 67 Setup 67 Reset Base unit 50 R...

Страница 76: ... the returned product Any unit that is replaced by Panasonic and not shipped with proper proof of purchase by you will be subject to a minimum 100 00 charge The original unit must be properly packaged in the same manner as the replacement unit utilizing the packing materials provided Damage due to improper or inadequate packing will be charged to you as an out of warranty cost If our 1 800 HELP FA...

Отзывы: