background image

Please read these operating instructions 
before using the unit and save for future 
reference.

This unit is compatible with Caller ID. You 
must subscribe to the appropriate service 
of your service provider/telephone 
company.

Operating Instructions


Plain Paper Fax

 with Digital Answering System

Model No.


KX-FP373FX

FP373FX-PNQX1826ZA-OI-en.

PDF

  Page 1  Thursday, November 6, 2008  11:23 AM

Содержание KX-FP373FX

Страница 1: ...the unit and save for future reference This unit is compatible with Caller ID You must subscribe to the appropriate service of your service provider telephone company Operating Instructions Plain Paper Fax with Digital Answering System Model No KX FP373FX ...

Страница 2: ...elopment to energy saving designs from greater product reusability to waste conscious packaging practices Declaration of Conformity L Panasonic Communications Co Ltd declares that this equipment is in compliance with the essential requirements and other relevant provisions of Radio Telecommunications Terminal Equipment R TTE Directive 1999 5 EC Declarations of Conformity for the relevant Panasonic...

Страница 3: ...ompany For safety purposes this unit is equipped with a grounded plug If you do not have this type of outlet please have one installed Do not defeat this safety feature by tampering with the plug Do not place objects on the power cord Install the unit where no one can step or trip on the cord Do not overload power outlets and extension cords This can result in the risk of fire or electric shock Co...

Страница 4: ...e telephone line cord plug or allow it to become wet at all This may cause a fire If the telephone line cord plug becomes wet immediately pull it from the telephone wall jack and do not use Unplug this unit from power outlets and refer servicing to an authorised service centre when the following conditions occur L If the power cord is damaged or frayed L If liquid has been spilled into the unit L ...

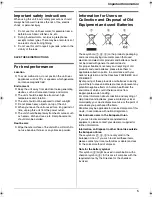
Страница 5: ...teries These symbols 1 2 3 on the products packaging and or accompanying documents mean that used electrical and electronic products and batteries should not be mixed with general household waste For proper treatment recovery and recycling of old products and used batteries please take them to applicable collection points in accordance with your national legislation and the Directives 2002 96 EC a...

Страница 6: ... 22 4 4 Broadcast transmission 23 Receiving Faxes 4 5 Selecting the way to use your fax machine 24 4 6 Receiving a fax manually Auto answer OFF 25 4 7 Receiving a fax automatically Auto answer ON 26 4 8 Receive polling retrieving a fax placed on another fax machine 27 4 9 Junk fax prohibitor preventing fax reception from undesired callers 28 5 Copy Copying 5 1 Making a copy 29 6 Answering Machine ...

Страница 7: ... Accessory information Replacement film 1 Model No Part No KX FA57E KX FA57X 70 m 1 roll prints about 210 A4 sized pages 1 To ensure the unit operates properly we recommend using the Panasonic replacement film The ink film is not reusable Do not rewind and use the ink film again 1 Telephone line cord 2 Handset 3 Handset cord 4 Paper tray 5 Recording paper support 6 Starter ink film 1 10 metres lon...

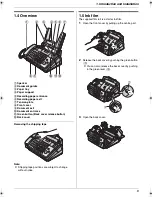
Страница 8: ...ER L To turn the auto answer setting ON OFF page 25 H MIC L The built in microphone I STOP L To stop an operation or programming session L To erase a character number J RECORD L To record your greeting message page 31 L To record your voice memo page 31 K TONE L To change from pulse to tone temporarily during dialling when your line has rotary pulse service L MUTE L To mute your voice during a con...

Страница 9: ...ver by pulling up the centre part 2 Release the back cover by pushing the green button 1 L You can also release the back cover by pushing in the green lever 2 3 Open the back cover 1 Speaker 2 Document guides 3 Paper tray 4 Paper support 5 Recording paper entrance 6 Recording paper exit 7 Tension plate 8 Front cover 9 Document exit j Document entrance k Green button Back cover release button l Bac...

Страница 10: ...s like carbon paper L Make sure the blue gear 3 and white gear 4 are installed as shown 5 Turn the blue gear 5 in the direction of the arrow until the ink film is tight 6 and at least one layer of ink film is wrapped around the blue core 7 6 Close the back cover securely by pushing down on the dotted area at both ends 8 7 Close the front cover securely 3 4 5 6 Correct Incorrect 7 Tight 1 turn No i...

Страница 11: ...ndset cord 1 1 7 Paper tray Insert the tabs 1 on the paper tray 2 into the slots on the back of the unit 3 1 8 Recording paper support Insert the recording paper support 1 into the slot to the right of the recording paper exit 2 then into the left slot 3 1 2 3 1 3 2 1 ...

Страница 12: ...aper 1 Fan the paper to prevent paper jams 2 Pull the tension plate forward 1 and insert the paper gently print side down 2 L The paper should not be over the tab 3 L If the paper is not inserted correctly remove all of the installed paper and re install it gently Otherwise the paper may jam Note L Remove all of the installed paper before adding paper Correct Incorrect 3 2 1 ...

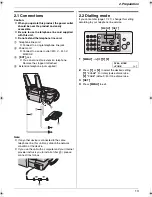
Страница 13: ...er and your internet provider instructs you to install a filter 5 please connect it as follows 2 2 Dialling mode If you cannot dial page 17 21 change this setting according to your telephone line service 1 MENU i 1 3 DIAL MODE TONE 2 Press 1 or 2 to select the desired setting 1 PULSE For rotary pulse dial service 2 TONE default For tone dial service 3 SET 4 Press MENU to exit 1 Telephone line cord...

Страница 14: ...s A or B Speaker volume While using the speakerphone press A or B Initial Programming 2 4 Date and time 1 MENU i 0 1 i SET D 01 M 01 Y 08 TIME 00 00 2 Enter the current date month year hour minute by selecting 2 digits for each Press repeatedly to select AM PM or 24 hour clock format Example 10 August 2008 10 15PM 12 hour clock format 1 Press 1 0 0 8 0 8 1 0 1 5 D 10 M 08 Y 08 TIME 10 15 2 Press r...

Страница 15: ...cursor to the next space and press 5 3 times LOGO BIL L To switch between uppercase or lowercase letters Pressing the button will change the letter input to uppercase or lowercase alternately 1 Press 2 2 times LOGO B 2 Press 4 3 times LOGO B I 3 Press LOGO B i 4 Press 5 3 times LOGO Bi l To correct a mistake Press or to move the cursor to the incorrect character and make the correction L To erase ...

Страница 16: ...2 Enter your fax number up to 20 digits L To enter a press L To enter a space press L To enter a hyphen press FLASH L To erase a number press STOP 3 SET 4 Press MENU to exit To correct a mistake Press or to move the cursor to the incorrect number and make the correction L To erase all of the numbers press and hold STOP SET MENU STOP FLASH ...

Страница 17: ...al L see the character table page 15 L To search for symbols press 1 4 Press B repeatedly to display LISA L To stop the search press STOP L To dial the displayed number press DIGITAL SP PHONE or lift the handset 3 1 3 Editing a stored item 1 PHONEBOOK 2 Press A or B repeatedly to display the desired item i MENU 3 L If you do not need to edit the name skip to step 5 4 Edit the name For further deta...

Страница 18: ... the one touch dial 1 Select the desired station key For stations 1 5 Press the desired station key For stations 6 10 Press LOWER then press the desired station key 2 Press DIGITAL SP PHONE or lift the handset 3 2 3 Editing a stored item 1 PHONEBOOK 2 Press A or B repeatedly to display the desired item i MENU 3 L If you do not need to edit the name skip to step 5 4 Edit the name For further detail...

Страница 19: ...d in the unit s phonebook the stored name will be displayed L If the unit is connected to a PBX Private Branch Exchange system caller information may not be received properly Consult your PBX supplier L If the unit cannot receive caller information the following will be displayed OUT OF AREA The caller dialled from an area which does not provide Caller ID service PRIVATE CALLER The caller requeste...

Страница 20: ...Erasing all caller information 1 Press MENU repeatedly to display CALLER SETUP i SET L CALL LIST ERASE will be displayed 2 SET L To cancel erasing press STOP then MENU 3 SET i STOP 3 6 2 Erasing specific caller information 1 CALLER ID 2 Press A or B repeatedly to display the desired item i i SET i STOP 3 7 Storing caller information into the phonebook one touch dial 1 CALLER ID 2 Press A or B repe...

Страница 21: ... the document Add the other pages up to 10 at a time on top of the previously inserted pages while the last page is being fed into the unit Pre dialling a fax number 1 Enter the fax number 2 Insert the document 3 FAX START Sending from memory Quick scan feature To use this feature activate feature 34 page 38 beforehand 1 Insert the document 2 Enter the fax number i FAX START L If the document exce...

Страница 22: ...g a copy machine to copy the original document onto A4 or letter sized paper then sending the copied document 4 3 Sending a fax using the phonebook and one touch dial feature Before using this feature store the desired names and telephone numbers into the phonebook page 17 and one touch dial feature page 18 1 Adjust the width of the document guides to fit the actual size of the document 2 Insert t...

Страница 23: ... SET L To add other items repeat step 3 up to 20 items 4 STOP 4 4 3 Erasing a stored item from the broadcast memory 1 PHONEBOOK 2 Press A or B repeatedly to display BROADCAST i MENU i 3 Press A or B repeatedly to display the desired item you want to erase L To cancel erasing press STOP 4 SET i SET i STOP 4 4 4 Sending the same document to pre programmed parties 1 Insert the document FACE DOWN 2 If...

Страница 24: ...a fax calling tone is detected the fax machine will receive the fax automatically 4 5 2 Use only as a fax FAX ONLY mode Your situation You have a separate telephone line just for faxes or you want to use the unit only for receiving faxes Setup Set the fax machine to FAX ONLY mode page 27 by pressing AUTO ANSWER repeatedly L The AUTO ANSWER indicator turns ON Note L Make sure feature 77 is set to F...

Страница 25: ...feature 73 is set to TEL page 40 beforehand 2 Press AUTO ANSWER repeatedly to display TEL MODE L The AUTO ANSWER indicator turns OFF Note L If you do not answer the call within 10 rings the unit will temporarily answer the call Then you need to enter the remote operation ID to turn the auto answer setting ON See page 33 for details How to receive phone calls and faxes 1 Lift the handset to answer ...

Страница 26: ...e the fax machine is ringing The auto disconnection code can be changed in feature 49 on page 39 B If you do not answer the call the unit will activate the fax function L Some fax machines do not generate fax calling tones when sending faxes therefore the unit will try to receive a fax even if no fax calling tone is detected Note L Even when you answer a call with the extension telephone and press...

Страница 27: ...hen there are no new messages If you call your unit from outside to listen to new messages page 33 you will know that there are no messages when the unit rings for the 4th time You can then hang up without being charged for the call 4 7 2 Activating FAX ONLY mode 1 Make sure feature 77 is set to FAX ONLY beforehand page 40 2 Press AUTO ANSWER repeatedly to display FAX ONLY MODE L The AUTO ANSWER i...

Страница 28: ...19 if you do not wish to receive faxes from them 1 Press MENU repeatedly to display JUNK FAX PROH 2 Press repeatedly to display JUNK LIST SET i SET 3 Press A or B repeatedly to display the item you wish to prevent the fax reception from i SET 4 Press STOP to exit To display the junk fax prohibitor list 1 Press MENU repeatedly to display JUNK FAX PROH 2 Press repeatedly to display JUNK LIST DISP i ...

Страница 29: ...f the document exceeds the memory capacity copying of the exceeded document will be cancelled and this feature will be turned OFF automatically To stop copying Press STOP 5 1 1 More copying features To enlarge a document 1 Insert the document i COPY i 2 Press A repeatedly to select 150 or 200 i START L The unit will enlarge the centre of the upper part of the document To make an enlarged copy of t...

Страница 30: ...e original document Note L The unit will store the documents into memory while collating the copies If memory becomes full while storing the unit will only print out the stored pages Collated pages Uncollated pages 4 3 2 1 4 3 2 1 1 1 2 2 3 3 4 4 ...

Страница 31: ... If you change the setting from 60 seconds to 16 seconds your greeting message will be deleted The pre recorded greeting message will be played when a call is received To check the greeting message 1 Set feature 77 to TAM FAX beforehand page 40 2 Press AUTO ANSWER repeatedly to display TAM FAX MODE L The unit will play the TAM FAX greeting message 6 1 1 Erasing your recorded greeting message 1 Set...

Страница 32: ...ges will be played Note L The total recording time of all messages greeting incoming and memo messages is about 18 minutes A maximum of 59 messages can be recorded If messages are recorded in noisy environment the actual recording time may be less To repeat a message Press while listening to the message L If you press within 5 seconds of the beginning of the message the previous message will be pl...

Страница 33: ...y press firmly 1 If pressed within the first 5 seconds of a message the previous message will be played 2 To resume operation press a command key within 10 seconds otherwise the marker message recording will start Recording a marker message After playing back the messages you can leave an additional message 1 Wait for 3 beeps indicating the end of the remote operation 2 Hear 1 beep 3 Wait about 10...

Страница 34: ...atures Summary 7 1 Programming 1 MENU 2 Press and the 2 digit code page 35 to page 41 3 Press the desired command to display the desired setting L This step may be slightly different depending on the feature 4 SET 5 To exit programming press MENU SET MENU ...

Страница 35: ...4 5 5 6 6 7 7 8 8 9 9 Note L Set feature 77 to FAX ONLY page 40 beforehand Changing the ring count in TAM FAX mode 0 6 0 TOLL SAVER 2 2 default 3 3 4 4 5 5 6 6 7 7 See page 27 for details Note L Set feature 77 to TAM FAX page 40 beforehand Changingthemaximum recording time for incoming messages 1 0 0 GREETING ONLY The unit plays the greeting message but does not record any incoming messages 1 1 MI...

Страница 36: ...7 Programmable Features 36 Setting the ringer tone 1 7 1 TONE 1 default 2 TONE 2 3 TONE 3 Feature Feature code Selection ...

Страница 37: ...al Sending a fax at a specified time 2 5 This feature allows you to take advantage of low cost calling hours offered by your telephone company This feature can be set up to 24 hours in advance of the desired time 0 OFF default 1 ON To send a document 1 Insert the document 2 If necessary press A or B repeatedly to select the desired resolution page 21 3 MENU i 2 5 4 Press 1 to select ON i SET 5 Ent...

Страница 38: ...ing paper the unit can reduce the document and print it Select the desired reduction rate 1 72 2 86 3 92 default 4 100 Setting Recording paper size Original document size 100 A4 Letter 92 default A4 A4 86 A4 A4 72 A4 Legal Note L The information of the sending party is printed on the top of each page Therefore even if the original document is the same size as the recording paper the document will ...

Страница 39: ...hone in TEL FAX mode page 26 activate this feature and program the code 0 OFF 1 ON default 1 MENU i 4 9 2 Press 1 to select ON i SET 3 Enter your code from 2 to 4 digits using 0 9 and L The default code is 0 4 SET i MENU Changing the recording time for your TAM FAX greeting message 5 4 1 16s default Maximum recording time is 16 seconds 2 60s Maximum recording time is 60 seconds See page 31 for det...

Страница 40: ...ure allows you to hear connecting tones fax tone ring back tone and busy tone You can use those tones to confirm the status of the other party s machine 0 OFF Deactivates this feature 1 ON default You will hear connecting tones Note L If the ring back tone continues the other party s machine may not be a fax machine or may have run out of paper Check with the other party L The connecting tone volu...

Страница 41: ...ced features to their default settings 8 0 0 NO default 1 YES To reset the advanced features 1 MENU i 8 0 2 Press 1 to select YES i SET i SET i MENU Note L The ECM selection feature 68 on page 39 will not be reset Feature Feature code Selection ...

Страница 42: ...arty s fax machine Check with the other party JUNK FAX PROH REJECT L The junk fax prohibitor feature of this unit rejected fax reception MEMORY FULL L The memory is full of received documents due to a lack of recording paper a lack of ink film or a recording paper jam Install paper page 12 install ink film page 9 or remove the jammed paper page 49 NO DOCUMENT L The document was not fed into the un...

Страница 43: ... in memory if the power is removed Check with power connected FAX MEMORY FULL L The memory is full of received documents due to a lack of recording paper a lack of ink film or a recording paper jam Install paper page 12 install ink film page 9 or remove the jammed paper page 49 You will lose all faxes in memory if the power is removed Check with power connected L When performing memory transmissio...

Страница 44: ...rding paper Try again REMOVE DOCUMENT L The document is jammed Remove the jammed document page 51 L Press STOP to eject the jammed paper TRANSMIT ERROR L A transmission error occurred Try again L If you are sending a fax overseas try the following Use the overseas transmission mode feature 23 on page 37 Add 2 pauses at the end of the telephone number or dial manually UNIT OVERHEATED L The unit is ...

Страница 45: ...report feature 04 on page 35 journal report feature 22 on page 37 Caller ID list feature 26 on page 37 During programming I cannot enter the code or ID number L All or part of the numbers are the same as another code or ID Change the number remote operation ID feature 11 on page 35 fax activation code feature 41 on page 38 auto disconnection feature 49 on page 39 The unit beeps L The memory recept...

Страница 46: ...ty complains that black lines white lines or smudges appear on their received document L The scanner glass or rollers are dirty with correction fluid etc Clean them page 51 Please do not insert a document before correction fluid has dried completely Documents frequently misfeed L Clean the document feeder rollers and rubber flap page 51 Problem Cause Solution I cannot receive documents L The telep...

Страница 47: ...ing paper jam Install paper page 12 install ink film page 9 or remove the jammed paper page 49 The other party complains that they cannot send a document L The receiving mode is set to TEL mode Receive the document manually page 25 or change the receiving mode to TAM FAX mode page 26 FAX ONLY mode page 27 or TEL FAX mode page 26 L The memory is full of received documents due to a lack of recording...

Страница 48: ...over L You may have used paper with a cotton and or fibre content that is over 20 such as letterhead or resume paper L The recording paper is too damp Use new paper Original Copy Documents frequently misfeed L Clean the document feeder rollers and rubber flap page 51 Problem Cause Solution The answering machine is turned ON but caller messages are not recorded L The recording time is set to GREETI...

Страница 49: ...in the unit The display will show the following PAPER JAMMED 1 Open the front cover by pulling up the centre part 2 Release the back cover by pushing the green button 1 L You can also release the back cover by pushing in the green lever 2 3 Open the back cover 4 Remove the jammed recording paper 3 1 2 3 ...

Страница 50: ... area at both ends 7 then close the front cover securely 8 9 1 2 When the recording paper was not fed into the unit properly The display will show the following CHECK PAPER Remove the recording paper and straighten Pull the tension plate 1 forward and hold open while inserting paper then press SET to clear the message Correct Incorrect 4 5 6 Tight 1 turn No ink film is wrapped around the blue core...

Страница 51: ...eeder scanner glass when Documents frequently misfeed Smudges or black white lines appear on the original document when sending or copying 1 Disconnect the power cord and the telephone line cord 2 Open the front cover by pulling up the centre part 3 Clean the document feeder rollers 1 and rubber flap 2 with a cloth moistened with isopropyl rubbing alcohol and let all parts dry thoroughly Clean the...

Страница 52: ...or black white lines appear on a copied received document check whether there is dust on the thermal head Clean the thermal head to remove the dust 1 Disconnect the power cord and the telephone line cord 2 Open the front cover by pulling up the centre part 3 Release the back cover by pushing the green button 1 L You can also release the back cover by pushing in the green lever 2 1 2 ...

Страница 53: ...alcohol and let it dry thoroughly Caution L To prevent a malfunction due to static electricity do not use a dry cloth and do not touch the thermal head directly 6 Re install the ink film and close the covers see step 4 to 7 on page 10 7 Insert the recording paper gently page 12 8 Connect the power cord and the telephone line cord 3 4 ...

Страница 54: ...ndard resolution 7 7 lines mm fine photo resolution 15 4 lines mm super fine resolution Photo resolution 64 levels Scanner type Contact Image Sensor Printer type Thermal Transfer on plain paper Data compression system Modified Huffman MH Modified READ MR Modified Modified READ MMR Modem speed 14 400 12 000 9 600 7 200 4 800 2 400 bps Automatic Fallback Operating environment 5 C 35 C 20 80 RH Relat...

Страница 55: ...nt on one side Try using the other side of the paper if you are not happy with the print quality or if misfeeding occurs L For proper paper feeding and best print quality we recommend using long grained paper L Do not use paper of different types or thickness at the same time This may cause paper jams L Avoid double sided printing L Do not use paper printed from this unit for double sided printing...

Страница 56: ...Cleaning 51 Connecting tone Feature 76 40 Connections 13 Copy 29 Collation 29 Enlarge Reduce 29 D Date and time Feature 01 14 Delayed transmission Feature 25 37 Dialling mode Feature 13 35 Display Contrast Feature 39 38 Error messages 43 Document size 22 E ECM selection Feature 68 39 Error messages 42 Extension telephone 25 F Fax activation code Feature 41 38 Fax number Feature 03 16 FAX ONLY mode...

Страница 57: ...an contrast Feature 58 39 Sending faxes Broadcast 23 From memory 21 Manually 21 One touch 22 Phonebook 22 Sending report Feature 04 21 Setup list 54 Storing Broadcast 23 One touch 18 Phonebook 17 T TAM FAX mode 26 Telephone number list 54 TEL FAX mode 24 26 TEL FAX ring count Feature 78 40 TEL mode 24 25 V Voice guidance Feature 47 39 Volume 14 ...

Страница 58: ...58 Notes ...

Страница 59: ...59 Notes ...

Страница 60: ...PNQX1826ZA CM1108DW0 1 62 4 chome Minoshima Hakata ku Fukuoka 812 8531 Japan Manufacturer 0682 Global web site http panasonic net ...

Отзывы: