background image

77

Fax/Copy

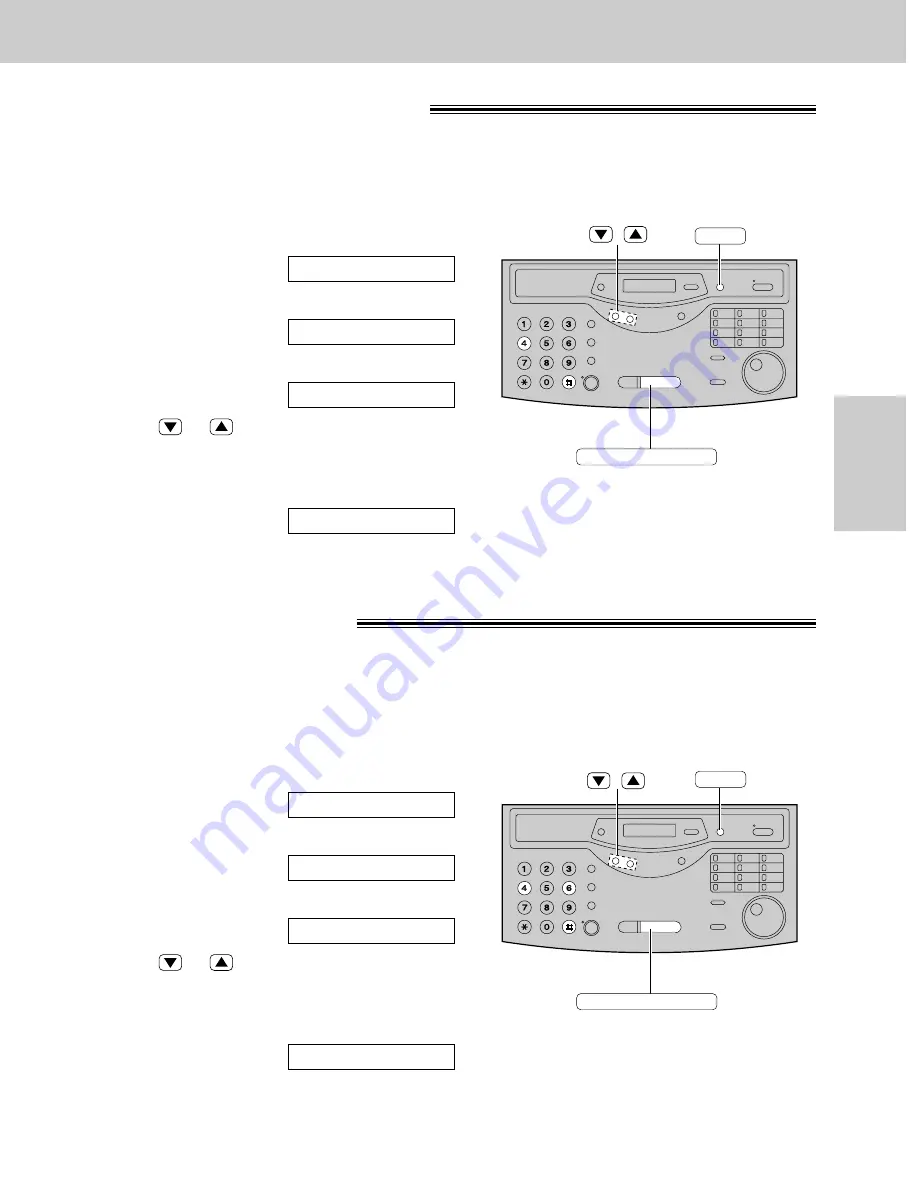
Friendly reception

!

The friendly reception feature allows you to receive fax documents automatically without pressing

(START/SET/COPY)

(p. 62).

When this feature is deactivated, you have to press 

(START/SET/COPY)

to receive fax documents each time

you answer a fax call.

MENU

START/SET/COPY

/

1

Press 

(MENU)

.

Display:

2

Press 

(#)

, then 

(4)(6)

.

3

Press 

(START/SET/COPY)

.

4

Press 

or 

to select the desired setting.

If this feature is not required, select “OFF”.

5

Press 

(START/SET/COPY)

.

6

Press 

(MENU)

.

SETUP ITEM [  ]

MODE=ON

▼▲

FRIENDLY RCV

1.SYSTEM SET UP

Memory reception alert

!

When a received document is stored into memory due to a problem, the unit will alert you with beep tones. If
you hear slow beeps, clear the printing problem or supply paper to print the stored document. The beep tones
will stop.

MENU

START/SET/COPY

/

1

Press 

(MENU)

.

Display:

2

Press 

(#)

, then 

(4)(4)

.

3

Press 

(START/SET/COPY)

.

4

Press 

or 

to select the desired setting.

If this feature is not required, select “OFF”.

5

Press 

(START/SET/COPY)

.

6

Press 

(MENU)

.

SETUP ITEM [  ]

MODE=ON

▼▲

RECEIVE ALERT

1.SYSTEM SET UP

Receiving Faxes

Содержание KX-FLM600

Страница 1: ...unction Laser FAX Model No KX FLM600 To get started please read the Quick Start section p 6 13 OPERATING INSTRUCTIONS Please read these Operating Instructions before using the unit and save for future reference FOR OPERATION ASSISTANCE CALL 1 800 HELP FAX 1 800 435 7329 OR SEND A FAX TO 1 215 741 6376 Comienzo rápido p 132 ...

Страница 2: ...g the facsimile and Telephone number of the business entity or person s To program this information into your unit complete all the instructions on pages 29 to 32 If you have not applied to the service you will not be able to use the IQ FAX function p 46 48 When connecting the fax machine to your computer use the included parallel cable for reliable data communications and compliance with FCC rule...

Страница 3: ...unit where no one can step or trip on the cord 10 Do not overload wall outlets and extension cords This can result in the risk of fire or electric shock 11 Never push any objects through slots in this unit This may result in the risk of fire or electric shock Never spill any liquid on the unit 12 To reduce the risk of electric shock do not disassemble this unit Take the unit to an authorized servi...

Страница 4: ...of fire or electrical shock do not expose this product to rain or any type of moisture CAUTION This printer utilizes a laser Use of controls or adjustments or performance of procedures other than those specified here in may result in hazardous radiation exposure OTHER INFORMATION Keep the unit away from electrical noise generating devices such as fluorescent lamps and motors The unit should be kep...

Страница 5: ...7 9080 or call 1 800 332 5368 Power cord 1 Telephone line cord 1 Handset 1 Toner cartridge 1 Drum unit 1 Handset cord 1 Panasonic PC software for KX FLM600 CD ROM 1 Paper tray 1 Printer cable 1 Parallel cable Accessory order information For best results use genuine Panasonic toner cartridge drum unit Model No KX FA75 To order call toll free 1 800 332 5368 or see the fax order instructions below Fa...

Страница 6: ...carefully A Remove the protection cap and protection sheet attached to the drum unit Do not touch or scratch the green drum surface A Do not expose the drum unit to light for more than 5 minutes B Install the drum unit on the toner cartridge by holding the two tabs C Close the top cover Before installation p 21 Remove the shipping tape Green drum surface Protection sheet Protection cap Shipping ta...

Страница 7: ...ift the paper cassette up slightly and pull it out of the unit B Fan the stack of paper to prevent a paper jam and place the paper in the paper cassette Put the side to be printed face up C Insert the paper cassette into the unit until it clicks into place A Insert the two tabs of the paper tray into the slots on the paper cassette B Open the paper tray extender C Open the paper stacker ...

Страница 8: ...the unit B Connect to a single telephone line jack Wall jack RJ11C 120 V 60 Hz Power surge protector Line surge protector Power cord 3 A Connect to the unit B Connect to a power outlet Answering machine not included For further details see page 65 For further details see page 27 To connect an answering machine peel off the sheet on the EXT jack and connect the cord ...

Страница 9: ...d talking replace the handset 2 Dial the number 1 When the unit rings lift the handset 2 When finished talking replace the handset For further details see page 34 If you are having trouble see page 108 Voice calls making Voice calls answering For further details see page 34 If you are having trouble see page 108 ...

Страница 10: ...rt the document until the unit grabs the document and a single beep is heard FACE DOWN up to 15 pages Press START SET COPY Dial the fax number 4 5 For further details see page 43 If you are having trouble see page 108 Faxes sending Note While scanning do not move the pages which have already ejected A paper jam may occur Allow the scanning process to finish before viewing documents ...

Страница 11: ...place the handset 2 When document reception is required a fax calling tone slow beep is heard or no sound is heard press START SET COPY For further details see page 62 You can select the way to receive calls according to your needs p 60 61 If you are having trouble see page 109 Faxes receiving ...

Страница 12: ... the document and a single beep is heard Make sure the handset is on the cradle FACE DOWN up to 15 pages Press START SET COPY Enter the number of copies 5 6 Press START SET COPY 4 For further details see page 80 If you are having trouble see page 109 Note While scanning do not move the pages which have already ejected A paper jam may occur Allow the scanning process to finish before viewing docume...

Страница 13: ...red language that you use with this software Then click OK If the language dialog box does not appear The installation will automatically start If the language dialog box does not appear and the installation does not start automatically Click Start choose Run Type d setup where d is the drive letter of your CD ROM drive Click OK If you are not sure what the drive letter is for your CD ROM drive pl...

Страница 14: ... a voice call using the JOG DIAL directory 41 Voice Contact Talking to the caller after fax transmission or reception 42 Fax Copy Sending Faxes Sending a fax manually 43 Sending a fax using the One Touch Dial 44 Sending a fax using the JOG DIAL directory 45 IQ FAX 46 Documents you can send 49 Sending report for confirmation 50 Automatic journal report 51 Delayed transmission sending a fax at a spe...

Страница 15: ...ending documents created on the PC 93 Sending a document from the fax machine using the PC 95 PC Receiving Receiving faxes on your PC 96 Phone Call Making a phone call 98 Address Book Computerized directory for fax and phone numbers 99 Scanning Using your fax machine as a scanner 100 Copier PC based copying 101 More Information The Communication Log 102 Viewer 103 PC link turning PC related functi...

Страница 16: ... hacer contestar una llamada de voz 136 Envío de un fax 136 Reciviendo un fax 137 Para hacer una copia 137 Utilización del software PANA LINK de computadora 138 Comienzo rápido en español Index Index 151 Features Summary of user programmable features 153 Summary General Information Limited Limited Warranty 126 Warranty Servicenter Directory 127 Notes for product service and shipping the product 12...

Страница 17: ...ur unit 2 How to store names in the JOG DIAL directory and how to dial them 3 Help with problems sending faxes 4 Help with problems receiving faxes 5 How to use the copier function 6 Frequently asked questions and answers 7 Explanation of error messages shown on the display 8 List of available reports 3 Press START SET COPY PRINTING 8 REPORTS 7 ERRORS 6 Q and A 5 COPIER 4 FAX RECEIVING 3 FAX SENDI...

Страница 18: ...tion or cancel programming To initiate fax transmission reception or copying To store a setting during programming To prepare the unit for manual feeding p 90 To send faxes using the IQ FAX function p 48 To print a quick reference p 17 To select a resolution p 43 Hookswitch p 35 To redial the last number dialed p 34 43 To insert a pause during dialing p 35 To change from pulse to tone during diali...

Страница 19: ...12 22 for the One Touch Dial p 37 38 44 To keep the telephone number secret p 37 39 To insert a hyphen p 31 37 For the One Touch Dial p 37 38 44 Command keys p 31 To turn the AUTO ANSWER mode on off p 60 To initiate or exit programming To search for a stored name p 41 45 To select characters during programming p 31 To select the basic features during programming p 153 To select an enlargement redu...

Страница 20: ...rnal telephone jack Paper stacker Top cover handle To open the top cover Top cover 20 Finding the Controls Overview Front panel Speaker Document entrance Document feeder tray Document exit Paper level indicator Paper tray extender Paper cassette Paper tray Document guides To match the width of the document p 43 Front view Rear view ...

Страница 21: ...n the protection bag until you have read the following instructions and are ready to install the drum unit The drum unit contains a photosensitive drum Exposing it to light may damage the drum Once you have opened the protection bag Do not expose the drum unit to light for more than 5 minutes Do not touch or scratch the green drum surface Do not place the drum unit near dust or dirt Do not place t...

Страница 22: ...r cartridge Drum unit 3 Remove the tape and remove the protection cap by holding the tab Caution Do not touch the roller Do not put up the toner cartridge Protection cap 4 Rock the toner cartridge from side to side several times carefully Triangles Tape Tape Tab Tabs 2 Open the protection bag by cutting the end of the bag and remove the toner cartridge Protection bag Toner cartridge Roller ...

Страница 23: ... surface as this may damage the drum unit Do not expose the drum unit to light for more than 5 minutes as this may damage the drum unit Protection sheet Tape 9 Install the drum unit on the toner cartridge by holding the two tabs and matching the triangles Drum unit Toner cartridge Dotted area Triangles Tabs 10 Close the top cover securely by pushing down on the dotted area at both ends ...

Страница 24: ...You can load letter or legal size paper in the paper cassette The paper cassette can hold up to 250 sheets of 75 g m2 20 lb paper You can use 60 g m2 to 90 g m2 16 lb to 24 lb paper Loading paper in the paper cassette 3 Insert the paper cassette into the unit until it clicks into place Paper cassette Note Do not use different types or thicknesses of paper in the paper cassette at the same time Thi...

Страница 25: ...xtremely smooth or shiny paper or paper that is highly textured Coated papers Letterhead imprinted with low temperature or thermography These materials may transfer onto the fusing roller and cause damage Any pre printed paper should use inks compatible with 200 oC 392 oF for 0 1 second Damaged or wrinkled paper or paper with irregularities such as tabs staples etc Multipart forms or carbonless pa...

Страница 26: ...e two tabs of the paper tray into the slots on the paper cassette Paper tray Tab Paper tray Slots 2 Open the paper tray extender by pressing marked area Paper tray extender Paper stacker Paper cassette 1 Press marked area on the paper stacker Paper stacker Tab ...

Страница 27: ... Connect the telephone line cord 3 Connect the power cord The unit will automatically start to detect the dialing mode of your telephone line see below When the power is turned on for the first time the unit will eject the protection sheet and print some basic information Automatic dialing mode setting When the telephone line cord and the power cord are connected the unit will automatically start ...

Страница 28: ...R PAPER SIZE 1 SYSTEM SET UP Recording paper size Set the size of recording paper you load in the paper cassette This setting is used when the unit determines the reduction rate for incoming faxes The following choices are available LETTER 216 mmk279 mm 81 2qk11q A4 210 mmk297 mm May not be available in the United States LEGAL 216 mmk356 mm 81 2qk14q MENU START SET COPY ...

Страница 29: ... 2 digits using the dial keypad Example Aug 10 1999 Press 0 8 1 0 9 9 5 Press START SET COPY 6 Enter the correct hour minute by selecting each 2 digits using the dial keypad Press to select AM or PM Example 3 15PM 1 Press 0 3 1 5 2 Press until PM is displayed TIME 03 15PM TIME 03 15AM TIME 12 00AM M 08 D 10 Y 99 M 01 D 01 Y 99 SET DATE TIME 1 SYSTEM SET UP Note To enter the year 2000 in step 4 pre...

Страница 30: ...f where you want to insert the character 2 Press INSERT One Touch Dial key 2 to insert a space and enter the character 1 Press MENU Display 2 Press then 0 2 3 Press START SET COPY 4 Enter your logo up to 30 characters by using the dial keypad See next page for details Example Bill 1 Press 2 twice Cursor 2 Press 4 six times 3 Press 5 six times 4 Press fl to move the cursor to the next space and pre...

Страница 31: ...ect characters using the JOG DIAL Instead of pressing the dial keys you can select characters using the JOG DIAL Capital alphabet Lower case alphabet Number Symbol Rotating to the right Rotating to the left Characters 1 _ A B C a b c 2 D E F d e f 3 G H I g h i 4 J K L j k l 5 M N O m n o 6 P Q R S p q r s 7 T U V t u v 8 W X Y Z w x y z 9 0 HYPHEN key To insert a hyphen INSERT key To insert one c...

Страница 32: ...AL press fl to move the cursor The button replaces the digit with a and the button replaces it with a space Example using the dial keypad 234 5678 Press 2 3 4 5 6 7 8 To enter a hyphen in a telephone number press HYPHEN One Touch Dial key 1 SETUP ITEM NO 1234567 NO YOUR FAX NO 1 SYSTEM SET UP MENU START SET COPY STOP JOG DIAL HYPHEN To correct a mistake Press fi or fl to move the cursor to the inc...

Страница 33: ...SET COPY To turn the ringer back on press While the ringer volume is set to off The display will show the following message When a call is received the unit will not ring and will display the following Handset receiver volume 5 levels high to low are available While using the handset press or Monitor volume 8 levels high to low are available While using the monitor press or INCOMING CALL RINGER OF...

Страница 34: ... hear you but you can hear them 2 To resume the conversation press HANDSET MUTE again MUTE Voice calls making 1 Press MONITOR or lift the handset Display 2 Dial the telephone number Example If you misdial hang up and dial again 3 When the other party answers talk into the handset 4 When finished talking replace the handset TEL 2345678 TEL HANDSET MUTE MONITOR REDIAL PAUSE Handset Voice calls answe...

Страница 35: ...ge from the pulse to tone mode during a dialing operation When you hang up the unit will automatically return to the pulse mode FLASH button The FLASH button functions as the hookswitch on a regular telephone If you misdial a telephone number press the FLASH button firmly The FLASH button also allows you to use special features of a host exchange if connected or local telephone company services su...

Страница 36: ...esired setting 5 Press START SET COPY 6 Press MENU SETUP ITEM MODE AUTO DIALING MODE 1 SYSTEM SET UP Dialing mode touch tone or pulse If this feature is set to AUTO the unit will automatically set the dialing mode when it is turned on If you cannot dial change the dialing mode setting to TONE or PULSE by following the instructions below ...

Страница 37: ...RAM to exit the program OR USE JOG DIAL PRESS STATION REGISTERED S02 111 4497 S02 NAME John DIAL MODE OR USE JOG DIAL PRESS STATION START SET COPY SECRET HYPHEN LOWER One Touch Dial keys DIRECTORY PROGRAM To keep a telephone number secret Press SECRET One Touch Dial key 3 after entering the telephone number in step 5 A secret number cannot be viewed if this is set The telephone number will not app...

Страница 38: ...lking replace the handset Helpful hints You can confirm the stored items on the display p 41 or on the telephone number list p 123 You can use the JOG DIAL directory to select the station name instead of using the One Touch Dial keys Rotate JOG DIAL until the desired name is displayed then press MONITOR or lift the handset TEL John TEL One Touch Dial keys LOWER JOG DIAL MONITOR Handset Making a vo...

Страница 39: ... items repeat steps 3 to 6 7 Press DIRECTORY PROGRAM to exit the program NAME REGISTERED NO 5552233 NO NAME Alice NAME OR USE JOG DIAL PRESS STATION START SET COPY STOP JOG DIAL DIRECTORY PROGRAM SECRET START SET COPY STOP JOG DIAL DIRECTORY PROGRAM SECRET HYPHEN Note You can confirm the stored items on the display p 41 or on the telephone number list p 123 You can store items during a telephone c...

Страница 40: ...9 7 Press START SET COPY REGISTERED NO 0123456 NAME Mary EDIT DELETE Mary START SET COPY JOG DIAL DIRECTORY PROGRAM 1 Rotate JOG DIAL until the desired name is displayed Example 2 Press DIRECTORY PROGRAM 3 Press to select DELETE If you do not want to erase the item press STOP 4 Press START SET COPY The stored name and number are deleted DELETED YES PRESS SET DELETE OK EDIT DELETE Smith Erasing a s...

Страница 41: ...d the unit will automatically dial the number To search for a name by initial Example If you want to search for the name Lisa 1 Rotate JOG DIAL until any name is displayed Example 2 Press 5 repeatedly until any name with the initial L is displayed see the character table on page 31 3 Rotate JOG DIAL to the right until Lisa is displayed 3 To stop the operation press STOP 4 Press MONITOR or lift the...

Страница 42: ...tive ring When the other party answers your unit will emit a distinctive ring 2 Lift the handset to start talking Note If you initiate voice contact during transmission the unit will call you with a distinctive ring after all the documents have been transmitted If you initiate voice contact during reception the unit will call you with a distinctive ring after the current page of the document is re...

Страница 43: ...ss STOP To eject the document press STOP again WAITING REDIAL To select the resolution Select the desired resolution according to the type of document STANDARD For printed or typewritten originals with normal sized characters FINE For originals with small printing SUPER FINE For originals with minute printing HALF TONE For originals containing photographs shaded drawings etc Using the fine super f...

Страница 44: ...eatedly to select the desired setting p 43 5 For stations 1 11 Press the desired One Touch Dial key For stations 12 22 Press LOWER then press the desired One Touch Dial key Example The unit will start transmission Helpful hints You can confirm the stored items on the display p 41 or on the telephone number list p 123 You can use the JOG DIAL directory to select the station name instead of using th...

Страница 45: ...an confirm the stored items on the display p 41 or on the telephone number list p 123 The connecting tone will be heard during dialing to tell you the status of the other party s machine p 59 Note While scanning do not move the pages which have already ejected A paper jam may occur Allow the scanning process to finish before viewing documents If the desired name has not been stored press STOP and ...

Страница 46: ...rectory p 39 How your fax is sent to the other party s fax machine Fax server R If any transmission errors occur between the fax server and the other party s fax machine the fax server will automatically redial the other party s fax machine up to 4 times If your fax is still not trasmitted after 4 attemps the fax server will fax a Non Delivery Notice to you In this case there is no charge Set your...

Страница 47: ...4 Press or to select ON If this feature is not required select OFF 5 Press START SET COPY 6 Press MENU SETUP ITEM MODE ON MODE OFF IQ FAX 1 SYSTEM SET UP Turning on the IQ FAX function Before programming confirm that your application has been processed by FaxSav Sending Faxes Fax Copy ...

Страница 48: ... internationally using IQ FAX contact FaxSav at 1 888 332 9728 SENDING NORMAL OUT OF NETWORK SENT TO SERVER SENDING P1 CONNECTING TRYING IQ FAX FAX 223344 IQFAX TO WHERE STANDARD Document guides Document feeder tray RESOLUTION START SET COPY FACE DOWN BROADCAST JOG DIAL One Touch Dial keys IQ FAX If you cannot send a fax Contact FaxSav at 1 888 332 9728 The FaxSav customer service center may send ...

Страница 49: ...t Note Remove clips staples or other similar fastening objects Check that ink paste or correction fluid has dried Do not send the following types of document Use copies for fax transmission Chemically treated paper such as carbon or carbonless duplicating paper Electrostatically charged paper Heavily curled creased or torn paper Paper with a coated surface Paper with a faint image Paper with print...

Страница 50: ...transmission fails pre selected setting ON The sending report will always print out indicating whether fax transmission is successful or not OFF The sending report will not print 01 2345678 00 51 SND 00 COMMUNICATION ERROR 43 Jan 20 1999 01 19PM Jan 20 01 18PM SENDING REPORT CODE NO USAGE TIME MODE PAGES START TIME RESULT OTHER FACSIMILE Sample of a sending report Communication message p 105 Error...

Страница 51: ...AL Automatic journal report This feature prints a journal report automatically after every 35 new fax communications After printing only the oldest communication result will be erased when a new communication occurs If this feature is deactivated the unit will store the records of the fax communications but will not print the journal report automatically Sample of a journal report Communication me...

Страница 52: ...IME 12 00AM FAX MODE ON MODE OFF DELAYED SEND 1 SYSTEM SET UP STANDARD START SET COPY FACE DOWN JOG DIAL One Touch Dial keys STOP MENU Note While scanning do not move the pages which have already ejected A paper jam may occur Allow the scanning process to finish before viewing documents You can receive transmit and copy documents while delayed transmission is set Delayed transmission sending a fax...

Страница 53: ... memory The amount of memory used will be shown as a percentage on the display Display After storing all pages the unit will transmit the document PAGES 01 05 SAVING DATA Note While scanning do not move the pages which have already ejected A paper jam may occur Allow the scanning process to finish before viewing documents The stored document will be automatically erased after transmission To cance...

Страница 54: ...SE JOG DIAL PRESS STATION Multiple stations This feature is useful for sending the same document to selected parties whose telephone numbers are stored in the One Touch Dial or JOG DIAL directory You must program the desired parties into one of the BROADCAST keys One Touch Dial key 1 2 3 or 4 Important Before programming make sure that the desired telephone numbers have been stored in the One Touc...

Страница 55: ...t the program Erasing a stored name and number 1 Rotate JOG DIAL until the BROADCAST key you want to edit is displayed Example 2 Press DIRECTORY PROGRAM 3 Press to select DELETE The first name will be shown Example 4 Rotate JOG DIAL until the desired name is displayed Example If you do not want to erase the item press STOP 5 Press START SET COPY YES PRESS SET DELETE OK Dick Alex ADD DELETE BROADCA...

Страница 56: ...ill be fed into the unit and scanned into memory The unit will then transmit the data to each station calling each number sequentially Note While scanning do not move the pages which have already ejected A paper jam may occur Allow the scanning process to finish before viewing documents If you select the fine super fine or half tone resolution the number of pages that the unit can transmit will de...

Страница 57: ...ay 2 Press then 2 3 3 Press START SET COPY 4 Press or to select ON If this feature is not required select OFF 5 Press START SET COPY 6 Press MENU Note After transmission this feature will turn off automatically This feature is not available for transmission using the BROADCAST keys A slower transmission speed will lengthen the call duration Therefore the calling charges may be higher SETUP ITEM MO...

Страница 58: ...g when the image to be scanned contains both photographs and words pre selected setting MENU START SET COPY 1 Press MENU Display 2 Press then 6 8 3 Press START SET COPY 4 Press or to select the desired setting 5 Press START SET COPY 6 Press MENU SETUP ITEM MODE OFF ECM SELECTION 1 SYSTEM SET UP Error correction mode setting ECM means Error Correction Mode You can send documents even if there is st...

Страница 59: ... s machine may not be a facsimile or may have run out of paper Check with the other party Busy tone The other party s machine is busy Let the unit continue redialing or press STOP and try again later This feature is set to ON as a pre selected setting If this feature is not required you can turn it off 1 Press MENU Display 2 Press then 7 6 3 Press START SET COPY 4 Press or to select the desired se...

Страница 60: ...will operate When the unit rings you must answer all calls If you hear a fax calling tone slow beep or no sound is heard press START SET COPY An answering machine can also answer the incoming calls p 65 Ring Ring Ring You have a separate telephone line just for fax calls Fax call FAX ONLY mode p 63 64 All incoming calls will be answered as faxes and the unit will try to receive a fax Option A Opti...

Страница 61: ... rings on the answering machine to less than 4 3 Record a greeting message on the answering machine 4 Turn on the answering machine 5 Program the remote activation ID into your fax machine For further details see pages 65 to 67 Use with TEL mode or FAX ONLY mode If you use with FAX ONLY mode set the FAX ONLY mode ring count to 5 EXT TAM p 64 When receiving voice calls The answering machine will re...

Страница 62: ...106 and 107 to solve the problem and print the stored document For memory capacity see page 129 FAX IN MEMORY 62 Receiving Faxes OFF FAX ON AUTO ANSWER Handset START SET COPY STOP TEL mode answering all calls manually If the AUTO ANSWER light is on turn it off by pressing AUTO ANSWER Display 1 When the unit rings lift the handset to answer the call 2 When document reception is required a fax calli...

Страница 63: ...be used with a telephone line which is used for both voice and fax calls When the unit answers the call fax communication is attempted even if someone is trying to call you FAX ONLY MODE FAX ON AUTO ANSWER ON RED Receiving Faxes Fax Copy If you have a telephone line just for receiving faxes we recommend the following setup Example One telephone line is used for voice calls and a separate telephone...

Страница 64: ...he ring count in the FAX ONLY mode This setting determines the number of rings before the unit answers a call in the FAX ONLY mode You can choose from 1 to 5 rings If you use the unit with an answering machine p 65 67 select 5 EXT TAM Helpful hints To answer a call before the unit does increase the number of rings If you have difficulty receiving faxes the other parties may have tried to send faxe...

Страница 65: ... 62 or FAX ONLY mode p 63 If you set it to FAX ONLY mode set the ring count in the FAX ONLY mode feature setting 06 to 5 EXT TAM p 64 The number of rings on the answering machine should be less than the FAX ONLY mode ring count so that the answering machine will answer a call first Using the FAX ONLY mode will allow you to receive faxes if the answering machine is full 6 Check the remote access co...

Страница 66: ...y the caller s request and receive the document For further details see page 67 To use the unit with an answering machine and computer we recommend the following setup Always connect the fax machine directly to the wall jack Wall jack Computer Answering machine Fax machine Wall jack Note Set the TEL mode on the fax machine The device which has the shortest ring count will answer a call first Confi...

Страница 67: ...ng machine will answer the call 2 The caller can leave their message after the greeting message 3 The caller presses 9 pre selected fax activation code The fax machine will activate the fax function 4 The caller presses their start button to send a document Note The fax activation code can be changed p 74 If the wrong fax activation code is entered the caller must wait at least 5 seconds to reente...

Страница 68: ...ou subscribe to a Distinctive Ring service you can assign telephone numbers for personal numbers business numbers fax numbers and so on When a call is received you will know which number is being called by the ring pattern Example Your telephone number 012 1234 012 5678 012 9876 Ring pattern Standard ring Double ring Triple ring Use Personal Business Facsimile Standard ring one long ring Double ri...

Страница 69: ...ong short rings D Other triple ring short short long rings OFF Turns off the feature pre selected setting 5 Press START SET COPY When the setting is changed from OFF to either A B C or D the unit will print an information list 6 Press MENU Note The unit will automatically answer a Distinctive Ring call after the first ring regardless of the AUTO ANSWER receive mode or ring count setting If you hav...

Страница 70: ...ines that do not send a fax calling tone OR A call is received The unit will ring up to 3 times Silent fax recognition ring count Answer the call The unit will automatically receive documents without ringing Ring Ring Ring A telephone fee will be charged to the caller from this point A fax calling tone is automatically generated by the sending fax machine Some fax machines do not have this capabil...

Страница 71: ...he call The unit will automatically receive documents without ringing Ring Ring Ring Ring Ring The unit will not ring Receiving Faxes Fax Copy TEL FAX delayed ring count Up to 4 ring signals will be generated before the unit answers depending on feature setting 78 on page 73 In the TEL FAX mode the unit will not generate an audible ring during this time Silent fax recognition ring count The unit g...

Страница 72: ...SWER TEL FAX MODE SETUP ITEM PRINTING MODE TEL FAX MODE FAX ONLY AUTO ANSWER 1 SYSTEM SET UP MENU START SET COPY FAX ON AUTO ANSWER ON RED Changing the AUTO ANSWER setting to the TEL FAX mode Note To return to the FAX ONLY mode select FAX ONLY in step 4 We recommend the following setup Only a fax machine is connected and you are always near the fax machine Answering machine Do not connect an answe...

Страница 73: ... Press then 3 0 3 Press START SET COPY 4 Press or to select the desired number or enter the number using the dial keypad 5 Press START SET COPY 6 Press MENU SETUP ITEM RING 3 SILENT FAX RING 1 SYSTEM SET UP MENU START SET COPY TEL FAX delayed ring count This setting determines the number of times the extension telephone rings in the TEL FAX mode You can choose from 1 to 4 rings This setting does n...

Страница 74: ...rvices which require a code all or part of the fax activation code must be different from the service access code The fax activation code should not be set to 0000 Note You can change the fax activation code see below 1 Press MENU Display 2 Press then 4 1 3 Press START SET COPY 4 Press or to select ON If this feature is not required select OFF 5 Press START SET COPY The display will show the pre s...

Страница 75: ...t on letter size recording paper pre selected setting OFF The unit does not reduce any incoming faxes Oversized documents will be divided when printed out To change the setting proceed as follows 1 Press MENU Display 2 Press then 3 7 3 Press START SET COPY 4 Press or to select the desired setting 5 Press START SET COPY 6 Press MENU SETUP ITEM LEGAL LTR AUTO REDUCTION 1 SYSTEM SET UP MENU START SET...

Страница 76: ...e documents from fax machines that do not send a fax calling tone activate this feature If you use an answering machine to give greeting messages and record incoming messages on a single cassette tape deactivate this feature MENU START SET COPY 1 Press MENU Display 2 Press then 4 0 3 Press START SET COPY 4 Press or to select the desired setting If this feature is not required select OFF 5 Press ST...

Страница 77: ... required select OFF 5 Press START SET COPY 6 Press MENU SETUP ITEM MODE ON FRIENDLY RCV 1 SYSTEM SET UP Memory reception alert When a received document is stored into memory due to a problem the unit will alert you with beep tones If you hear slow beeps clear the printing problem or supply paper to print the stored document The beep tones will stop MENU START SET COPY 1 Press MENU Display 2 Press...

Страница 78: ...example 5555 1 Press MENU Display 2 Press then 7 0 3 Press START SET COPY 4 Press or to select ON If this feature is not required select OFF 5 Press START SET COPY 6 Enter your pager number You can enter a total of 46 digits and or pauses Example 1 202 555 1234PPP12345678PPP5555 NO MODE ON MODE OFF FAX PAGER CALL 1 SYSTEM SET UP 17 Press START SET COPY The unit will dial the stored pager number 18...

Страница 79: ...nting from the PC this setting does not work To save toner use the PANA LINK printer driver setting SETUP ITEM MODE ON MODE OFF TONER SAVE 1 SYSTEM SET UP Toner save With the toner save feature on toner consumption can be decreased resulting in a longer effective cartridge life This feature is available when printing received fax documents help lists and other reports lists or copying documents ME...

Страница 80: ... until the following is displayed see next page 9 Press START SET COPY OR Press QUICK SCAN if you want to remove the copy document for other uses The unit will feed the documents and scan them into memory then start printing COLLATE ON NUMBER 1 100 STANDARD Document guides Document feeder tray RESOLUTION START SET COPY STOP FACE DOWN JOG DIAL COLLATE QUICK SCAN To stop copying Press STOP Note Whil...

Страница 81: ...red reduction rate by rotating JOG DIAL to the left The unit can reduce copies by 5 to as little as 50 of the original Note If the appropriate reduction rate is not programmed the document may be divided and the top of the second sheet will be deleted Copying Fax Copy Collated 4 3 2 1 4 3 2 1 Uncollated 4 4 3 3 2 2 1 1 If you turn the collating feature on the unit will store the document into memo...

Страница 82: ...ended Hard disk More than 40 MB available space Other Parallel port Panasonic Multi Function fax machine Microsoft Windows operating system Version 3 1 3 11 hereafter Windows 3 1 3 11 Connect your personal computer to the fax machine as follows Printer cable Parallel cable Caution When connecting the fax machine to your computer use the included printer cable for reliable data communications and c...

Страница 83: ...lation will automatically start If the language dialog box does not appear and the installation does not start automatically Click Start choose Run Type d setup where d is the drive letter of your CD ROM drive Click OK If you are not sure what the drive letter is for your CD ROM drive please use Windows Explorer and look for the CD ROM drive Note For detailed instructions on PANA LINK software use...

Страница 84: ...o delete one figure of a telephone number Send a fax To send a file created on the PC Scan To create an image file by scanning the document set in the fax machine Copy To make a copy of the document set in the fax machine Print To print a file created on the PC T s n To start fax transmission or reception Viewer To display an image sent or received with PANA LINK Comtn Log To display the record of...

Страница 85: ...the received documents which have not been viewed yet To switch to the telephone numbers To delete the data in the one touch memory To register or change data in the one touch memory To minimize To minimize to an icon To exit PANA LINK One touch dial Reception icon To switch to the fax numbers ...

Страница 86: ...em User Information and Cover Page 3 Change the set value in the Setup dialog box To change the value without closing the window press Apply 4 Click OK 2 Click Setup in the main panel The Setup dialog box will be displayed 1 Open the PANA LINK main panel Note For further details use the Help function ...

Страница 87: ...e and the header that prints on the top of each page you send from the PC 3 Click User Information The User Information dialog box will be displayed 1 Open the PANA LINK main panel 2 Click Setup in the main panel The Setup dialog box will be displayed 4 Enter your information for each item 5 Click OK ...

Страница 88: ...want to print 2 Select Print from the File menu The Print dialog box will appear 3 Select Panasonic KX FLM600 650 as the active printer If you want to change the printer setting click Properties The printer setup dialog box will appear You can change the following Resolution Orientation Paper Source Copies and Paper Size 4 Set the Page range and enter the number of copies 5 Click OK in the Print d...

Страница 89: ... 3 Select the file you want to print 4 Click Open in the Open dialog box The unit will start printing If an application which creates the file starts follow the instructions for the application to print the file 1 Open the PANA LINK main panel 2 Click Print in the main panel The Open dialog box will appear ...

Страница 90: ...L 216 mmk279 mm 81 2qk11q 216 mmk356 mm 81 2qk14q 210 mmk297 mm 184 mmk267 mm 71 4qk101 2q 216 mmk279 mm 81 2qk11q 210 mmk297 mm 105 mmk241 mm 41 8qk91 2q 220 mmk110 mm Paper Transparency Envelope Media size START SET COPY Paper tray extender 3 Place a sheet on the paper tray with printing side face down and align the edge of the sheet to the guide marks The sheet should not exceed the tabs on bot...

Страница 91: ...also print on labels and transparencies that are made for the printer Panasonic has tested and found that the following work satisfactorily Note With any label the labels must completely cover the backing material see below Re using transparencies that have been fed through the printer once for example after jams or if the transparency is ejected without being printed can reduce the life of the co...

Страница 92: ...ge Paper weight of 75 g m2 20 lb Flat free of curls wrinkles nicks etc No cotton and or fiber material included Note Wrinkles may occur in some cases even if high quality envelopes are used We recommend that you do not use envelopes with any of the following characteristics using these may result in paper jams Irregularly shaped envelopes Envelopes with curls wrinkles nicks twists dog ears or othe...

Страница 93: ...the PANA LINK application has not started yet it will start now and then one item is added to it as the transmission document 5 Set the fax number you want to send the document to To set the telephone number you can use the keypad one touch dialing or the address book 6 Click START in the main panel The document will be sent Keypad One touch dialing Address book Note If the line is busy or there i...

Страница 94: ...layed 4 Select a file you want to send and then click Open An image of the file will be displayed in the preview window 5 Set the fax number which you are going to send the file to To set the telephone number you can use the keypad one touch dialing or the address book Note If the line is busy or there is no answer the PANA LINK Fax will automatically redial the number up to 5 times To cancel tran...

Страница 95: ...et the fax number you want to send the document to in the main panel To set the telephone number you can use the keypad one touch dialing or the address book 4 Click START A dialog box to set the image quality type and brightness will be displayed Note If you send a fax using a PC the FaxSav service cannot be used p 46 To cancel transmission after dialing press STOP on the fax machine One touch di...

Страница 96: ...ew print or send again To receive manually You can receive manually during a telephone conversation 2 Click START in the main panel 1 Set the fax machine to the AUTO ANSWER mode by pressing AUTO ANSWER To receive automatically You can receive faxes to your PC automatically FAX ON AUTO ANSWER ON RED 1 Open the PANA LINK main panel 2 Open or minimize the PANA LINK main panel ...

Страница 97: ...ncoming faxes when using the PC but want to receive faxes directly to your facsimile machine follow these steps 1 Click Setup in the main panel The Setup dialog box will appear 2 Click the Reception tab in the dialog box 3 Click Receive directly to facsimile unit 4 Click OK 1 Open the PANA LINK main panel 2 Click on the reception icon New doc in the main panel or click on Comtn Log and switch to t...

Страница 98: ...pad Address book 1 Open the PANA LINK main panel 2 Enter the telephone number in the main panel You can select the telephone numbers using the following methods Keypad one touch dial address book or redial The main panel indicator will display Start calling by pressing the Dial 3 Click Dial The main panel indicator will display Lift the fax machine s handset to talk Handset ...

Страница 99: ...information will be shown in the list 1 Open the PANA LINK main panel 2 Click Add Book in the main panel The Address Book window will appear 3 Select New entry from Edit menu or click New entry in the toolbar A dialog box to register personal information will appear Broadcast When sending the same document to more than one location you can use the Group function in the Address Book You may select ...

Страница 100: ...ge will be displayed in it FACE DOWN 1 Set the document which you are going to scan in the fax machine 3 Click Scan in the main panel The Scan dialog box will appear 2 Open the PANA LINK main panel 6 To save the scanned image select Save from the File menu Note While scanning do not move the pages which have already ejected A paper jam may occur Allow the scanning process to finish before viewing ...

Страница 101: ...NA LINK main panel 3 Click Copy in the main panel The Copier dialog box will appear 7 If necessary change the setting of Image Quality Image Type and Brightness 8 Click Scan The fax machine will start scanning the documents then will print the copies Note While scanning do not move the pages which have already ejected A paper jam may occur Allow the scanning process to finish before viewing docume...

Страница 102: ...tn Log in the main panel The Communication Log window will appear Communication Log Folder 1 Open the PANA LINK main panel 3 Select the Communication Log Folder The content of the selected Communication Log Folder will be displayed in the Communication Log List Communication Log List Note As the transmitted image files will remain in the hard disk please check regularly that there is enough free s...

Страница 103: ...d an image as a fax 2 Click Viewer in the main panel The Viewer window will appear Note Text on the image cannot be edited Use OCR to convert text on the image to text data that can be edited with word processor software 1 Open the PANA LINK main panel 3 Click on File then Open in the menu bar or click the Open icon in the tool bar in the main panel The Open window will appear 4 Select the file yo...

Страница 104: ...he following Turn off the PC LINK on the fax machine Select Receive directly to facsimile unit on the PC p 97 To turn off the PC LINK on the fax machine When this feature is off operations from your PC such as fax transmission reception scanning printing or copying are not available 1 Press MENU Display 2 Press then 1 4 3 Press START SET COPY 4 Press or to select OFF To turn on the PC LINK on the ...

Страница 105: ...s fax machine was busy or ran out of recording paper Try again The document was not fed properly Reinsert the document and try again The other party s fax machine rings too many times To send a fax manually dial the number confirm the fax tone and press START SET COPY The other party s machine is not a facsimile Check with the other party The number you dialed is not in service The PC cannot contr...

Страница 106: ...nit cannot pick up the recording paper loaded in the paper cassette Remove the paper cassette and clear the jammed paper p 115 The unit has a document in memory See the other message instructions to print out the document Memory is full of received documents due to a lack of recording paper or a recording paper jam etc Install paper or clear the jammed paper When performing memory transmission the...

Страница 107: ... or more sheets and try again Paper was placed on the paper tray for manual feeding without first pressing START SET COPY Remove the paper When the PLEASE WAIT message disappears place the paper on the paper tray The paper cassette is not inserted correctly Insert it correctly The toner is empty Replace the toner cartridge and drum unit with new ones p 117 119 The remaining toner is low Replace th...

Страница 108: ...nnot make and receive calls I cannot make calls The unit does not work The unit does not ring The other party complains they only hear a fax tone and cannot talk The REDIAL PAUSE button does not function properly The receive mode does not function as explained on page 60 During programming I cannot enter the code or ID number Fax sending The telephone line cord is connected to the EXT jack on the ...

Страница 109: ...The recording image is faint Receive mode If you want to set the FAX ONLY or TEL FAX mode Select the desired mode using feature 77 p 72 and Press AUTO ANSWER to turn on the AUTO ANSWER light If you want to set the TEL mode Press AUTO ANSWER to turn off the AUTO ANSWER light OFF FAX ON AUTO ANSWER ON FAX ON AUTO ANSWER RED Cause Remedy Problem I cannot select the desired receive mode You cannot mak...

Страница 110: ...messages You set the answering machine to only give a greeting message You paused for over 4 seconds during the conversation To resume the conversation press the STOP button on the unit Cause Remedy Problem I cannot receive documents automatically I cannot receive voice messages I cannot retrieve recorded voice messages on the answering machine from a remote location The greeting message on the an...

Страница 111: ...alog by pressing the Setup button and click the Default cover page at every transmission check box in the Cover page tab You can change your selection in the PANA LINK Main Panel Double click the number you set in the Main Panel Display the fax number switches into the telephone number You can also right click the entry to select a specific number If there is transmission data or a document is set...

Страница 112: ...eck box to activate in the Reception tab in the Setup dialog box If so click this check box to deactivate The setting of the PC LINK on the fax machine is off Turn it on p 104 The PANA LINK application does not operate Start the PANA LINK application Open the Setup dialog box then check the Receive directly to Facsimile Unit check box to activate in the Reception tab Print after selecting the desi...

Страница 113: ...MILE WARNING CONTENTS HAVE BEEN CLEARED DUE TO POWER DOWN FOR ADDITIONAL INFORMATION PLEASE SEE THE JOURNAL REPORT POWER DOWN REPORT Problem Cause Remedy Confirm that a maximum of 15 pages are set correctly If you select Fine 200 x 200 dpi in the image quality list make sure the document is less than 655 mm 257 8q If you select Line Art 400 x 400 dpi make sure the document is less than 470 mm 181 ...

Страница 114: ...med in the fuser unit 1 Remove the jammed paper carefully Caution Do not touch or scratch the green drum surface as this may damage the drum unit 2 Close the top cover securely by pushing down on the dotted area at both ends 1 Pull the jammed paper out carefully Caution Do not touch or scratch the green drum surface as this may damage the drum unit 2 Close the top cover securely by pushing down on...

Страница 115: ...f the unit 3 Remove the jammed recording paper 4 Insert the paper cassette into the unit until it clicks into place 5 Replace the paper tray and open the paper tray extender 1 Close the paper tray extender and remove the paper tray by A slightly lifting and B pulling it out of the unit Paper cassette B A Paper tray Paper tray extender ...

Страница 116: ...ck bands appear on a copied or transmitted document clean the white roller Front panel White roller Document feeder tray 1 Disconnect the printer cable the power cord and the telephone line cord 2 Open the document feeder tray and the front panel 3 Clean the white roller with a cloth moistened with isopropyl rubbing alcohol by rotating the roller and let it dry thoroughly 4 Close the front panel s...

Страница 117: ...tment If toner comes into contact with skin wash thoroughly with soap and water Do not put up the toner cartridge The drum unit contains a photosensitive drum Exposing it to light may damage the drum Do not expose the drum unit to light for more than 5 minutes Do not touch or scratch the green drum surface Do not place the drum unit near dust or dirt Do not place the drum unit in a high humidity a...

Страница 118: ...ting the end of the bag and remove the new toner cartridge 5 Remove the tape and remove the protection cap by holding the tab Caution Do not put up the toner cartridge Protection bag Toner cartridge Tabs 7 Install the new toner cartridge by holding the two tabs and matching the triangles Toner cartridge 6 Rock the toner cartridge from side to side several times carefully Protection cap Triangles T...

Страница 119: ...urely by pushing down on the dotted area at both ends Drum unit 10 Remove the protection sheet Caution Do not touch or scratch the green drum surface as this may damage the drum unit Do not expose the drum unit to light for more than 5 minutes as this may damage the drum unit Protection sheet Green drum surface Dotted area 8 Open the protection bag by cutting the end of the bag and remove the drum...

Страница 120: ...The unit should be handled in the upright vertical position until the unit is repacked completely If you plan to move the unit from one location to another or if you want to store it follow the steps below 1 Disconnect the power cord printer cable telephone line cord handset and handset cord 2 Close the paper stacker and the paper tray extender Remove the paper tray by A slightly lifting and B pul...

Страница 121: ...ion Do not expose the drum unit to light for more than 5 minutes as this may damage the drum unit Prevent the green drum surface from being sticked with the tape 8 Pack the drum unit into the protection bag Green drum surface Protection sheet Protection bag Drum unit 4 Pull the top cover handle forward and open the top cover Top cover handle Top cover Tabs Drum unit 7 Attach the protection cap to ...

Страница 122: ...g materials 9 Remove the toner cartridge by holding the two tabs Caution Do not put up the toner cartridge 11 Pack the toner cartridge into the protection bag Toner cartridge Tabs Toner cartridge Protection bag 10 Attach the protection cap using the tape tightly Caution To avoid getting your hands dirty do not touch the roller Protection cap Dotted area Tape Tape Roller ...

Страница 123: ...s not printed Journal report keeps records of fax transmissions and receptions This report will be printed automatically after every 35 fax communications p 51 Broadcast list provides you with names and telephone numbers which are stored in the BROADCAST keys p 54 56 1 Press MENU two times Display 2 For the feature list press then 1 For the telephone number list press then 3 For the journal report...

Страница 124: ...ART SET COPY 6 Press MENU SETUP ITEM MODE NORMAL LCD CONTRAST 1 SYSTEM SET UP Resetting the advanced features Use this feature to return the advanced features p 154 155 to their pre selected settings MENU START SET COPY STOP 1 Press MENU Display 2 Press then 8 0 3 Press START SET COPY 4 Press or to select YES 5 Press START SET COPY If this feature is not required press STOP 6 Press START SET COPY ...

Страница 125: ... FCC Part 68 If such changes can be reasonably expected to render any customer terminal equipment incompatible with telephone company communications facilities or require modification or alteration of such terminal equipment or otherwise materially affect its use or performance the customer shall be given adequate notice in writing to allow the customer an opportunity to maintain uninterrupted ser...

Страница 126: ... the film cartridge the toner cartridge and drum unit or the print and ink cartridge The inability of this product to interface with any specific computer is not a manufacturing defect and is outside of the scope of this Limited Warranty In no event shall the warrantor be liable by reason of such incompatibility The warranty does not cover damages which occur in shipment or failures which are caus...

Страница 127: ...ville PA 15017 TENNESSEE 3800 Ezell Road Suite 806 Nashville TN 37211 TEXAS 7482 Harwin Drive Houston TX 77036 13615 Welch Road Suite 101 Farmers Branch TX 75244 WASHINGTON 20425 84th Avenue South Kent WA 98032 HAWAII 99 859 Iwaiwa Street Aiea Hawaii 96701 Phone 808 488 1996 Fax 808 486 4369 For Product Information Operating Assistance Literature Requests Dealer Locations and all Customer Service ...

Страница 128: ... the symptom or problem to the outside of the carton Send the unit to an authorized servicenter prepaid and adequately insured Do not send your unit to the Panasonic Consumer Electronics Company or to any executive or regional sales offices These locations do not repair consumer products Energy Star As an ENERGY STAR Partner Panasonic has determined that this product meets the ENERGY STAR guidelin...

Страница 129: ...DARD FINE HALF TONE mode Max 420 mm 1617 32q in length SUPER FINE mode Effective Scanning Width 208 mm 83 16q Effective Printing Width 208 mm 83 16q Transmission Time Approx 8 s page ECM MMR Scanning Density Horizontal 8 pels mm 203 pels inch Vertical 3 85 lines mm 98 lines inch STANDARD mode 7 7 lines mm 196 lines inch FINE HALF TONE mode 15 4 lines mm 392 lines inch SUPER FINE mode Halftone Leve...

Страница 130: ... 2qk14q Paper Printer feature Printer Type Laser beam printer Print Speed 8 ppm Printing Resolution 600k600 dpi Compatible OS Windows 3 1 3 11 95 98 Interface 8 bit parallel Included Paper specifications Media Size Using the paper cassette Scanner feature Document Size Max 216 mm 81 2q in width Max 600 mm 235 8q in length Effective Scanning Width 208 mm 83 16q Scanning Density Standard 200k100 dpi...

Страница 131: ...and toner life for the included toner cartridge or KX FA75 toner cartridge Toner life for the included toner cartridge or KX FA75 toner cartridge Note The image area changes with the depth thickness and size of the characters in the document Note Toner life will vary depending on actual usage 5 image area 10 image area 15 image area 4 000 sheets 5 000 3 000 2 000 1 000 0 5 10 15 Toner life Image a...

Страница 132: ...verde del tambor No exponga la unidad del tambor a la luz durante más de 5 minutos B Instale la unidad del tambor en el cartucho de toner sujetándola por ambas lengüetas C Cierre la cubierta superior Antes de hacer la instalación Retire la cinta de transporte Superficie verde del tambor Tapa de protección Hoja de protección Cinta de transporte Cinta de transporte Tapa de protección Asa de apertura...

Страница 133: ...ón produciendo un chasquido A Inserte las dos lengüetas de la bandeja de papel en las ranuras del casete de papel B Abra el extensor de la bandeja de papel C Abra el apilador de papel Para conectar un contestador automático desprenda la cinta que cubre la toma EXT y conecte el cable Casete de papel Apilador de papel Bandeja de papel Extensor de la bandeja de papel Lengüetas Ranuras Protector contr...

Страница 134: ...teclado de marcación consulte las instrucciones de la derecha o JOG DIAL consulte la página siguiente Para introducir continuamente el mismo número pulse fl para mover el cursor al siguiente espacio 5 Pulse START SET COPY 6 Pulse MENU Ajuste del número de teléfono de su facsímil 1 Pulse MENU 2 Pulse y luego 0 3 3 Pulse START SET COPY 4 Introduzca el número de teléfono de su facsímil con un máximo ...

Страница 135: ...hacia la izquierda Memorización de nombres y números de teléfono en el directorio JOG DIAL Para acceder rápidamente a los números marcados frecuentemente además de la marcación de un toque la unidad proporciona también el directorio JOG DIAL 100 estaciones 1 Pulse DIRECTORY PROGRAM 2 Gire JOG DIAL e introduzca el nombre hasta 10 caracteres utilizando el teclado dè marcación consulte la página 134 ...

Страница 136: ...se visualice el nombre deseado 2 Levante el auricular La unidad empezará a marcar automáticamente 3 Cuando termine de conversar vuelva a poner el auricular en su lugar Para contestar una llamada de voz 1 Levante el auricular cuando oiga el timbre de la unidad 2 Cuando termine de conversar vuelva a poner el auricular en su lugar Para hacer contestar una llamada de voz Envío de un fax Envío manual d...

Страница 137: ...ET COPY 1 Abra la bandeja del alimentador de documentos 2 Ajuste la anchura de las guías de documentos según el tamaño del documento 3 Inserte el documento hasta que se oiga un pitido 4 Pulse START SET COPY 5 Introduzca el número de copias 6 Pulse START SET COPY Reciviendo un fax Recepción manual de un fax 1 Levante el auricular cuando oiga el timbre de la unidad 2 Cuando sea necesario recibir un ...

Страница 138: ...esora Memoria mínima 16 MB se recomienda 32 MB o más Disco duro Se requiere más de 40 MB de espacio disponible Otro Puerto paralelo Facsímil Panasonic multifuncional Conecte su computadora personal al facsímil de la forma siguiente Precaución Cuando conecte el facsímil a su computadora para obtener una comunicación de datos fiable y cumplir con las normas de la FCC utilice el cable de impresora su...

Страница 139: ...e 5 Cómo utilizar la Ayuda 6 Acrobat Reader 7 Problemas ECP 3 La instalación comenzará automáticamente Si la casilla de diálogo de idioma no aparece La instalación comenzará automáticamente Si la casilla de diálogo de idioma no aparece y la instalación no comienza automáticamente Haga clic en Start elija Run Escriba d setup donde d es la letra de unidad de disco de su unidad de CD ROM Haga clic en...

Страница 140: ...ndo use Properties podrá cambiar las siguientes configuraciones Resolution resolución Orientation orientación Paper Source fuente de papel Copies número de copias y Paper Size tamaño de papel 4 Ajuste el intervalo de páginas e introduzca el número de copias 5 Haga clic en OK en la casilla de diálogo Print La unidad comenzará a imprimir Impresión del archivo seleccionado Podrá imprimir el archivo e...

Страница 141: ...os o más hojas coloque las hojas una a una confirmando en la computadora el mensaje de indicación de inserción de hoja Carta Oficio A4 Ejecutivo Carta A4 COM10 DL 216 mmk279 mm 81 2qk11q 216 mmk356 mm 81 2qk14q 210 mmk297 mm 184 mmk267 mm 71 4qk101 2q 216 mmk279 mm 81 2qk11q 210 mmk297 mm 105 mmk241 mm 41 8qk91 2q 220 mmk110 mm Papel Transparencias Sobres Tamaño del papel START SET COPY Extensor d...

Страница 142: ... ésta se iniciará y luego se añadirá un elemento a la misma como documento de transmisión 5 Introduzca el número de teléfono al que quiera enviar el documento Para introducir el número de teléfono podrá utilizar el teclado la marcación de un toque o la libreta de direcciones 6 Haga clic en START del panel principal El documento será enviado Teclado Marcación de un toque Libreta de direcciones Nota...

Страница 143: ...en Se visualizará una imagen del archivo en la ventana de previsualización Nota Si la línea está ocupada o no hay contestación el PANA LINK Fax repetirá automáticamente la marcación del número un máximo de 5 veces Para cancelar la transmisión tras la marcación haga clic en STOP del panel principal Si envía un fax utilizando una computadora no podrá utilizar el servicio FaxSav Cuando haga clic en S...

Страница 144: ...o de teléfono al que quiera enviar el documento Para introducir el número de teléfono podrá utilizar el teclado la marcación de un toque o la libreta de direcciones 4 Haga clic en START Se visualizará una casilla de diálogo para ajustar la calidad tipo y brillo de la imagen Nota Si envía un fax utilizando una computadora no podrá utilizar el servicio FaxSav Para cancelar la transmisión después de ...

Страница 145: ...r o enviar de nuevo Para recibir faxes manualmente Podrá recibir un fax manualmente durante una conversación telefónica 2 Haga clic en START del panel principal 1 Ponga el facsímil en el modo AUTO ANSWER pulsando AUTO ANSWER Para recibir faxes automáticamente Podrá recibir un fax en la computadora automáticamente FAX ON AUTO ANSWER 1 Abra el panel principal de PANA LINK 2 Abra o minimice el panel ...

Страница 146: ...bir los faxes directamente en su facsímil siga los pasos siguientes 1 Haga clic en Setup del panel principal Aparecerá la casilla de diálogo Setup 2 Haga clic en la lengüeta Reception de la casilla de diálogo 3 Haga clic en Receive directly to facsimile unit 4 Haga clic en OK 1 Abra el panel principal de PANA LINK 2 Haga clic en el icono de recepción New doc del panel principal O cambie la pantall...

Страница 147: ...pal visualizará Start calling by pressing the Dial 3 Haga clic en Dial El indicador del panel principal visualizará Lift the fax machine s handset to talk 4 Levante el auricular del facsímil Auricular Directorio computarizado para números de teléfono y fax La libreta de direcciones es la base de datos de su información personal sobre números de teléfono y fax 4 Introduzca información personal en c...

Страница 148: ... visualizará en ella la imagen explorada CARA IMPRESA HACIA ABAJO 1 Coloque en el facsímil el documento cuya imagen va a explorar 3 Haga clic en Scan del panel principal Aparecerá la casilla de diálogo Scan 2 Abra el panel principal de PANA LINK 6 Para guardar la imagen explorada seleccione Save en el menú File Notas Durante la exploración no mueva las páginas que ya hayan salido Puede ocurrir un ...

Страница 149: ...ABAJO 1 Coloque en el facsímil el documento cuya imagen va a imprimir 2 Abra el panel principal de PANA LINK 3 Haga clic en Copy del panel principal Aparecerá la casilla de diálogo Copier 4 Introduzca el número de copias en Number of copies 5 Se fuera necesario cambie la configuración de Enlarge Reduce Ampliar Reducir 6 Haga clic en Start Aparecerá la casilla de diálogo Scan Notas Durante la explo...

Страница 150: ...uede visualizar la imagen enviada recibida o explorada con el PANA LINK Se pueden transmitir los datos de la imagen y usarlos como un documento de fax Desde Viewer también se puede enviar una imagen como fax 2 Haga clic en Viewer del panel principal Aparecerá la ventana Viewer Nota El texto que haya en la imagen no podrá ser editado Utilice OCR para convertir el texto que haya en la imagen a datos...

Страница 151: ...duce copy 80 81 Envelope specifications 92 Error correction mode setting 58 Error messages 105 107 Extension telephone 71 74 F Facsimile telephone number 32 Fax activation code 74 Fax auto redial 44 FAX ONLY mode 60 63 64 FAX ONLY ring count 64 Fax pager 78 Feature list 123 Feeder jam 116 FLASH button 35 Friendly reception 62 77 H Half tone setting 58 Handset cord 8 27 HANDSET MUTE button 34 Hands...

Страница 152: ...n 43 45 48 80 Ring count 64 73 Ring pattern detection 68 69 Ringer volume 33 S Scanner 100 SECRET key 37 39 Sending From memory 53 From PC 93 95 IQ FAX 46 48 JOG DIAL 45 Manually 10 43 Multiple stations 54 56 One Touch Dial 44 Sending document jam 116 Sending report 50 Set default 124 Silent detection 76 Silent fax recognition ring 73 Specifications Common 129 Fax Copy 129 Printer 130 Scanner 130 ...

Страница 153: ...can display the basic features in the order above by rotating JOG DIAL instead of entering the code number 01 02 etc Basic features 01 02 03 04 06 12 13 14 16 29 30 32 50 64 67 36 104 28 Setting the date and time Setting your logo Setting your facsimile telephone number Printing the sending report Setting the ring count in the FAX ONLY mode Securing the remote operation for the answering machine S...

Страница 154: ... 68 51 57 52 73 69 75 58 124 76 74 77 77 58 Setting the journal report to print automatically Sending documents overseas Sending a fax at a specific time Setting the silent fax recognition ring count Setting the Distinctive Ring pattern Receiving other sizes of documents Changing the half tone setting Changing the display contrast Setting the silent detection Changing the fax activation code Setti...

Страница 155: ...5 76 77 78 79 80 78 47 59 72 73 79 124 Signaling your pager when your unit receives a fax Setting the IQ FAX function Setting the connecting tone Changing the AUTO ANSWER setting Setting the TEL FAX delayed ring count Setting the toner save Resetting the advanced features SET DEFAULT TONER SAVE TEL FAX RING AUTO ANSWER CONNECTING TONE IQ FAX FAX PAGER CALL Code Feature Display Available settings M...

Страница 156: ...se must be included with the returned product Any unit that is replaced by Panasonic and not shipped with proper proof of purchase by you will be subject to a minimum 100 00 charge The original unit must be properly packaged in the same manner as the replacement unit utilizing the packing materials provided Damage due to improper or inadequate packing will be charged to you as an out of warranty c...

Отзывы: