background image

2. Preparation

17

2 Preparation

Connections and Setup

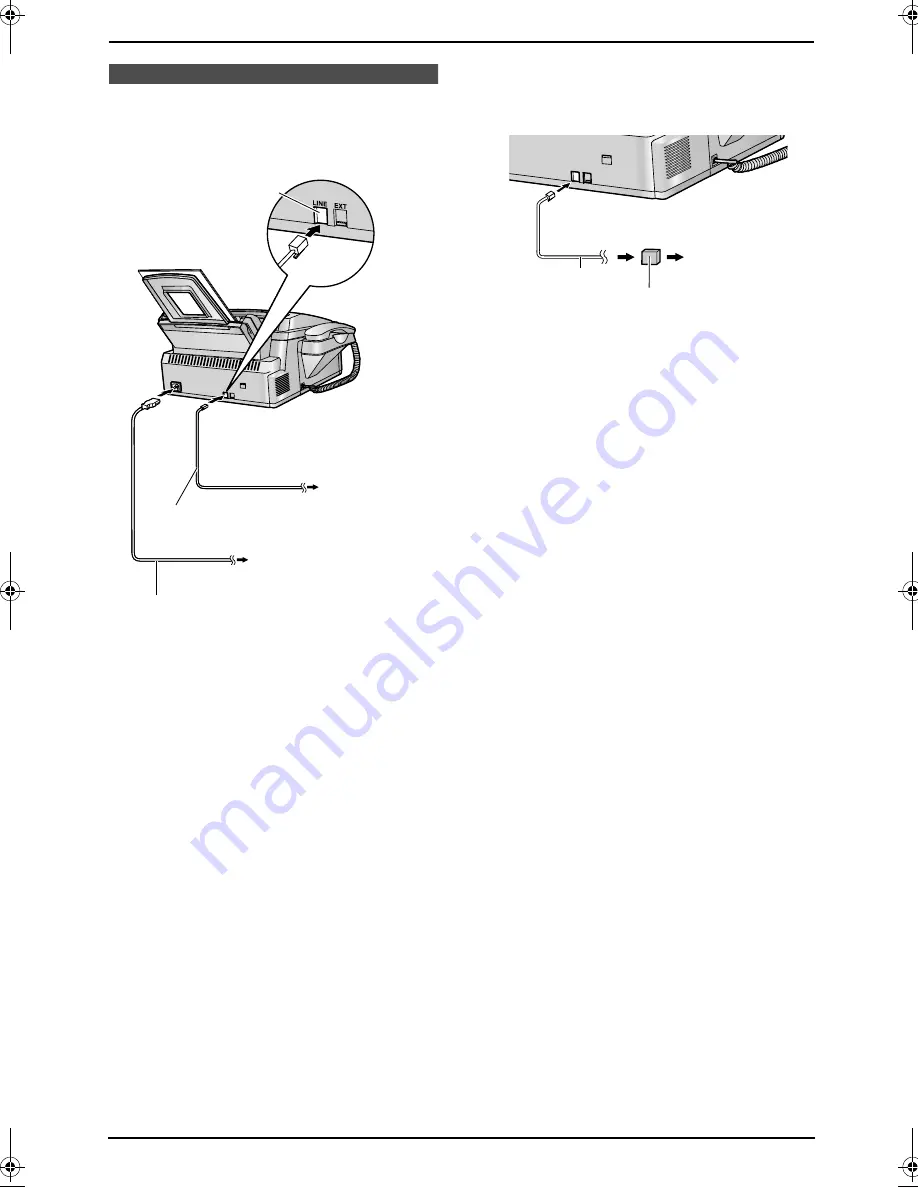
2.1 Connections

Plug in the mains lead and the telephone line 
cord. (Switch on AC mains outlet.)

Caution:

L

The mains lead must remain connected at 
all times.

L

Never install telephone wiring during a 
lightning storm.

L

When you operate this product, the power 
outlet should be near the product and 
easily accessible.

L

Be sure to use the telephone line cord 
included in this unit.

L

Do not extend the telephone line cord.

Note:

L

To avoid malfunction, do not position fax 
machine near appliances such as TVs or 
speakers which generate an intense 
magnetic field.

L

If any other device is connected on the same 
line, this unit may disturb the network 
condition of the device.

L

If you want to connect an answering machine 
to this unit, see page 33.

L

If you use the unit with a computer and your 
internet provider instructs you to install a 
filter, please connect it as follows.

Mains lead

To Household 
Mains Supply
(220-240 V, 50 Hz)

To 
telephone 
network

Telephone line cord

Connect to LINE.

Telephone 
line cord

To telephone 
network

Filter

FL511E.book  Page 17  Monday, June 30, 2003  5:55 PM

Содержание KX-FL511E

Страница 1: ...ing Instructions before using the unit and save for future reference This model is designed to be used only in the United Kingdom and Ireland High Speed Laser Fax with Copier function Operating Instructions Model No KX FL511E ...

Страница 2: ... Location of Controls How to use the operating instructions When following operating instructions always keep the front cover page next page open so that you will find easy reference to the buttons OPEN ...

Страница 3: ...rder AUTO ANSWER G HELP M R K BROADCAST B JUNK FAX PROHIBITOR D REDIAL PAUSE I CALLER ID PRINT Q LOWER S RESOLUTION F CALLER ID SEARCH R MANUAL BROAD C SET U COLLATE E MENU O Station keys A COPY START V MONITOR L STOP T DIRECTORY PROGRAM N NAME TEL NO S VOLUME P FAX START U NAVIGATOR P HANDSET MUTE J QUICK SCAN START H A C D G H E N Q P R S T U V O J K M L B F I ...

Страница 4: ...Ltd declare that this equipment is in compliance with the essential requirements and other relevant provisions of Directive 1999 5 EC If you want to get a copy of the original Declaration of Conformity of our products which relates to the R TTE please contact to our web address http doc panasonic tc de Copyright L This manual is copyrighted by Panasonic Communications Co Ltd PCC and its licensee U...

Страница 5: ...t Take the unit to an authorised service centre when service is required Opening or removing covers may expose you to dangerous voltages or other risks Incorrect reassembly can cause electric shock when the unit is subsequently used 13 Unplug this unit from power outlets and refer servicing to an authorised service centre when the following conditions occur A When the mains lead is damaged or fray...

Страница 6: ...with your skin wash the area thoroughly with soap and water If you inhale any toner move to an area with fresh air and consult local medical personnel Drum unit L Read the instructions on page 12 before you begin installation of the drum unit After you have read them open the drum unit protection bag The drum unit contains a photosensitive drum Exposing it to light may damage the drum Once you hav...

Страница 7: ...aratus should be consulted for an up to date list of PBX s with which the apparatus is compatible It cannot be guaranteed that the apparatus will operate under all possible conditions of connection to compatible PBX s This apparatus is suitable for connection to a PBX with or without initial proceed indication This apparatus is suitable for connection to a PBX with or without secondary proceed ind...

Страница 8: ... with a screwdriver and replace the fuse and fuse cover FUSE This appliance is supplied with a moulded three pin mains plug for your safety and convenience A 13 amp fuse is fitted in this plug Should the fuse need to be replaced please ensure that the replacement fuse has a rating of 13 amps and that it is approved by ASTA or BSI to BS1362 Check for ASTA mark or the BSI mark on the body of the fus...

Страница 9: ...asing caller information 26 3 11 Storing caller information 26 4 Fax Sending Faxes 4 1 Sending a fax manually 27 4 2 Documents you can send 28 4 3 Sending a fax using one touch dial and navigator directory 28 4 4 Broadcast transmission 29 Receiving Faxes 4 5 Selecting the way to use your fax machine 31 4 6 Receiving a fax manually 32 4 7 Receiving a fax automatically 32 4 8 Using the unit with an ...

Страница 10: ...ipping and transportation of the unit No Item Part number 1 Quantity Specifications 1 Mains lead PFJA03A008Z 1 2 Telephone line cord PQJA87S 1 for UK 3 Handset PFJXE1005Z 1 4 Handset cord PFJA1029Z 1 5 Paper stacker PFKS1096Z1 1 6 Paper tray PFKS1085Z1 1 7 Drum unit KX FA84X 1 See page 57 8 Toner cartridge starter toner cartridge 1 prints about 800 A4 sized pages with a 5 image area page 57 9 Oper...

Страница 11: ...d directly by Panasonic UK Ltd L It couldn t be simpler L Also available through our Internet is direct shopping for a wide range of finished products take a browse on our website for further details 1 3 Extension telephone adaptor for UK When using the unit with an external answering machine page 33 please purchase an extension telephone adaptor by contacting one of the following www panasonic co...

Страница 12: ...g J HANDSET MUTE L To mute your voice to the other party during a conversation Press this button again to resume the conversation K R L To access special telephone services such as call waiting page 24 or for transferring extension calls L MONITOR L To initiate dialling M HELP L To print a quick reference page 18 N DIRECTORY PROGRAM L To store or edit names and telephone numbers page 22 O MENU L T...

Страница 13: ... all illustrations Note L Remove all the blue shipping tapes before installation 1 Handset 2 Speaker 3 Document guides 4 Paper tray 5 Recording paper entrance 6 Tension plate 7 Paper stacker 1 8 Document stacker 1 9 Recording paper exit j Document exit k Front cover l Document entrance 1 7 8 9 2 3 4 5 6 k j l ...

Страница 14: ... surface Do not place the drum unit near dust or dirt or in a high humidity area Do not expose the drum unit to direct sunlight L Do not leave the toner cartridge out of the protection bag for a long time It will decrease the toner life 1 Before opening the protection bag of the new toner cartridge shake it vertically more than 5 times 2 Remove the toner cartridge and drum unit from the protection...

Страница 15: ...ner unit 1 by holding the tabs L Do not touch the transfer roller 2 9 Close the front cover 1 by pushing down on both sides until locked L While the unit displays PLEASE WAIT do not open the front cover or disconnect the mains lead Toner save feature If you want to reduce toner consumption set the toner save setting to ON feature 79 on page 39 The toner cartridge will last approximately 40 longer ...

Страница 16: ...ine up the slots 1 in the paper stacker with the pegs 2 on the bottom of the unit then insert the two tabs of the paper stacker into the slots on the unit 3 Note L Do not place the unit in an area where the paper stacker may be easily bumped into L Document and recording paper will be ejected from the front of the unit Do not place anything in front of the unit L The paper stacker can hold up to a...

Страница 17: ...o open the extender 3 1 10 Handset cord Connect the handset cord 1 1 11 Recording paper A4 size recording paper can be used for fax messages The unit can hold up to 220 sheets of 60 g m2 to 75 g m2 paper 200 sheets of 80 g m2 or 180 sheets of 90 g m2 paper See the note for paper specifications page 56 1 Before inserting a stack of paper fan the paper to prevent paper jams 2 1 3 1 ...

Страница 18: ...tension plate forward 1 and insert the paper print side down 2 then push the tension plate back 3 L The paper should not be over the tabs 4 L If the paper is not inserted correctly readjust the paper or the paper may jam 4 4 1 2 3 Correct Incorrect ...

Страница 19: ... extend the telephone line cord Note L To avoid malfunction do not position fax machine near appliances such as TVs or speakers which generate an intense magnetic field L If any other device is connected on the same line this unit may disturb the network condition of the device L If you want to connect an answering machine to this unit see page 33 L If you use the unit with a computer and your int...

Страница 20: ...ted Volume 2 3 Adjusting volume 2 3 1 Ringer volume 4 levels high medium low off are available While the unit is idle press A or B L If any documents are in the document entrance you cannot adjust the ringer volume Confirm that there are no documents in the entrance To turn the ringer OFF 1 Press B repeatedly to display the following RINGER OFF OK YES SET NO STOP 2 Press SET RINGER OFF L To turn t...

Страница 21: ...to select AM or PM Example 3 15PM 12 hour clock entry 1 Press 0 3 1 5 D 10 M 08 Y 03 TIME 03 15AM 2 Press repeatedly to display PM D 10 M 08 Y 03 TIME 03 15PM 6 Press SET L The next feature will be displayed 7 Press MENU to exit the program Note L This information will be printed on each page transmitted from your unit L The accuracy of the clock is approximately 60 seconds a month To correct a mi...

Страница 22: ...cter located on the same number key press to move the cursor to the next space To enter your logo Example BILL 1 Press 2 2 times LOGO B 2 Press 4 3 times LOGO B I 3 Press 5 3 times LOGO BI L 4 Press to move the cursor to the next space and press 5 3 times LOGO BIL L To change capital or lower case letters Pressing the key will change to capital or lower case alternately 1 Press 2 2 times LOGO B 2 ...

Страница 23: ...urn to step 1 to enter the next character Display order of characters 2 6 Your fax number 1 Press MENU SYSTEM SETUP PRESS NAVI 2 Press or repeatedly to display the following YOUR FAX NO PRESS SET 3 Press SET L Cursor will appear on the display NO 4 Enter your fax number up to 20 digits Example NO 1234567 5 Press SET L The next feature will be displayed 6 Press MENU to exit the program Note L This ...

Страница 24: ...7 Press DIRECTORY PROGRAM Helpful hints L You can confirm the stored entries in the telephone number list page 54 Note L A hyphen or a space entered in a telephone number counts as two digits To correct a mistake Press or to move the cursor to the incorrect character number and then make the correction To delete a character number Press or to move the cursor to the character number you want to del...

Страница 25: ...ront cover page open for button locations 1 Press L Confirm that there are no documents in the document entrance 2 Press A or B repeatedly to display the desired entry 3 Press DIRECTORY PROGRAM 4 Press L To cancel erasing press STOP 5 Press SET 3 5 Making a phone call using one touch dial and navigator directory Before using this feature program the desired names and telephone numbers into one tou...

Страница 26: ...elephone services L This unit cannot support services based on the DTMF based subscriber line protocol L Depending on the service of the local telephone company the date time of the call or the caller s name may not be displayed Change the following ring setting to 2 or more rings beforehand FAX ring setting feature 06 page 38 3 7 1 How Caller ID is displayed The calling party s telephone number o...

Страница 27: ...to display the desired entry 3 Press NAME TEL NO to display the telephone number 4 Press dial key 0 to 9 or to enter the editing mode and edit the telephone number 5 Press MONITOR or lift the handset to call back the edited number L The unit will start dialling automatically L To send a fax insert the document FACE DOWN and press FAX START Note L The edited telephone number will not be saved in th...

Страница 28: ...e or The caller information does not include a telephone number L Keep the front cover page open for button locations 1 Press CALLER ID SEARCH 2 Press A or B repeatedly to display the desired entry 3 Press DIRECTORY PROGRAM 4 Select the station key or navigator directory For stations 1 3 1 Press the desired station key 2 Press SET 3 Press SET For stations 4 11 1 Press the desired station key 2 Pre...

Страница 29: ...HOTO and PHOTO WITH TEXT settings will increase transmission time L If the resolution setting is changed during feeding it will be effective from the next sheet To redial the last number 1 Press REDIAL PAUSE 2 Press FAX START L If the line is busy the unit will automatically redial the number up to 5 times L To cancel redialling press STOP then press SET To send more than 20 pages at a time Insert...

Страница 30: ...cument size Effective scanning area L Shaded area 1 will be scanned Document weight L Single sheet 45 g m2 to 90 g m2 L Multiple sheets 60 g m2 to 80 g m2 Note L Remove clips staples or other fasteners L Do not send the following types of documents Use copies for fax transmission Chemically treated paper such as carbon or carbonless duplicating paper Electrostatically charged paper Badly curled cr...

Страница 31: ...st function utilises stations 1 3 The one touch dial function will be disabled L Keep the front cover page open for button locations 4 4 1 Programming entries into the broadcast memory 1 Press DIRECTORY PROGRAM 2 Select the desired broadcast key For BROADCAST 1 2 1 Press the desired BROADCAST key 2 Press A or B repeatedly to select BROADCAST For MANUAL BROADCAST 1 Press MANUAL BROAD 2 Press A or B...

Страница 32: ... programmed parties 1 Insert the document FACE DOWN 2 If necessary press RESOLUTION repeatedly to select the desired resolution page 27 3 Press the desired BROADCAST 1 2 or MANUAL BROAD L The document will be fed into the unit and scanned into memory The unit will then transmit the data to each entry calling each number sequentially L After transmission the stored document will be erased automatic...

Страница 33: ...tuation You plan to answer the calls yourself How to set up Set the fax machine to TEL mode page 32 by pressing AUTO ANSWER repeatedly How to receive calls You have to answer all calls manually To receive a fax document press FAX START for each fax receiving 4 5 3 With answering machine Your situation You want to use the fax machine with an answering machine How to set up Connect an external telep...

Страница 34: ...other party can then send a fax To stop receiving Press STOP Extension telephone You can receive fax documents using an extension telephone 1 When the extension telephone rings lift the handset of the extension telephone 2 When document reception is required a fax calling tone slow beep is heard or no sound is heard press 9 pre selected fax activation code firmly 3 Replace the handset L The fax ma...

Страница 35: ... the same the remote access code of the answering machine the fax activation code feature 41 on page 39 Receiving a voice message and fax document in one call The caller can leave a voice message and send a fax document during the same call Inform the caller of the following procedure beforehand 1 The caller calls your unit L The answering device will answer the call 2 The caller can leave a messa...

Страница 36: ...them 1 Press CALLER ID SEARCH 2 Press A or B repeatedly to display the entry you wish to prevent the fax reception from 3 Press JUNK FAX PROHIBITOR 4 Press SET L To program other entries repeat steps 2 to 4 5 Press STOP to exit the program Note L If there is no space to store new entries LIST FULL is displayed in step 4 Erase unnecessary entries To display the junk fax prohibitor list 1 Press JUNK...

Страница 37: ...DARD copying will be done using FINE mode To stop copying Press STOP 5 1 1 More copying features To enlarge a document 1 After step 4 on page 35 press A repeatedly to select from 105 to 200 by changing the enlargement rate 5 at a time 2 Press COPY START L The unit will only enlarge the centre of the upper part of the document To make an enlarged copy of the bottom of the document turn the document...

Страница 38: ...it will store the documents into memory while collating the copies If memory becomes full while storing the unit will only print out the stored pages L After copying the collating feature will turn OFF automatically Collated pages 4 3 2 1 4 3 2 1 Uncollated pages 4 4 3 3 2 2 1 1 ...

Страница 39: ...the feature 6 Press SET L The setting you selected is set and the next feature will be displayed 7 To exit programming press MENU To cancel programming Press MENU to exit the program Programming by entering the program code number directly You can select a feature by directly entering the program code and a 2 digit number instead of using or 1 Press MENU 2 Press and the 2 digit code number page 37...

Страница 40: ...erseas fax activate this feature before starting transmission L This feature is not available for broadcast transmission L The calling charge may be higher as the transmission speed is slowed down NEXT FAX This setting is effective only for the next attempted fax transmission After transmission the unit will return to the previous setting ERROR default When the previous fax transmission fails and ...

Страница 41: ...ly reception FRIENDLY RCV ON To receive a fax automatically when you answer a call and hear a fax calling tone slow beep ON default You do not have to press FAX START for fax reception OFF You have to press FAX START for fax reception Code 68 Setting the Error Correction Mode ECM ECM SELECTION ON This feature is available when the transmitting receiving fax machines are ECM compatible ON default T...

Страница 42: ...fault 3 3 4 4 5 5 6 6 7 7 8 8 9 9 1 2 Remote activation ID 1 ON 2 OFF default L If you select ON then enter your ID from 1 to 5 digits using 0 9 and 1 7 Ringer pattern 1 A default 2 B 3 C 2 2 Journal report 1 ON default 2 OFF 2 3 Overseas mode 1 NEXT FAX 2 OFF 3 ERROR default 2 5 Delayed transmission 1 ON 2 OFF default L If you select ON then enter the fax number and transmission time using the di...

Страница 43: ...ther party s fax machine is busy or has run out of recording paper Try again L The document was not fed properly Re insert the document and try again L The other party s fax machine rings too many times Send the fax manually page 27 L The other party s machine is not a fax machine Check with the other party L The number you dialled is not in service PRESSED THE STOP KEY L STOP was pressed and fax ...

Страница 44: ...t Contact our service personnel NO FAX REPLY L The other party s fax machine is busy or has run out of recording paper Try again OUT OF PAPER L Recording paper is not installed or the unit has run out of paper Install paper page 15 L Recording paper is not fed into the unit properly Reinstall paper page 15 PAPER JAMMED L A recording paper jam occurred Clear the jammed paper page 48 PLEASE WAIT L T...

Страница 45: ...ps and install paper 7 3 2 Fax sending I cannot send documents L The telephone line cord is connected to the EXT socket on the unit Connect to the LINE socket page 17 L The other party s fax machine is busy or has run out of recording paper Try again L The other party s machine is not a fax machine Check with the other party L The other party s fax machine rings too many times Send the fax manuall...

Страница 46: ...urn ON the AUTO ANSWER light I cannot select the desired receiving mode L If you want to set FAX ONLY mode press AUTO ANSWER repeatedly to turn ON the AUTO ANSWER light L If you want to set TEL mode press AUTO ANSWER repeatedly to turn OFF the AUTO ANSWER light 7 3 4 Copying The unit will not make a copy L You cannot make a copy during programming Make the copy after programming A black line a whi...

Страница 47: ...ich does not include Also change the code of the fax machine with feature 12 page 38 Callers complain that they cannot send a document L Your answering machine has run out of recording tape Rewind the tape to record messages L You set the answering machine to only give a greeting message 7 3 6 If a power failure occurs L The unit will not function L The unit is not designed for making emergency te...

Страница 48: ...posing it to light may damage the drum Once you have opened the protection bag Do not expose the drum unit to light for more than 5 minutes Do not touch or scratch the green drum surface Do not place the drum unit near dust or dirt or in a high humidity area Do not expose the drum unit to direct sunlight L Do not unplug the fax machine Loss of fax documents in memory may occur L Do not leave the t...

Страница 49: ...the used cartridge 1 from the drum unit 2 L The toner may stick to the cartridge and the drum unit Be careful when handling See page 4 for details L Do not drop the toner on the green drum surface 3 L Put the used toner cartridge into the protection bag 7 If you replace the drum unit at the same time remove the new drum unit from the protection bag Place the new toner cartridge 1 into the drum uni...

Страница 50: ...the tabs 12 Close the front cover 1 by pushing down on both sides until locked L While the unit displays PLEASE WAIT do not open the front cover or disconnect the mains lead Waste disposal method Waste material should be dumped or incinerated under conditions which meet all national and local environmental regulations Jams 7 5 Recording paper jam 7 5 1 When the recording paper has jammed in the un...

Страница 51: ...er 2 When the recording paper has jammed near the recording paper exit 1 Remove the recording paper 1 then remove the drum and toner unit 2 to allow the jammed paper 3 to pull free from the rear cabinet 2 Lift both green levers 1 forward until they stop 3 Remove the jammed paper 1 from the fuser unit by pulling it upwards carefully then install the drum and toner unit Caution The fuser unit 3 gets...

Страница 52: ...hten the recording paper 7 5 2 When the recording paper is not fed into the unit properly The display will show the following FAILED PICK UP Remove the recording paper Pull the tension plate forward 1 and re insert the recording paper 2 then push back the tension plate L Before re inserting make sure to fan and straighten the recording paper 7 6 Document jams sending 1 Lift open the front cover 1 ...

Страница 53: ...If any of the following problems occurs clean the inside of the unit If misfeeding of your original occurs frequently If a black line a white line or a dirty pattern appears on your recording paper on your original or on the fax document received by the other party Caution L Be careful when handling the drum and toner unit See the caution for the drum unit on page 46 for details L Do not use paper...

Страница 54: ...ller 3 5 Clean the document feeder roller 1 with a cloth moistened with isopropyl rubbing alcohol and let all parts dry thoroughly Clean the upper glass 2 with a soft and dry cloth 6 Push back the inner cover 7 Remove the drum and toner unit 1 by holding the two tabs 8 Clean the lower glass 1 with a soft and dry cloth 9 Reinstall the drum and toner unit 1 by holding the tabs Caution The fuser unit...

Страница 55: ...7 Help 53 10 Close the front cover 1 by pushing down on both sides until locked 11 Reconnect the mains lead and the telephone line cord Note L Do not touch the transfer roller 1 1 1 ...

Страница 56: ...eception This report will be printed automatically after every 30 fax communications feature 22 page 38 Broadcast programming list Provides you with names and numbers which are stored in the broadcast memory page 29 Printer test Allows you to check the print quality of your unit If the test print has a dirty pattern or blurred points or lines clean the inside of the unit page 51 If printing qualit...

Страница 57: ...n super fine resolution Photo resolution 64 level Scanner type Contact Image Sensor Printer type Laser Printer Data compression system Modified Huffman MH Modified READ MR Modified Modified READ MMR Modem speed 14 400 12 000 9 600 7 200 4 800 2 400 bps Automatic Fallback Operating environment 10 C 32 5 C 20 80 RH Relative Humidity Dimensions Approx height 220 mm width 430 mm depth 360 mm Mass Weig...

Страница 58: ...cause damage Moist paper Inkjet paper L Some paper only accepts print on one side Try using the other side of the paper if you are not happy with the print quality or if misfeeding occurs L For proper paper feeding and best print quality we recommend using long grained paper L Do not use paper of different types or thickness at the same time This may cause a paper jam L Avoid double sided printing...

Страница 59: ...rum unit or Model No KX FA84X can print approx 10 000 A4 sized sheets at 20 sheets per print job and approx 5 000 A4 sized sheets at 1 sheet per print job regardless of the content of the image area The actual drum life is determined by various factors such as temperature humidity and type of paper etc Note L Any details given in these instructions are subject to change without notice L The pictur...

Страница 60: ...ly to damage caused through fire accident lightning misuse wear and tear neglect incorrect adjustment or repair to damage caused through installation adaption modification or use in an improper manner or inconsistent with the technical and or safety standards required in the country where this appliance is used or to damage occurred during transit to or from the purchaser 5 If at any time during t...

Страница 61: ... 35 Collation 35 Enlarge 35 Reduce 35 D Date and time Feature 01 19 Delayed transmission Feature 25 38 Direct command 40 Display Contrast Feature 39 39 Error messages 41 Document size 28 Drum life 57 Drum unit 12 46 E ECM selection Feature 68 39 Error messages 41 Extension telephone 32 F Fax activation code Feature 41 39 Fax number Feature 03 21 37 Friendly reception Feature 46 39 H Help 18 J Jams...

Страница 62: ...e 06 38 S Sending faxes Broadcast 30 Dual access 27 From memory 27 Manually 27 Navigator directory 28 One touch dial 28 Sending report Feature 04 28 37 Set default Feature 80 39 Storing Broadcast 29 Navigator directory 22 One touch dial 22 T Toner cartridge Installing 12 Replacing 46 Toner life 57 Toner save Feature 79 13 39 V Volume 18 ...

Страница 63: ...61 ...

Страница 64: ...62 ...

Страница 65: ...63 ...

Страница 66: ... CM0503DT0 Panasonic Communications Co Ltd 1 62 4 chome Minoshima Hakata ku Fukuoka 812 8531 Japan 0682 Sales Department Panasonic Business Systems U K Panasonic House Willoughby Road Bracknell Berkshire RG12 8FP ...

Отзывы: