background image

138

VQT1Y00

Problem

Check points

This unit cannot be 
operated though it is 
turned on.

This unit does not 
operate normally.

Turn on the power again. If normal conditions are not 
restored yet, remove the battery or AC adaptor, wait about 
1 minute and then reconnect the battery or AC adaptor. 
Then about 1 minute later, turn on the power again. 
(Conducting the above operation while the media is being 
accessed may damage the data on the media.)

If normal operation is still not restored, detach the power 
connected, and contact consumer support. (

l

157, 158)

Recording does not start 
although power is 
supplied to this unit and 
the SD card is correctly 
inserted.

A message is displayed and you cannot record when the 
HDD does not operate normally due to the temperature of 
the unit being too high or low, when the built-in memory 
does not operate normally, or when the SD card cover 
cannot be closed due to failure of the SD card cover. In this 
case, press the recording start/stop button to display the 
media change message, allowing you to change the 
recording media.

Item other than the 
touched one is selected.

Calibrate the touch screen. (

l

42)

The remote control does 
not function.

Remote control cannot be operated when the [REMOTE 
CONTROL] is set to [OFF].

The button-type battery of the remote control may have run 
out. Replace it with a new button-type battery. (

l

43)

The remaining time 
indication or the elapsed 
time indication is not 
shown.

If you set [SETUP] 

>

 [DISPLAY] 

>

 [OFF], indications 

other than warnings and date etc are not displayed. (

l

36)

The unit arbitrarily stops 
recording.

Use an SD card that can be used for motion picture 
recording. (

l

29)

When the unit stops while a usable SD card for recording 
motion pictures (

l

29) is used, the data writing rate has 

deteriorated. We recommend formatting the SD card being 
used. (

l

97)

If [AGS] is [ON], record in the normal horizontal position or 
set [AGS] to [OFF]. (

l

66)

If the unit is exposed to strong vibrations or shocks while 
recording on HDD, recording may stop to protect the HDD. 
If the unit is used in a place with loud sounds, the recording 
may stop due to sound vibrations. Recording data on an SD 
card is recommended in these places.

Repeated recording and deletion of motion pictures may 
reduce the usable time for recording on a media you use. In 
that case, format the media.

HDCSD20&SD25&HS20P-VQT1Y00_eng.book  138 ページ  2008年12月22日 月曜日 午後8時16分

Содержание HDC-HS20P

Страница 1: ...assistance please call 1 800 561 5505 or visit us at www panasonic ca High Definition Video Camera Operating Instructions Model No HDC SD20P PC HDC TM20P PC HDC HS20P PC Before connecting operating o...

Страница 2: ...ENSURE THE UNIT IS WELL VENTILATED TO PREVENT RISK OF ELECTRIC SHOCK OR FIRE HAZARD DUE TO OVERHEATING ENSURE THAT CURTAINS AND ANY OTHER MATERIALS DO NOT OBSTRUCT THE VENTILATION VENTS The socket out...

Страница 3: ...uipment and receiver Connect the equipment into an outlet on a circuit different from that to which the receiver is connected Consult the dealer or an experienced radio TV technician for help FCC Caut...

Страница 4: ...s above the following temperatures or incinerate Button type battery 60 oC 140 oF Battery pack 60 oC 140 oF AC adaptor This AC adaptor operates on AC between 110 V and 240 V But In the U S A and Canad...

Страница 5: ...grounding prong The wide blade or the third prong are provided for your safety If the provided plug does not fit into your outlet consult an electrician for replacement of the obsolete outlet 10 Prote...

Страница 6: ...a manner that will not subject it to unnecessary movement avoid shaking and striking Your camera contains a sensitive pick up device which could be damaged by improper handling or storage CARE TO CLEA...

Страница 7: ...sonic Corporation x v Color is trademark LEICA is a registered trademark of Leica Microsystems IR GmbH and DICOMAR is a registered trademark of Leica Camera AG Microsoft Windows Windows Vista and Dire...

Страница 8: ...e time of the travel destination 40 7 Adjusting LCD monitor 41 LCD monitor adjustment 41 Touch screen calibration 42 Recording Yourself 42 8 Using with the remote control 43 Operation of direction but...

Страница 9: ...DVD burner to copy to play back a disc 105 Preparing for copying playing back 105 Copying to discs 107 Playing back the copied disc 111 Managing the copied disc Formatting Auto protect Displaying dis...

Страница 10: ...re using this unit Battery pack VW VBG070 AC adaptor VSK0697 AC cable K2CA2CA00025 DC cable K2GJYDC00004 Remote control Built in battery N2QAEC000024 AV cable K2KYYYY00054 Component cable K1HY10YY0005...

Страница 11: ...products With other products Available function Picture quality Watching Video Pictures on your TV l 98 to 104 Playback with the HDMI mini cable jPlayback using VIERA Link HDAVI Control l 103 High def...

Страница 12: ...go Press the center of the SD card and then pull it straight out 4 Securely close the SD card cover Securely close it until it clicks How to turn on the power Turn on the power by changing the mode to...

Страница 13: ...rding motion pictures 1 Change the mode to 2 Open the LCD monitor For users who have proceed to step 4 3 Press the MENU button then touch MEDIA SELECT Built in Memory or SD CARD Press the MENU button...

Страница 14: ...k Stops the playback and shows the thumbnails Still picture playback 1 Change the mode to 2 Touch the play mode select icon A to select desired media to be played back Touch PICTURE SD CARD to play ba...

Страница 15: ...CESS A The lamp illuminates while the SD card or built in memory is being accessed initialization recording playback deleting etc Do not perform the following operations when the lamp illuminates It m...

Страница 16: ...observed copy the data on the HDD to a PC a DVD disc etc immediately and contact consumer support l 157 158 Once the HDD is out of order data cannot be restored Operation may stop in hot or cold envi...

Страница 17: ...DC IN l 28 Always use the supplied AC adaptor or a genuine Panasonic AC adaptor VW AD21PP optional 10 USB terminal l 105 114 125 11 Menu button MENU l 34 12 Delete button l 88 13 SD card open lever OP...

Страница 18: ...optional or the wide conversion lens VW W4307H optional first remove the lens hood 23 Remote control sensor l 44 24 Recording lamp l 36 25 Video light l 60 26 Recording start stop button l 50 27 Statu...

Страница 19: ...houlder strap fixture 34 Battery release lever BATT l 24 35 Tripod receptacle This is a hole for attaching the unit to the optional tripod For details on mounting the tripod refer to the operating ins...

Страница 20: ...Panasonic AC adaptor VW AD21PP optional 10 USB terminal l 105 114 125 11 Menu button MENU l 34 12 Delete button l 88 13 SD card open lever OPEN l 30 14 Audio video output terminal A V l 98 113 Use the...

Страница 21: ...al first remove the lens hood 23 Remote control sensor l 44 24 Recording lamp l 36 25 Video light l 60 26 Recording start stop button l 50 27 Status indicator l 31 28 Mode dial l 31 29 HDD access lamp...

Страница 22: ...houlder strap fixture 35 Battery release lever BATT l 24 36 Tripod receptacle This is a hole for attaching the unit to the optional tripod For details on mounting the tripod refer to the operating ins...

Страница 23: ...as been found that counterfeit battery packs which look very similar to the genuine product are made available to purchase in some markets Some of these battery packs are not adequately protected with...

Страница 24: ...the figure Inserting removing the battery Removing the battery Make sure that the power is off and that the status indicator is turned off and then remove by holding onto it taking care not to drop Mo...

Страница 25: ...0 min 1 h 20 min VW VBG260 optional 7 2 V 2500 mAh 4 h 40 min 4 h 10 min 2 h 35 min VW VBG6 optional 7 2 V 5400 mAh 9 h 25 min 10 h 20 min 6 h 20 min HDC TM20 Battery model number Voltage Capacity min...

Страница 26: ...n HDC HS20 Battery model number Voltage Capacity minimum Charging time Recording destination Recording mode Maximum continuously recordable time Actual recordable time Supplied battery VW VBG070 optio...

Страница 27: ...apacity The actual time can vary depending on your actual use The maximum amount of remaining battery capacity able to be indicated is 9 hours 59 minutes If the actual remaining time exceeds 9 hours 5...

Страница 28: ...equipment with this unit A DC output terminal B DC input terminal Insert the DC cable matching the mark of the DC input terminal 1 Connect the AC cable to the AC adaptor and the AC outlet 2 Connect t...

Страница 29: ...C compatible device is compatible with both SD Memory Cards and SDHC Memory Cards When using an SDHC Memory Card on another device confirm that the device supports the SDHC Memory Card Cards that you...

Страница 30: ...cal noise static electricity or the failure of this unit or the SD card may damage or erase the data stored on the SD card When the card access lamp is lit do not jRemove the SD card jTurn the unit of...

Страница 31: ...rn off the power Change the mode to OFF The status indicator B goes off Operate the mode switch while at the same time pressing in the lock release button if changing from OFF to another mode Status i...

Страница 32: ...s turned off when it is closed To turn on the power A The status indicator lights To turn off the power A The status indicator goes off Turning the power on and off with the LCD monitor Change the mod...

Страница 33: ...the unit when it is to be used Only use the supplied stylus pen Do not tuck the stylus pen with the LCD monitor About the operation icons These icons are used to switch the menu and thumbnail display...

Страница 34: ...setting is completed when is surrounded by yellow after touching it 4 Touch the desired item to enter the setting 5 Touch EXIT or press the MENU button to exit the menu setting About information disp...

Страница 35: ...MEDIA SELECT is set to Built in Memory 6 It will be displayed only when the MEDIA SELECT is set to HDD 7 It will not be displayed when the MEDIA SELECT is set to HDD Language selection Menu list RECO...

Страница 36: ...he power saving function is not activated 5 MINUTES When about 5 minutes have passed without any operation this unit automatically turns off to save battery life The power save function will not activ...

Страница 37: ...FORMAT CARD 4 l 97 FORMAT HDD 6 l 97 FORMAT Built in Memory 5 l 97 CALIBRATION l 42 DEMO MODE This item is used to start the unit demonstration Only when the mode is at the position If DEMO MODE is s...

Страница 38: ...playback For any other menus that are not described above refer to menus with the same names for the recording mode still picture playback For any other menus that are not described above refer to me...

Страница 39: ...Touch EXIT or press the MENU button to exit the menu screen Changing the date and time display mode Select the menu l 34 SETUP DATE TIME desired display style You can also show or change the date and...

Страница 40: ...for selecting home travel destination appears after setting the home region successively If the home region has already been set once execute the menu operation for Step 1 5 Only when setting the regi...

Страница 41: ...en becomes brighter automatically when the power is turned on The recordable time will become shorter when you use this unit with the LCD monitor lit up Adjusting the brightness and color level of the...

Страница 42: ...ion cannot be performed when the LCD monitor is turned 180o Change the mode to Rotate the LCD monitor towards the lens side The image is horizontally flipped as if you see a mirror image However the i...

Страница 43: ...op button START STOP 9 Date time button DATE TIME l 39 10 Menu button MENU 11 OK button OK means that these buttons function in the same manner as the corresponding buttons on the unit SETUP REMOTE CO...

Страница 44: ...item with the direction button 3 Confirm the selection by pressing the OK button Selection confirmation of operation icons thumbnail display etc can be operated All touch operations on the unit can a...

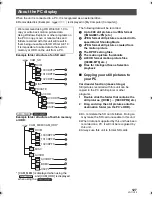
Страница 45: ...the subject is backlit it will become dark in the recording When recording make sure your footing is stable and there is no danger of colliding with another person or object 1 Hold the unit with both...

Страница 46: ...e not completely exposed for instance wearing sunglasses jThe size of a face is small on the screen jWhen the digital zoom is used The function may not operate properly in some recording conditions ev...

Страница 47: ...white color will become a purer white The unit determines the hue of light thereby judging the recording condition and selects the closest hue setting The illustration above shows the range over which...

Страница 48: ...ect that is surrounded by objects with glossy surfaces or by highly reflective objects jRecording a subject in dark surroundings jRecording a fast moving subject jRecording a subject with little contr...

Страница 49: ...itor and then open it again Quick Start Standby Mode cannot be released by the remote control Turn the mode to OFF when powering off Only when recording to an SD card or built in memory The unit is pu...

Страница 50: ...4 3 Select the media to record from the menu You cannot set the recording media for motion pictures and still pictures separately When selecting media Select the menu l 34 MEDIA SELECT Built in Memory...

Страница 51: ...a when played back with another device Still pictures can be recorded while recording the motion picture l 54 Screen indications in the recording mode A Recording mode B Remaining time left for record...

Страница 52: ...time in the row of 4 GB in above table as a guideline for the time that can be copied onto one DVD disc 4 7 GB Recordable time using the battery l 25 Mosaic pattern noise may appear on a playback imag...

Страница 53: ...pressing the PRE REC button or while the PRE REC indication flashes within about 3 seconds after initiating the Quick Start operation motion pictures taken 3 seconds before pressing the recording sta...

Страница 54: ...tely 4 Press the button halfway For auto focus only Focus indication appears and the unit focuses on the subject automatically If you set the Optical Image Stabilizer function l 58 to on then the imag...

Страница 55: ...he status of the auto focus The focus indication will not be displayed in the following conditions jWhen the manual focus is used jWhen the MagicPix function is used You can record still pictures even...

Страница 56: ...ber of recordable pictures depends on whether and are used together and on the subject being recorded Maximum number of recordable pictures that can be displayed is 99999 If the number of recordable p...

Страница 57: ...tion sound may be recorded When returning the zoom lever to the original position move it quietly When the zoom magnification is 16k the subjects are focused at about 1 2 m 3 9 feet or more When the z...

Страница 58: ...on Set the Intelligent Auto mode to off before turning the Optical Image Stabilizer function to off In the following cases the image stabilizer function may not work effectively jWhen the unit is sha...

Страница 59: ...alfway the focus is set to the object that is locked The target frame turns green when it focuses and the target cannot be changed When target lock fails the target frame blinks in red and then disapp...

Страница 60: ...within 1 5 m 5 feet of the unit Do not look directly into the light Using the MagicPix function at the same time will make conditions even brighter We recommend using the video light in a bright plac...

Страница 61: ...icon again to cancel the function It is not displayed when the Intelligent auto mode is on If you turn off the power or change the mode to MagicPix Backlight compensation and tele macro functions are...

Страница 62: ...ade setting is canceled when the recording stops To select the color for Fade in out Select the menu l 34 RECORD SETUP FADE COLOR WHITE or BLACK Soft skin mode This makes skin colors appear softer for...

Страница 63: ...the effect may not be clear If you record a person in the distance the face may not be recorded clearly In this case cancel Soft Skin mode or zoom in on the face close up to record Tele macro The tele...

Страница 64: ...cenes less shaky with slow playback and pause of playback Portrait To make people stand out against the background Spotlight Improved quality when subject is brightly illuminated Snow Improved image q...

Страница 65: ...ode is set to l 78 VIDEO SETUP GUIDE LINES desired setting The guide lines do not appear on the images actually recorded Set to OFF to cancel the guide line Digital cinema Use this function to record...

Страница 66: ...NE COMBINE it will be possible to perform the relay recording again If the RELAY REC is set to ON without performing the RELAY SCENE COMBINE a message is displayed You will be able to perform relay re...

Страница 67: ...face framing is displayed in orange Focus and adjustment of brightness will be performed against the prioritized face framing Prioritized face framing will not be displayed in manual focus mode Focus...

Страница 68: ...M MIC Directivity of the microphone is synchronized with the zoom operation Sounds near the front of the unit are recorded more clearly if you zoom in close up and surrounding sounds are recorded more...

Страница 69: ...C Back left D Front right E Back right F Microphone input level Touch to activate disactivate AGC When AGC is activated the icon is surrounded by yellow and the amount of sound distortion can be redu...

Страница 70: ...o set the focus and record It will automatically focus if you press fully once so it is convenient when recording objects moving back and forth 3 Touch Record or Delete Record Pictures are stored Dele...

Страница 71: ...hrough Press the MENU button Built in flash When the button is pressed the flash is activated and the picture will be recorded Use the built in flash in order to record still pictures in dark places C...

Страница 72: ...turned ON may not be played back properly with a player that cannot support 24p video signal playback Relay recording It does not allow the relay recording of still pictures However even still pictur...

Страница 73: ...ferent depending on the zoom rate The microphone input level meter shows the largest volume for the microphones You cannot record with the audio completely muted Hi speed burst shooting If you turn of...

Страница 74: ...s Change the mode to Press the MANUAL button appears on the screen Perform the setting by touching the desired item to be set Touch 1 to change the page and touch to display not display the operation...

Страница 75: ...complete If the display continues flashing the white balance cannot be set In this case use other white balance modes When the display flashes the manual white balance previously adjusted is stored W...

Страница 76: ...to the automatic adjustment When setting both the shutter speed and the iris gain value set the shutter speed and then set the iris gain value Manual shutter speed adjustment If you increase the shut...

Страница 77: ...m magnification is more than 16k The part of the screen that is enlarged is not enlarged on the image actually recorded Adjust the quality of the image while recording Adjust by outputting to a TV whi...

Страница 78: ...uch VIDEO HDD to play back the HDD 3 Touch the scene to be played back Next previous page can be displayed by touching HDC SD20 HDC TM20 Operate the mode switch while at the same time pressing in the...

Страница 79: ...r volume during playback Towards r Increases the volume Towards s Decreases the volume Fast forward rewind playback Touch 5 during playback to fast forward Touch 6 to rewind The fast forward rewind sp...

Страница 80: ...ormed for about 3 seconds the bar will disappear Touch the screen again to display the bar Direct playback bar cannot be operated with the remote control Sound will be heard only during normal playbac...

Страница 81: ...ed as a thumbnail at set time interval Scene can be played back from any midway point of the scene you wish to see Move the zoom lever to i side and change over the thumbnail display to Highlight Time...

Страница 82: ...ack the scenes excluding a portion of the scene judged to have failed to shoot due to fast movement of this unit camera shake or focus error 1 Touch 2 Touch INTEL SCENE 3 Touch the scene to be played...

Страница 83: ...playback is finished or stopped the screen to select REPLAY SELECT AGAIN or EXIT is displayed Touch the desired item Scene setting 1 Touch SELECT SCENES or SELECT DATE 2 When SELECT SCENES is selected...

Страница 84: ...the scene is split Playing back of all the scenes returns if the power is turned off or the mode is changed Playback of the first scene starts after playback of the last scene finishes Select the men...

Страница 85: ...e played back The selected still picture is played back on the full screen and the operation icon is automatically displayed on the screen Next previous page can be displayed by touching HDC SD20 HDC...

Страница 86: ...llowing order if the zoom lever is operated to _ side or side 20 still pictures 9 still pictures 1 still picture 9 still pictures display returns if the power is turned off or the mode is changed Chan...

Страница 87: ...tely in the following cases jWhen the number of still pictures exceeds 999 jWhen pictures are recorded in Hi speed Burst Shooting mode is indicated after the date in the list by date is displayed afte...

Страница 88: ...deleted 3 Only when SELECT is selected in step 2 Touch the scene still picture to be deleted When touched the scene still picture is selected and the indication appears on the thumbnail Touch the sce...

Страница 89: ...or Highlight Playback is selected scenes cannot be deleted To delete an unwanted part of a scene divide the scene first and then delete the unnecessary part l 90 Scenes still pictures which cannot be...

Страница 90: ...e dividing the same scene To continue dividing other scenes touch NO and repeat steps 3 4 5 Press the MENU button to complete dividing 6 Delete the unnecessary scene l 88 To delete all the divided poi...

Страница 91: ...Change the mode to 1 Select the menu l 34 2 Touch the scene still picture to be protected When touched the scene still picture is selected and the indication appears on the thumbnail Touch the scene...

Страница 92: ...ting services support this feature at this time 1 Select the menu l 34 2 Touch the still picture to be set 3 Touch to set the number of prints Up to 999 prints can be selected Prints for set number ca...

Страница 93: ...ange the mode to and touch the play mode select icon to select desired media to confirm the media information l 78 Select the menu l 34 SD card information display Built in memory information display...

Страница 94: ...HDD 3 Touch the desired item Video Picture All scenes are copied in order of motion pictures then still pictures Proceed to step 7 VIDEO Motion pictures are copied PICTURE Still pictures are copied 4...

Страница 95: ...jThe number of recorded scenes is large jThe temperature of the unit is high If some motion pictures or still pictures have already been recorded to the copy destination then the same date may be assi...

Страница 96: ...ted Relay recording information will be deleted when the relay scenes are combined and relay recording will be possible again When the relayed scenes in the built in memory or SD card are deleted comb...

Страница 97: ...tion message appears touch YES When formatting is complete touch EXIT to exit the message screen Perform a physical formatting of the built in memory HDD when this unit is to be disposed transferred l...

Страница 98: ...ith the terminals Image quality may vary with the connected terminals 1 High quality 2 HDMI terminal 3 Component terminal 4 Video terminal A V A V A HDMI mini cable optional B Component cable supplied...

Страница 99: ...cable Select the Video 2 channel with an AV cable The name of the channel may differ depending on the connected TV 3 Change the mode to to play back The image and audio are output on the TV Cables Re...

Страница 100: ...l is pressed the information displayed on the screen operation icon and time code etc can be displayed not displayed on the TV It will not display when the power is turned off When connecting with a H...

Страница 101: ...hat is HDMI HDMI is the interface for digital devices If you connect this unit to a HDMI compatible high definition TV and then play back the recorded high definition images you can enjoy them in high...

Страница 102: ...lifier and Panasonic TV that are compatible with VIERA Link linked operations VIERA Link become possible l 103 The unit cannot be connected to the optical digital cable Component output setting can be...

Страница 103: ...he VIERA Link VIERA Link is a new name for EZ Sync This function allows you to use your remote control for the Panasonic TV for easy operations when this unit has been connected to a VIERA Link compat...

Страница 104: ...ic input switching If you connect with a HDMI mini cable and then turn on the power on this unit the input channel on the TV automatically switches to this unit s screen If the TV s power is in standb...

Страница 105: ...burner or HD Writer AE 1 0 can additionally copy 4 Connect this unit and a DVD burner before formatting If you format a used disc you can copy on that disc Please be aware that if a disc is formatted...

Страница 106: ...W BN1 A Mini AB USB Connection Cable supplied with VW BN1 B DVD burner optional Insert the plugs as far as they will go 4 Insert the disc in the DVD burner Insert the DVD disc with the recording side...

Страница 107: ...d the continued scene that is on the SD card will be copied together to the disc 1 Connect this unit to the DVD burner to prepare for copying l 105 For users who have proceed to step 3 2 Touch copy so...

Страница 108: ...RE is selected in step 3 Touch the desired item ALL SCENES All motion pictures or still pictures are copied Touch NEXT to proceed to step 8 SELECT SCENES Some scenes are selected for copying SELECT DA...

Страница 109: ...pying is complete be sure to play back the discs to check that they have been copied to correctly l 111 Important Notice When connecting an optional DVD burner and this unit for copying a disc do not...

Страница 110: ...in the Intelligent Scene Selection or Highlight Playback About the approximate time it takes for copying to a disc To copy motion pictures to the full capacity of a disc Disc type Copy time High Defi...

Страница 111: ...e component cable or AV cable l 98 2 Touch the scene or still picture to be played back and then play it back The playback operation is performed the same as when playing back motion pictures or still...

Страница 112: ...ult setting is ON If a disc that you copied to is inserted in another device without protecting it a message may be displayed prompting you to format the disc We recommend setting AUTO PROTECT to ON i...

Страница 113: ...date and time display and function indication are not wanted cancel them before dubbing l 39 100 If the dubbed images are played back on a wide screen TV the images may be stretched vertically In this...

Страница 114: ...cables except the supplied one Operation is not guaranteed with any other USB cables 2 Touch PRINTER For users who have proceed to step 4 If the PictBridge indication does not appear or continues to...

Страница 115: ...nnect the USB cable 4 Touch a still picture to be printed 5 Touch to set the number of prints Touch ENTER after the number of prints is set You can set up to 9 prints To cancel the setting set the num...

Страница 116: ...n you stop printing halfway Touch CANCEL A confirmation message appears If YES is selected the number of prints set is canceled and the screen returns to step 4 If NO is selected all the settings are...

Страница 117: ...1 0 for HDC 1 Copying in BD AVCHD format A Motion Still pictures B Motion pictures 1 Built in memory Built in HDD Copying in DVD Video format B Motion pictures 1 Built in memory Built in HDD Converted...

Страница 118: ...f it is inserted anywhere other than the SD card slot Be sure to insert it in card slot for the SD card To use the HD Writer AE 1 0 You will need a high performance PC depending on the functions to be...

Страница 119: ...se Engineering Decompiling or Disassembly Licensee may not reverse engineer decompile or disassemble the Software except to the extent either of them is permitted under law or regulation of the countr...

Страница 120: ...k 1 Microsoft Windows Vista Home Premium or Service Pack 1 Microsoft Windows Vista Ultimate or Service Pack 1 Microsoft Windows Vista Business or Service Pack 1 CPU Intel Pentium III 1 0 GHz or higher...

Страница 121: ...nly can use this software If using Windows Vista administrative account and standard account users only can use this software An administrative account user should install and uninstall this software...

Страница 122: ...crosoft Windows Vista Home Premium or Service Pack 1 Microsoft Windows Vista Ultimate or Service Pack 1 Microsoft Windows Vista Business or Service Pack 1 Microsoft Windows Vista Enterprise or Service...

Страница 123: ...uble click the CD ROM drive icon in My Computer Computer 2 Click Next 3 Select where the application is to be installed then click Next 4 Select Yes or No to create shortcut 5 Select the country or re...

Страница 124: ...ll any software applications that you no longer require 1 Select start Settings Control Panel Add or Remove Programs Applications or Uninstall a program 2 Select HD Writer AE 1 0 for HDC then click Ch...

Страница 125: ...they will go Do not use any other USB cables except the supplied one Operation is not guaranteed with any other USB cables 4 Touch PC This unit is automatically recognized as an external drive of the...

Страница 126: ...port on your PC To disconnect USB cable safely 1 Double click the icon in task tray displayed on the PC Depending on your PC s settings this icon may not be displayed 2 Select USB Mass Storage Device...

Страница 127: ...recorded with this unit can be copied to the PC with Explorer or other programs 1 Double click the folder that contains the still pictures DCIM 100CDPFQ etc 2 Drag and drop the still pictures onto th...

Страница 128: ...authorized or with the user name for a standard user account If you log on with a user name for a guest user account the software cannot be used On the PC Select start All Programs Programs Panasonic...

Страница 129: ...ection screen will appear 2 Touch PC 3 Double click CAM_SD displayed on the desktop CAM_SD and CAM_MEM are displayed on the desktop when using the and CAM_SD and CAM_HDD are displayed on the desktop w...

Страница 130: ...N 0dB 0h00m00s MF PRE REC 1 100 R3000 1 MEGA NOV 1 2009 12 34PM 2 1M HDD recording possible status 2 White Green Card recording possible status Recognizing the card Red Recording Green Recording pause...

Страница 131: ...rding possible status Recording still picture MEGA OIS l 55 HDD Falling detection l 16 2 2 1M MEGA 1 Playback l 79 86 Pause l 79 86 5 6 Fast forward rewind playback l 79 7 8 Last first scene paused 9...

Страница 132: ...cted to a PC l 125 2 Time display The built in battery is low l 39 The warning alarm indication appears when LCD monitor is rotated towards the lens side Return the direction of the LCD monitor to nor...

Страница 133: ...If this message appears even though motion pictures and still pictures are recorded on an SD card the card may be unstable Reinsert the SD card then turn the power off and then on again THIS BATTERY...

Страница 134: ...not be possible to completely repair the data When data recorded on another device is recovered it may not be possible to play back the data on this unit or the other device If recovery fails turn th...

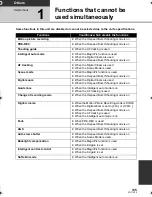
Страница 135: ...igital zoom When the Digital Cinema is used When the Hi speed Burst Shooting mode is on Guide lines When the Intelligent auto mode is on When the AF tracking is used Change of recording mode When the...

Страница 136: ...MF assist function When Digital Zoom 16k or higher is used Hi speed burst shooting mode When the Digital Zoom is set to 40k or 1000k When the AF tracking is used When the Intelligent auto mode is on F...

Страница 137: ...remote control for the TV the power on this unit also turns off If you are not using VIERA Link set VIERA Link to OFF l 103 When this unit is connected to a DVD burner to copy or play back images a d...

Страница 138: ...media Item other than the touched one is selected Calibrate the touch screen l 42 The remote control does not function Remote control cannot be operated when the REMOTE CONTROL is set to OFF The butto...

Страница 139: ...rn to normal playback l 82 Although this unit is correctly connected to a TV images cannot be seen The images are squeezed horizontally Please read the operating instructions of your TV and select the...

Страница 140: ...ly when the object moves across the image very fast but this is because the unit is using MOS for the image sensor This is not a malfunction White round spots like soap bubbles appear on the recorded...

Страница 141: ...y the PC Select another USB terminal on the PC Check the operating environment l 120 Connect the supplied USB cable again after restarting the PC and turning on this unit again When the USB cable is d...

Страница 142: ...he HD Writer AE 1 0 but it will play back smoothly if you set Seamless settings in the HD Writer AE 1 0 Refer to the operating instructions for the HD Writer AE 1 0 When the scenes were recorded on di...

Страница 143: ...the picture may momentarily stop at the point where the scenes switch B The point where the scenes switch will be played back smoothly if you select the scenes in order Other cases If you record more...

Страница 144: ...micals onto the unit If the unit is sprayed with such chemicals its body may be marred and the surface finish may peel off Do not leave rubber or plastic products in contact with the unit for a long t...

Страница 145: ...perature rises or falls In cold areas the full charge indication may not appear or the low battery indication may appear about 5 minutes after starting use At high temperatures the protection function...

Страница 146: ...consumer support l 157 158 If you use the AC adaptor near a radio radio reception may be disturbed Keep the AC adaptor 1 m 3 3 feet or more away from the radio When using the AC adaptor it may generat...

Страница 147: ...r to outside When a cold room has been warmed up quickly When cool wind from an air conditioner is directly blown onto this unit After summer afternoon showers of rain When this unit is in a very humi...

Страница 148: ...to F3 3 Focal length 2 95 mm to 47 2 mm Macro Full range AF Filter diameter 43 mm Zoom 16k optical zoom 40k 1000k digital zoom Monitor 2 7z wide LCD monitor approx 230 K pixels Microphone 5 1 channel...

Страница 149: ...4 mm W k67 mm H k127 mm D 2 52 q W k2 64 q H k5 00 q D excluding projecting parts 64 mm W k69 mm H k128 mm D 2 52 q W k2 72 q H k5 04 q D excluding projecting parts Mass Weight Approx 270 g Approx 0 6...

Страница 150: ...r to page 52 for the recordable time Picture size HA HG 1920k1080 60i 1920k1080 24p HX 1920k1080 60i HE 1440k1080 60i Audio compression Dolby Digital Dolby AC3 5 1 ch HDC SD20 HDC TM20 HDC HS20 Record...

Страница 151: ...change without prior notice Power source Power consumption DC output AC 110 V to 240 V 50 60 Hz 19 W DC 9 3 V 1 2 A Unit operation DC 8 4 V 0 65 A Battery charging Dimensions 92 mm W k33 mm H k61 mm...

Страница 152: ...VW VBG130 2 Rechargeable Lithium Ion Battery Pack VW VBG260 2 Rechargeable Lithium Ion Battery Pack VW VBG6 2 3 Rechargeable Lithium Ion Battery Pack VW VH04 Battery pack holder kit RP CDHM15 RP CDHM3...

Страница 153: ...ease consult your local dealer Accessory No Figure Description RP SDM12GU1K RP SDM06GU1K RP SDM04GU1K RP SDM02GU2A RP SDM02GU1A Class 4 12 GB SDHC Memory Card Class 4 6 GB SDHC Memory Card Class 4 4 G...

Страница 154: ...FICE 20421 84th Avenue South Kent WA 98032 Ship To Mr Mrs Ms First Last Street Address City State Zip Phone Day Night 4 Shipping information UPS delivery requires complete street address Please photoc...

Страница 155: ...product needs service Please include your proof of purchase Failure to do so will delay your repair To further speed your repair please provide an explanation of what is wrong with the unit and any s...

Страница 156: ...box pictures on standard 4 3 screen TV s or non expanded standard 4 3 pictures on wide screen TV s or onscreen data in a stationary and fixed location The warranty ALSO DOES NOT COVER damages which oc...

Страница 157: ...ers TTY 1 877 833 8855 As of October 2008 For hearing or speech impaired TTY users TTY 1 866 605 1277 Purchase Parts Accessories and Instruction Books online for all Panasonic Products by visiting our...

Страница 158: ...chase receipt or other proof of date of original purchase is required before warranty service is performed THIS EXPRESS LIMITED WARRANTY IS IN LIEU OF ALL OTHER WARRANTIES EXPRESS OR IMPLIED INCLUDING...

Страница 159: ...OF setting 92 Dubbing 113 DVD burner 105 E Economy 36 F Fade 62 Flash 71 Focus 54 77 Format 97 Frame by frame playback 80 G Gain 76 Grip belt 19 22 Guide line 65 H HDD 16 HDD information display 93 HD...

Страница 160: ...93 SD Memory Card 29 SD Speed Class Rating 29 SDHC Memory Card 29 Self recording 42 Self timer recording 71 Shooting guide 53 Shoulder strap fixture 19 22 Shutter sound 72 Shutter speed 76 Simultaneou...

Страница 161: ...ope manteni ndola derecha Empuje el centro de la tarjeta SD luego t rela recta fuera 4 Cierre firmemente la tapa de la tarjeta SD Ci rrela firmemente hasta que dispare C mo encender la unidad Encienda...

Страница 162: ...ci n de pel culas 1 Cambie el modo a 2 Abra la pantalla LCD Para usuarios quienes tienen proceda al Paso 4 3 Pulse el bot n MENU luego toque SELEC MEDIO MEM INTERNA o TARJETA SD Pulse el bot n MENU lu...

Страница 163: ...a reproducci n y visualizar las miniaturas Reproducci n de fotograf as 1 Cambie el modo a 2 Toque el icono A de selecci n del modo de reproducci n para seleccionar el medio deseado a ser reproducido T...

Страница 164: ...c Corporation 2008 Panasonic Consumer Electronics Company Division of Panasonic Corporation of North America One Panasonic Way Secaucus NJ 07094 Panasonic Canada Inc 5770 Ambler Drive Mississauga Onta...

Отзывы: