background image

Network

TQBS0165

45

Network Service

Network Service allows you to access some 
specific websites supported by Panasonic, and 
enjoy Internet contents.

Preparation

• Perform network connection and settings. 

(

>

10, 11)

1

Press [INTERNET].
• When a message is displayed, read it 

carefully and then press [OK].

• NETFLIX can be accessed directly by 

pressing [NETFLIX] button.

2

Select the item, then press [OK].
• Operable buttons:

[

3

,

4

,

2

,

1

], [OK], [RETURN

], colour 

buttons and number buttons.

To exit

Press [EXIT

].

• In the following cases, settings are possible using “Network 

Service Settings”. (

>

57)

- When restricting the use of Network Service.
- When the audio is distorted.

• For information about other disclaimers. (

>

68, Disclaimer)

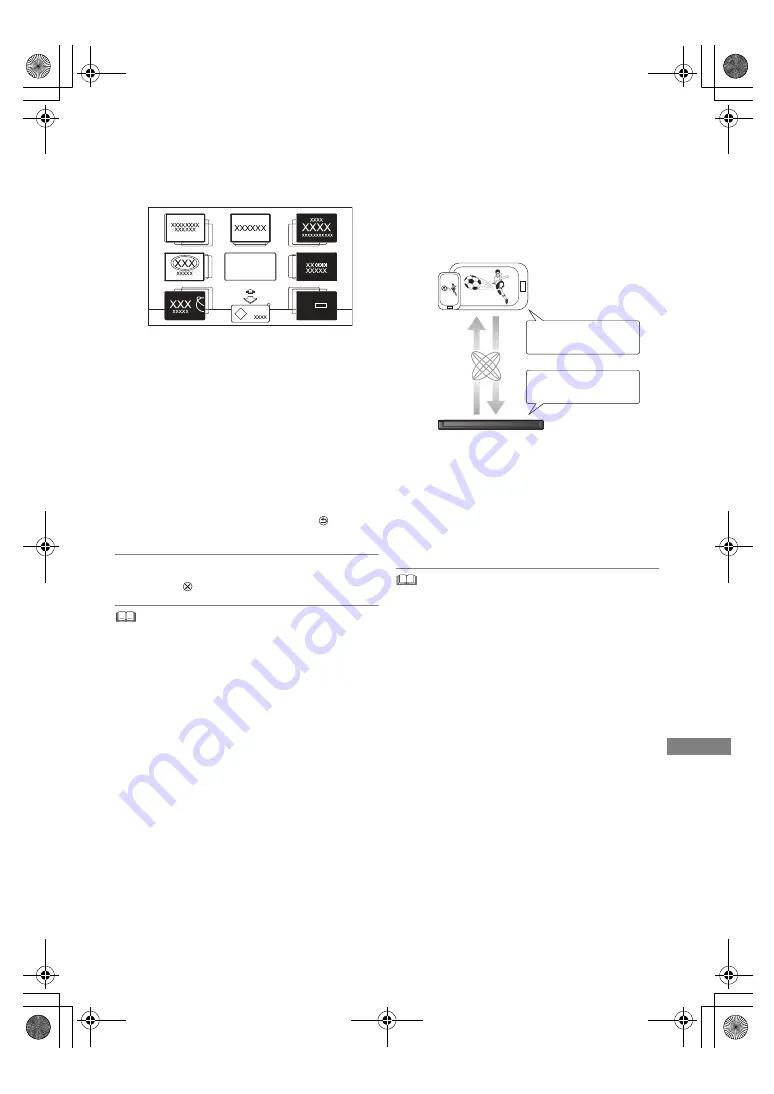
TV Anytime

Operations such as the ones below can be 
performed from anywhere with a smartphone or 
tablet installed with Media Center App.
- Setting a recording
- Watching TV with this unit’s tuner
- Playing back programmes recorded on this unit

Use the Media Center App to complete user 
registration to use these functions.

Preparation

• Perform network connection and settings. 

(

>

10, 11)

• TV Anytime Settings (

>

57)

• This unit will always be connected to the Internet when this 

function is activated.

• For details, please check the following website.

http://panasonic.jp/support/global/cs/av/mediacenter/
(This site is in English only.)

• For information about other disclaimers. (

>

68, Disclaimer)

Network

MORE

BACK

XXX XXXX

e.g.,

This unit

Internet

Timer recording

Watching TV
Playback programmes

Smartphone 
or tablet

DMR-HST270GZ_eng.book  45 ページ  2017年12月26日 火曜日 午後5時47分

Содержание DMR-HST270

Страница 1: ...y before using this product and save this manual for future use Operating Instructions HDD Recorder Model No DMR HST270 Software Firmware Update To support the latest features it s very important you install the latest updates to maintain proper operation of your unit For details refer to Software Firmware Update 50 or http panasonic jp support global cs This site is in English only until 2018 01 ...

Страница 2: ...aged mains plug or socket outlet The mains plug is the disconnecting device Install this unit so that the mains plug can be unplugged from the socket outlet immediately Unit Do not place sources of naked flames such as lighted candles on this unit This unit may receive radio interference caused by mobile telephones during use If such interference occurs please increase separation between this unit...

Страница 3: ...e covering has been peeled off Remove batteries if you do not intend to use the remote control for a long period of time Store in a cool dark place When disposing of the batteries please contact your local authorities or dealer and ask for the correct method of disposal Please check and identify the supplied accessories Product numbers are correct as of December 2017 These may be subject to change...

Страница 4: ...back menu 33 Editing video Deleting Editing programmes 35 Copying video Copying programmes 38 Photo and Music Photo 40 Music 43 Network Network Service 45 TV Anytime 45 Home Networking DLNA 46 With Other Equipment Copying the HD Video AVCHD 49 Other functions VIERA Link 50 Software Firmware Update 50 Other operations 51 Setup Basic Settings 52 Reference Troubleshooting guide 60 HDD and media infor...

Страница 5: ...ing to vibration and shock Even after the unit is switched to standby mode the HDD continues operating for a short time The registration of the USB HDD may be cancelled in the process of repairing this unit You can use the USB HDD again by re registering but all recorded content already on the USB HDD will be lost In such cases the recorded content data cannot be recovered This unit may contain pr...

Страница 6: ...a USB HDD to the USB port on the rear side 26 Connecting the USB HDD Front Pull to flip down the front panel 1 Display 7 2 Remote control signal sensor Angle Approx 20 up and down 30 left and right Distance Within approx 7 m in front of the unit 3 Play 4 Standby on switch Í I Press to switch the unit from on to standby mode or vice versa In standby mode the unit is still consuming a small amount o...

Страница 7: ...8 Recording indicator REC lights up while recording is in progress 1 flashes when the first timer recording standby is activated or recording is paused and lights up while recording is in progress In the same way as 1 2 lights up or flashes for the second recording Rear 1 AC IN terminal 9 2 Cooling fan 3 LNB IN terminal 9 Connect the satellite dish 4 USB port DC 5 V 500 mA Connect a USB HDD to thi...

Страница 8: ...0s Skip approx 10 seconds backward 60s Skip approx 1 minute forward 6 Basic operations for recording and play REWIND LIVE TV PAUSE LIVE TV 16 7 Show Information 14 28 31 8 Selection OK Frame by frame 31 9 Show Video Menu 27 Show OPTION menu 33 35 42 Colour buttons red green yellow blue Use in accordance with instruction on the screen Select audio 15 31 To delete unwanted recorded programmes timer ...

Страница 9: ...ll the units from AC power Connect the AC mains lead after making all connections When the unit is not to be used for a long time To save power unplug it from the household mains socket This unit consumes a small amount of power even when the unit is in standby mode 67 Basic connections HDMI This unit s rear panel Household mains socket AC 220 to 240 V 50 Hz AC mains lead supplied Connect only aft...

Страница 10: ...method refer to the instructions supplied with the connected equipment Use category 5 or above straight LAN cables STP when connecting to peripheral devices About wireless LAN connection 11 Easy Network Setting The unit is not compatible with public wireless LAN services Amplifier receiver connections HDMI terminal DIGITAL AUDIO OUT terminal HDMI cable Amplifier receiver sound bar HDMI cable COAXI...

Страница 11: ...ting Follow the on screen instructions to establish your connection settings Select Wired or Wireless then press OK LAN cable connection Wired Follow the on screen instructions to apply your connection settings Wireless LAN connection Wireless Before beginning wireless connection setup Obtain your network name SSID 1 If your wireless connection is encrypted please be sure that you know your encryp...

Страница 12: ...e Network function If you set Home Network function to On all connected devices on the same network can access this unit Ensure that the router for your home network has adequate security system to prevent unauthorised access Refer to the operating instructions of the hub or router Do not use this unit to connect to any wireless network for which you do not have usage rights After performing netwo...

Страница 13: ...de number is invalid for your TV this remote control is not compatible with your TV When using a DiSEqC1 0 antenna system TV operation buttons Manufacturer Code Manufacturer Code AIWA 35 BENQ 58 59 BRANDT 10 15 CENTREX 66 CURTIS 05 DESMET 05 ELEMIS 05 FINLUX 61 Panasonic 01 02 03 04 AKAI 27 30 BEKO 05 71 72 73 74 BUSH 05 DAEWOO 64 65 DUAL 05 FERGUSON 10 34 FISHER 21 MITSUBISHI 05 19 20 47 METZ 05 ...

Страница 14: ...nformation screen Press EXIT To change Category Press the blue button To register your favourite channels 52 To check the current programme and the next programme Press 2 1 To switch to another channel Press 3 4 then press OK When appears in Channel Information Press STTL Press again to hide subtitle When appears in Channel Information 1 Press TEXT 2 Use 3 4 2 1 number buttons or colour buttons et...

Страница 15: ...sclaimers 68 About Network Service in Disclaimer 1 Press GUIDE 2 Select the programme then press OK 3 Select View then press OK Page up down Press CH W X To view a programme list for another day Press the green button Previous or the yellow button Next To see programme information Press STATUS To change TV Guide view Press GUIDE to switch between Landscape view and Portrait view To set a timer rec...

Страница 16: ...layback will be performed by that point To stop REWIND LIVE TV or PAUSE LIVE TV 1 Press 2 Select Yes then press OK Temporary save stops in the following cases When switching to other channels or other screen When the unit has started recording using all tuners These functions do not work in the following cases While watching a programme being recorded When a radio programme is selected While pausi...

Страница 17: ...g Mode 3 Select the recording mode picture quality then press OK Recording mode Picture Quality 66 The recording mode set here is used as the default value for the next recording To check to see if the recording mode change is finished 37 To cancel the recording mode change 37 Programmes in the original picture quality DR mode will be deleted after their recording mode is changed When the HDD does...

Страница 18: ...me being recorded to the HDD 1 Press VIDEO MENU red is displayed on the recording programme 2 Select the programme then press OK Operation during Recording To check the recording programme To stop recording REC2 HDD REC1 OTR AUTO 5 Recording programme displayed on the TV Recording programme not displayed on the TV Stop Recording Yes No Recording of this programme is in progress Stop this recording...

Страница 19: ...s the same programmes broadcast at different times are available for timer recording 1 Press GUIDE TV Guide screen appears 2 Select the programme then press the red button The timer icon F red is displayed If on screen instructions are displayed follow them If the screen for selecting single or series timer recording appears To edit the timer recording on the TV Guide screen 1 Select the programme...

Страница 20: ...he episodes of a series by setting just one timer recording Split Programme You can record a programme separated into two or more parts by some other programmes e g news If the signal is not sent correctly the recording may lack the beginning or the ending part of the programmes If the same episode has already been set for series timer recording at a different time or on another channel Repeat pro...

Страница 21: ...options Refer to Timer recording options left 3 Press OK To exit the timer recording list Press EXIT Timer recording options Timer Recording Channel 1 TUE 02 01 Day Date Stop XXXXX XXXXX Start Mode OFF Subtitles Date TUE 02 01 2018 XXXXX 400 00 DR Time Remaining DR XP Programme Name To confirm and edit a timer programme 1 Press PROG CHECK Red To delete a timer programme Green To resolve an overlap...

Страница 22: ...may not be possible to record because there is not enough space left programmes are deactivated etc the number of possible programmes has reached its maximum 65 Split Programme 20 Notes on recording When you programme successive timer recordings to start about last 1 minute of earlier programme will not be recorded Timer recording will not start while copying HD Video AVCHD from USB device changin...

Страница 23: ...corded Programmes 27 Video AVCHD 27 Video MP4 MKV 29 Photo 40 Music 44 Home Networking DLNA allows you to watch the contents and broadcasts This unit can be used both as Server and Client Miracast 48 DLNA Client 46 Media Renderer 47 Wi Fi Direct 48 You can change the unit s settings of Digital TV Tuning Sound Display Connection Network etc in the menu Basic Settings 52 TV Anytime 45 Wallpaper Pers...

Страница 24: ...fy Search Conditions and Recording Settings To activate select Set Recording Settings Search Conditions e g Keyword Recording conditions Search Conditions Keyword 1 16 Input the keyword to be registered Refer to Entering text 51 Default keyword is the programme name selected on the TV Guide screen If the programme name includes its episode number etc delete the number before registering the name S...

Страница 25: ...ity order of Keyword Recording left 1 Press OPTION 2 Select Change Priority then press OK 3 Press 3 4 to shift the position then press OK F Blue Recording has already been set with a different Keyword F Red Timer recording standby is activated Priority order of Keyword Recording 1 A programme that is already being recorded 2 Timer Recording 3 Keyword Recording programmes will be recorded in ascend...

Страница 26: ...Settings in Setup then press OK 3 Select Settings for USB HDD in HDD USB HDD then press OK 4 Select USB HDD Registration then press OK 5 Select Yes then press OK 6 When the registering is complete message screen appears Press OK 7 The confirmation screen appears Press OK To cancel all USB HDD registrations 54 It is not possible to play back the content on the USB HDD whose registration has been ca...

Страница 27: ...n HDD Recorded programmes can be played OK RETURN Video AVCHD Recorded Programmes Video MP4 MKV Photo Music Video Menu screen Screen icons Red Currently recording programme Protected programme Programme was not recorded due to recording protection Recording did not complete as the timer recording has started t Programme cannot be played When data is damaged etc Grouped programmes Blue Programme ha...

Страница 28: ...k Parental Rating 53 Programme has been recorded in Series timer recording Programme has been recorded in Series timer recording and has not yet been played Keyword recording programme which has not yet been played Grouped Keyword recording programmes Keyword recording programme which has already been played Notification icon for a new Keyword Recording Programme cannot be played from DLNA client ...

Страница 29: ...le When Video Format is set to Automatic 56 When 24p 25p Conversion is set to Auto 34 This unit can not output 4K image when playing back in 3D Playing Keyword Recording programmes 1 Select Keyword Record tab 2 Select the Keyword then press OK 3 Select the programme then press OK To protect Keyword Recording programmes To delete Keyword Recording programmes To remove Keyword Recording programmes f...

Страница 30: ...ars Select the item or content then press OK Repeat this step if necessary When the following conditions are met videos are played back in 4K regardless of the image quality When this unit is connected to a TV that is 4K and 24p 25p compatible When Video Format is set to Automatic 56 When 24p 25p Conversion is set to Auto 34 This unit can not output 4K image when playing back in 3D Menu screen Vid...

Страница 31: ...effective Skip forward 1 minute Press 60s Skip backward 10 seconds Press 10s Depending on the content that you play back this function is not available This function does not work for programmes containing recorded broadcasts Press or 9 HDD USB_HDD For recorded programmes It will not skip the programme But the programme in the grouped programmes will be skipped 28 Press AUDIO It will switch depend...

Страница 32: ...nit only guarantees the playback of the Frame Sequential and the Side by Side Half programme types 4K Networking You can save 4K videos photos recorded with digital cameras and other 4K compatible devices to the HDD of this unit and play them back Compatible 4K content MP4 MOV 4K 24p 25p and 30p bit rate up to 100 Mbps resolution up to 3840k2160 25p 30p 4096k2160 24p JPEG MPO resolution 3840k2160 ...

Страница 33: ...Channel Soundtrack 1 LR Menu Item Setting e g Basic Operation Soundtrack Show or change the soundtrack Audio Selection AD Switch in the case of multiple audio and Audio Description Audio Channel Change audio LR L R during playback Subtitles Turn the subtitle on off and change the language depending on the media Subtitle Language Select the subtitle language in the case of multiple languages Repeat...

Страница 34: ...However if the video content is distorted then select Auto Reset to Default Picture Settings Restores the default settings of the Picture Settings menu Sound Effect Settings DSD Decode Sampling Frequency Select the settings that suit your sound quality preferences DSD LPF Setting Select the settings that suit your sound quality preferences Sound Settings Sound Effects This function is effective wh...

Страница 35: ...he protection 1 Select Partial Delete in Edit then press OK 2 Press OK at the start point and end point to delete You can find the desired point by using play search etc 31 3 Select Continue then press OK Select Next then press OK to delete other sections Up to 20 sections can be set go to step 2 4 Select Delete then press OK 5 Press RETURN Chapter Mark is generated in the scene that was partially...

Страница 36: ...dio Description Automatic Audio Description will be recorded if they are included in the programme Off Audio Description will not be recorded Timing Now A picture quality change starts immediately after step 4 Timer recordings cannot be performed while a picture quality change is in progress During standby A picture quality change starts after the unit is switched to standby mode 3 Select the item...

Страница 37: ...want to start a new chapter while viewing the programme 1 Press the green button 2 Press OK at the point you want to divide Repeat this step 3 Press RETURN to go to Chapter View screen To delete the chapter 1 Select the chapter then press the red button Multiple selection 35 2 Select Delete then press OK To combine chapters Delete chapter mark 1 Select the chapter then press OPTION 2 Select Combin...

Страница 38: ...in Contents on HDD then press OK 4 Select the programme Multiple selection Select the programme then press the yellow button A check mark is displayed Repeat this step Press the yellow button again to cancel 5 Press the blue button 6 Select Yes then press OK If you select No you can change the selection right To change the selection 7 Set other settings then press OK right Setting the copying opti...

Страница 39: ...n be copied at once While copying no other operations can be performed Timer recordings will not proceed Copying programmes with copying list Screen icons Programmes that cannot be copied NTSC PAL Programme recorded using a different encoding system from that of the unit Programmes displaying these marks cannot be selected Copy HDD USB HDD 2 3 Source Destination When a programme is copied from HDD...

Страница 40: ...N 2 Select the item below then press OK Playing photos 1 HDD 1 Press FUNCTION MENU 2 Select Photo in Contents on HDD then press OK Except HDD 1 Insert or connect the media The menu screen appears 30 2 Select View Photos then press OK Photo and Music Photo play option Graphic Display Level You can change the 3D position of the screen display etc during the 3D photo playback Photo Menu Start Slidesh...

Страница 41: ...ideshow Delete Calendar 03 01 2012 29 10 2012 25 02 2013 15 03 2013 0002 0002 OK RETURN 8 12 18 4 Photo Menu All 3D Page Up Page Down CH Tab Slideshow settings Start Slideshow Interval Set up the time until the next photo is to display Transition Effect Effect for the next photo to display can be set Repeat Play Music Selection Select background music on either from HDD or USB or off Background Mu...

Страница 42: ...ain to cancel Enter Folder Name Refer to Entering text 51 Combine Folders Delete Folder Move Photos Select Move to new folder or Move to another folder then press OK If Move to another folder is selected set a destination folder Delete Photos Selecting and copying the photos USB_HDD USB HDD 1 On the Photo Menu screen To copy the folder Select the folder then press the blue button To copy the photo...

Страница 43: ...ng automatically USB_HDD USB HDD 1 Insert the media The menu screen appears 30 2 Select Copy New Photos then press OK e g USB 3 Select Yes then press OK Copying will start Yes No After storing on HDD the photo cannot be copied to other media Deleting original photo is not recommended Start copying Copy New Photos OK RETURN HDD USB Playing music file on the media 2 Select Play Copy Music then press...

Страница 44: ...r folder then press the yellow button A check mark is displayed Repeat this step Press the yellow button again to cancel While copying no other operations can be performed Timer recordings will not proceed All files in the folder will be copied Up to 1000 files can be copied at once HDD 1 On the music list screen Select the file or folder Multiple selection above 2 Press the red button 3 Select Ye...

Страница 45: ...aimers 68 Disclaimer TV Anytime Operations such as the ones below can be performed from anywhere with a smartphone or tablet installed with Media Center App Setting a recording Watching TV with this unit s tuner Playing back programmes recorded on this unit Use the Media Center App to complete user registration to use these functions Preparation Perform network connection and settings 10 11 TV Any...

Страница 46: ...py restriction are not available If video frames are dropped change the following settings Conversion Setting for DLNA 57 Resolution Setting for DLNA 57 Files not on the HDD cannot be played back Playing back 3D video recorded on this unit may not work properly 3D photos copied to this unit cannot be played back in 3D You can share videos photos and music stored in the DLNA Certified media server ...

Страница 47: ...ntroller compatible equipment To exit Press RETURN Playable contents Container Video codec Audio codec Example of file extension XP SP LP FR 1 MPEG2 Dolby Digital Linear PCM DR HG HX HE HL HM 1 MPEG2 H 264 MPEG HE AAC Dolby Digital Container Video codec Audio codec Example of file extension AVCHD 1 H 264 Dolby Digital mts MP4 H 264 AAC mp4 PS MPEG2 Dolby Digital Linear PCM mpg mpeg TS MPEG2 H 264 ...

Страница 48: ...Miracast compatible smartphone etc on the big screen of your TV Compatible with AndroidTM device ver 4 2 and above and Miracast certified 1 Press FUNCTION MENU 2 Select Miracast in Home Network then press OK 3 Operate the Miracast compatible equipment To exit Press EXIT Wi Fi Direct 5 When selected DLNA Client Go to step 4 on page 46 When selected DLNA Server Operate the playback equipment Client ...

Страница 49: ...yellow button A check mark is displayed Repeat this step Press the yellow button again to cancel 4 Press OK 5 Select Start then press OK To stop copying Press and hold RETURN for 3 seconds Videos recorded in a signal format different from the TV System setting of the unit cannot be copied to the unit About other screen icons Refer to Screen icons 27 39 This unit cannot copy the videos in the HDD t...

Страница 50: ... of December 2017 and is subject to change Software Firmware Update Software of this unit can be updated automatically by the following methods at the specified time From broadcasts Default setting is 3 a m 59 Software Update in Standby From Internet Network connection and setting are required 10 11 If a software firmware update is available a notification is displayed It is displayed on the Chann...

Страница 51: ... may take up to a few hours until the update is completed depending on the network or broadcast environment The timer recording always takes preference over the software firmware download if the timer recording is scheduled to start the downloading will be performed at the next opportunity You can also download the latest software firmware from the following website http panasonic jp support globa...

Страница 52: ...igital TV Tuning HDD USB HDD Picture Sound Display Connection Network Others To delete channels Select the channel in the Favourites column then press OK Yellow Delete all channels To change the name of the Favourites list 1 Press the red button in the Favourites column 2 Press 3 4 2 1 to select a character then press OK Repeat this step to enter other characters Red Delete a character Blue Delete...

Страница 53: ...hanging the setting run Auto Setup 52 LNB Configuration You can set LNB setting when necessary If you do not know the connected satellite select No Satellite in Satellite Available satellite will be searched in Auto Setup If you select Other satellite in Satellite set Test Transponder Frequency manually Dual Polarisation Mode This setting should be changed in a case like when Freeview broadcast op...

Страница 54: ... Delete all music Delete all Music on the built in HDD Format HDD Formatting deletes all contents on the built in HDD and they cannot be restored Check carefully before proceeding Settings for USB HDD USB HDD Registration Register the USB HDD 26 USB HDD Disconnection This function puts the USB HDD in a state in which it can be safely disconnected 26 USB HDD Management Press and hold OK for 3 secon...

Страница 55: ...t Select PCM when the connected equipment cannot decode the respective audio format Not making the proper settings may result in noise System Volume Adjustment If the volume of a programme being watched through this unit is different than the volume of a programme being watched directly on the TV the gap may be reduced by switching this setting to Mode 1 or Mode 2 This function works only while yo...

Страница 56: ...ic is selected the optimal method of playback depending on the TV e g cinema will automatically be selected only when the TV supports Contents Type Flag Network Easy Network Setting Press OK to start Easy Network Setting 11 Network Settings LAN Connection Mode Select the LAN connection method When not using wireless LAN when turning it off select Wired Wireless Settings This allows to set and chec...

Страница 57: ...s unit is initialized When you initialize the device password you will not be able to use TV Anytime To use the TV Anytime again you must re register to the service Home Network Settings You can set the DLNA Server function 46 Home Network function You can switch between enable disable of the DLNA Server and DMR Media Renderer function If On is selected the setting for Quick Start is fixed to On 5...

Страница 58: ...Start Quick Start is activated when the set time comes If you set Home Network function 57 or TV Anytime 57 to On the setting for Quick Start is fixed to On Automatic Standby Set the time to turn the unit to standby mode automatically When the unit is not operating the unit will be turned to standby mode once the set time has passed Automatic Standby after OTR On This unit is turned to standby mod...

Страница 59: ...rental control 1 Enter your 4 digit PIN with the number buttons 2 Enter the new 4 digit PIN with the number buttons Make a note of PIN in case you forget it e g 3 Press OK OK Remember the PIN PIN Entry 0 0 0 0 System Update Software Update in Standby When you set this unit to standby mode software firmware updates 50 are downloaded automatically at the time you have specified Software Update Now B...

Страница 60: ...rt is not activated 58 0 00 is flashing on the front panel display Set the clock 59 The clock does not display on the unit when switched to standby The clock does not display when Quick Start is not activated 58 Screen size is wrong Check the Aspect for 4 3 Video 56 Adjust the aspect ratio setting on TV Check Aspect for Recording before recording or picture quality change 54 The black screen appea...

Страница 61: ... from a device connected with an HDMI cable set Audio Output to On 56 Cannot change audio channel You cannot change the audio channel if Digital Audio Output is set to Bitstream 55 Cannot record Cannot copy Some broadcasts are copyright protected Timer recording does not work properly When is displayed on the screen 22 Auto Renewal Recording does not work properly The programme will not be overwri...

Страница 62: ...f you insert a USB device while watching TV the USB device detection screen is displayed Use this screen to select the device you want to use The TV Guide information is not displayed properly Set the clock correctly 59 Clock There was a programme change or TV Guide information from a broadcast station was possibly not correctly transmitted If signal quality is bad the TV Guide system may not be a...

Страница 63: ...his unit TV Guide data is being downloaded Displayed when the unit is started and is switched to standby mode There was a power failure or the AC plug was disconnected while the unit was on The unit is carrying out its recovery process Wait until the message disappears There are already 32 timer programmes Delete unnecessary timer programmes 21 The USB device is drawing too much power Remove the U...

Страница 64: ...PO 3D photo AAC ALAC DSD FLAC MP3 WAV WMA 1 It cannot be recorded directly Only compatible with copying from the built in HDD 2 Recorded with AVCHD format compatible devices Panasonic video camera etc It may not be able to play back depending on the device 3 It cannot be played back directly from the USB HDD or USB memory Playback is possible by copying to the built in HDD 49 With certain recordin...

Страница 65: ... USB device A maximum of 1000 files can be copied to the HDD at once We recommend that you limit the depth of folder trees to about five levels The video file and subtitle text files are inside the same folder and the file names are the same except for the file extensions Some files may not be played back even if they have these extensions Information about contents Media Maximum programmes HDD 30...

Страница 66: ...ack MP4 JPEG MP3 etc in a USB device with this unit The USB device must be formatted in FAT12 FAT16 FAT32 or NTFS file system The USB device over 2 TB is not usable This unit supports USB 2 0 High Speed This unit can use USB 3 0 devices as USB 2 0 devices This unit does not recognise USB HDDs other than those in which the size of one sector is 512 bytes or 4096 bytes For details consult the dealer...

Страница 67: ...ort Type A USB2 0 2 pcs LAN Ethernet Port 1 pc 10BASE T 100BASE TX Wireless LAN Standard compliance IEEE802 11a b g n Frequency range 2 4 GHz 5 GHz band Security WPA WPA2 Encryption type TKIP AES Authentication type PSK WEP 64 bit 128 bit Depending on the content being recorded the recording time may become shorter than indicated Recording time of DR mode may vary depending on the bit rate of broa...

Страница 68: ...ase where any type of repair is made to the unit including any other non HDD related component About the viewing of broadcasts It is not possible to view HEVC content Functions such as Guide Link and Keyword Recording may not work depending on the programme About data service Catch Up TV On screen instructions may not correspond to the remote control buttons It may take some time to show the data ...

Страница 69: ...for any other use Additional information may be obtained from MPEG LA L L C See http www mpegla com This product is licensed under the VC 1 patent portfolio license for the personal and non commercial use of a consumer to i encode video in compliance with the VC 1 Standard VC 1 Video and or ii decode VC 1 Video that was encoded by a consumer engaged in a personal and non commercial activity and or...

Страница 70: ...V2 0 LGPL V2 1 or the other licenses with the obligation to do so as well as the respective copyright notice thereof Contact Information oss cd request gg jp panasonic com The source code and the copyright notice are also available for free in our website below https panasonic net cns oss MS PlayReady Final Product Labeling This product contains technology subject to certain intellectual property ...

Страница 71: ...vice 45 Wi Fi Direct 48 P PAUSE LIVE TV 16 Photo 40 Picture Quality 36 66 67 PIN 14 59 Playback menu 33 Protection Video 35 Q Quick Start 58 R Recording 17 Timer recording 19 Recording mode picture quality 36 66 67 Recording time 67 Remote control 8 HOLD function 51 Remote control code 59 TV operation 13 Reset 59 62 63 REWIND LIVE TV 16 54 S Setting Auto Setup 11 52 Easy setting 11 Slideshow 41 So...

Страница 72: ...Panasonic Corporation http www panasonic com Panasonic Corporation 2018 p TQBS0165 F1217SR0 DMR HST270GZ_eng book 72 ページ 2017年12月26日 火曜日 午後5時47分 ...

Отзывы: