background image

52

CONF DPOF

CONFIG    ENTRAR   SALIR

2

2

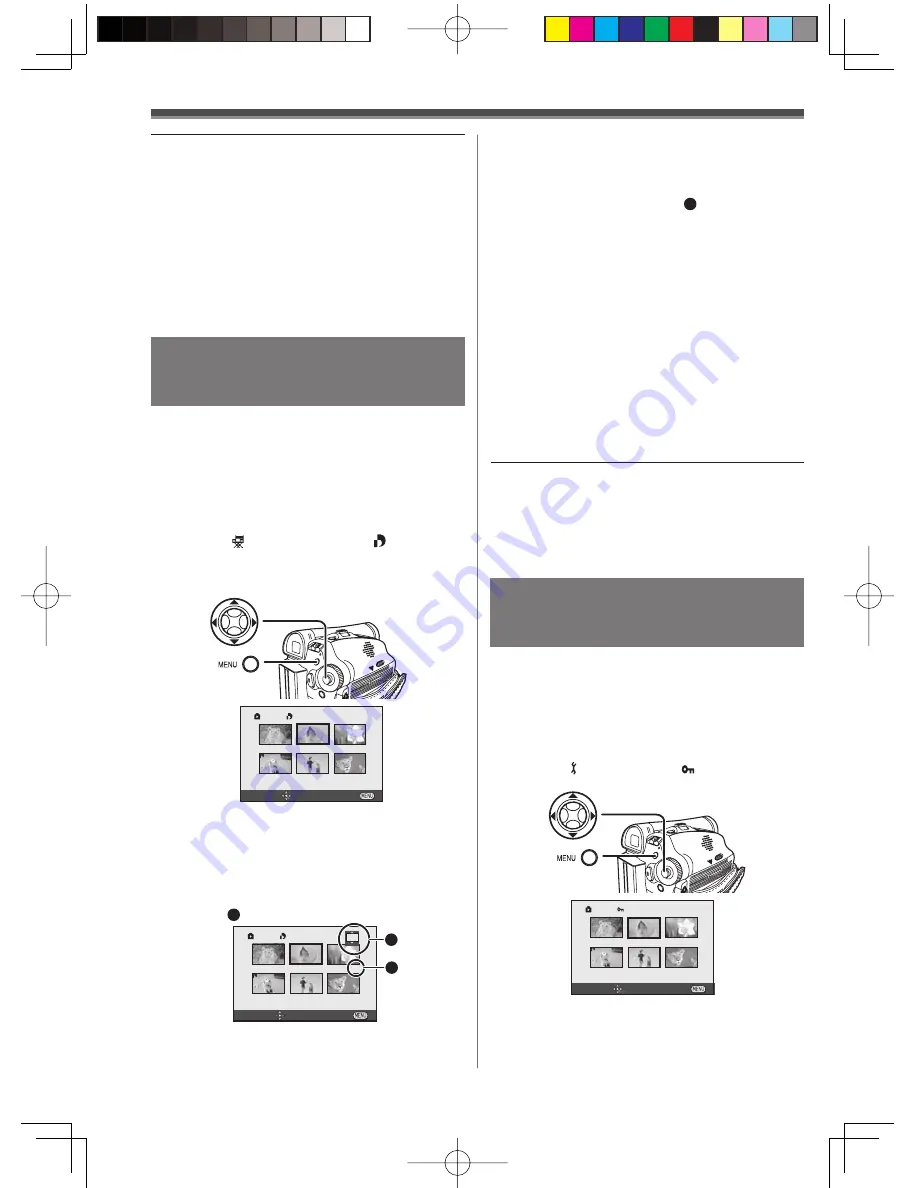
Protección de los archivos en una 
tarjeta ( Ajuste del cierre) 
(Para PV-GS39/PV-GS69)

Los archivos valiosos grabados en una tarjeta se 

pueden bloquear para evitar una pérdida accidental. 

(Aún si los archivos están bloqueados, los archivos 

se eliminarán si se formatea la tarjeta).

• 

Seleccione el modo de reproducción de foto.

•  El icono del sistema de navegación de un toque 

aparece en la parte inferior derecha de la pantalla.

1

 Ajuste 

[  BÁSICAS] >> [   PROTEGER] >> 

[SÍ].

4

  Repita los pasos 2 y 3 y presione el botón 

[MENU] cuando 

fi

 nalice la con

fi

 guración.

Notas:

•  Los ajustes DPOF realizados en otra cámara 

pueden no ser reconocidos por la Camcorder. 

Realice los ajustes DPOF en su Camcorder.

•  La verificación de las configuraciones DPOF 

pueden tardar un momento. Espere hasta que la 

lámpara de acceso a la tarjeta se apague.

•  El número de impresiones 

2

 se indica en el 

conjunto de imágenes.

•  Puede seleccionar un valor de 0 a 999. (Se 

puede imprimir el número seleccionado de 

imágenes si se especifica el número de 

impresiones en una impresora compatible con 

DPOF.)

•  Se puede especificar 2 o más archivos 

sucesivamente.

2

  Mueva el joystick [

, o 

] para 

seleccionar una imagen deseada y 
presione el joystick

.

•  La imagen seleccionada se marca en un 

recuadro.

•  Se visualiza la cantidad de impresiones que 

DPOF 

1

 estableció.

3

  Mueva el joystick [

] o [

] para 

seleccionar la cantidad de imágenes que 
se imprimirán y presione el joystick

.

1

2

PROTEGER

CONFIG    ENTRAR   SALIR

Escribir información impresa en 
una tarjeta ( Configuración DPOF) 
(Para PV-GS39/PV-GS69)

Los datos de impresión de la configuración DPOF 

(configuración DPOF) como por ejemplo la cantidad 

de imágenes que se imprimirán, se pueden escribir 

en la tarjeta. “DPOF” significa formato de orden de 

impresión digital.

• 

Seleccione el modo de reproducción de foto.

•  El icono del sistema de navegación de un toque 

aparece en la parte inferior derecha de la pantalla.

1

 Ajuste 

[   AVANZADAS] >> [   CONF 

DPOF] >> [ESTAB].

•  Cuando no se impriman todas las imágenes, 

seleccione [CANCELAR].

CONF DPOF

CONFIG    ENTRAR   SALIR

Notas:

•  No apague la unidad mientras borra datos.

•  Para borrar archivos, utilice el adaptador de CA o 

una batería con una carga suficiente.

•  En caso de realizar utilizar [TODOS], el borrado 

puede tardar cierto tiempo si hay muchos archivos 

en la tarjeta.

•  Cuando se visualiza [TARJETA LLENA] durante la 

grabación, cambie al modo de reproducción de foto 

y luego borre los archivos que no necesite.

•  Si se borran archivos que cumplen con la 

norma DCF, también se borran todos los datos 

relacionados con dichos archivos.

„

 Acerca de DPOF

DPOF significa formato de orden de impresión 

digital. Esta característica permite agregar 

información de impresión a las imágenes 

almacenadas en la tarjeta de modo que pueda 

utilizarse en un sistema compatible con DPOF.

Содержание Digital Palmcorder PV-GS69

Страница 1: ...re attempting to connect operate or adjust this product please read these instructions thoroughly LSQT1070 A PV GS69 PV GS39 PV GS29 Digital Video Camcorder Operating Instructions Models No PV GS69 Shown PL ...

Страница 2: ...ttom cover Your Camcorder is designed to record and play back in Standard Play SP mode and Long LP mode It is recommended that only cassette tapes that have been tested and inspected for use in Camcorders with the mark be used Thank you for choosing Panasonic This symbol warns the user that uninsulated voltage within the unit may have sufficient magnitude to cause electric shock Therefore it is da...

Страница 3: ...ver there is no guarantee that interference will not occur in a particular installation If this equipment does cause harmful interference to radio or television reception which can be determined by turning the equipment off and on the user is encouraged to try to correct the interference by one or more of the following measures Reorient or relocate the receiving antenna Increase the separation bet...

Страница 4: ...t consult an electrician for replacement of the obsolete outlet 10 Protect the power cord from being walked on or pinched particularly at plugs convenience receptacles and the point where they exit from the apparatus 11 Only use attachments accessories specified by the manufacturer 12 Use only with the cart stand tripod bracket or the table specified by the manufacturer or sold with the apparatus ...

Страница 5: ...LY AT THE SUN AS THIS MAY CAUSE DAMAGE TO THE INTERNAL PARTS OF THE EVF DO NOT EXPOSE YOUR CAMCORDER TO EXTENDED HIGH TEMPERATURE Such as in direct sunlight inside a closed car next to a heater etc This action could permanently damage the internal parts of your Camcorder AVOID SUDDEN CHANGES IN TEMPERATURE If the unit is suddenly moved from a cold place to a warm place moisture may form on the tap...

Страница 6: ...to the extent either of them is permitted under law or regulation of the country where Licensee resides Matsushita or its distributors or dealers will not be responsible for any defects in the Software or damage to Licensee caused by Licensee s reverse engineering decompiling or disassembly of the Software Article 6 Limitation of Liability The Software is provided AS IS without warranty of any kin...

Страница 7: ...FT0648 USB Cable Supplied K1HA05CD0014 Supplied K1HA05CD0014 Card Feature No Yes Yes Monitor 2 5 inch LCD 2 7 inch Wide LCD 2 7 inch Wide LCD USB Jack No Yes Full Speed Yes High Speed Audio Dubbing No No Yes Recording a Still Picture on a Tape Yes No No Cinema Function Yes No No Wide 4 3 Function No Yes Yes Remote Control Sensor No No Yes How to Turn off the Demo Mode To terminate the demonstratio...

Страница 8: ...or later PV GS69 Windows 2000 Yes Yes SP4 or later Yes SP4 or later Windows XP Yes Yes SP1 or later Yes SP2 or later Model Number Macintosh OS Built in SD Drive Web Camera MotionDV STUDIO Quick Movie Magic PV GS29 X v 10 1 v 10 4 PV GS39 X v 10 1 v 10 4 Yes PV GS69 X v 10 1 v 10 4 Yes The USB equipment operates with the driver installed standard on your OS For Windows For Macintosh Model Number Ma...

Страница 9: ...nto a Card For PV GS39 PV GS69 55 Audio Dubbing PV GS69 Only 55 Copying onto a DVD Recorder or a VCR Dubbing 56 Using the DV Cable for Recording Digital Dubbing 56 PC Connection With DV Interface Cable 57 Using Camcorder with a PC 58 Using the USB Function 58 To disconnect USB cable safely 61 Using as a Web Camera 62 Using the Motion Picture Editing Software PV GS69 Only 66 If you no longer need s...

Страница 10: ...used close the Cassette Compartment Cover by pressing the mark 3 2 1 Inserting a Card 2 Open the Card Slot Cover 3 3 While holding the Memory Card with its cut corner facing right 4 insert it into the Card Slot 5 4 Close the Card Slot Cover 3 securely 3 1 Place your Thumb on the OPEN 1 Knob and pull the LCD Monitor 2 out in the direction of the arrow 1 2 3 Quick Guide Inserting a Cassette Before u...

Страница 11: ... Joystick Control 1 to rewind the tape 3 Move the Joystick Control 2 to start playback 4 Move the Joystick Control 3 to stop playback Playing Back a Tape 1 Set the Mode Dial to Picture Playback Mode The CARD PLAYBACK MODE is displayed on the screen The One Touch Navigation icon is displayed on the lower right of the screen Joystick Control Starting the Slide Show Stop the Slide Show Joystick Contr...

Страница 12: ...ssory power plug adaptor VJSS0070 KZDB4ZE00001 in an area which has special AC outlets Parts Identification and Handling Camcorder 1 LCD Monitor Open Knob OPEN p 22 2 LCD Monitor pp 21 23 78 Due to limitations in LCD production technology there may be some tiny bright or dark spots on the LCD Monitor screen However this is not a malfunction and does not affect the recorded picture 3 Card Access La...

Страница 13: ... Status Indicator STATUS pp 21 36 29 Menu Button MENU p 26 30 Mode Dial p 23 31 Recording Start Stop Button p 31 32 Joystick Control pp 23 26 33 Light Button LIGHT p 35 34 Grip Belt p 17 35 Tripod Receptacle This is a hole for attaching the Camcorder to optional tripod Please carefully read the Operating Instructions for how to attach the tripod to the Camcorder You cannot open the Card Slot Cover...

Страница 14: ...pp 37 47 44 Variable Speed Search Button VER SEARCH p 48 45 Menu Button MENU p 27 46 Photoshot Button PHOTO SHOT pp 33 34 47 Rewind Review Button p 48 48 Pause Button pp 49 55 57 49 Stop Button pp 15 57 50 Recording Start Stop Button START STOP p 31 51 Play Button pp 48 49 57 52 Fast Forward Cue Button p 48 53 Enter Button ENTER p 27 Remote Control PV GS69 Only Optional Using the Remote Control wi...

Страница 15: ...er and press an appropriate button The above operating ranges are for indoor use Outdoors or under strong light the Camcorder may not operate properly even within the above ranges 15 15 15 15 VCR1 Press the Ι Button and Button simultaneously 1 VCR2 Press the Ι Button and Button simultaneously 2 When the battery in the Remote Control is replaced the mode is automatically reset to VCR1 Mode Selectin...

Страница 16: ...hen the Camcorder has been used for a long time the Camera body becomes warm but this is not a malfunction If the CHARGE Lamp does not light up although the Battery is attached to the AC Adaptor detach the Battery and reattach it Since the Battery will not be charged when the DC Cable is connected to the AC Adaptor disconnect it from the AC Adaptor The CHARGE Lamp lights up and charging starts Whe...

Страница 17: ... indicate the recording time when the Viewfinder is used The numbers in parentheses indicate the recording time when the LCD Monitor is used In actual use the available recording time may be shorter The times shown in the table are for continuous recording at a temperature of 25 C 77 F and humidity of 60 If the Battery is charged at a higher or lower temperature the charging time may be longer We ...

Страница 18: ...aler or visit www panasonic com For your reference if you travel frequently you should also purchase a Panasonic head cleaning tape AY DVMCLA and use when HEAD CLOG message appears on the LCD EVF of your Camcorder 1 Fit the AC Adaptor or the Battery and turn on the Power 2 Slide the OPEN EJECT Lever toward the front and pull up to fully open the Cassette Compartment Cover To protect the tape if th...

Страница 19: ...te Holder cannot be housed Set the OFF ON Switch to OFF then to ON again Check if the battery has run down Notes After use be sure to rewind the cassette completely remove it and put it in a case Store the case in an upright position p 77 If the indicator of the condensation does not display on the LCD screen and or Viewfinder and you notice condensation on the lens or the main unit do not open th...

Страница 20: ...Do not touch the terminals on the back of the card Do not format the card with another Camcorder or any personal computer This operation may make the card unusable Electrical noise static electricity or failure of the Camcorder or the card may damage or erase the data stored on the card We recommend saving important data on a personal computer by using a USB Cable PC Card Adaptor and USB Reader Wr...

Страница 21: ...ording Mode or Card Recording Mode 1 Open the LCD Monitor or extend the Viewfinder to use The LCD Monitor or the Viewfinder will be activated 2 2 Close the LCD Monitor and retract the Viewfinder The power will not turn off if the LCD Monitor is closed and the Viewfinder is retracted The STATUS Indicator 2 automatically goes off and the power turns off If Quick Start is set to ON pp 35 36 the unit ...

Страница 22: ... be recharged Leave the camera as is for approx 24 hours and the battery will drive the date and time for approx 6 months Even if the OFF ON Switch is set to OFF the battery is still being recharged Using the Viewfinder LCD Monitor Before using the Viewfinder adjust the field of view so that the displays inside the Viewfinder become clear and easy to read 1 Pull the Viewfinder Using the Viewfinder...

Страница 23: ...SETUP ENTER EXIT EVF SET SET ENTER EXIT Notes In order to adjust the brightness of the Viewfinder close the LCD Monitor and the Viewfinder will be activated When the LCD Monitor is rotated by 180 towards the lens the brightness of the LCD Monitor cannot be adjusted These settings will not affect the images actually recorded Easy to Use Mode Dial You can choose a desired mode by rotating the Mode D...

Страница 24: ...the One Touch Navigation icon will be automatically on the lower right of the screen e g Tape Recording Mode AUTO Tape Recording Mode When the AUTO MANUAL FOCUS Switch is set to MANUAL 5 5 NEXT IRIS SHTR WB 1 5 NEXT 2 2 NEXT IRIS SHTR WB 1 2 NEXT 2 5 NEXT 3 5 NEXT 4 5 NEXT 5 5 Manual Iris Adjustment Mode pp 45 46 Manual Shutter Speed Adjustment Mode p 45 Manual White Balance Adjustment Mode pp 43 ...

Страница 25: ... MANUAL FOCUS Switch is set to MANUAL 1 3 NEXT 2 3 NEXT 3 3 NEXT IRIS SHTR WB 3 3 Manual Iris Adjustment Mode pp 45 46 Manual Shutter Speed Adjustment Mode p 45 Manual White Balance Adjustment Mode pp 43 44 Go to next page 1 1 is displayed while recording on a tape Tape Playback Mode Playback Pause p 47 Fast Cue Playback p 48 Rewind Review Playback p 48 Stop p 47 Picture Playback Mode For PV GS39 ...

Страница 26: ...reen Each time the Joystick Control is moved down the indication changes Using the Menu Screen To facilitate the selection of a desired function or setup this Camcorder displays various function setups on Menus 1 Press the MENU Button The Menu corresponding to the Mode selected by the Mode Dial is displayed Do not switch the Mode Dial when the Menu is displayed 2 Move the Joystick Control or to se...

Страница 27: ...HTR EFFECT PV GS29 Only Shutter effect p 33 SETUP Setup Sub Menu DISPLAY Display Mode p 29 DATE TIME Date and Time Indication pp 29 73 POWER SAVE Power Save Mode p 30 QUICK START Quick Start Mode pp 35 36 REMOTE PV GS69 Only Remote Control Mode p 15 BEEP SOUND Beep Sound p 29 List of Menus The figures of the Menus are for explanation purposes only and they are different from the actual Menus TAPE ...

Страница 28: ... 27 LCD SET LCD Adjustment p 23 EVF SET Viewfinder Adjustment p 23 INITIAL SET Initial Setting Mode p 30 DEMO MODE Demonstration Mode p 30 LANGUAGE Language Setup Sub menu p 27 CARD RECORDING MENU For PV GS39 PV GS69 BASIC ADVANCED SETUP LANGUAGE SETUP ENTER EXIT BASIC SCENE MODE PICT QUALITY ASPECT CLOCK SET OFF 16 9 NO SETUP ENTER EXIT e g BASIC Basic Setup Sub Menu SCENE MODE Scene Mode pp 42 4...

Страница 29: ... SOUND Set to Tape Card Recording Mode When BEEP SOUND on the SETUP is set to ON confirmation alarm beeps are issued as follows 1 Beep When you start recording When you turn on the power When the unit goes from Quick Start standby mode to recording pause 2 Beeps When you pause recording When you turn off the power When the unit goes into Quick Start standby mode 2 Beeps 4 times When a cassette wit...

Страница 30: ...ting cannot be back to the initial shipping condition LP Mode You can switch the tape recording speed Set to Tape Recording Playback Mode 1 Set BASIC or ADVANCED REC SPEED LP If the LP mode is selected the recording time will be 1 5 times the SP mode but some functions will be disabled We recommend using the SP mode for important recordings In order to fully exhibit the performances of the LP mode...

Страница 31: ... h 5 9 m 5 9 s 2 9 f R 2 0 0 1 2 3 4 5 6 A M J A N 2 2 0 0 6 1 0 0 These indications are displayed only when the card is inserted For PV GS39 PV GS69 1 Recording mode 2 Recording time elapse 3 Remaining tape indication 4 Still picture size 5 Quality of still pictures 6 Number of recordable still pictures When no picture can be recorded this indication will flash in red On screen Display in the Tap...

Страница 32: ...trol to select 4 4 NEXT One Touch Navigation icon 3 Move the Joystick Control to select A confirmation message appears 4 Move the Joystick Control or to select YES and press the Joystick Control YES NO SETUP ENTER EXIT PERFORM BLANK SEARCH The indication and the One Touch Navigation icon appears during the Blank Search The Blank Search Function aids you in locating the end of the recording on the ...

Страница 33: ...is displayed on the screen Recording a Still Picture on a Card Photoshot For PV GS39 PV GS69 Still pictures can be recorded on the Memory Card from the Camcorder Open the LCD Monitor or extend the Viewfinder before turning on the power 1 Set the OFF ON Switch to ON The STATUS Indicator lights Red Selecting the quality of Photoshot images 1 Set BASIC PICT QUALITY High Picture Quality or Normal Pict...

Страница 34: ...ing results in slightly inferior image quality For the number of still pictures to be recorded on a card refer to page 33 The sound cannot be recorded While data is being recorded on a card do not operate the Mode Dial When the Access Lamp is lit do not insert or remove a card Another product may degrade or not play back data recorded on this Camcorder If set PICT QUALITY mosaic pattern noise may ...

Страница 35: ...ut images use this mode Notes The subject should be within 4 9 feet 1 5 meters of the Camcorder Using the LED Video Light reduces battery time Set the LED Video Light to off when not in use Do not look directly into the light If the LED Video light is used with a Conversion lens attached a slight vignetting darkening around edges effect occurs on the screen Using the MagicPix Function at the same ...

Страница 36: ...t recorded When the MagicPix Function is used however the White Balance of the scene last recorded is retained If the power is turned on in Quick Start standby the zoom magnification becomes 5 and the picture size may differ from what it was before Quick Start standby When using the AC Adaptor Quick Start can be used even if a tape is not inserted 1 Self timer Recording For PV GS39 PV GS69 When yo...

Страница 37: ...ong with the zooming operation the microphone s directional angle and sensitivity are varied for recording sounds Set to Tape Recording Mode 1 Set ADVANCED ZOOM MIC ON The Indication is displayed To Cancel the Zoom Microphone Function Set ADVANCED ZOOM MIC OFF Note The Zoom Microphone Function may not work effectively if the surrounding noise is too loud S P 3 h 5 9 m 5 9 s 2 9 f R 2 0 0 1 2 3 4 5...

Страница 38: ...dication flashes When the Gain Up mode is set to ON the image stabilizer function does not work If so the indication flashes Under fluorescent lighting image brightness may change or colors may not look natural After images may appear When a tripod is used we recommend that you turn the Image Stabilizer off In the following cases the Image Stabilizer Function may not work effectively When the digi...

Страница 39: ... seconds to pause recording 1 Press the Joystick Control to display the One Touch Navigation icon on the lower right of the screen 2 Move the Joystick Control until the page with indication is displayed 1 4 NEXT One Touch Navigation icon 3 Move the Joystick Control to select The BACKLIGHT COMPENSATION ON is displayed The Indication flashes and then is displayed The entire screen becomes brighter T...

Страница 40: ...o obtain the best effect we recommend framing the subject as shown above in the picture To Cancel the Soft Skin Mode Move the Joystick Control to select again The SOFT SKIN MODE OFF is displayed 3 Move the Joystick Control to select The SOFT SKIN MODE ON is displayed The Indication flashes and then is displayed Notes If set in a bright place the screen may become whitish for a while The MagicPix F...

Страница 41: ...CINEMA OFF Notes Images played back vary depending on the TV connected Please refer to the operating instructions for your TV This function does not widen the recording range When images are played back on a TV screen the Date Time Indication may be erased in some cases Depending on the TV the picture quality may deteriorate When a Cinema picture is imported onto a personal computer the imported p...

Страница 42: ...ecording in Special Situations Scene Mode The Indication and the One Touch Navigation icon appears You can select optimal scene mode under specific recording situations Set to Tape Card Recording Mode 1 Set the AUTO MANUAL FOCUS Switch to MANUAL S P 3 h 5 9 m 5 9 s 2 9 f R 2 0 0 1 2 3 4 5 6 A M J A N 2 2 0 0 6 1 0 0 S P 3 h 5 9 m 5 9 s 2 9 f R 2 0 0 1 2 3 4 5 6 A M J A N 2 2 0 0 6 1 0 0 S P 3 h 5 ...

Страница 43: ...k Control to select The White Balance indication appears etc 1 2 3 4 3 Move the Joystick Control or to select a desired White Balance Mode BACK WB WB S P 3 h 5 9 m 5 9 s 2 9 f R 2 0 0 1 2 3 4 5 6 A M J A N 2 2 0 0 6 1 0 0 BACK WB WB S P 3 h 5 9 m 5 9 s 2 9 f R 2 0 0 1 2 3 4 5 6 A M J A N 2 2 0 0 6 1 0 0 BACK WB WB S P 3 h 5 9 m 5 9 s 2 9 f R 2 0 0 1 2 3 4 5 6 A M J A N 2 2 0 0 6 1 0 0 BACK WB WB S...

Страница 44: ...e adjust the White Balance The White Balance Sensor 1 determines the nature of the light source during recording Do not cover the White Balance Sensor with your hand during recording because White Balance will not function normally About White Balance Sensor BACK WB WB S P 3 h 5 9 m 5 9 s 2 9 f R 2 0 0 1 2 3 4 5 6 A M J A N 2 2 0 0 6 1 0 0 1 1 The effective range of Automatic White Balance Adjustm...

Страница 45: ...ase the shutter speed manually the sensitivity lowers and accordingly the gain value increases automatically which may increase the noises on the screen You may see vertical lines of light in the playback image of a brightly shining subject or highly reflective subject but this is not a malfunction During normal playback image movement may not look smooth Avoid recording under fluorescent light me...

Страница 46: ... FOCUS The MF Indication Manual Focus Mode appears 3 Move the Joystick Control or to adjust the focus If you keep moving the Joystick Control or the speed of adjusting becomes faster The Indication and the One Touch Navigation icon appears To Resume Automatic Adjustment Set the AUTO MANUAL FOCUS Switch to AUTO or FOCUS When focused with a wide angle the subject may not be in focus when zoomed in F...

Страница 47: ... AUDIO Adjust the speaker volume for playback 1 Push the VOL Lever to adjust the volume Towards increases the volume Towards decreases the volume Nearer the bar to larger the volume One Touch Navigation icon Repeat Playback When the tape end is reached the tape will be rewound and played back again 1 Set ADVANCED REPEAT PLAY ON 2 Move the Joystick Control to start playback The Indication appears T...

Страница 48: ...During playback press the VER SEARCH Button The 1 Indication appears The speed of Cue Playback or Review Playback can be varied S P 3 h 5 9 m 5 9 s 2 9 f R 2 0 0 1 2 3 4 5 6 A M J A N 2 2 0 0 6 2 8 S P 3 h 5 9 m 5 9 s 2 9 f R 2 0 0 1 2 3 4 5 6 A M J A N 2 2 0 0 6 2 8 Finding a Scene You Want to Play Back Cue Review Playback Notes If the Joystick Control is held continuously it turns to Cue Playbac...

Страница 49: ...in the forward or backward direction If you keep pushing the Lever still pictures advance continuously Playing Back a Memory Card For PV GS39 PV GS69 It plays back files recorded on a Card Open the LCD Monitor or extend the Viewfinder before turning on the power 1 Set the OFF ON Switch to ON The STATUS Indicator lights Red 2 Set the Mode Dial to Picture Playback Mode The CARD PLAYBACK MODE is disp...

Страница 50: ...e depending on the number of pixels of the file When playing back a file recorded on other equipment the date and time display is different from when it was recorded When playing back a picture recorded on other equipment the picture may not be played back or the quality of pictures may be deteriorated When playing back a non standardized file the Folder File Number may not be displayed About the ...

Страница 51: ... Move the Joystick Control or to select the file to be deleted One Touch Navigation icon The selected file is deleted from the Card If NO is selected the file selection is canceled 4 Move the Joystick Control or to select YES and press the Joystick Control DELETE SETUP ENTER EXIT YES NO DELETE THIS IMAGE To Select and Delete All Files 1 Move the Joystick Control to select 2 Move the Joystick Contr...

Страница 52: ...NU Button when the setup is completed Notes DPOF setting made on another camera may not be recognized by Camcorder Perform the DPOF Settings on your Camcorder Verifying the DPOF Settings may take a little time Wait until the Card Access Lamp goes out The number of prints 2 is displayed in the picture set You can select from 0 to 999 Selected number of pictures can be printed as you set the number ...

Страница 53: ...If the switch is moved to the LOCK side you cannot write to or format the Card If it is moved back you can FORMAT CARD SETUP ENTER EXIT YES NO DELETES ALL DATA Notes Normally it is not necessary to format the card If a message appears even though you insert and remove the card several times format it In order to maintain full compatibility you must format the SD Memory Card using the Camcorder PC ...

Страница 54: ...ck the connected terminal Check the TV s input setting input switch For more information please read the operating instructions for the TV To Display the On screen Information on the TV The information displayed on the LCD Monitor or the Viewfinder One Touch Navigation icon time code and mode indication etc date and time can be displayed on the TV 1 Press the EXT DISPLAY Button on the Remote Contr...

Страница 55: ...ne you wish to record and press the PHOTO SHOT Button Before Recording with Audio Dubbing Set to Tape Recording Mode When you want to preserve the original sound taken during recording set ADVANCED AUDIO REC 12bit to take pictures When set 16bit the sounds taken during recording are erased after recording with audio dubbing Set BASIC REC SPEED SP to take pictures 2 Press the AUDIO DUB Button on th...

Страница 56: ...tional DV cable Only for equipment with a DV terminal 2 Turn on the Camcorder and set to Tape Playback Mode 3 Select the input channel on the TV set and recorder 4 Move the Joystick Control to start playback The image and sound are reproduced 5 Start recording 6 Move the Joystick Control to stop playback 7 Stop recording If you record dub images onto another video device and then play them back on...

Страница 57: ...roducts and software from a number of video editing software companies Using products from video editing software companies allows you to capture and edit video clips using the DV Interface Our DVC being OHCI compliant should have no problem working with any OHCI compliant Firewire Card video Editing software package Personal Computer must be equipped with an DV Terminal During Camcorder playback ...

Страница 58: ...ting system environment of the personal computer used 4 Follow the instructions on the computer screen until the installation is complete Setup window will disappear when the installation is complete Software Installation For Windows PV GS39 Only If you have Internet access please download the USB Driver With a PC 1 To download and install the Driver go to http www panasonic com consumerdownloads ...

Страница 59: ...omputer with pre installed Microsoft Windows XP Professional Home Edition Microsoft Windows 2000 The USB equipment operates with the driver installed standard on your OS 2 Function This is the Operating environment for the USB Driver which can be installed from the supplied CD ROM PV GS69 or the Web Site PV GS39 IBM PC AT compatible personal computer with pre installed Microsoft Windows XP Profess...

Страница 60: ...r OS If you have Internet access please download the USB Driver PV GS39 Only 1 To download and install the Driver go to http www panasonic com consumerdownloads 2 Click Camcorder on the screen 3 Click USB Driver for Web Camera 4 Decompress the downloaded data 5 Double click icon The set up program starts running 6 Finish installation by following the on screen instructions Click Next and proceed w...

Страница 61: ... Card and also save them to your hard disk Please do not change file or folder names on the Personal Computer The images on the Memory Card may not be able to be viewed on the Camcorder To disconnect USB cable safely For Windows If USB Cable is disconnected while computer is on error dialog may appear In such case click OK and close the dialog box By following the steps below you can disconnect th...

Страница 62: ... 2000 Professional SP4 or later CPU Intel Pentium lll 450 MHz or higher including compatible CPU RAM 128 MB or more 256 MB or more recommended Free hard disk space At least 250 MB or more Interface USB 1 1 or more A Type To use the Camcorder as a Web Camera the additional minimum requirements must be met Graphic display High Color 16 bit or more Desktop resolution of 800 600 pixels or more Communi...

Страница 63: ...r Tape Playback Mode To send the live camera picture to a PC set the Camcorder to Tape Recording mode To send pictures recorded on a tape to a PC set the Camcorder to Tape Playback mode Connecting the Camcorder to Personal Computer For Using as a Web Camera When the Camcorder and personal computer with Windows 2000 are connected via USB Cable a message such as the one below is displayed However te...

Страница 64: ... be exchanged will depend on the Internet connection status If the USB Cable is disconnected from the personal computer the Web Camera mode is canceled If the Camcorder is used as a Web Camera video cannot be recorded onto a tape or a card You cannot output the video input from the DV terminal to the display of the PC In the Web Camera mode the audio may be interrupted in the middle of communicati...

Страница 65: ... finished close Windows Messenger then turn off the Camcorder Finally disconnect the USB Cable If the Camcorder is used as Web Camera continuously for two hours the communication is automatically shut OFF In this case restart Windows Messenger and set up the communication again 8 Select DVC in the Microphone menu 7 Click Web Camera Settings in the Tools menu 8 Confirm that the Panasonic DVC Web Ca...

Страница 66: ...STUDIO The Motion DV STUDIO is the software that allows videos to be captured from a video device edited and outputted Digital edition on a PC Non linear edit enables you to create video works with minimum deterioration of image quality You can also apply various special effects such as fade effects transition effects and titles to videos The Camcorder can be connected to the personal computer wit...

Страница 67: ...e supplied CD ROM into the personal computer s CD ROM drive Quit all applications The Setup Menu screen appears 2 Click MotionDV STUDIO PV GS69 Supplied Sample data is installed concurrently with the MotionDV STUDIO software After reading the displayed contents please carry out the installation according to instructions 4 Select the Video system 5 After the completion of setup click on Finish The ...

Страница 68: ...ard With USB supplied OS Windows XP SP2 or later Windows 2000 SP4 or later The personal computer should be compatible with USB 2 0 Hi Speed Confirmation before connection For Windows XP 2000 When you connect the personal computer and the Camcorder with the USB Cable and then use Quick Movie Magic or MotionDV STUDIO on Windows XP SP2 or later or Windows 2000 SP4 or later check the driver of the USB...

Страница 69: ...gic Mode 3 Connect the Camcorder to your personal computer with USB Cable 2 Connect the Camcorder to the personal computer with DV Cable 3 Start Quick Movie Magic or MotionDV STUDIO LE for DV You can record the video edited by the PC onto the Tape in the Camcorder When 2 or more USB devices are connected to a personal computer or when devices are connected through USB hubs or by using extension ca...

Страница 70: ...e Panasonic make digital video camera with USB Jack is referred to as Camcorder These instructions do not cover the basic operations of the personal computer or define any terms For this information refer to the Operating Instructions which accompany your personal computer 3 Click the iMovie HD icon 4 Click Create a New Project 5 Click Create in the Create Project screen and select a folder in whi...

Страница 71: ...low these Operating Instructions the Camcorder will not be recognized correctly In this case delete the USB Driver from Device Manager as described below uninstall the USB Driver and re install it With the Camcorder and personal computer connected via a USB Cable open the Device Manager Right click DVC 1 in Ports or Other devices and select Uninstall DVC 1 will differ depending on the OS or operat...

Страница 72: ... file numbers IMGA0001 JPG etc along with the images The file numbers are recorded with each image as consecutive numbers When using software without an indication function indication data such as date are not displayed Depending on the software in use the date and the time may not be displayed correctly The memory capacity indicated on the SD Card label corresponds to the total card capacity Some...

Страница 73: ...ed with this Camcorder the size display is determined as follows according to the number of horizontal pixels White Photoshot Mode Red While Photoshot recording is activated Green While the Card being read Red Using a card that cannot be recognized Tape Recording Mode p 31 Tape Playback Mode p 47 Card Recording Mode p 33 Picture Playback Mode p 49 PC Mode pp 60 61 SP Standard Play Mode Recording S...

Страница 74: ...SAVE position WRONG TAPE FORMAT You are attempting to play back a tape section that has been recorded with a different TV system This cassette is incompatible CLOSE CASSETTE DOOR The cassette cover is open Close the cassette cover pp 18 19 UNABLE TO A DUB LP RECORDED Because the original recording was in LP Mode audio dubbing cannot be performed UNABLE TO A DUB You are attempting to perform audio ...

Страница 75: ...ion properly turn off the Camcorder power and detach the Battery or AC Adaptor and then connect the Battery or AC Adaptor again Thereafter turn on the Camcorder power Do not use your Camcorder near radio transmitters or high voltage cables If you record pictures near radio transmitters or high voltage cables recorded images or sounds may be adversely affected Do not use this Camcorder for surveill...

Страница 76: ...depending on circumstances When condensation occurs on the lens or the Camcorder it also may occur on the head and the tape Do not open the Cassette Compartment Cover When the Lens Is Fogged Set the OFF ON Switch to OFF and leave the Camcorder in this condition for about 1 hour When the lens temperature becomes close to the ambient temperature the fog disappears naturally Video Head Clogging and C...

Страница 77: ...e Camcorder in places that expose it to high temperature Battery Extremely high temperatures or low temperatures will shorten the life of the Battery If the Battery is kept in smoky or dusty places the terminals may rust and cause malfunctions Do not allow the Battery terminals to come in contact with metal objects such as necklaces hairpins etc This can result in a short circuit or heat generatio...

Страница 78: ...s The result is more than 99 99 effective pixels with a mere 0 01 of the pixels inactive or always lit However this is not a malfunction and does not affect the recorded picture Before Requesting Service Problems and Solutions Power Body The Camcorder power cannot be turned on Is the battery fully charged Use a fully charged battery The battery protection circuit may have operated Attach the batte...

Страница 79: ... condition warning and date indications disappear The Camcorder cannot be operated though powered up The Camcorder does not operate normally The Camcorder cannot be operated unless you open the LCD Monitor or extend the Viewfinder Remove the cassette and then press the RESET button p 81 If normal conditions are not restored yet turn off the power Then about 1 minute later turn on the power again C...

Страница 80: ... dealer During playback UNPLAYABLE CARD is displayed The image was either recorded in a different format or data is damaged Playback Sound Sound is not played back from the built in speaker of the Camcorder Is the volume too low During playback push the VOL lever to display the volume indication and adjust it p 47 Different sounds are reproduced at the same time Have you set SETUP 12bit AUDIO MIX ...

Страница 81: ... Do not attempt to repair the appliance by yourself Even if connected by the USB cable the Camcorder is not recognized by the PC Is the USB driver installed For information refer to pages 58 60 When the USB cable is disconnected an error message will appear on PC For Windows To disconnect the USB cable safely double click the icon in the task tray and follow the instructions on the screen For Maci...

Страница 82: ...glass Because the focus is on the dirty glass the subject behind the glass will not be focused 3 Recording a subject in dark surroundings Because the light information that comes through the lens decreases considerably the Camcorder cannot focus correctly 4 Recording a subject that is surrounded by objects with glossy surfaces or by highly reflective objects Because the Camcorder focuses on the ob...

Страница 83: ...ut Mic sensitivity 50 dB 0 dB 1 V Pa 1 kHz USB Card reader writer function USB 2 0 compliant Hi Speed PV GS69 Full Speed PV GS39 No copyright protection support Power Source DC 7 9 7 2 V Power Consumption Recording 4 2 W PV GS29 4 4 W PV GS39 PV GS69 Digital Interface DV Input Output Jack IEEE1394 4 pin Dimensions Approx 69 H 82 W 120 D mm Approx 2 11 16 H 3 1 4 W 4 3 4 D inch Mass Approx 0 41 kg ...

Страница 84: ...12BU1A RP SD256BU1A RP SD128BU1A RP SD064BPPA RP SD032BPPA Pro High Speed 2 GB SD Memory Card Pro High Speed 1 GB SD Memory Card Pro High Speed 512 MB SD Memory Card Super High Speed 256 MB SD Memory Card High Speed 2 GB SD Memory Card High Speed 1 GB SD Memory Card High Speed 512 MB SD Memory Card High Speed 256 MB SD Memory Card High Speed 128 MB SD Memory Card High Speed 64 MB SD Memory Card Hi...

Страница 85: ... Function 40 Manual Focus 46 Mode Dial 23 MotionDV STUDIO 66 O One Touch Navigation icon 23 P Photoshot 33 Playback with Zoom Lever 49 Portrait Mode 42 Q Quick Movie Magic 66 Quick Start 35 R RapidFire Consecutive Photoshot 34 Recording Check 32 Remote Control 14 Review Playback 48 S Scene Mode 42 SD Memory Card 71 Self timer Recording 36 Self Recording 35 Shutter Speed 45 Slide Show 50 Slow Motio...

Страница 86: ...Printed in Indonesia LSQT1070 A S0106A0 Matsushita Electric Industrial Co Ltd Web Site http www panasonic co jp global ...

Страница 87: ...mente estas instrucciones antes de usar el producto y conserve este manual para futuras consultas LSQT1070 A PV GS69 PV GS39 PV GS29 Videocámara digital Manual de instrucciones Número de modelo Se exhibe PV GS69 PL ...

Страница 88: ...quipo en un lugar cerrado como una biblioteca o unidad similar Fecha de compra Comprada a distribuidor Dirección del distribuidor Núm telefónico del distribuidor Núm de modelo Núm de serie Gracias por haber elegido Panasonic Cosas que usted debe saber Precauciones para su seguridad Usted ha adquirido uno de los productos más sofisticados y confiables actualmente disponibles en el mercado Si es usa...

Страница 89: ...ándar SP y modo Largo LP Se recomienda el uso sólo de cintas de cassette que hayan sido probadas e inspeccionadas para su uso en aparatos VCR con la marca Este símbolo tiene por finalidad alertar al usuario acerca de la presencia de tensión sin aislación en el interior del producto que puede tener la intensidad suficiente como para causar descargas eléctricas Por lo tanto hacer contacto con cualqu...

Страница 90: ...en la toma de corriente solicite el reemplazo de la toma de corriente obsoleta a un electricista 10 Proteja el cable de alimentación para evitar que sea pisado o aplastado especialmente en las clavijas receptáculos y en el punto donde sale del aparato 11 Utilice solamente los accesorios especificados por el fabricante del aparato 12 Utilice el aparato solamente con un carro pedestal trípode mesa o...

Страница 91: ...dad no tiene en su interior piezas que puedan ser reparadas por el usuario Desconecte la cámara grabadora de la fuente de alimentación antes de limpiarla NO APUNTE LA CÁMARA GRABADORA HACIA EL SOL O HACIA OTROS OBJETOS LUMINOSOS NO DEJE EL CAMCORDER CON EL EVF APUNTANDO DIRECTAMENTE HACIA EL SOL YA QUE ESTO PODRÍA CAUSAR DAÑOS A LAS PIEZAS INTERNAS DEL EVF NO EXPONGA LA CÁMARA GRABADORA A ALTAS TE...

Страница 92: ...tén permitidos por las leyes o regulaciones del país en que el Licenciatario reside Matsushita o sus distribuidores o agentes de ventas no serán responsables de ningún defecto en el Software o daño al Licenciatario causado por la ingeniería inversa la descompilación o desmantelamiento del Software por parte del Licenciatario Artículo 6 Limitaciones de la responsabilidad El Software se provee TAL C...

Страница 93: ...a K1HA05CD0014 Incluida K1HA05CD0014 Función de tarjeta No Sí Sí Monitor LCD de 2 5 pulgadas LCD ancha de 2 7 pulgadas LCD ancha de 2 7 pulgadas Conexión USB No Sí Velocidad normal Sí Alta velocidad Copia de audio No No Sí Grabación de una imagen fija en cinta Sí No No Función cine Sí No No Función Wide 4 3 No Sí Sí Sensor del control remoto No No Sí Cómo desactivar el modo de demostración Para ca...

Страница 94: ...ws XP Sí Sí SP2 o posterior PV GS69 Windows 2000 Sí Sí SP4 o posterior Sí SP4 o posterior Windows XP Sí Sí SP1 o posterior Sí SP2 o posterior Número de modelo SO Macintosh Para utilizar la unidad SD incorporada Cámara Web MotionDV STUDIO Quick Movie Magic PV GS29 X v 10 1 v 10 4 PV GS39 X v 10 1 v 10 4 Sí PV GS69 X v 10 1 v 10 4 Sí El equipo USB funciona con el controlador estándar instalado en su...

Страница 95: ...ta a una tarjeta Para PV GS39 PV GS69 55 Copia de audio Sólo PV GS69 55 Copia en un grabador de DVD o videograbador 56 Utilización del cable DV para grabación Copia digital 56 Conexión de computadora personal con cable de interfaz DV 57 Uso de la Camcorder con una PC 58 Utilización de la función USB 58 Para desconectar el cable USB de manera segura 61 Utilización como una cámara Web 62 Utilización...

Страница 96: ...do cierre la cubierta del compartimiento del cassette presionando la marca 3 Inserción de una tarjeta de memoria 2 Abrir la cubierta de la ranura de tarjeta 3 3 Mientras sostiene la tarjeta de memoria con su esquina cortada hacia la derecha 4 insértela en la ranura de tarjeta 5 4 Cierre bien la cubierta de ranura de tarjeta 3 1 Usando su pulgar presione la perilla OPEN 1 y saque la pantalla LCD 2 ...

Страница 97: ... fija en tarjeta Photoshot Para PV GS39 PV GS69 3 Presione el botón de inicio parada de grabación nuevamente para detener la grabación PV GS39 PV GS69 PV GS29 PV GS39 PV GS69 PV GS29 1 Ajuste el selector de modo en modo de reproducción de cinta Se visualiza la indicación REPRODUCCIÓN DE LA CINTA en la pantalla El icono del sistema de navegación de un toque aparece en la parte inferior derecha de l...

Страница 98: ...S0070 KZDB4ZE00001 en el área que tiene salidas de ca especiales Identificación de las partes y manipulación Camcorder 1 Perilla de apertura del monitor LCD OPEN pág 22 2 Monitor LCD pág 21 23 78 Debido a las limitaciones en la tecnología de producción de LCD puede haber algunos puntos oscuros o brillantes diminutos en la pantalla del monitor LCD Sin embargo éste no es un signo de mal funcionamien...

Страница 99: ... 29 Botón de menú MENU pág 26 30 Selector de modo pág 23 31 Botón de comienzo detención de grabación pág 31 32 Joystick pág 23 26 33 Botón de luz LIGHT pág 35 34 Correa de sujeción pág 17 35 Receptáculo para el trípodo Este agujero sirve para fijar la Camcorder a un trípodo opcional Lea cuidadosamente las instrucciones que explican cómo instalar la Camcorder en un trípodo No se puede abrir la cubi...

Страница 100: ...ág 48 45 Botón de menú MENU pág 27 46 Botón de disparo de foto PHOTO SHOT pág 33 34 47 Botón de rebobinado revisión pág 48 48 Botón de pausa pág 49 55 57 49 Botón de detención pág 15 57 50 Botón de comienzo de grabación detención START STOP pág 31 51 Botón de reproducción pág 48 49 57 52 Botón de avance rápido aviso pág 48 53 Botón de enter ENTER pág 27 Control remoto Sólo PV GS69 opcional Con la ...

Страница 101: ... Cuando se utiliza el control remoto por primera vez después de encender la Camcorder se visualiza CONTROLAR MANDO DISTANCIA pág 74 y la operación no es posible Seleccione el mismo modo de control remoto Configuración del Camcorder Ajuste REMOTO en el Submenú CONFIGURAR el modo de control remoto deseado pág 27 29 Configuración del control remoto 15 15 15 15 1 2 Suministro de energía Cómo utilizar ...

Страница 102: ...l principio pero la batería se carga normalmente Cuando la temperatura de la batería es demasiado alta o baja el indicador CHARGE destella y el tiempo de carga es superior al normal 3 Coloque la batería cargada en el Camcorder Cómo desconectar de la fuente de energía Ajuste el interruptor OFF ON en OFF y mientras desliza el interruptor BATTERY RELEASE retire la batería hacia abajo o el cable de al...

Страница 103: ...mente cuando rota el monitor LCD hacia delante para grabarse a usted mismo Las baterías se calientan con el uso y al ser cargadas La Camcorder también se calienta con el uso Esto es normal Para utilizar como correa de sujeción Ajuste la longitud de la correa de sujeción al tamaño de su mano 1 Despegue el extremo de la correa de sujeción 2 Ajuste la longitud de la correa de sujeción al tamaño de su...

Страница 104: ...e la cubierta del compartimiento del cassette Para proteger la cinta el soporte del cassette no podrá expulsarse si la tapa no está completamente abierta Cuando no use la tapa del objetivo tire el cordón de la tapa del objetivo en la dirección que indica la flecha 1 Cuando no esté grabando asegúrese de cubrir el objetivo con la tapa del mismo para protegerlo 2 Cómo colocar la correa para el hombro...

Страница 105: ...del cassette tenga cuidado de que no se atasque nada p ej un cable en la tapa 3 3 Después de que abra el soporte del cassette inserte extraiga un cassette 4 Cierre el soporte del cassette presionando la marca PUSH 1 El soporte del cassette está completamente guardado 1 Para insertar un cassette oriéntelo como se muestra arriba e introdúzcalo de forma segura hasta que tope Al sacar el cassette hága...

Страница 106: ... de la ranura de la tarjeta Inserción extracción de una tarjeta Cómo utilizar la tarjeta de memoria Opcional Para PV GS39 PV GS69 Para grabar imágenes detenidas se puede utilizar una tarjeta Utilice sólo una tarjeta de memoria SD auténtica fabricada por Panasonic Antes de insertar o retirar tarjeta asegúrese de apagar el Camcorder De otro modo el Camcorder puede no funcionar correctamente o se pue...

Страница 107: ...bación de cinta o de tarjeta 1 Abra el monitor LCD o extienda el visor para utilizarlos El monitor LCD o el visor se activarán La Camcorder no se apagará si el monitor LCD está cerrado y si el visor está retraído El indicador STATUS 2 se apaga automáticamente y la alimentación se desconecta Si se ajusta la función de inicio rápido a ENCENDIDO pág 35 36 la unidad entra en el modo de espera de inici...

Страница 108: ...ora se controla mediante una batería de litio incorporada Asegúrese de comprobar la hora antes de iniciar una grabación ya que el reloj incorporado no es muy preciso Recarga dela batería interna de litio Si o se visualizan cuando se enciende la Camcorder entonces la batería interna de litio está agotada Utilice los pasos que siguen a continuación para cargar la batería Cuando se coloca por primera...

Страница 109: ...ra ajustar el brillo del visor cierre el monitor LCD esto activará el visor Cuando el monitor LCD se gira 180º hacia el objetivo no será posible ajustar su brillo Estos ajustes no tienen ningún efecto sobre las imágenes grabadas Selector de modo fácil de usar Usted puede elegir el modo deseado girando el selector de modo 1 Gire el selector de modo Ajuste el selector a la posición 1 Modo de grabaci...

Страница 110: ...rece automáticamente en la parte inferior derecha de la pantalla p ej Modo de grabación de cinta AUTO Modo de grabación de cinta Cuando el selector AUTO MANUAL FOCUS está ajustado a MANUAL 5 5 NEXT IRIS SHTR WB 1 5 NEXT 2 2 NEXT IRIS SHTR WB 1 2 NEXT 2 5 NEXT 3 5 NEXT 4 5 NEXT 5 5 Modo de ajuste manual del iris pág 45 46 Modo de ajuste manual de velocidad del obturador pág 45 Modo de ajuste manual...

Страница 111: ...MANUAL 1 3 NEXT 2 3 NEXT 3 3 NEXT IRIS SHTR WB 3 3 Modo de ajuste manual del iris pág 45 46 Modo de ajuste manual de velocidad del obturador pág 45 Modo de ajuste manual de balance de blancos pág 43 44 Ir a la página siguiente 1 1 se visualiza mientras se graba en una cinta Modo de reproducción de cinta Reproducción Pausa pág 47 Avance rápido reproducción de señal pág 48 Rebobinado reproducción de...

Страница 112: ...que se mueve el joystick hacia abajo la indicación cambia Cómo utilizar la pantalla menú Para facilitar la selección de una función o una configuración deseada este Camcorder visualiza las configuraciones de diferentes funciones en menús 1 Presione el botón MENU Se visualiza el menú correspondiente al modo seleccionado utilizando el selector de modo No mueva el selector de modo mientras visualiza ...

Страница 113: ...m pág 37 EFFEC OBTU Sólo PV GS29 Efecto de obturación pág 33 CONFIGURAR Submenú de configuración PANTALLA Modo de visualización pág 29 DIA HORA Indicación de la fecha y la hora pág 29 73 AHORRO ENE Modo de ahorro de energía pág 30 INICIO RÁPIDO Modo de inicio rápido pág 35 36 REMOTO Sólo PV GS69 Modo de control remoto pág 15 SONIDO BIP Pitido pág 29 Lista de menús Las figuras de los menús cumplen ...

Страница 114: ...ste de LCD pág 23 CONF VISOR Ajuste de visor pág 23 CONF INIC Modo de ajuste inicial pág 30 MODO DEMO Modo de demostración pág 30 LANGUAGE Submenú de selección de idioma pág 27 Menú de grabación de tarjeta Para PV GS39 PV GS69 BÁSICAS AVANZADAS CONFIGURAR LANGUAGE CONFIG ENTRAR SALIR BÁSICAS MOD ESCENA CAL IMAG ASPECTO CONF RELOJ APAGADO 16 9 NO CONFIG ENTRAR SALIR BÁSICAS Submenú de configuración...

Страница 115: ... BIP en CONFIGURAR está ajustado en ENCENDIDO los pitidos de confirmación alarma se emiten de la siguiente manera 1 pitido Cuando comienza a grabar Cuando se conecta la alimentación 2 pitidos Cuando la unidad pasa del modo de espera de comienzo rápido a la pausa de grabación 2 pitidos Cuando hace una pausa en la grabación Cuando apaga la unidad Cuando la unidad entra en modo de espera de comienzo ...

Страница 116: ...un poco No es posible restaurar el ajuste de idioma predeterminado de la fabrica Modo LP Puede cambiar la velocidad de grabación de cinta Seleccione el modo de grabación reproducción de cinta 1 Ajuste BÁSICAS o AVANZADAS VEL GRAB LP Si el modo LP está activo el tiempo de grabación será 1 5 veces el tiempo del modo SP pero algunas funciones no estarán disponibles Le recomendamos utilizar el modo SP...

Страница 117: ...5 9 s 2 9 f R 2 0 0 1 2 3 4 5 6 A M J A N 2 2 0 0 6 1 0 0 Estas indicaciones aparecen solamente cuando la tarjeta está insertada Para PV GS39 PV GS69 1 Modo de grabación 2 Tiempo de grabación transcurrido 3 Indicación de cinta restante 4 Tamaño de imagen fija 5 Calidad de las imágenes fijas 6 Número de imágenes fijas que se pueden grabar Cuando no se puede grabar ninguna imagen esta indicación par...

Страница 118: ...3 Mueva el joystick para seleccionar Aparece un mensaje de confirmación 4 Mueva el joystick o para seleccionar SÍ y presione el joystick SÍ NO CONFIG ENTRAR SALIR BÚSQUEDA EN BLANCO La indicación y el icono de navegación de un toque aparecen durante la búsqueda de espacios en blanco La función de búsqueda de espacios en blanco le ayuda a buscar el final de la grabación en un cassette rápidamente l...

Страница 119: ...AL IMAG Calidad de imagen alta o Calidad de imagen normal También puede cambiar la calidad de imagen en AVANZADAS CAL IMAG en el modo de grabación de cinta Grabación con efecto de obturador Puede agregar un sonido que simula el funcionamiento de un obturador 1 Ajuste AVANZADAS EFEC OBTU ENCENDIDO 2 Ajuste el selector de modo en modo de grabación de tarjeta Se visualiza la indicación GRABACIÓN EN T...

Страница 120: ...mero de imágenes fijas que se puede grabar en una tarjeta consulte la página 33 No se puede grabar el sonido Mientras se graban datos en una tarjeta no mueva el selector de modo Mientras la lámpara de acceso está encendida no inserte ni extraiga una tarjeta El uso de otro producto puede dañar o no reproducir los datos grabados en esta Camcorder Si se selecciona CAL IMAG puede aparecer una trama de...

Страница 121: ...educe Ajuste la lámpara de video LED en apagado cuando no la utilice No mire la luz directamente Si utiliza la lámpara de video LED con un objetivo de conversión incorporado se produce un efecto de viñeta se oscurece en los bordes en la pantalla Si utiliza la función MagicPix al mismo tiempo las condiciones se volverán aún más brillantes La luz LED de video permite iluminar las imágenes tomadas en...

Страница 122: ...a función MagicPix se retiene el balance de blancos de la última escena grabada Si se conecta la alimentación estando en el modo de espera de inicio rápido la magnificación de zoom será de 5x y el tamaño de la imagen puede ser diferente al que estaba antes con el modo de espera de inicio rápido Cuando utilice el adaptador de ca es posible utilizar el inicio rápido incluso si no se ha insertado una...

Страница 123: ...rófono del zoom Junto con la función de zoom el ángulo direccional y la sensibilidad del micrófono son variados para los sonidos de grabación Seleccione el modo de grabación de cinta 1 Ajuste AVANZADAS ZOOM MIC ENCENDIDO Se visualiza la indicación Para cancelar la función de micrófono del zoom Ajuste AVANZADAS ZOOM MIC APAGADO Nota Es posible que la función de micrófono zoom no funcione correctame...

Страница 124: ...ivo la función de estabilización de imagen no funciona En tal caso la indicación parpadea Bajo una iluminación fluorescente el brillo de la imagen puede cambiar o los colores pueden no verse naturales Pueden aparecer imágenes restantes Si utiliza un trípode le recomendamos desactivar el estabilizador de imagen En los siguientes casos la función de estabilización de imagen puede no funcionar de man...

Страница 125: ...demás una pausa en la grabación también tarda varios segundos 1 Presione el joystick para visualizar el icono de navegación de un toque en la parte inferior derecha de la pantalla 2 Mueva el joystick hasta que se visualice la página con la indicación 1 4 NEXT 3 Mueva el joystick para seleccionar Aparece la indicación LUZ DE FONDO SÍ La indicación destella y luego se visualiza Toda la pantalla se v...

Страница 126: ...uestra en la imagen de arriba Para cancelar el modo Soft skin Mueva el joystick para seleccionar nuevamente Aparece la indicación MODO PIEL SUAVE NO 3 Mueva el joystick para seleccionar Aparece la indicación MODO PIEL SUAVE SÍ La indicación destella y luego se visualiza Notas Si se activa esta función en un lugar luminoso la pantalla puede tornarse blanquecina durante algunos instantes La función ...

Страница 127: ...CINE APAGADO Notas Las imágenes reproducidas pueden variar según el televisor conectado Consulte las instrucciones de uso de su televisor Esta función no extiende el rango de grabación Al reproducir imágenes en una pantalla de TV en algunos casos puede desaparecer la indicación de fecha hora Dependiendo del televisor que se utilice la calidad de imagen puede deteriorarse Al importar una imagen de ...

Страница 128: ... especiales Modo de escena Aparece la indicación y el icono de navegación de un toque Puede seleccionar un modo de escena óptima para situaciones de grabación específicas Seleccione el modo de grabación de cinta tarjeta 1 Ajuste el interruptor AUTO MANUAL FOCUS en MANUAL S P 3 h 5 9 m 5 9 s 2 9 f R 2 0 0 1 2 3 4 5 6 A M J A N 2 2 0 0 6 1 0 0 S P 3 h 5 9 m 5 9 s 2 9 f R 2 0 0 1 2 3 4 5 6 A M J A N ...

Страница 129: ...vo puesta es posible que el ajuste de balance de blancos no funcione correctamente Encienda el Camcorder luego de quitar la tapa del objetivo Seleccione el modo de grabación de cinta tarjeta Aparecen y el icono de navegación de un toque Aparece la indicación de balance de blancos etc 1 2 3 4 1 Ajuste el interruptor AUTO MANUAL FOCUS en MANUAL 3 Mueva el joystick o para seleccionar un modo de balan...

Страница 130: ... 5 9 s 2 9 f R 2 0 0 1 2 3 4 5 6 A M J A N 2 2 0 0 6 1 0 0 1 Notas Si se enciende la Camcorder con la tapa del objetivo instalada el ajuste automático del balance de blancos puede no realizarse correctamente Encienda la Camcorder después de quitar la tapa del objetivo Al ajustar tanto el balance de blancos como el iris ganancia ajuste el balance de blancos primero Vuelva a ajustar el balance de bl...

Страница 131: ...de velocidad del obturador 1 60 1 8000 s en modo Grabación de cinta 1 60 1 500 s en modo Grabación de tarjeta La velocidad estándar del obturador es 1 60 s cuando EIS está ajustado a APAGADO El seleccionar una velocidad cercana a 1 8000 hace que la velocidad del obturador sea más rápida 2 Mueva el joystick para seleccionar 5 5 NEXT IRIS SHTR WB BACK SHTR SHTR S P 3 h 5 9 m 5 9 s 2 9 f R 2 0 0 1 1 ...

Страница 132: ...ón del zoom hay valores de iris que no se visualizarán Si el valor no cambia a OPEN no es posible ajustar el valor de ganancia Si se incrementa el valor de ganancia el ruido en la pantalla también aumenta Cuando se utiliza el modo MagicPix pág 40 o el modo de escena pág 42 el iris no puede ajustarse Si intenta ajustar la velocidad de obturación luego de ajustar el iris el valor ajustado para el ir...

Страница 133: ...e del volumen de sonido para reproducción 1 Presione el botón VOL para ajustar el volumen Hacia aumenta el volumen Hacia disminuye el volumen Mientras más cerca de mayor será el volumen Reproducción repetida Cuando se llega al final de la cinta esta se rebobina y se reproduce nuevamente 1 Ajuste AVANZADAS VOLVER REP ENCENDIDO 2 Mueva el joystick para comenzar la reproducción Aparece la indicación ...

Страница 134: ...reproducción de revisión se puede cambiar S P 3 h 5 9 m 5 9 s 2 9 f R 2 0 0 1 2 3 4 5 6 A M J A N 2 2 0 0 6 2 8 S P 3 h 5 9 m 5 9 s 2 9 f R 2 0 0 1 2 3 4 5 6 A M J A N 2 2 0 0 6 2 8 Encontrar una escena que desea reproducir Reproducción de señal revisión Notas Si se mantiene presionado el joystick éste funciona como control de reproducción de señal o control de reproducción de revisión hasta que s...

Страница 135: ...ión de avance o de retroceso Si sigue presionando la palanca las imágenes detenidas avanzan continuamente Reproducción de una tarjeta de memoria Para PV GS39 PV GS69 Reproduce archivos grabados en una tarjeta Antes de encender el Camcorder abra la pantalla LCD o Visor 1 Ajuste el interruptor OFF ON a ON El indicador STATUS se ilumina de color rojo 2 Ajuste el selector de modo en modo de reproducci...

Страница 136: ...producir un archivo grabado en otro equipo la indicación de fecha y hora no coincidirá con la fecha y hora en que se grabó el archivo Cuando se reproduce una imagen grabada en otro equipo es posible que la imagen no se reproduzca o que la calidad de las imágenes se deteriore Cuando se reproduce un archivo estandarizado es posible que el número de archivos de la carpeta no se visualice Acerca del a...

Страница 137: ...o puede recuperar Seleccione el modo de reproducción de foto El icono del sistema de navegación de un toque aparece en la parte inferior derecha de la pantalla Para seleccionar y eliminar archivos 1 Mueva el joystick o para seleccionar el archivo que desea borrar Icono de navegación de un toque Icono de navegación de un toque Para seleccionar y eliminar todos los archivos 1 Mueva el joystick para ...

Страница 138: ... impresiones que DPOF 1 estableció 3 Mueva el joystick o para seleccionar la cantidad de imágenes que se imprimirán y presione el joystick 1 2 PROTEGER CONFIG ENTRAR SALIR Escribir información impresa en una tarjeta Configuración DPOF Para PV GS39 PV GS69 Los datos de impresión de la configuración DPOF configuración DPOF como por ejemplo la cantidad de imágenes que se imprimirán se pueden escribir...

Страница 139: ...D formateadas en el sistema FAT12 para tarjetas de memoria SD de 8 16 32 y 64 MB y FAT16 para tarjetas de memoria de 128 256 512 MB 1 GB y 2 GB Formatear una tarjeta Para PV GS39 PV GS69 Si el Camcorder no puede leer una tarjeta formatéela para volver a utilizarla El formateo borra toda la información grabada en la tarjeta Cuando se formatea la tarjeta también se borran todos los archivos protegid...

Страница 140: ... Nota Utilice el adaptador de ca para evitar que la batería se descargue 6 Mueva el joystick para seleccionar para comenzar la reproducción La imagen y el audio se reproducen en el televisor 7 Mueva el joystick para seleccionar para detener la reproducción Si la imagen o el audio de la Camcorder no se reproducen en el televisor Compruebe que las clavijas están insertadas correctamente Compruebe lo...

Страница 141: ...HOT Antes de grabar con copia de audio Seleccione el modo de grabación de cinta Si desea conservar el sonido original capturado durante la grabación seleccione AVANZADAS GRAB AUDIO 12bit para grabar imágenes Si se selecciona 16bit los sonidos capturados durante la grabación se borran después de la grabación con copia de audio Seleccione BÁSICAS VEL GRAB SP para grabar imágenes 2 Presione el botón ...

Страница 142: ... en equipos que tienen un terminal DV 2 Encienda la Camcorder y seleccione el modo de reproducción de cinta 3 Seleccione el canal de entrada en el televisor y en el grabador 4 Mueva el joystick para comenzar la reproducción Se reproduce la imagen y el sonido 5 Comenzar la grabación 6 Mueva el joystick para detener la reproducción 7 Detener la grabación Si graba copia imágenes en otro dispositivo d...

Страница 143: ...mero de compañías de software de edición de videos Utilizando productos de compañías de software de edición de videos le permite capturar y editar videos atravez de la interfaz DV La computadora debe estar equipada con una terminal DV Durante la reproducción del Camcorder no desconecte el cable de interfaz DV ni apague el Camcorder porque puede ocurrir un error de finalización de sesión de la comp...

Страница 144: ...adora personal que se utilice 4 Siga las instrucciones en la pantalla de la computadora hasta que la instalación esté completa La ventana de instalación desaparecerá cuando la instalación haya finalizado Instalación del software Para Windows Sólo PV GS39 Si tiene acceso a Internet descargue el controlador USB Con una PC 1 Para descargar e instalar el controlador consulte http www panasonic com con...

Страница 145: ...alados Microsoft Windows XP Professional Home Edition Microsoft Windows 2000 El equipo USB funciona con el controlador instalado de forma predeterminada en el sistema operativo SO 2 Función Este es el ambiente operativo para el controlador USB el cual puede instalarse con el CD ROM PV GS69 suministrado o desde la página web PV GS39 Computadora personal IBM PC AT compatible con los siguientes progr...

Страница 146: ...nternet descargue el controlador USB Sólo PV GS39 1 Para descargar e instalar el controlador consulte http www panasonic com consumerdownloads 2 Haga clic en Camcorder en la pantalla 3 Haga clic en USB Driver for Web Camera 4 Descomprima los datos descargados 5 Haga doble clic en el icono Comienza a ejecutarse el programa de instalación 6 Finalice la instalación siguiendo las instrucciones de la p...

Страница 147: ...isco duro No cambie los nombres de los archivos ni carpetas en su computadora personal Es posible que las imágenes de la tarjeta de memoria no se puedan ver en el Camcorder Para desconectar el cable USB de manera segura Para Windows Si el cable USB está desconectado mientras la computadora está encendida puede aparecer un diálogo de error En este caso haga clic en OK y cierre el cuadro de diálogo ...

Страница 148: ...SP4 o posterior CPU Intel Pentium lll 450 MHz o superior incluyendo CPU compatible RAM 128 MB o más 256 MB o más recomendado Espacio libre en disco duro Por lo menos 250 MB o más Interfaz USB 1 1 o superior Tipo A Para utilizar el Camcorder como una cámara Web se deben cumplir los requisitos adicionales mínimos Visualización gráfica Alto color 16 bit o más Resolución del escritorio de 800 600 píxe...

Страница 149: ...gen en vivo desde la cámara a una PC ponga la Camcorder en el modo de grabación de cinta Para enviar imágenes grabadas en una cinta a una PC ponga la Camcorder en el modo de reproducción de cinta Conectar el Camcorder a la computadora personal Para utilizarla como una cámara Web Cuando el Camcorder y la computadora personal con Windows 2000 están conectadas a través del cable USB se visualiza un m...

Страница 150: ...biará dependerá del estado de la conexión a Internet Si el cable USB está desconectado de la computadora personal el modo de la cámara Web se cancela Si utiliza el Camcorder como una cámara Web el video no se puede grabar ni en una cinta ni en una tarjeta No es posible emitir el video recibido desde el terminal DV para visualizarlo en la PC En el modo de cámara web el audio puede interrumpirse a l...

Страница 151: ...r y luego apague el Camcorder Por último desconecte el cable USB Si utiliza el Camcorder como una cámara Web ininterrumpidamente durante dos horas la comunicación se corta automáticamente En este caso reinicie Windows Messenger y establezca la comunicación nuevamente 8 Seleccione DVC en el menú Microphone 7 Haga clic en Web Camera Settings en el menú Tools 8 Confirme que Panasonic DVC Web Camera D...

Страница 152: ...n software que permite la captura de videos desde un dispositivo de video editados y emitidos La edición digital en un computador personal edición no lineal le permite crear trabajos de videos con un mínimo deterioro en la calidad de la imagen Es posible aplicar también varios efectos especiales tales como los efectos de aparción desaparición gradual efectos de transición y títulos en los videos L...

Страница 153: ... unidad de CD ROM de la computadora personal Cierre todas las aplicaciones Aparece la pantalla Setup Menu 2 Haga clic en MotionDV STUDIO PV GS69 incluido Con la instalación del software MotionDV STUDIO se instalan también datos de muestra Después de leer la información que aparece lleve a cabo la instalación de acuerdo con las instrucciones 4 Seleccione el sistema de video 5 Una vez que se complet...

Страница 154: ...inta y retire la cinta y la tarjeta Con USB suministrado Sistema operativo Windows XP SP2 o posterior Windows 2000 SP4 o posterior La computadora personal debe ser compatible con USB 2 0 de alta velocidad Comprobación previa a la conexión para Windows XP 2000 Al conectar la computadora personal a la Camcorder mediante el cable USB Cable y utilizar Quick Movie Magic MotionDV STUDIO en Windows XP SP...

Страница 155: ...on el cable USB Si ya no necesita el software ni el controlador Desinstalar Las pantallas pueden variar con el tipo de sistema operativo 1 Seleccione Start Settings Control Panel seleccione el software o el controlador desde Add Remove Programs para desinstalar Los pasos de desinstalación pueden variar de acuerdo con el sistema operativo Consulte el manual del usuario de su sistema operativo 2 Lue...

Страница 156: ...cubren las funciones básicas de la computadora personal ni definen ningún término Para obtener más información consulte las instrucciones de uso que acompañan su computadora personal 3 Haga clic en el icono iMovie HD 4 Haga clic en Create a New Project 5 Haga clic en Create en la pantalla Create Project y seleccione una carpeta en la cual desee guardar las imágenes en movimiento Se visualizará Cam...

Страница 157: ...ado el cable USB o si no sigue estas instrucciones de uso En este caso elimine el controlador USB del Device Manager como se describe a continuación desinstale el controlador USB y vuelva a instalarlo Con el Camcorder y la computadora personal conectadas a través del cable USB abra Device Manager Haga clic con el botón derecho en DVC 1 en Ports o en Other devices y seleccione Uninstall DVC 1 varia...

Страница 158: ...to con las imágenes Los números de los archivos se graban con cada imagen como números consecutivos Cuando se utiliza el software sin una función de indicación la información de indicación como la fecha no se visualiza Según el software que se utiliza es posible que la fecha y la hora no se visualicen correctamente La capacidad de la memoria que se indica en la etiqueta de la tarjeta SD correspond...

Страница 159: ...das en este Camcorder la visualización del tamaño está determinada como se explica a continuación de acuerdo con el número de píxeles horizontales Blanco Modo Photoshot Rojo Mientras está activada la grabación de Photoshot Verde Mientras se lee la tarjeta Rojo No se reconoce el uso de la tarjeta Modo grabación de cinta pág 31 Modo reproducción de cinta pág 47 Modo grabación de tarjeta pág 33 Modo ...

Страница 160: ...tal está ajustado a la posición SAVE IMPOSIB REPROD CINTA OTRO FORMATO Está intentando reproducir una sección de la cinta que ha sido grabada con un sistema de televisión diferente Este cassette no es compatible CERRAR PUERTA La cubierta del cassette está abierta Cierre la cubierta del cassette pág 18 19 IMPOSIB A DUB GRABADO EN LP Debido a que la grabación original se realizó en modo LP no se pue...

Страница 161: ...afectada por un equipo cargado magnéticamente y no funciona bien desconecte el Camcorder y desconecte la batería o el adaptador de ca y luego vuelva a conectarlos A continuación encienda el Camcorder No utilice su Camcorder cerca de radiotransmisores ni cables de alto voltaje Si graba imágenes cerca de radiotransmisores o de cables de alto voltaje las imágenes o los sonidos grabados pueden afectar...

Страница 162: ...e produce condensación en el objetivo o en el Camcorder es posible que también se produzca en el cabezal y en la cinta No abra la cubierta del compartimiento del cassette Cuando el objetivo se ve nublado Ajuste el interruptor OFF ON en OFF y deje el Camcorder así durante aproximadamente 1 hora Cuando la temperatura del objetivo se acerca a la temperatura ambiente el efecto de niebla desaparece nat...

Страница 163: ...res expuestos a altas temperaturas Batería Las temperaturas extremadamente altas o extremadamente bajas acortarán la vida útil de la batería Si se deja la batería en lugares con humo o polvo las terminales se pueden oxidar y provocar un mal funcionamiento No permita que las terminales de la batería entren en contacto con objetos metálicos como collares prensillas para el cabello etc Esto puede oca...

Страница 164: ...e píxeles inactivos o siempre encendidos Sin embargo esto no es un signo de mal funcionamiento y no afecta la imagen grabada Antes de solicitar servicio de reparación Problemas y soluciones Alimentación Cuerpo No se puede encender la Camcorder No se puede encender el Camcorder Está completamente cargada la batería Utilice una batería completamente cargada El circuito de protección de la batería pu...

Страница 165: ... todas las indicaciones desparecen excepto las de desplazamiento de cinta advertencia y fecha No se puede utilizar la Camcorder a pesar de que tiene suministro de energía La Camcorder no funciona normalmente Si no abre el monitor LCD o no extiende el visor la Camcorder no funcionará Extraiga el cassette y presione el botón RESET pág 81 Si no se restablecen las condiciones normales desconecte la al...

Страница 166: ...arjeta pueden estar dañadas Consulte a un agente de ventas Durante la reproducción se visualiza la indicación IMPOS REPROD TARJ La imagen se grabó en un formato diferente o la información está dañada Reproducción Sonido No se reproduce sonido desde el altavoz incorporado en el Camcorder El volumen está demasiado bajo Durante la reproducción presione el botón VOL para visualizar la indicación de vo...

Страница 167: ... mediante el cable USB la PC no reconoce a la Camcorder Está instalado el controlador USB Para más información consulte las páginas 58 a 60 Cuando el cable USB esté desconectado aparecerá un mensaje de error en la computadora personal Para Windows Para desconectar el cable USB de manera segura haga doble clic en el ícono en la bandeja de tareas y siga las instrucciones en la pantalla Para Macintos...

Страница 168: ... está en el vidrio sucio el objeto detrás del vidrio no será enfocado 3 Grabación de un objeto en un ambiente oscuro Debido a que la información de luz que ingresa a través del objetivo disminuye considerablemente el Camcorder no puede enfocar correctamente 4 Grabación de un objeto que está rodeado de objetos con superficies brillantes o de objetos altamente reflexivos Debido a que el Camcorder en...

Страница 169: ...V Pa 1 kHz USB Función lectora escritora de tarjeta USB 2 0 compatible Alta velocidad PV GS69 Velocidad normal PV GS39 Sin soporte de protección de copyright Fuente de energía 7 9 V cc 7 2 V Consumo de energía Grabación 4 2 W PV GS29 4 4 W PV GS39 PV GS69 Interferencia digital Conexión entrada salida DV IEEE1394 4 pin Dimensiones Aprox 69 alto 82 ancho 120 diámetro mm Aprox 2 11 16 alto 3 1 4 anch...

Страница 170: ...032BPPA Tarjeta de memoria SD Pro High Speed de 2 GB Tarjeta de memoria SD Pro High Speed de 1 GB Tarjeta de memoria SD Pro High Speed de 512 MB Tarjeta de memoria SD Super High Speed de 256 MB Tarjeta de memoria SD High Speed de 2 GB Tarjeta de memoria SD High Speed de 1 GB Tarjeta de memoria SD High Speed de 512 MB Tarjeta de memoria SD High Speed de 256 MB Tarjeta de memoria SD High Speed de 12...

Страница 171: ...sparador 36 Grabación de usted mismo 35 Gradual 38 I Icono de navegación de un toque 23 Inicio rápido 35 Iris 45 J Joystick 23 L Lámpara de video LED incorporada 35 Lista de menús 27 29 M Manual del enfoque 46 Micrófono del zoom 37 Modo deportes 42 Modo de escena 42 Modo lámpara baja 42 Modo reflector 42 Modo retrato 42 Modo SP LP 30 Modo surf y nieve 42 Monitor LCD 22 78 MotionDV STUDIO 66 N Núme...

Страница 172: ...Impreso en Indonesia LSQT1070 A S0106A0 Matsushita Electric Industrial Co Ltd Web Site http www panasonic co jp global ...

Отзывы: