background image

Operating Instructions (Additional Features)

42

Stop the SD Memory Recording

After you stop the SD memory recording, remove the SD memory card.

Note

You can confirm the SD memory capacity on the Status page.

If the camera is restarted, the SD memory recording starts again.

If you remove the SD memory card and insert it again, the SD memory 
recording starts again.

1.

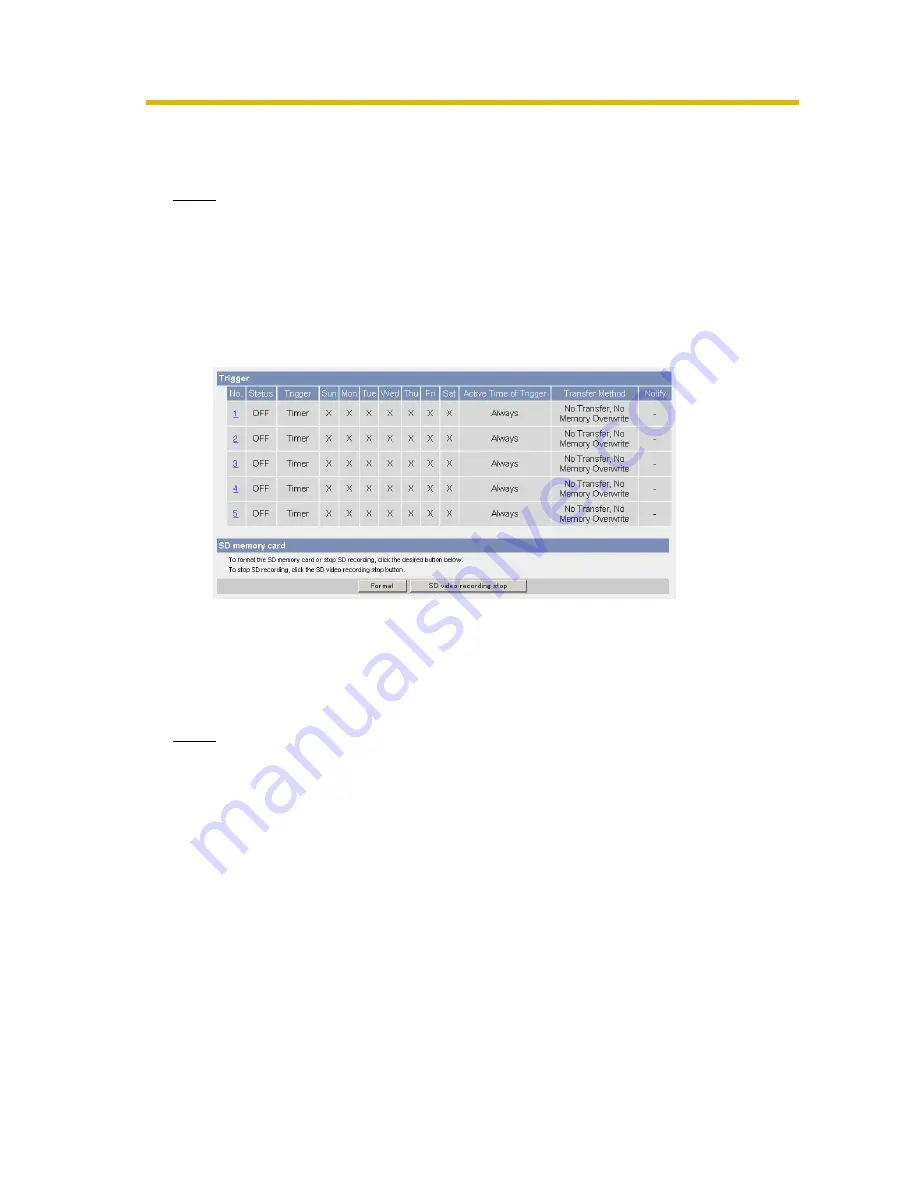
Click [Trigger] on the Setup page.

2.

Click [SD video recording stop].

3.

Click [OK] on the confirmation window.

The SD memory recording is stopped.

4.

Click [Go to Trigger page].

The Trigger page is displayed.

Note

Ensure that recording has stopped before removing the SD memory card. Do 
not remove the SD memory card, nor restart or turn off the camera while 
recording images on the card. Doing so can cause a decrease in SD memory 
card capacity, data corruption or camera malfunction.

Содержание BB-HCM381

Страница 1: ... of Viewnetcam com is changed the position of Buffer Transfer is moved and the menu on the Setup window is added page 7 Registering User specified DynamicDNS DynamicDNS service is a service that allows you to assign an easy to remember name to the camera similar to your favorite web site DynamicDNS service also allows you to easily access the camera even when your ISP changes the IP address Panaso...

Страница 2: ...e Motion Detection The sensitivity of the Motion Detection can be adjusted page 35 Notifying Setup of an Alarm Log Once a day an alarm log sent at a specified time can be checked page 38 Changing the Time Stamp Setting The Time stamp setting is changed on the Image Display page page 40 Format the SD memory card The format specification is changed page 41 Stop the SD Memory Recording The recording ...

Страница 3: ...he object only while playing video 1 Clicking the right mouse button Clicking the right mouse button on the upper third of the Single Camera screen zooms in and clicking on the lower third of the Single Camera screen zooms out 2 Rotating the mouse wheel Rotating the mouse wheel away from you zooms in and rotating it towards you zooms out Clicking the right mouse button Clicking the right mouse but...

Страница 4: ... follows When Zoom Control is disabled on Access Level A 10x digital zoom feature that described the previous page is can be used When Zoom Control is enabled on Access Level A 42x optical zoom feature is can be used The magnification will not be displayed Rotating the mouse wheel On a screen rotating the mouse wheel away from you zooms in and rotating it towards you zooms out Zoom in Zoom out ...

Страница 5: ...ered preset position The camera takes each position and the image is displayed Note The registered preset positions can be viewed on your mobile phone The preset position may be developed into a gap Home Position Alarm Position and Preset Position Pan Tilt Putting the cursor displays the preset name Home Position UpperLeft ...

Страница 6: ... position 4 Adjust the focusing if necessary 5 Click the home position alarm position or a preset number 1 20 6 Click Save after setting the preset name or click Delete If you quit to change or delete settings click Back and then Cancel If Success is displayed click Back Note The home position or the alarm position cannot be deleted and these position names cannot be changed either Pan Tilt Changi...

Страница 7: ...NS service 2 Camera Sets camera name white balance pan tilt range return to specified position and color night view settings Buffer Transfer 3 Trigger Sets image buffer or transfer by timer or alarm or motion detection 4 Motion Detection Sets the threshold and the sensitivity 5 Alarm Log Sets the information to notify the log by e mail Advanced 6 Image Display Sets resolution image quality and ref...

Страница 8: ...e IP address Panasonic Communications recommends you to register with it for the Internet access to the camera 1 Click DynamicDNS on the Setup page 2 Check User specified DynamicDNS and click Next Clicking Cancel cancels your settings without saving changes 3 Set each parameter You can get DynamicDNS information from the DynamicDNS service industry company 4 Click Save after finished New settings ...

Страница 9: ...ice is not connected Confirming the Internet access Due to the router specifications the image may not be displayed even if you access the camera from your PC on the same LAN as the camera In this case access the camera in the following procedures Accessing from the PC on another network Accessing from your mobile phone see page 46 ...

Страница 10: ...Operating Instructions Additional Features 10 Time on the Camera Page Time of Return to Specified Position on the Camera page is changed ...

Страница 11: ...available Time Do not move 10 s 20 s 30 s 1 min 5 min 10 min 30 min 1 h Specified Position Home Position Preset No 1 20 Alarm No 1 Alarm No 2 Note If you did not set any presets the camera cannot turn to the preset position When registering preset positions set Time long enough to complete the registration process If Time is set too short the camera will return to the specified position while regi...

Страница 12: ...Transfer Memory Overwrite FTP E mail Transfer Method Select one from the lists No Transfer No Memory Overwrite No Transfer Memory Overwrite FTP E mail Buffer Transfer by Alarm Signal Page 13 Lens Position When Triggered Setting Lens Position When Triggered Setting E mail Notification When Triggered Setting E mail Notification When Triggered Setting Save the settings to complete Buffer Transfer by ...

Страница 13: ...to enable image buffer transfer by E mail or FTP 1 Click Trigger on the Setup page 2 Click No to enable Trigger 3 Check Enable Image Buffer Transfer select Alarm 1 or 2 for trigger select Rising GND to Open High or Falling Open High to GND and click Next Note Click Delete Buffered Images to delete this buffered images Click Save to save the settings Clicking Cancel takes you back to the Trigger pa...

Страница 14: ...ansfer the image by alarm signal Selecting Motion Detection enables the camera to capture transfer the images when the motion detects something Alarm enable condition Selecting the method of the detection for an alarm connected to the External I O terminal Select Rising GND to Open High or Falling Open High to GND Rising GND to Open High is the state that GND pin and pin 1 or pin 2 is left open Fa...

Страница 15: ... the Trigger page without saving changes 6 Set the image settings and click Next Clicking Back takes you back to the previous page Clicking Cancel takes you back to the Trigger page without saving changes Setting Description Lens Position When Triggered Set Move to alarm position or Preset 1 20 to move the lens to the Home Position or the alarm position when the alarm signal is detected Setting De...

Страница 16: ...mage quality Favor Clarity optimizes for good quality Standard offers standard quality default Favor Motion optimizes for enhanced motion Mobile Phone is for a transfer to a mobile phone Note 640 x 480 pixels cannot be set for a transfer to a mobile phone Setting Description Enable Pre trigger Image Buffer Check the box to enable the setting The camera buffers or transfers the image right before t...

Страница 17: ...transfers the image right after the alarm signal is detected Set an interval number of images to buffer and total number The buffered images may not match the total number due to memory capacity image resolution image quality or what object you view Setting Description No Transfer No Memory Overwrite If the internal memory is full the camera stops the buffer No Transfer Memory Overwrite If the int...

Страница 18: ...al Features 18 When you set FTP for Transfer Method Select FTP and click Next The following page is displayed Clicking Back takes you back to the previous page Clicking Cancel takes you back to the Trigger page without saving changes ...

Страница 19: ...ver If you set One Time during 1 minute transfer the camera logs in to the server only once and can reduce the time to log in or log out Upload File Name 1 Set the file name to save on an FTP server Enter 1 234 characters Entering creates directories for a file E g NetworkCamera image jpg Overwrite Setting Selecting Overwrite File saves and overwrites the image on the server Selecting Save as New ...

Страница 20: ... the Trigger page without saving changes Note The camera works only with an SMTP Simple Mail Transfer Protocol server It does not work with mail servers like Hotmail using a web browser The subject name by E mail transfer uses only 24 h format The file name is image jpg E g image 20050101093020500 Underlined numbers are 9h30min20s500ms on January 1 2005 The letter s is inserted after the day when ...

Страница 21: ...v6 address Port No Enter a number 1 65535 Usually set to 110 Login ID 2 2 But is not available If your ISP requires a login ID to log in to a POP3 server set it 0 63 characters Password 2 If your ISP requires a password to log in to a POP3 server set it 0 63 characters Reply E mail Address 2 Set the sender s E mail address We recommend you to set the administrator s E mail address Destination E ma...

Страница 22: ...d Enter the settings seeing page 20 and page 21 When finished click Next and go to step 10 10 Click Save after confirming the settings New settings are saved When finished Success is displayed Setting Description Disable The camera does not send an E mail notification when buffering or transferring image Enable The camera sends an E mail notification up to 3 destinations when buffering or transfer...

Страница 23: ... transfer stops its operations until the camera finishes all transfers For example if the camera transfers 3 images per minute and 6 images in total the alarm detection will be in the following operation If you are buffering images on the internal memory the following operations also delete all buffered images Turning off the camera Saving the Date and Time page Restarting updating firmware or res...

Страница 24: ...function as a trigger The Trigger page allows you to enable image buffer transfer by E mail or FTP 1 Click Trigger on the Setup page 2 Click No to enable Trigger 3 Check Enable Image Buffer Transfer select Motion Detection for trigger and click Next Note Click Delete Buffered Images to delete this buffered images Click Save to save the settings Clicking Cancel takes you back to the Trigger page wi...

Страница 25: ...camera turns to the Home Position Preset No 1 20 or Alarm No 1 2 Trigger Selecting Timer enables the camera to buffer transfer the image by timer Selecting Alarm 1 or 2 enables the camera to buffer transfer the image by alarm signal Selecting Motion Detection enables the camera to capture transfer the images when the motion detects something Setting Description A day of the week Check the box to e...

Страница 26: ...sition When Triggered Set Move to alarm position or Preset 1 20 to move the lens to the Home Position or the alarm position when the alarm signal is detected Setting Description Image Resolution Select image resolution 640 480 320 240 default or 160 120 pixels to buffer or transfer Image Quality Select the image quality Favor Clarity optimizes for good quality Standard offers standard quality Defa...

Страница 27: ...k the box to enable the setting The camera buffers or transfers the image right before the motion detection signal is detected Set an interval number of images to buffer and total number The buffered images may not match the total number due to memory capacity image resolution image quality or what object you view Enable Post trigger Image Buffer Check the box to enable the setting The camera buff...

Страница 28: ... or FTP confirm that the default gateway and DNS server addresses are assigned correctly Setting Description No Transfer No Memory Overwrite If the internal memory is full the camera stops the buffer No Transfer Memory Overwrite If the internal memory is full the camera deletes the old images and continues to buffer the image FTP The camera transfers the image to an FTP server see page 29 E mail T...

Страница 29: ...al Features 29 When you set FTP for Transfer Method Select FTP and click Next The following page is displayed Clicking Back takes you back to the previous page Clicking Cancel takes you back to the Trigger page without saving changes ...

Страница 30: ...ver If you set One Time during 1 minute transfer the camera logs in to the server only once and can reduce the time to log in or log out Upload File Name 1 Set the file name to save on an FTP server Enter 1 234 characters Entering creates directories for a file E g NetworkCamera image jpg Overwrite Setting Selecting Overwrite File saves and overwrites the image on the server Selecting Save as New ...

Страница 31: ... the Trigger page without saving changes Note The camera works only with an SMTP Simple Mail Transfer Protocol server It does not work with mail servers like Hotmail using a web browser The subject name by E mail transfer uses only 24 h format The file name is image jpg E g image 20050101093020500 Underlined numbers are 9h30min20s500ms on January 1 2005 The letter s is inserted after the day when ...

Страница 32: ...v6 address Port No Enter a number 1 65535 Usually set to 110 Login ID 2 2 But is not available If your ISP requires a login ID to log in to a POP3 server set it 0 63 characters Password 2 If your ISP requires a password to log in to a POP3 server set it 0 63 characters Reply E mail Address 2 Set the sender s E mail address We recommend you to set the administrator s E mail address Destination E ma...

Страница 33: ...gered page is displayed Enter the settings seeing page 31 and page 32 10 Click Save after confirming the settings New settings are saved When finished Success is displayed Setting Description Disable The camera does not send an E mail notification when buffering or transferring image Enable The camera sends an E mail notification up to 3 destinations when buffering or transferring image ...

Страница 34: ...to factory default Maximum number of buffered images change depending on resolution image quality and what object the camera buffers At the 320 x 240 pixels resolution and the standard quality the camera buffers about 125 frames If 3 triggers are enabled maximum 5 triggers the internal memory capacity is divided into 3 sections In this case each trigger can buffer about 40 images See 3 11 File Siz...

Страница 35: ...to set the sensitivity level 4 Click Save to save the settings Clicking Cancel cancels your settings without saving changes 5 Click Go to Motion Detection page The Motion Detection page is displayed Note The Motion Detection is disabled while zooming panning and tilting Preview Display current threshold and detection level The threshold is displayed by between green and red bar The detection level...

Страница 36: ...tected What is the sensitivity The sensitivity is the brightness change level for the camera to detect as the motion The high sensitivity setting enables the camera to detect the slight brightness change Lower the sensitivity to make the camera to detect only the big brightness change Note Lowering the threshold and heightening sensitivity enable the camera easily to detect the trivial motion on t...

Страница 37: ...tificial light such as the fluorescent light In other cases motion detection by the Network Camera Recorder detects whole objects and brightness changes The way to detect motion differs between the camera and Network Camera Recorder Additionally if the object s color is absorbed by the background color the camera is hard to detect the motions The detecting level depends on the object resolution or...

Страница 38: ...r address setting is required See 2 2 Connecting the Camera to Your IPv4 Network or 2 3 Connecting the Camera to Your IPv6 Network on the Operating Instructions 1 Click Alarm Log on the Setup page When selecting Alarm1 Alarm2 or Motion Detection in Trigger page the Alarm log window is displayed 2 Set each parameter 3 Click Save Clicking Cancel cancels your settings without saving changes 4 Click G...

Страница 39: ...P Address or Host Name 1 If you set the server IP address set 4 digits 0 255 and 3 periods such as 192 168 0 253 But 0 0 0 0 and 255 255 255 255 are not available Or set a host name 0 255 characters An IPv6 address can be set Port No Enter a number 1 65535 Usually set to 110 Login ID 2 2 But is not available If your ISP requires a login ID to log in to a POP3 server set it 0 63 characters Password...

Страница 40: ... changed on the Image Display page Setting Description Time stamp setting You can display a time stamp on the upper left side of the image Select from Enable or Disable Note If you enable this feature the time is also stamped on the buffered image Set AM PM format and 24H format on the Date and Time page ...

Страница 41: ...ra image you need to format the SD memory card Note You can confirm the SD memory capacity on the Status page 1 Insert the SD memory card 2 Click Trigger on the Setup page 3 Click Format 4 Click OK on the confirmation window Format is complete 5 Click Go to Trigger page The Trigger page is displayed ...

Страница 42: ...it again the SD memory recording starts again 1 Click Trigger on the Setup page 2 Click SD video recording stop 3 Click OK on the confirmation window The SD memory recording is stopped 4 Click Go to Trigger page The Trigger page is displayed Note Ensure that recording has stopped before removing the SD memory card Do not remove the SD memory card nor restart or turn off the camera while recording ...

Страница 43: ...SD memory recording starts again 1 Click Trigger on the Setup page 2 Click SD video recording start 3 SD video recording was started is displayed The SD memory recording is stopped 4 Click Go to Trigger page The Trigger page is displayed Note Ensure that recording has stopped before removing the SD memory card See page 42 Do not remove the SD memory card nor restart or turn off the camera while re...

Страница 44: ... Alarm Log on Maintenance page 2 Alarm Logs are displayed Note If the camera is restarted all alarm logs are deleted Maintenance 1 Alarm Log Displays alarm logs Item Description New Alarm Logs Displays the number of new alarm logs Date Displays the date and time when the Alarm 1 2 or Motion Detect were responded Sensor Type Displays the Trigger Setting Alarm 1 2 or Motion Detection on the Trigger ...

Страница 45: ...Operating Instructions Additional Features 45 Signal Type Displays the Alarm enable condition on the Trigger page when selected Alarm 1 or 2 Item Description ...

Страница 46: ...egistered preset positions to click each link Displays up to 50 Logs in order of time and only when logging in as an administrator Go to the control page when clicking Displays the number of new logs Displays the date and time the kind of signal and sensor Go to the control page when clicking Display Operation Signal A1 R A2 F MD Alarm1 Alarm2 Motion Detection Rising GND to Open High Falling Open ...

Страница 47: ...Operating Instructions Additional Features 47 ...

Страница 48: ...onic Communications Co Ltd and may be reproduced for internal use only All other reproduction in whole or in part is prohibited without the written consent of Panasonic Communications Co Ltd The information in this document is subject to change without notice Panasonic Communications Co Ltd 1 62 4 chome Minoshima Hakata ku Fukuoka 812 8531 Japan ...

Отзывы: