background image


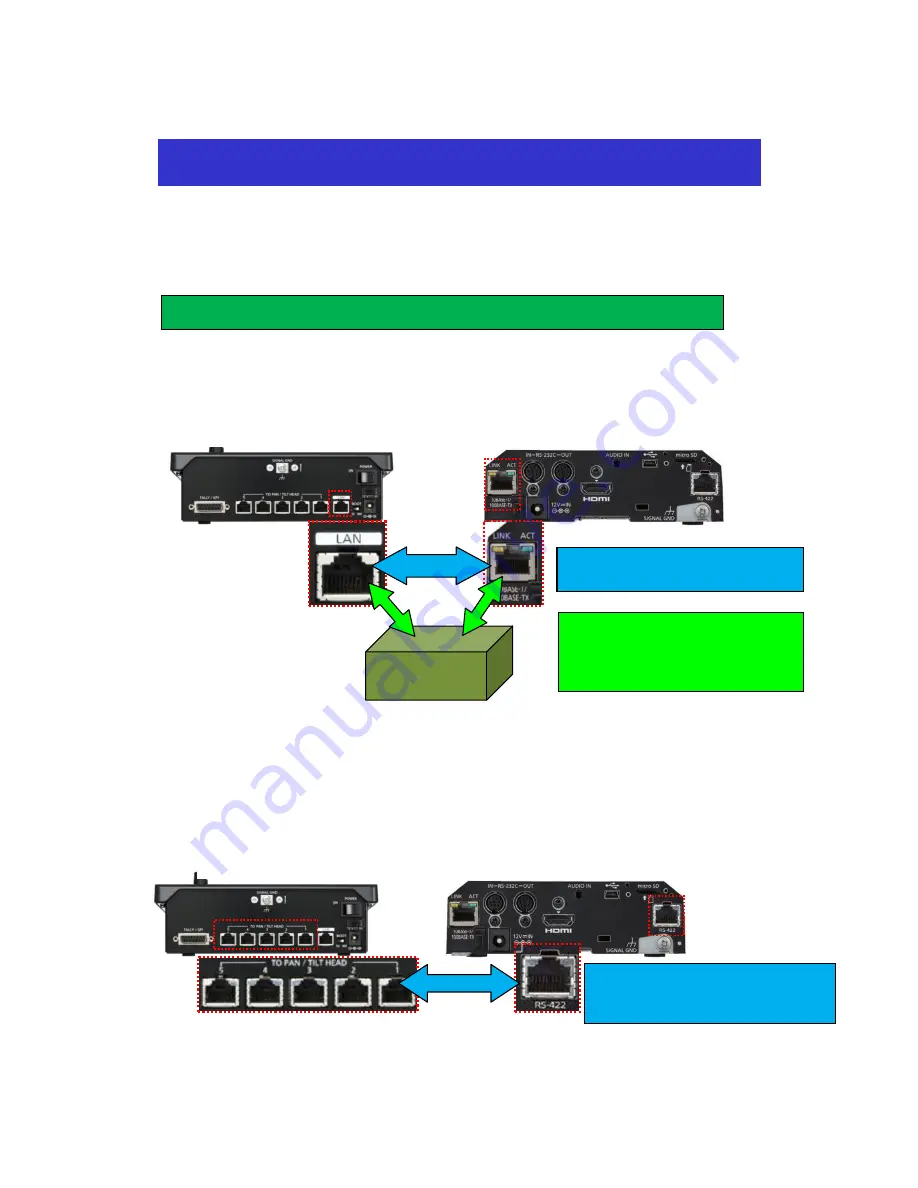
This is  to  explain  the  procedure  for  allowing  AW-HE40  series  cameras  to  be  used  via 

AW-RP50 controller. 

    For detailed explanations, please see each Operating Instructions. 


IP Connection

】 


(Point) 

Through a hub, AW-RP50 controller can control up to 100 remote cameras. 


Connect [LAN] on AW-RP50 rear panel and [LAN ACT/LINK] on AW-HE40 rear panel using a LAN cable. 


Serial Connection

】 


(Point)

 The cable can be extended up to 1,000m. 


AW-RP50 controller can control up to five AW-HE40 cameras via serial connection. 

Connect TO PAN/TILT HEAD [1] 

– [5] on AW-RP50 rear panel and [RS-422] on AW-HE40 rear panel using 

a LAN cable. 


TO  PAN/TILT  HEAD  ports  [1] 

– [5] correspond to AW-RP50 connection settings “CAM1” – “CAM5”, 

respectively. 


If you want to use AW-

RP50 “CAM3” for serial controlling of the camera, please connect a LAN cable 

with TO PAN/TILT HEAD port [3]. 

Remote Camera Installation & Setup Guide 

1

 Connecting the LAN Cable 

(AW-RP50 Rear Panel) 

(AW-HE40 Rear Panel) 

HUB 

(LAN Cable) 

Category 5 or higher, Up to 100m 

(LAN Cable) 

Category 5 or higher, Up to 100m 

<


For PoE+ Hub > 

Category 5e or higher, Up to 100m 

(AW-RP50 Rear Panel) 

(AW-HE40 Rear Panel) 

(LAN Cable) 

Category 5 or higher, Up to 1,000m 

Straight cable 

Direct Connection 

(Through a hub) 

Содержание aw-he40 series

Страница 1: ...ion Connect TO PAN TILT HEAD 1 5 on AW RP50 rear panel and RS 422 on AW HE40 rear panel using a LAN cable TO PAN TILT HEAD ports 1 5 correspond to AW RP50 connection settings CAM1 CAM5 respectively If...

Страница 2: ...determine the setting Fig 1 D Serial Connection Turn F2 dial to select Serial then press F2 dial to determine the setting Fig 1 D If the setting is executed correctly the LED marked with will light u...

Страница 3: ...C to select 5 AUTO SET IP Press F1 dial to make RENEW IP ADR appear on the lower half of the LCD screen If it does not appear turn F2 dial Fig 3 D to make RENEW IP ADR appear While RENEW IP ADR is dis...

Страница 4: ...nge If in POWER ON mode turned on it lights up in green For details please see the illustrated manual Controlling Multiple AW HE40 Cameras via AW RP50 Controller 1 CAMERA CTL MENU ON Select 10 5 AUTO...

Страница 5: ...dial The camera will switch over to POWER ON mode turned on If the setting is changed to POWER OFF while being in the turned on state the camera will switch over to Standby mode For details please see...

Страница 6: ...be opened on the SDI or HDMI output image Use F1 dial Fig 5 C to change the camera menu setting below Procedure System Others Others 1 4 Install Position Select Hanging For details please see the illu...

Страница 7: ...e see 3 Turning AW HE40 Camera ON of this Guide Turn the power on again Setting up is now completed If you fail to bring the camera into Standby mode and disconnect the power supply at the AC power fe...

Страница 8: ...again the preset is overwritten Press STORE button Fig 7 B STORE button will go off Recalling a Preset Memory Press one of CAMERA STATUS SELECTION buttons 1 5 to select a remote camera to be operated...

Страница 9: ...F1 dial to change the following camera menu setting Fig 8 C Location Camera Scene Put the setting to any of Manual1 3 Press the IRIS AUTO button 3 on the front panel to switch between Auto and Manual...

Страница 10: ...is Manual Focus ADJ With PTZ 5 setting can be changed 5 Focus ADJ With PTZ is a function to automatically readjust the focus while panning tilting or zooming If you need full manual control of focus p...

Страница 11: ...m are available at FAQ as illustrated manuals Please use them when you install your system https eww pass panasonic co jp pro av support content faq EN faq_remote_cam htm Introduction to Our Remote Ca...

Отзывы: