background image

40

Basic menu operations

Menus are displayed on the monitor when the unit’s settings are to be selected.
The monitor is connected to the video signal output connector (VIDEO OUT connector or HD/SD ANALOG connector).
The basic menu operations involve displaying sub-menus from the main menu items, and selecting settings on the sub-menus. 
Some sub-menus have menu items for performing more detailed settings.

The menu operations are conducted using the accessory wireless remote control.
If a controller is connected, they can also be conducted using the controller.

   It may be necessary to upgrade the controller’s version in order to support the AW-HE100. 

For further details, consult with your dealer.

Described below are the basic operations for changing the menu item settings using the accessory wireless remote control and 
controller (AW-RP655, AW-RP555 or AW-RP400/AW-CB400).

Only the steps taken using the accessory wireless remote control will be described here for the operations conducted to 
select and set the items.
For details of the operations conducted using the controller, substitute “controller” for “wireless remote control” when reading 
the basic operations.
Also, refer to the Operating Instructions of the controller.
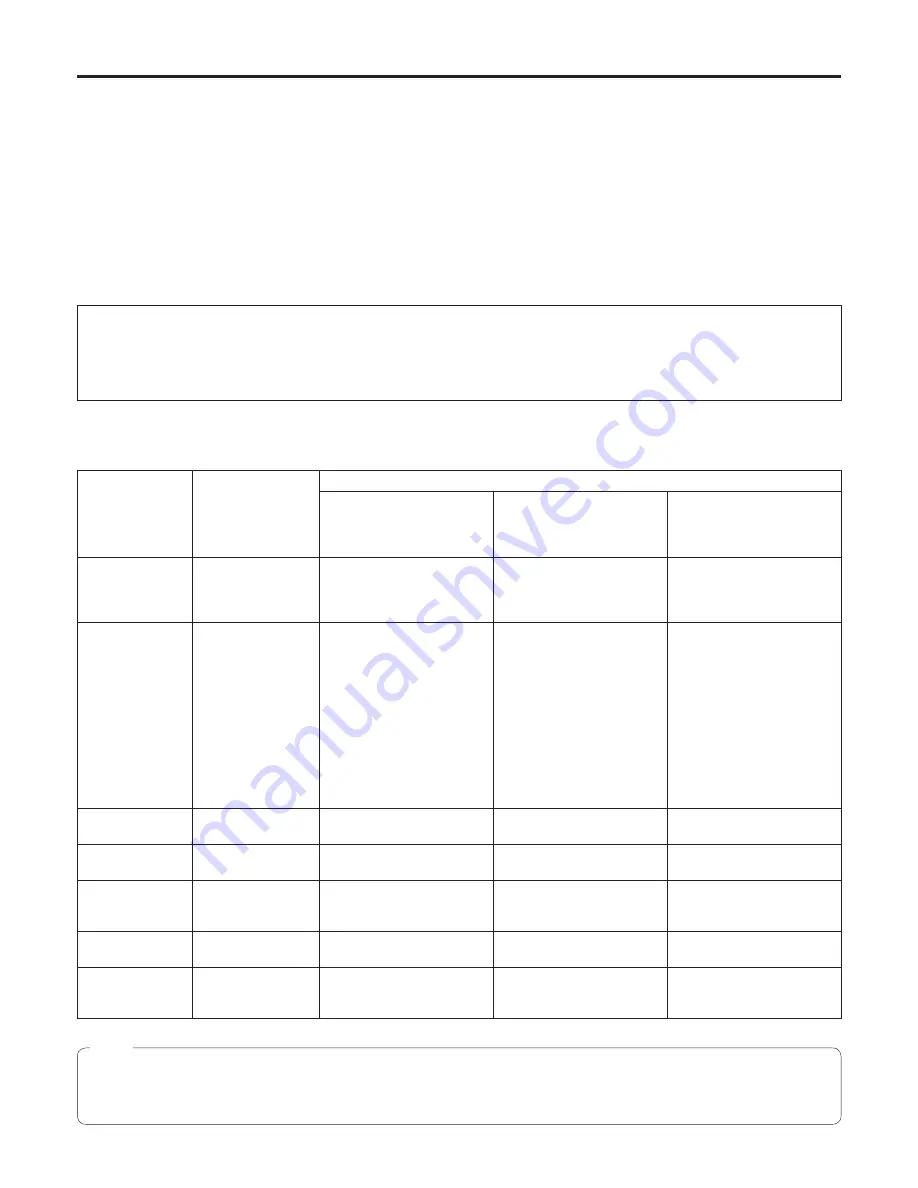
Table of operations

Menu operation

Remote control

Controller

AW-RP655

AW-RP555

AW-RP400/AW-CB400

(The following operations 

are performed using the 

AW-CB400.)

Selecting the 
camera to be 
operated

Press the [CAM1], 
[CAM], [CAM3] or 
[CAM4] button.

Press one of the [1] to [5] 
buttons of [CONTROL/
PREVIEW MONITOR OUT 
SEL].

Press one of the [1] to [5] 
buttons of [CONTROL].

Press one of the [1] to [5] 
buttons of [CONTROL 
SELECT].

Displaying the 
main menu

Press the [MENU] 
button for two 
seconds.

1.  Press the [MENU] button.
   The display on the 

AW-RP655’s LCD panel 
changes to the menu mode.

.  Turn the jog dial (main), and 

display “CAMERA SETTING” 
on the LCD panel.

3.  Press the [OK] button, and 

display “OPEN CAMERA 
MENU? 

 OK Key” on the 

LCD panel.

4. Press the [OK] button again.

Press the [MENU] button for 
two seconds.

Press the [A] button of 
[OPTION SW] for two seconds.

Selecting the 
items

Press the [

] or [

button.

Turn the jog dial (L).

Press the [MENU] or [ITEM] 
button.

Press the [A] or [B] button of 
[OPTION SW].

Displaying the 
sub-menus

Press the [

] or [

button.

Press the jog dial (L).

Press the [YES] button.

Press the [C] button of 
[OPTION SW].

Returning to the 
previous menu

Press the [

] or [

button while “Return” 
is blinking.

Press the jog dial (L) while 
“Return” is blinking.

Press the [YES] button while 
“Return” is blinking.

Press the [C] button of 
[OPTION SW] while “Return” 
is blinking.

Changing the 
settings

Press the [

] or [

button.

Turn the jog dial (R).

Press the [YES] or [NO] button.

Press the [C] or [D] button of 
[OPTION SW].

Exiting the menu 
operations

Press the [MENU] 
button for two 
seconds.

Press the [MENU] button or 
[R/B GAIN/PED] button.

Press the [MENU] button for 
two seconds.

Press the [A] button of 
[OPTION SW] for two seconds.

   Perform the menu operations and exit from the menus using the controller which displayed the main menu. 

If a menu operation has been performed or a menu has been exited using another controller, first display the main menu 
and exit from it using one controller, and then display the main menu and exit from it using the other controller.

Note

Содержание AW-HE100

Страница 1: ...Panasonic Broadcast AW HE100 Menu Information ...

Страница 2: ...ons of CONTROL PREVIEW MONITOR OUT SEL Press one of the 1 to 5 buttons of CONTROL Press one of the 1 to 5 buttons of CONTROL SELECT Displaying the main menu Press the MENU button for two seconds 1 Press the MENU button The display on the AW RP655 s LCD panel changes to the menu mode 2 Turn the jog dial main and display CAMERA SETTING on the LCD panel 3 Press the OK button and display OPEN CAMERA M...

Страница 3: ...nu items have a sub menu of their own 5 Press the or button to make the item to be set or the setting blink Each time the or button is pressed the blinking item changes When Return is made to blink and the or button is pressed operation returns to the previous menu While the menus are displayed the and button have the same functions Bear in mind however that if the button is pressed when it is pos...

Страница 4: ...ressing this jog dial when the set value can be changed will change the set value in the positive direction Jog dial R When the LCD is in the gain adjustment mode Adjust the B GAIN setting 30 to 30 When the LCD is in the pedestal adjustment mode This operation is not available When the camera menu mode is established Change set value Changing the set values in the camera menu Turn clockwise Set va...

Страница 5: ...et or the setting blink Each time the jog dial L is turned the blinking item changes When the Return is made to blink and the jog dial L is pressed operation returns to the previous menu 9 Turn the jog dial R to change the setting 10After the setting has been completed press the MENU button or R B GAIN PED button The menu display is exited Press other buttons when in the camera menu mode to exit t...

Страница 6: ... the mode switches between Auto Focus and Manual Focus The EXT AF button lights when the camera is in the Auto Focus mode These buttons cannot be used for controlling the AW HE100 1 Press one of the 1 to 5 buttons of CONTROL to select the unit which is to be operated 2 Press the MENU button for two seconds The main menu is displayed on the monitor 3 Press the MENU or ITEM button to make the item t...

Страница 7: ...operation returns to the previous menu 6 Press the YES or NO button to change the setting Press the YES button to change the set value in the positive direction and press the NO button to change the set value in the negative direction 7 After the setting has been completed press the MENU button for two seconds The menu display is exited It may be necessary to upgrade the software version in order ...

Страница 8: ...TRACING MEMORY function is not available The R B PED dial is not available The camera menu operation becomes available when the CAMERA MENU CNT item is set to ENABLE in the LCD menu of the AW CB400 OPTION SW A Opens the menu and also scrolls up the item list B Scrolls down the item list C Confirms the item selection and also changes a set value in the positive direction D Changes a set value in th...

Страница 9: ...nd the C button is pressed operation returns to the previous menu 6 Press the C or D button of OPTION SW to change the setting Press the C button of the OPTION SW to change the set value in the positive direction and press the D button of the OPTION SW to change the set value in the negative direction 7 After the setting has been completed press the A button of OPTION SW for two seconds The menu d...

Страница 10: ...e level of vibration accompanying the acceleration or deceleration initiated by the stop operation is less at the Soft setting than at the Just exact setting 5 Desktop stand alone installation Hanging suspended installation selection Install Position Desktop Hanging Factory setting Desktop Using this item select stand alone Desktop or suspension from an overhead surface Hanging as the manner in wh...

Страница 11: ...operations 4 After changing this item turn off the unit s power and turn it back on 9Initialization Initialize Using this item the settings of all the items on the Pan Tilt Head Setting menu are returned to the factory settings Refer to the section on the right Return to the previous menu main menu Return Concerning initialization When Initialize is selected the initialization confirmation screen ...

Страница 12: ...r Set Initialize Return 6 7 8 Daylight mode setting menu Daylight Mode Set Brightness Set Color Set G L Setup Set Other Set Initialize Return 6 7 8 User mode setting menu User Mode Set Brightness Set Color Set G L Setup Set Sharpness DTL Set Other Set Initialize Return 6 7 8 9 6 Brightness setting menu display Brightness Set The brightness setting menu of this shooting mode is displayed here 7Colo...

Страница 13: ...en in the halogen light mode When O K is selected while the initialization confirmation screen is displayed the screen shown below appears and initialization is performed Press the or button to make O K blink and press the or button When initialization is completed the display returns to the setting menu for the shooting mode concerned Halogen Mode initialize Example Halogen mode When O K is not s...

Страница 14: ...um gain selection AGC Max Gain 6dB 12dB 18dB Factory setting 18dB Using this item the maximum gain when Auto has been selected as the gain adjustment Gain setting is set 5 Return to the previous menu menu for selecting the shooting mode Return User mode brightness setting menu Brightness Set Picture Level 1 Shutter Mode Synchro Step Synchro 60 04Hz Gain Auto AGC Max Gain 18dB Return 1 6 7 3 4 5 Us...

Страница 15: ...ious status is erased from the memory If AWC auto white balance adjustment or a manual white balance adjustment is performed in the status selected by AWC A or AWC B the resulting status will be stored in the memory 3200K The white balance that was adjusted under 3200K lighting conditions equivalent to a halogen light is established 5600K The white balance that was adjusted under 5600K lighting co...

Страница 16: ...ting mode Return Sharpness setting menu user mode only The sharpness setting menu is provided in the user mode only Sharpness DTL Set Detail On Total Detail Level 2 V Detail Level 4 Noise Suppress 0 Return 1 2 3 4 5 1Detail ON OFF selection Detail On Off Using this item ON or OFF is selected for detail compensation When On is selected the amount of the detail compensation can be adjusted using the...

Страница 17: ...ormat Format setting either 16 9 squeeze or 4 3 sides cut off is selected as the aspect ratio When 1080i or 720p has been selected as the video format Format setting appears and the aspect ratio cannot be selected At this time the aspect ratio of the composite signals is fixed at 16 9 squeeze 5 AWC ABC operation status display ON OFF selection Status Off On Factory setting Off Using this item the ...

Страница 18: ...en shown below on which to confirm the setting changes appears when an operation involving a transfer to another item has been performed when the or button is pressed Other Set Focus Auto Iris Auto Format 1080i Change Setting O K CANCEL Return Example Halogen mode When O K is selected the video format is changed and the other setting menu Other Set is restored Press the or button select O K and pr...

Страница 19: ...rmat 1080i Aspect 16 9 Status Off Component Y Pb Pr Focus ADJ With Zoom On Return Initialize Return Menu Item Factory setting Camera Setting Daylight Brightness Set Picture Level 0 Step Off Gain Auto AGC Max Gain 18dB Return Color Set Chroma Level 0 White Bal ATW Return G L Setup Set H Phase 0 SC Coarse 90deg SC Fine 0 Setup Level On Return Other Set Focus Auto Iris Auto Format 1080i Aspect 16 9 S...

Отзывы: