Install the ION 1200
into the anchor until the bottom of the screw head protrudes 1/4” (.6cm) from the wall.
Repeat this step for the other three screw locations unless either is located over wood, in
which case, use a .75” wood screw instead of a drywall anchor and screw.
• Plywood wall—Use the screwdriver to insert a .75” wood screw into the center of each
template mark that is located over wood until the bottom of the screw heads protrude
1/4” (.6cm) from the wall.
STEP 3 |
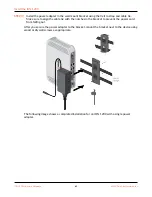
Align the four holes on the bottom of the device with the four screws on the wall and hang
the device on the screws. Make sure the device is securely connected to each of the four
screws before you let go.
ION 1200 Hardware Reference
60
©
2022 Palo Alto Networks, Inc.
Содержание ION 1200 Series
Страница 1: ...ION 1200 Hardware Reference docs paloaltonetworks com ...
Страница 5: ...Before You Begin Tamper Proof Statement Third Party Component Support Product Safety Warnings 5 ...
Страница 12: ...Before You Begin ION 1200 Hardware Reference 12 2022 Palo Alto Networks Inc ...
Страница 56: ...Install the ION 1200 ION 1200 Hardware Reference 56 2022 Palo Alto Networks Inc ...
Страница 62: ...Install the ION 1200 ION 1200 Hardware Reference 62 2022 Palo Alto Networks Inc ...
Страница 86: ...Install ION 1200 S ION 1200 Hardware Reference 86 2022 Palo Alto Networks Inc ...

