Page 37
TU2506
ǀ
TU2807V
US
4.5
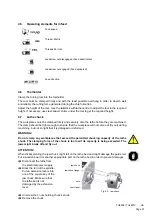
Operating elements for infeed
4.6
Toolholder
Clamp the turning tool into the toolholder.
The tool must be clamped firmly and with the least possible overhang in order to absorb well
and reliably the cutting force generated during the chip formation.
Adjust the height of the tool. Use the tailstock with lathe centre to adjust the tool to the required
height. If necessary, use steel spacer shims under the tool to get the required height.
4.7
Lathe chuck
The workpieces must be clamped firmly and securely onto the lathe before they are machined.
The clamp should be tight enough to ensure that the workpiece will not come out (fly out) during
machining, but not so tight that it is damaged or deformed
WARNING!
Do not clamp any workpieces that exceed the permitted chucking capacity of the lathe
chuck. The clamping force of the chuck is too low if its capacity is being exceeded. The
jaws might break off and fly out.
ATTENTION!
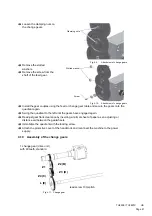
When disassembling the jaw chuck might fall on the lathe bed and might damage the guide rail.
Put a wooden board or another appropriate part on the lathe bed in order to prevent damages.
Disconnect the lathe from
the electrical power supply.
Block the turn of the spindle.
Put an extension levers into
one of the square key of the
jaw chuck. Make sure that
the lathe bed is not
damaged by the extension
lever.
Fig.4-2: jaw chuck
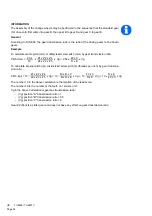
Unscrew the 3 nuts holding chuck’s studs.
Remove the chuck.
Feed speed
Thread - Metric
Threads Per Inch
Leadscrew nut disengaged (Feed deactivated)
Leadscrew nut engaged (Feed activated)
Feed direction
mm
T.P.I.
jaw chuck
jaw chuck flange
nuts
short taper
Содержание TU 2506
Страница 1: ...US Item No 9684509 Operating manual Version 2 2 2 Lathe...
Страница 28: ...Page 28 TU2506 TU2807V US 3 7 2 Chuck flange TU2506 TU2807V Fig 3 1 Chuck flange TU2506 TU2807V Unit mm...
Страница 74: ...Page 74 TU2506 US...
Страница 92: ...Page 92 TU2506 TU2807V US 8 Wiring diagrams 8 1 TU2506 Fig 8 1 Wiring diagram TU2506...
Страница 93: ...Page 93 TU2506 TU2807V US 8 2 TU2807V 230V Fig 8 2 Wiring diagram TU2807V...
Страница 98: ...Page 98 TU2506 TU2807V US...


