www.packardbell.com
45
Adding or replacing memory modules
Tools you need to complete this task:
Screws removed during this task:
•
3 black M2.5×6 (bay cover)
To add or replace memory modules:
1
Complete the steps in
“Preparing the notebook” on page 37
.
2
Complete the steps in
“Removing the bay cover” on page 39
.
3
If you are replacing a memory module, go to
step 4
.
If you installing an additional memory module, go to
step 5
.
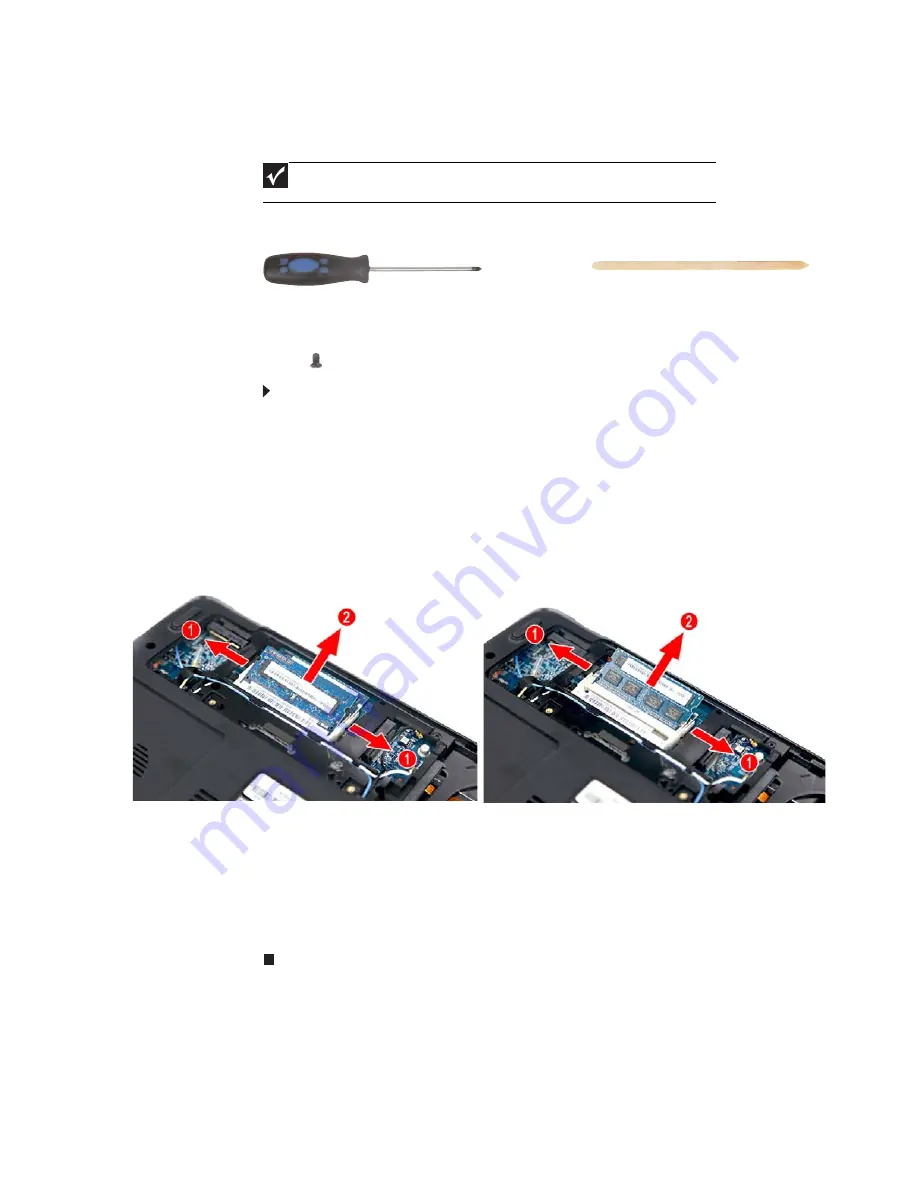
4
Use a non-marring plastic scribe to push out the latches on both sides of
the memory slot until the module tilts upward
(1)
, and then remove the
memory module from its slot
(2)
.
5
Insert the new memory module at a 30° angle into an empty memory slot,
and then press it down until it clicks into place.
The module is keyed so it can only be inserted in one direction. If the module
does not fit, make sure that the notch in the module lines up with the tab in
the memory slot.
6
Reinstall the bay cover.
Important
Use only memory modules designed for this notebook.
Phillips #0 screwdriver
Non-marring plastic scribe
Содержание EasyNote NS11HR
Страница 1: ...EasyNote NS11HR SERVICEGUIDE ...
Страница 6: ...Contents iv ...
Страница 12: ...CHAPTER 1 System specifications 6 System block diagram ...
Страница 38: ...CHAPTER 2 System utilities 32 ...
Страница 102: ...CHAPTER 3 Replacing notebook components 96 ...
Страница 122: ...CHAPTER 4 Troubleshooting 116 ...
Страница 123: ...CHAPTER5 117 Connector locations System board layout ...
Страница 127: ...CHAPTER6 121 FRU Field Replaceable Unit list Introduction Exploded diagram FRU list ...
Страница 153: ...APPENDIXA 147 Test compatible components Introduction Microsoft Windows 7 Compatibility Test ...
Страница 157: ...APPENDIXB 151 Online support information ...
Страница 161: ......
Страница 162: ...MAN NV5x SVC GDE R1 04 09 ...


