background image


page. 

17

 / 

42


17 

PRINCIPLES OF WORK


5.5


   MANUAL MODE  


MANUAL

TARGET
SIZE

1200 mm

90

°

90

°

SIZE. mm

1500

Q-TY.
RESET

START

STOP

CUTTING Q-ty.

0


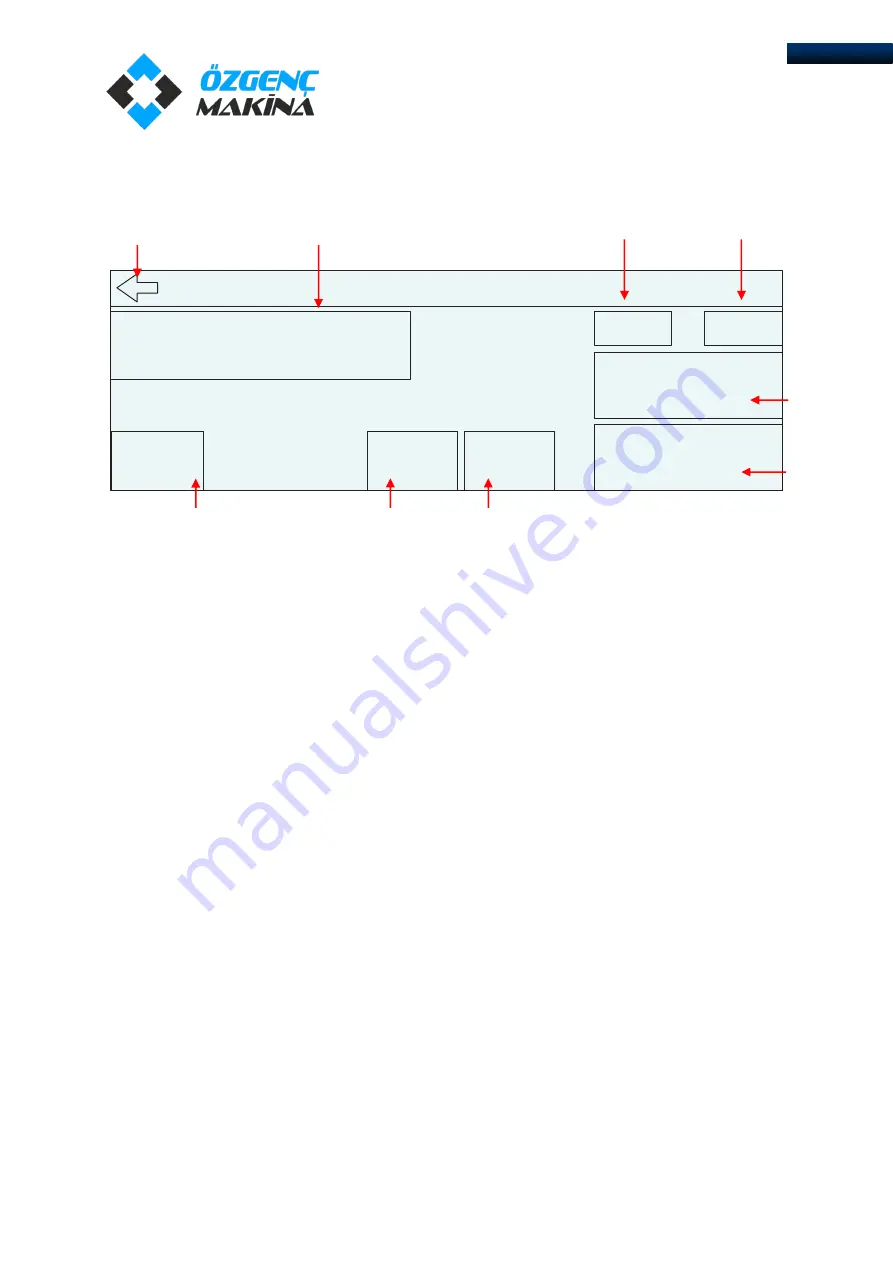
Picture 5.5-1 Manual mode 


1.


Target. Size needed for cutting. 

2.


Size. Actual size on machine. 

3.


Head № 1 degree position. 

4.


Head № 2 degree position. 

5.


Start. Sets Head № 2 on the target size. 

6.


Stop. Cancels Start command. 

7.


“Back” arrow. Goes to main menu. 

8.


Cutting quantity. 

9.


Cutting quantity reset. 

WORKING PRINCIPLE 

► 

The principle of operation in the given mode consists in data entry (size, angle) through the 
display and subsequent cutting. 

1.


Push on Target value to enter the cutting size. Size menu will appear. Enter required size and 

push ENT, if you entered incorrect puch CLR to delete. 

Содержание OMRM-133

Страница 1: ...USER MANUAL AUTOMATIC DOUBLE HEAD CUTTING SAW Model No OMRM 133 ...

Страница 2: ...5 1 MAIN SETTINGS 12 5 1 1 DEGREE CALIBRATION 45 90 12 5 1 2 MEASURE CALIBRATION 12 5 2 MACHINE CONTROL ELEMENTS 13 5 3 PLC 14 5 4 OPERATION OF THE MACHINE 16 5 5 MANUAL MODE 17 5 6 AUTOMATIC MODE 19 5 7 LONG PROFILE CUTTING over 4000 mm 21 5 8 PIECES CUTTING 22 5 9 ETH IP ETHERNET IP Hata Yer işareti tanımlanmamış 5 10 INTERMEDIATE DEGREE SETTING 23 6 MAINTENANCE AND THE LUBRICATION OF THE MACHIN...

Страница 3: ...OR 30 7 5 1 RECOMMENDED FILTER REGULATOR OILS 31 8 TROUBLESHOOTING 32 8 1 ACTIONS TO BE TAKEN DURING FAILURE 32 8 2 FAILURE REASON SOLUTION TABLE 32 9 CIRCUIT DIAGRAMS 34 9 1 PNEUMATIC CIRCUIT DIAGRAM 34 9 2 ELECTRIC CIRCUIT DIAGRAM 36 10 WARRANTY TERMS CONDITIONS 41 ...

Страница 4: ...understand it At correct operation and observance requests of the present instruction the manufacturer guarantees working capacity of the machine during a warranty period MANUFACTURED BY M S K MOTOR KOMPRESOR MAKINA SAN TIC LTD STI Address Nilufer Organize Sanayi Bolgesi 113 Sk No 23 Nilufer Phone No 90 224 411 07 45 pbx Fax 90 224 411 07 49 Web www mskmakina com tr E mail info mskmakina com tr Pr...

Страница 5: ...rpose of acquaintance with the machine Instructions on necessity of familiarity with a management before machine tool operation Instructions on safety conditions which are obligatory for observance by the user for the purpose of the prevention of drawing of a possible damage to the machine Warning of high voltage presence Warning of possible harm to health of the person and of any kinds of time da...

Страница 6: ...to use gloves It is necessary to use only original spare parts Make thrifty use of the control panel do not suppose any mechanical damages Equipment start is carried out by the expert of service department It is forbidden to suppose any other person to start Equipment repair should be carried out only by experts of the service centre and only with use of the original spare details and parts Use th...

Страница 7: ...s between the cylinders intended for fixing of a cross section and moving parts of the equipment Do not open safety covers to a machine blackout Only one operator should work on the machine The machine should pass regular service and adjustment Do not use the machine tool in faulty condition Do not use the machine tool in wet and damp premises It is forbidden to touch a heating plate of the workin...

Страница 8: ...neral view 1 Power switch 2 Electrical panel 3 Left stable head Head 1 4 Left head protective cover 5 Pneumatic clamp for left head 6 Control panel 7 Right mobile head Head 2 8 Right head protective cover 9 Pneumatic clamp for right head 10 Conveyor 11 Exhaust pipe 2 1 4 5 6 7 8 9 11 10 3 ...

Страница 9: ...itive cut program angle cut variable and fixed length fixed angle Extra length cut program over 5 mt Horizontal pneumatic clamping kit Industrial dust exhaust Bearing conveyor for the movable head 3 3 TECHNICAL FEATURES Voltage 380 V Frequency 50 60 Hz Total power 5 kW Air pressure 6 8 Bar Air consumption 30 lt min Minimum cutting length 500 mm Maximum cutting length 5000 mm Minimum cutting width ...

Страница 10: ...chine away from the pallet base using a sling harness wrapped around the cutting head of the saw Ensure that the floor is as level as possible before finally positioning the machine to the desired location It is forbidden to be under the machine during loading and unloading 1 At loading to forklift it is necessary to avoid damage of cables cylinders hoses filter regulator and control panels 2 Mean...

Страница 11: ...s of the machine should be done by the service staff or qualified electrician The used electric switchboard should correspond to norms of safety and electric standards The voltage stabilizer should be connected to a line of a supply of electricity The grounding contour prevents aggrieving to the user by wandering currents for this reason the correct system and reliability of a contour of grounding...

Страница 12: ...achine installation Check the electrical and air connections Switch on the machine Instruct the operator of the machine Give instruction on the safety and maintenance of machine Note If in new connection machine does not work then the cause could be the inconsistency of phases in the electrical network so that motors does not rotate in the opposite direction the machine is protected by a special c...

Страница 13: ...GREE CALIBRATION 45 90 The angle degree is automatically given by the operator via the control panel with time depending on the operation of the equipment may stray from the original settings To set the initial configuration needed to adjust the screws on the inside of the plate head Picture 5 1 1 Degree calibration 5 1 2 MEASURE CALIBRATION The machine has an automatic calibration function so no ...

Страница 14: ... Work 1 2 head 4 Button Start cutting 5 Button Start Head 2 motor 6 Button Stop Head 2 motor 7 Emergency Stop 8 Button Stop Head 1 motor 9 Button Start Head 1 motor 10 Button Start cutting 11 Switch Fixation 12 Fast move buton Use together with buton No 13 or 14 13 Button Backward 14 Button Forward 15 Display 14 3 2 1 6 5 4 9 8 7 13 12 11 10 15 ...

Страница 15: ...signals Input X0 ON when phase A has signal Input X1 ON when phase B has signal Input X2 ON when phase C has signal Input X4 ON when cutting Start button pushed Input X5 OFF when Head 1 motor s Stop button pushed Input X6 ON when Head 1 motor s Start button pushed Input X7 OFF when Head 2 motor s Stop button pushed Input X10 ON when Head 2 motor s Start button pushed Input X11 OFF when Pull out bu...

Страница 16: ... Y7 ON when cuttıng operation on Head 1 occurs Output Y10 ON when cuttıng operation on Head 2 occurs Output Y11 ON when Head 1 motor lamp is ON Output Y12 ON when Head 2 motor lamp is ON Output Y13 ON when Head 2 clamp valve is ON Output Y14 ON when Head 1 adjusted at 45 Output Y15 ON when Head 1 adjusted at 90 Output Y16 ON when Head 2 adjusted at 45 Output Y17 ON when Head 2 adjusted at 90 Befor...

Страница 17: ... screen with a language selection Select language EN English After language has been selected main menu screen appears MAIN MENU AUTO MODE LONG SIZE CUTTING CALIBRATION MANUAL MODE PIECES CUTTING ETH IP Main menu contains 6 sub menu Manual mode Automatic mode Long size cutting mode over 4000 mm Pieces cutting mode ...

Страница 18: ...ee position 5 Start Sets Head 2 on the target size 6 Stop Cancels Start command 7 Back arrow Goes to main menu 8 Cutting quantity 9 Cutting quantity reset WORKING PRINCIPLE The principle of operation in the given mode consists in data entry size angle through the display and subsequent cutting 1 Push on Target value to enter the cutting size Size menu will appear Enter required size and push ENT i...

Страница 19: ...he profile If clamping is incorrect push Pull out 2 5 Start the motors for right 5 and left 9 heads 6 At the same time push and hold cutting Start buttons 4 and 10 Pneumatic covers go down cutting blades go out and profile cutting happens 7 After cutting is finished leave the Start buttons 4 and 10 Cutting blades go back pneumatic covers go up pneumatic cylinders pull out 8 Push Stop buttons to sw...

Страница 20: ...tep 2 End final cutting step 3 Step number 4 Step size 5 Step cutting quantity 6 Head 2 angle position 7 Head 1 angle position 8 Start Programm start button 9 Stop Programm stop button 10 Cutting quantity 11 Length Actual size on machine 12 Back arrow Goes to main menu WORKING PRINCIPLE Working principle of the given mode consists in automatic cutting of set steps 1 Select step number 3 1 2 3 4 5 ...

Страница 21: ...clamping is incorrect push Pull out 2 7 Start the motors for right 5 and left 9 heads 8 At the same time push and hold cutting Start buttons 4 and 10 Pneumatic covers go down cutting blades go out and profile cutting happens 9 After cutting is finished leave the Start buttons 4 and 10 Cutting blades go back pneumatic covers go up pneumatic cylinders pull out 10 Repeat steps from 5 to 9 in accordan...

Страница 22: ...s cutting 1 Enter the size you will finally obtain 1 2 Enter time intervals for saw output 3 4 Time intervals could be changed depends on saw output speed width of cutting material profile 3 Enter angle position for both heads 5 6 Heads automatically set on 45 or 90 4 Push To End Head 2 will go the last point on machine 5 Put profile for cutting on plate of machine 6 Open motors on both heads 5 an...

Страница 23: ... menu WORKING PRINCIPLE The principle of given operation mode consists in automatic cutting of profile on equal parts Basically it is used for aluminium profile corner buffer joinery 1 Enter size of profile before cutting 1 2 Enter reqired pieces size 4 3 Enter time intervals for saw output 5 6 Time intervals could be changed depends on saw output speed width of cutting material profile 4 Enter an...

Страница 24: ...peating till profile obtains minimum cutting size 5 9 INTERMEDIATE DEGREE SETTING 1 Left head fixation handle 2 Мechanic valve for left head 3 Мechanic valve for right head Picture 5 9 1 Intermediate degree setting Intermediate angle degree setting between 45 90 performs in following way 1 Release the air pressure by switching OFF valves on left head front part 2 Slack fastening of the head turn t...

Страница 25: ...ss of the motor cutter ends should be performed by an expert 9 If the clamping cylinders do not press the profile the pressure should be checked from the air lubricator 10 The machine needs at least 6 bar air pressure Pressure should be followed Daily maintenance Clean machine and surround area with compressed area Clean with duster oil shaves dust etc Check bladesaw Must be changed if blunt or sa...

Страница 26: ...ing forward or backward slightly in the arrow direction the light on the sensor turns on when the magnet contacts with the sensor and the sensor is fixed in that position so the problem will be solved Picture 6 2 1 Sensor adjustment 1 Sensor 2 Piston and magnet 6 3 CHANGING THE BLADE 1 All air and electrical connections should be disconnected 2 Protective covers must be removed 3 The nuts on the m...

Страница 27: ... process or an air leakage occurs continuously in the valves you should perform following 1 Look the pneumatic drawing to understand which cylinder works with which valve If you don t have the pneumatic drawing follow the input output pipes of the cylinder to understand 2 Take off the air pipes connected to the A and B cable glands Give air from A and check from B If air comes from B the cylinder ...

Страница 28: ...ng from coils when electric applied to them must be heard If the voice cannot be heard check the electricity feed for coils 7 2 CYLINDER SPEED ADJUSTMENT Picture 7 2 1 Cylinder speed adjustment The part adjustment nut numbered 1 is loosened The adjustment bolt numbered 2 is fastened or loosened Therefore the piston motor movement enabling speed is detected by adjusting the pressure affecting the p...

Страница 29: ...ated on the auxiliary tank Should this occur cavitation or worse an air pocket would result causing erratic control Additional fluid should be put in exclusively through a unidirectional valve by means of an apporpriate syringe such as code number1400 99 01 Excess fluid will be expelled through a vent into an appropriate containet It is necessary to completely disassemble the regulator and be sure...

Страница 30: ...ylinder 6 Hydraulic speed control cylinder Cutting fluids are various fluids that are used in machining to cool and lubricate the cutting tool Before PVC profiles cutting operation started switch OFF the cooling system Open the protective covers of cutting heads and clean the inside area from coolant Тypes of cutting fluids recommended to use Shell Alvania 3 R3 Cyprina 3 RA Mobil Mobilux 2 3 EP2 E...

Страница 31: ...sate unit 4 Nipple for condensate discharging 5 Regulating screw for oil feeding 6 Oil unit Filter cleans the compressed air of impurities rust pipe deposits and condensation SETTING INSTRUCTIONS Pressure Adjustment Regulator head shown with 1 is pulled up If it is turned on in the clockwise direction lubricators outlet air pressure will increase If turned in counter clockwise direction the pressu...

Страница 32: ...ed will decrease if screw is turned in the opposite direction it starts giving oil faster to the system Oil output should be as one drop minute at air feeding 7 5 1 RECOMMENDED FILTER REGULATOR OILS 1 ESSO NUTO H32 2 MOBIL DTE24SHELL TELLUS C10 3 SHELL TELLUS C10 4 FESTO SPECIAL OIL 5 PETROL OFISI SPINDURA 10 6 ARAL VITAM GF32 7 MOBIL DHE LIGHT ...

Страница 33: ...ables on the contactors and if there is looseness in the connector screws 8 2 FAILURE REASON SOLUTION TABLE FAILURE REASON SOLUTION TABLE There is no movement Electrical failure Air connection failure Check the safety power switch Check the fuses Check the input phases Check the air connections Check the air pressure on the conditioner Motors are not turning Electrical failure Check the safety pow...

Страница 34: ...trol device has not reached the position See page 26 VALVE AND CYLINDER CONTROL Check the positioning device indicators Positioning measures do not match Calibration inaccurate See page 12 MEASURE CALIBRATION Position control device is not working Position control device or position control fuse failure Check the fuse first then the device Going forward in vibration or going backward in vibration ...

Страница 35: ...BBIN VALVE SING LE BO BBIN VALVE SING LE BO BBIN VALVE SING LE BO BBIN VALVE PAG E 2 O NE WAY STRE AM C O NTRO L VALVE O NE WAY STRE AM C O NTRO L VALVE O NE WAY STRE AM C O NTRO L VALVE O NE WAY STRE AM C O NTRO L VALVE O NE WAY STRE AM C O NTRO L VALVE O NE WAY STRE AM C O NTRO L VALVE O NE WAY STRE AM C O NTRO L VALVE O NE WAY STRE AM C O NTRO L VALVE O NE WAY STRE AM C O NTRO L VALVE O NE WAY ...

Страница 36: ... PING SYSTEM BY USING 1 5 2 24 DC SING LE BO BBIN VALVE AIR LUBRIC ATO R 8 BAR STRE AM C O NTRO L VALVE WITH BUTTO N STRE AM C O NTRO L VALVE WITH BUTTO N STRE AM C O NTRO L VALVE WITH BUTTO N DO UBLE BO BBIN VALVE DO UBLE BO BBIN VALVE O NE WAY STRE AM C O NTRO L VALVE O NE WAY STRE AM C O NTRO L VALVE O NE WAY STRE AM C O NTRO L VALVE STABLE HE AD ANG LE SE TTING C YLINDE R M O BILE HE AD ANG LE...

Страница 37: ...AGRAMS 9 2 ELECTRIC CIRCUIT DIAGRAM 3x1 6A FUSE 1 x1 6A FUSE STABLE HEAD M O TO R M O VABLE HEAD M O TO R FK1 PHASE C O NTRO L RELAY INV 0 4 kW DRIVER M 3 M O TO R DRIVER 02 02 201 2 AUTO M ATIC DO UBLE HEAD C UTTING M AC HINE ...

Страница 38: ... UTTING M AC HINE 02 02 201 2 C UTTING FO RWARD M 1 STO P M 1 START M 2 STO P M 2 START C LAM P O FF C LAM P O N SELEC TO R FIXATO R EM ERG ENC Y STO P C ALC ULATING C LAM P O FF THERM IC RELAY C LAM P O FF C ALC ULATING C LAM P O N DRIVER FO RWARD DRIVER BAC KWARD DRIVER SPEED ...

Страница 39: ...D DRIVER BAC KWARD DRIVER FASTER M O TO R I M O TO R II C LAM P O N AUTO M ATIC DO UBLE HEAD C UTTING M AC HINE 02 02 201 2 FIXATIO N FIXATIO N LAM P M _I FWD M _II FWD M _I LAM P M _2 LAM P C LAM P O N 2 HEAD 1 _45 HEAD 1 _90 HEAD 2_45 HEAD 2_90 ...

Страница 40: ...page 39 42 39 CIRCUIT DIAGRAMS AUTO M ATIC DO UBLE HEAD C UTTING M AC HINE 02 02 201 2 ...

Страница 41: ...page 40 42 40 CIRCUIT DIAGRAMS AUTO M ATIC DO UBLE HEAD C UTTING M AC HINE 02 02 201 2 DISPLAY ...

Страница 42: ...nction by the people other than service authority or agent service staff 8 Confirmation of mechanical malfunction and damage arising from usage contrary to rules of transportation maintenance and operation or changing the serial number on the machine 9 Malfunctions arising from insufficient lubricating and not using the adequate oil etc are not under warranty 10 Damage caused by fluctuations of el...

Отзывы: