Oxford BenchMate E Скачать руководство пользователя страница 20

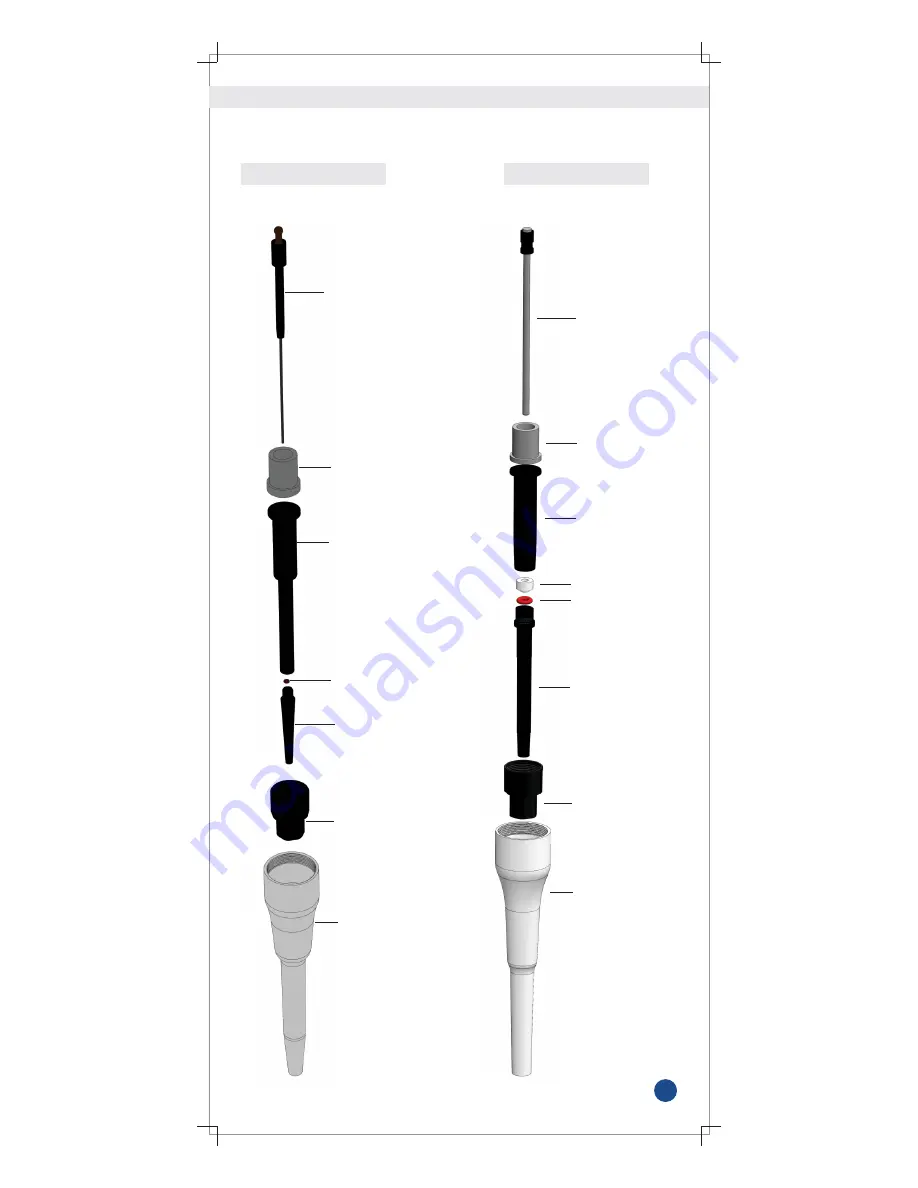
10.1.2 List of Spares: 

Volume 5-100µl

OX AE 50033-3

OX CEP 40111-1

OX SP 00029-3

OX SP 00301-1
OX SP 00161-1

OX SP 00045-3

OX SP 00038-3

OX AE 50017C-1.1

-19-

OX CEP_SP 00041-3

OX AE 50102-1

OX SP 00028-3

OX SP 00158-1

OX SP 00038-3

OX AE 50017B-1.1

OX SP 00048-3

Volume 0.5-10µl

Содержание BenchMate E

Страница 1: ......

Страница 2: ......

Страница 3: ... 6 8 3 1 Point Calibration 12 6 8 4 Restore Factory Calibration 12 6 8 5 Last Calibration Date 12 6 8 6 Due Calibration Date 13 6 8 7 Edit Password 13 6 8 8 Forgot Password 13 7 Warning Safety Precautions 13 8 Battery and Charging 14 8 1 Inserting a battery 14 8 2 Charging through power adopter 14 8 3 Charging through charging pod 14 9 Technical Specification 15 9 1 Single channel pipette specific...

Страница 4: ...udesthefollowing Ÿ Electronic Pipette Ÿ Li ion Battery Ÿ Charger Ÿ User Guide Ÿ Calibration Report Ÿ Toolkit Grease Container Tips Please insert the Li ion battery as shown in 8 1 Please charge the batteryfor3hoursorunlessthebarstopsmovinginthepipettedisplay Pleasefollowcharginginstructionasshownin8 2 Please switch on the instrument by pressing the ON OFF switch Here youcanstartworkinginanymodesof...

Страница 5: ...ey 6 Select Dispensing Speed by using up down arrow key 7 Select one of the 3 options a Save Run b Save Exit c Do Not Save a Save Run This will save the program and it will be ready for pipetting b Save Exit This will save the program and will exit from menu c Do Not Save No program will be saved You can use ESC key as well if you do not want to save this program 6 Modes 6 1 Favorites Steps 1 Micr...

Страница 6: ...outochangetheaspiration anddispensingspeed d Save Exit Comeoutofthemodeaftersavingthe program e Donotsave Itwillnotchangeanything f DeleteProg Thiswilldeletetheexistingprogram 1 SelectFavorites 2 SelectEdit 3 SelectEditSeq 4 Selectprogrampositionwhichyouwanttoswap 5 PressOKbutton 6 Selectthepositionwithwhichyouwanttoswapyour programbyusingup downarrowkey 7 PressOKbutton Youwillbedirectedtothefavor...

Страница 7: ...lectMultiDispensefromtheapplications 2 SelectRepeatDispensefromtheMultiDispensemenu 3 Selectvolume 4 SelectDispensingSteps thepipettewillcalculatethe maximumnumberof stepsonceyouselectthevolume 5 Useup downarrowkeytomodifythedispensingstepsand pressOKbutton 6 Presstriggerkeytoaspiratetheliquid 7 Presstriggerkeytodispensetheliquid Theexcessliquidwillremaininthetip 8 Presstriggerkeytodiscardtheexces...

Страница 8: ...4sequencescanbeselected 4 Select1stvolume byusingup downarrowkey 5 Repeatthisprocessfor2nd 3rdand4thsequenceselected 6 Aspiratethevolumebyusingtriggerkey 7 Dispensethe1stsequenceofvolume 8 Repeattheprocesstillallthevolume 9 Discardtheexcessliquidbyusingtriggerkey Thismodeisusedto dispensetheliquidindifferentsequences Note If you choose nominal volume in the 1st selection then you won tbeallowedtos...

Страница 9: ...ngifrequirebyusingtheESCkey 13 Presstriggertostartthemixingagain PresstheESCkeyto completelystopthemixinginbetweentheprocess Itwilldiscard theexcessliquidremaininginthetip 6 5 2 Diluting Mixing 6 6 Mixing You can mix the liquids using this mode There are three modes under mixing a Mixing b Pipetting Mixing c Diluting Mixing 6 6 1 Mixing Steps 1 SelectMixingfromtheapplications 2 Selectvolumebyusing...

Страница 10: ...ixingCyclebyusingup downarrowkey Max 10 cyclescanbeselected 8 Aspirate1stvolumebypressingtriggerkey 9 AspirateAirbypressingtriggerkey 10 Aspirate2ndvolumebypressingtriggerkey 11 Dispensetotalvolumeinvesselbyusingtriggerkey 12 Mixingwillautomaticallystartonceyoudispensetheliquid intothevessel 13 YoucanstopmixingbyusingtheESCkey 14 Presstriggertostartthemixingagain Pressthe ESCkeytocompletelystopmix...

Страница 11: ...wanttochangesound presstheESCkey 6 7 4 Product ID Steps 1 Selectsettingsfromapplications 2 SelectProductID 3 Select1stcharacterbyusingup downarrowkeyandpressOK button once you select 1st character You can select letters from thealphabetnumbers1 9andfewsymbols 4 AfterpressingtheOKbutton the2ndcharacterwillbehighlighted Followthesameprocessuntilmaximumcharacterlimitisreached 5 Onceyouwillselectthela...

Страница 12: ...youcanchangethisvolumeaccordingto yourrequirementbyusingup downarrowkey 9 EnterDeliveredVolume3 10 Select Yes tosavethechanges ItwillshowCalibration doneonthedisplay Select No toexit 6 8 2 2 Point Calibration Steps 1 SelectCalibrationfromtheapplications 2 SelectEnterPasswordfromthesubmenubydefault press 0000 ifyouhavenotsetyourownpassword 3 Select2PointCal fromthesubmenu 4 SelectExpectedVolume1 By...

Страница 13: ...creenwill appearforfewsecondsandyouwilldirectedtothe calibrationmenu 5 SelectNobypressingup downkeytokeeptheuser settings SpecialNote Wheneverthe user makes any changes in the calibration the Applications will show Calibration User Once you restore the factorycalibration Applicationswillshow CalibrationFact 6 8 4 Restore Factory Calibration This feature will allow you to restore all the factory ge...

Страница 14: ...EnterExistingPassword byusingup downarrowkey The defaultpasswordis 0000 4 EnterNewPasswordbyusingup downarrowkey 5 RepeattheNewPassword 6 Ifeverythingisokthen PasswordChangeSuccessful windowwillappear 6 8 8 Forgot password In case you forget the password please contact your supplier They willbeabletoresetyourpassword 7 Warning Safety Precautions To prevent fire electronic shock or any serious inju...

Страница 15: ... pod as shown in the image B 2 Connect the power plug of the power adaptor with the external power source 3 Place the pipette on the auto charging pod 8 1 Inserting a Battery 1 Pleasefollowtheimagetoopenthebatterycover 2 Insert battery supplied along with the instrument in a way that the metal pins inside the pipette establish proper contact with themetalpointsonthebattery 3 Slidethebatterycoverdo...

Страница 16: ... 0 4 0 2 OBE 5000 250 5000 µl 500 2500 5000 2 4 1 2 0 6 0 6 0 25 0 15 Color Cat No TestVolume µl Inaccuracy Imprecision 0 5 10 µl Volume Range µl 1 5 10 8 4 2 5 2 1 OBE 8 20 OBE 12 20 2 20 µl 2 10 20 7 3 2 3 2 1 6 OBE 8 100 OBE 12 100 5 100 µl 10 50 100 3 1 0 8 2 0 8 0 3 OBE 8 200 OBE 12 200 10 200 µl 20 100 200 5 1 0 7 1 4 0 4 0 25 Color 9 2 Multi Channel 8 12 Pipette Technical Specification OBE ...

Страница 17: ...edure follow below routinemaintenancesteps Pull out the piston and other parts and follow general maintenance Remembertokeepallpartsinorderforreassembly Clean piston piston spring Seal and O ring with a isopropanol and line free tissue Allow them to dry Check the tip cone for foreign particles and remove if any Grease the cleaned parts with the approved lubricant provided with each pipette Volume ...

Страница 18: ...e Tip Cone as per shown direction Pull out the Piston as per shown direction Volume 50 1000µl Step 1 Step 2 Step 3 Unscrew the Tip Ejector as per shown direction Unscrew the Tip Cone Cap as per shown direction Pull out the Piston as per shown direction Volume 5 100µl Volume 10 200µl ...

Страница 19: ...he Tip Ejector Cap as per shown direction then pull out piston as per shown direction Volume 250 5000µl Step 1 Step 2 Step 3 Unscrew the Tip Ejector as per shown direction Unscrew the Tip Cone as per shown direction ...

Страница 20: ...OX AE 50033 3 OX CEP 40111 1 OX SP 00029 3 OX SP 00301 1 OX SP 00161 1 OX SP 00045 3 OX SP 00038 3 OX AE 50017C 1 1 19 OX CEP_SP 00041 3 OX AE 50102 1 OX SP 00028 3 OX SP 00158 1 OX SP 00038 3 OX AE 50017B 1 1 OX SP 00048 3 Volume 0 5 10µl ...

Страница 21: ... SP 00057 3C OX SP 00302 1 OX SP 00159 1 OX SP 00044 3 OX SP 00217 1 20 Volume 50 1000µl Volume 10 200µl OX AE 50017C 1 1 OX AE 50251 1 OX CEP 40111 1 OX SP 00029 3 OX SP 00303 1 OX SP 00164 1 OX SP 00046 3 OX SP 00038 3 OX AE 50102 2 ...

Страница 22: ...Volume 250 5000µl OX AE 50024 1 1 21 OX CEP_CM 20126 1 OX AE 50109 1 OX SP 00164 1 OX RP 30156 1 OX SP 00110 1 OX SP 00050 3 OX AE 50018 1 1 ...

Страница 23: ...ipette maintenance 22 Move upwards tip ejector ring lock black part to remove from bottom assembly At the time of pipette assembly match two legs of tip ejector ring lock in pipette top half assembly Tip ejector ring lock ...

Страница 24: ...H SPM 00119 1 10 200µl 08CH SPM 00118 1 5 100µl 08CH SPM 00117 1 0 5 10µl 08CH SPM 00117 1 2 20µl 08CH SPM 00124 1 15 300µl 12CH SPM 00123 1 10 200µl 12CH SPM 00122 1 5 100µl 12CH SPM 00121 1 0 5 10µl 12CH SPM 00121 1 2 20µl 12CH SPM 00319 1 FOR 15 300µl SPM 00317 1 FOR 10 200µl SPM 00316 1 FOR 5 100µl SPM 00320 1 FOR 0 5 10µl SPM 00320 1 FOR 2 20µl SPM 00160 1 FOR 15 300µl SPM 00150 1 FOR 10 200µ...

Страница 25: ...SPM 00119 1 10 200µl 08CH SPM 00118 1 5 100µl 08CH SPM 00117 1 0 5 10µl 08CH SPM 00117 1 2 20µl 08CH SPM 00124 1 15 300µl 12CH SPM 00123 1 10 200µl 12CH SPM 00122 1 5 100µl 12CH SPM 00121 1 0 5 10µl 12CH SPM 00121 1 2 20µl 12CH SPM 00319 1 FOR 15 300µl SPM 00317 1 FOR 10 200µl SPM 00316 1 FOR 5 100µl SPM 00320 1 FOR 0 5 10µl SPM 00320 1 FOR 2 20µl SPM 00160 1 FOR 15 300µl SPM 00150 1 FOR 10 200µl ...

Страница 26: ...alibration Tip issue Wrong pipetting volume Restore Factory calibration See section 6 8 4 to restore factory calibration Use recommended standard tips password issue Unable to ENTER into Calibration menu Contact authorized distributor Not maintained regularly Leakage Open bottom assembly and perform routine maintenance Excessive usage of pipette Hard plunger movement open bottom assembly and perfo...

Страница 27: ......

Страница 28: ......

Отзывы: