
ThunderBay 4 mini – Thunderbolt 2
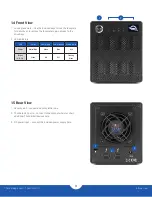
Introduction
4
1.6 Usage Notes
-
If you purchased a ThunderBay set up as or that is being used as a RAID 0, make sure your data
is backed up elsewhere. RAID 0 volumes should not be used for backup, due to a lack of data
redundancy and parity.
-
Thunderbolt device chains can support up to six Thunderbolt devices.
-
Thunderbolt 2 is backwards compatible with Thunderbolt, but any devices connected in a
Thunderbolt chain after a Thunderbolt device will operate at original Thunderbolt speed (10Gb/s)
rather than Thunderbolt 2 speed (20Gb/s). If mixing Thunderbolt 2 and original Thunderbolt
devices, use this device order: Computer > Thunderbolt 2 devices > Thunderbolt devices.
-
To safely remove drives and to ensure that no data is lost, always eject or unmount the drives from
your operating system before unplugging the ThunderBay 4 mini or removing the drives. See the
tips below for unmounting a drive from your specific OS.
macOS
-
Drag the icon for the disk you wish to unmount to the trash can; OR
-
Right-click the disk icon on the desktop, then click “Eject”; OR
-
Highlight the disk on your Desktop and press Command-E.
Windows
1. Go to the System Tray (located in the lower right corner of your screen). Click on the “Eject” icon (a
small green arrow over a hardware image).
2. A message will appear, detailing the devices that the “Eject” icon controls, i.e., “Safely remove...”
Click on this prompt.
3. You will then see a message that says, “Safe to Remove Hardware.” It is now safe to disconnect the
ThunderBay from the computer.
-
The steps above are applicable to Windows 10 build 1803 and earlier. If you are using Windows 10
build 1809 (October 2018) or later, you can eject the drive by clicking the ‘Show hidden items’ menu
in the Taskbar, then clicking ‘Safely Remove Hardware and Eject Media’, and last select the ‘Eject’
option for this volume.


