12
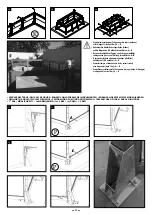
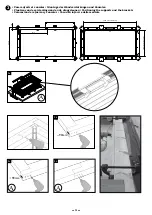
1 Holzrahmen des Pools
2 Grobsplitt rund um den Pool
3 Noppenbahn HDPE
4 Betonplatte unter dem Pool
❶
❹
❷
❸
1 cadre en bois de la piscine
2 gravillons grossiers tout autour de la piscine
3 Nappe d’étanchéité HDPE
4 dalle en béton en-dessous de la piscine
1 Houten zwembadomranding
2 Grof split rondom
3 Isolatiefolie HDPE
4 Betonplaat
1 Marco de madera de la piscina
2 Gravilla gruesa alrededor de la piscina
3 Membrana de motas de HDPE
4 Losa de hormigón debajo de la piscina
1 Bordatura in legno della piscina
2 Pietrisco grossolano attorno alla piscina
3 Membrana bugnata in HDPE
4 Lastra in calcestruzzo sotto la piscina
7504635
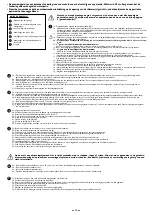
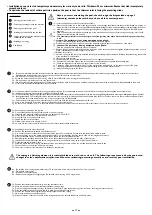
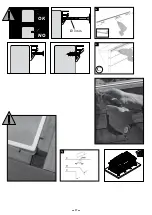
• Poser un film plastique alvéolé isolant (non fourni) sur la paroi
extérieure pour drainer les eaux de pluie.
La hauteur du film doit correspondre au niveau du remblai.
• Le côté à Excroissance est posé sur la structure de la piscine
pour créer un coussin d’air entre le terrain humide et les
parois de la piscine. La structure à excroissance garantit une
bonne répartition de la pression des remblais tout en assurant
une faible charge ponctuelle (résistance à la compression : 250 kN/m²)
• Le remblaiement du pourtour de la piscine doit être effectué
après sa mise en eau. Il doit être exclusivement réalisé avec du
gravier concassé
• Bringen Sie auf der Außenwand eine isolierende Kunststofffolie
(nicht im Lieferumfang enthalten) für die Abweisung von
Regenwasser an. Die Höhe der Folie muss exakt der Höhe der
Aufschüttung entsprechen.
• Die Noppenseite wird an die Pool-Struktur angelegt, um einen
Luftspalt zwischen der nassen Böschung und den Poolwänden
zu schaffen. Die Noppenstruktur sorgt für eine günstige
Verteilung des Böschungsdruckes bei gleichzeitig geringer
Punktbelastung (Druckfestigkeit: 250 kN/m²).
• Füllen Sie das Becken mit Wasser bevor Sie den Bereich, der
das Wasser umgibt, mit Split auffüllen. Füllen Sie dann den
Außenbereich mit Split auf. Achten Sie drauf, dass sich das
Becken nicht verformt.
• Coloque una lámina de plástico aislante alveolada (no viene
incluida) sobre la pared exterior para drenar el agua de lluvia.
La altura de la película debe corresponder al nivel del terraplén
• El lado de las motas se ciñe a la estructura de la madera para
crear una separación de ventilación entre el terraplén mojado
y las paredes de la piscina. La estructura de las motas
garantiza una distribución favorable de la presión del terraplén,
ofreciendo al mismo tiempo una reducida carga puntual
(resistencia a la presión: 250 kN/m²).
• Rellene la zona marginal exterior de la piscina de gravilla
gruesa.Tenga cuidado de no deformar la construcción al
rellenar de gravilla.
• Posare una membrana plastica alveolata isolante (non fornita)
sulla parete esterna per drenare le acque piovane. L’altezza della
membrana deve corrispondere al livello del terrapieno
• Il lato bugnato viene appoggiato alla struttura della piscina,
in modo da creare un’intercapedine tra la superficie in
pendenza bagnata e le pareti della piscina. La struttura bugnata
garantisce una corretta distribuzione della pressione sulla
superficie in pendenza e allo stesso tempo un carico puntuale
ridotto.(Resistenza alla compressione: 250 kN/m²).
• Riempire il perimetro della piscina con ghiaia frantumata.
Attenzione a non deformare la struttura quando si effettua il
riempimento con la ghiaia.
• Breng om de buitenwand een laag isolerende kunststof
noppenfolie aan (niet meegeleverd) om het regenwater af te
voeren. De hoogte van de folie moet overeenkomen met de
diepte van de kuil.
• De noppenzijde wordt tegen de houten structuur aangelegd om
een luchtspleet te creëren tussen de natte afgravingskant en
de zwembadwanden. De noppenstructuur zorgt voor een
gunstige verdeling van de druk op de afgraving en een lagere
puntbelasting (drukvastheid 250 kN/m2.)
• Vul de pool met water voordat u de rand ervan ophoogt met
grindzand. De rand rondom het bad opvullen met grindzand. Pas
er hierbij voor op dat u de constructie aan de rand van de kull
niet vervormt.
• Place an insulating plastic honeycomb liner (not provided) on
the outer sides of the pool to drain off rainwater. The height of
the liner must correspond to the level of the bank of gravel.
• The dimpled side is to be placed against the pool structure,
leaving an air gap between the wet slope and the pool walls. The
dimpled structure provides for a convenient distribution of the
slope pressure, und at the same time for a low point load
(compres¬sive strength: 250 kN/m²)
• Fill the pool with water before backfilling the circumference
with gravel. Fill the circumference of the pool with gravel. Be
careful not to destort the structure when backfilling.
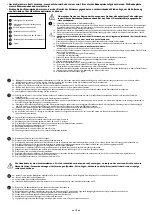
• Principe de la piscine Enterrée ou semi enterrée
Avant de débuter le montage, assurez vous que vous disposez bien de l’ensemble des pièces.
IMPORTANT : Si vous choisissez d’enterrer ou semi enterrer votre piscine, veillez à positionner votre pompe et le groupe de filtration au même niveau que le bas
de la piscine dans un local fermé et étanche. Pour le bon fonctionnement du groupe de filtration, celui-ci doit toujours se trouver au dessous du niveau d’eau.
ATTENTION : pour une piscine enterrée ou semi enterrée vous devez, avant la première mise en eau, vous équiper d’un système de sécurité conforme aux normes exigées
dans votre pays, pour vous prévenir des noyades. Dans le cas d’un enterrement ou semi enterrement de la piscine, la partie de la structure ensevelie doit être protégée au moyen
d’une nappe d’étanchéité tel qu’indiqué ci dessous. Le non-respect de cette directive entraine la perte de garantie 10 ans contre pourrissement et attaque d’insectes.
Lors des travaux d’excavation être sûr de sécuriser les parois latérales.
• Prinzip eines eingebauten oder halb versenkten Schwimmbads
Überprüfen Sie vor Beginn der Montagearbeiten bitte, dass Sie über alle erforderlichen Teile verfügen.
WICHTIG: Wenn Sie sich für einen Einbau oder halb versenkten Aufbau Ihres Schwimmbads entscheiden, achten Sie bitte darauf, die Pumpe und die Filtergruppe auf
der gleichen Höhe wie das Schwimmbad in einem geschlossenen und dichten Raum in der Erde zu verlegen. Für den ordnungsgemäßen Betrieb der Filtergruppe muss
sich diese stets unterhalb des Wasserpegels befinden.
ACHTUNG: Bei einem eingebauten oder halb versenkten Schwimmbad müssen Sie vor der ersten Wasserbefüllung zunächst ein Sicherheits- und Schutzsystem
erwerben und installieren, das den in Ihrem Land geltenden Normen und Vorschriften entspricht, um Unfälle durch Ertrinken optimal vorbeugen zu können.
Bei Baggerarbeiten müssen die Seitenwände abgestützt werden.
• Principe van het halfingebouwde of ingebouwde zwembad
Ga eerst na of u alle onderdelen in uw bezit heeft voordat u met de montage begint.
BELANGRIJK: Als u ervoor kiest het zwembad half in te bouwen, dan dient u de pomp en de filterinstallatie te plaatsen op niveau van de bodem van het zwembad,
in een gesloten en waterdichte ruimte. Om een correcte werking te garanderen dient de filterinstallatie zich altijd onder het waterniveau te bevinden
ATTENTIE: in verband met verdrinkingsgevaar dient u een halfingebouwd zwembad, voordat u het voor de eerste maal met water vult, uit te rusten met
veiligheidssystemen volgens de in uw land geldende normen
Beveilig de zijwanden tijdens de graafwerkzaamheden.
• Key points on the partially sunk swimming pool or on the inground installation
Before you begin to assemble the pool, make sure that you have all the necessary parts.
IMPORTANT: If you choose to sink or partially sink your swimming pool, make sure that you embed the pump and the filtration unit at the same level as the bottom
of the pool in an enclosed, watertight place. To ensure that the filtration unit works efficiently, it must always be positioned below the level of the water.
CAUTION: In the case of a partially sunk swimming pool, before you put any water into the pool, you must have a safety system in place for the prevention of
drowning, which complies with your national safety standards
During the excavation phase make sure that the side walls are secured.
• PEl principio de la piscina semienterrada/instalación enterrada
Antes de iniciar el montaje, compruebe si dispone de todas las piezas.
IMPORTANTE : Si decide enterrar o semienterrar la piscina, coloque la bomba y el equipo de filtración al mismo nivel que la parte baja de la piscina en un local
cerrado e impermeable. Para el buen funcionamiento del equipo de filtración, siempre debe encontrarse por debajo del nivel del agua.
ATENCIÓN : Para piscinas semienterradas, antes del primer llenado, debe disponer de un sistema de seguridad conforme a las normas vigentes en su país, con el fin
de evitar que alguien se pueda ahogar.
Durante los trabajos de excavación deben asegurarse las paredes laterales.
• Piscina seminterrata/interrata
Prima di cominciare il montaggio, assicuratevi di disporre di tutti i pezzi.
IMPORTANTE : Se si decide di interrare o semi interrare la piscina, posizionare la pompa e il gruppo di filtrazione allo stesso livello del fondo della piscina, in un
luogo chiuso e impermeabile. Per garantire il buon funzionamento del gruppo di filtrazione, questo deve trovarsi sempre al di sotto del livello dell’acqua.
ATTENZIONE : per una piscina seminterrata dovete, prima di riempirla d’acqua per la prima volta, equipaggiarvi di un sistema di sicurezza conforme alle norme
richieste nel vostro paese, in modo da prevenire il pericolo di annegamento.
Durante i lavori di scavo, assicurarsi che le pareti laterali siano sicure.
1 Wood frame of the pool
2 Coarse chippings around the pool
3 Dimpled sheet HDPE
4 Concrete plate under pool
Содержание Ubbink Azura 250x450
Страница 23: ...23 OK NO 2 me CAS M GLICHKEIT 2 2e MOGELIJKHEID 2nd CASE 2 CASO 2 CASO 1h 1h 1i 1i 1i P 1j...
Страница 24: ...24 1k lm 1n 1o 150 360 360 360 150 2 cm 1p 1q PF...
Страница 27: ...27 3 mm OK NO 3e C 3f 3g...
Страница 32: ...32 N 7e 7f 7g...
Страница 46: ...46...
Страница 47: ...47...


