11
10
3.0
Quick Start
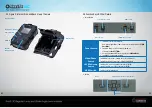
3.1 How to Start the Camera?
Switch ON “
Power Switch
”
Note: Camera comes pre-programmed with factory default settings. So for test purpose, user only needs
to insert a SD card and batteries to start test by powering on.
3.2 How to Set the Functions?
a. Switch ON “
Power Switch
”, Press “
OK
” once to enter Test mode, then press button “
Menu
” once to enter
camera setting menu;
b. Use navigation buttons “
” , “
” , “
” and “
” to obtain favoured settings, press “
OK
” for confirmation and
save the preferred change, press “
Menu
” to exit current page;
c. Exit main menu, then press button “
OK
” for 3 secs to enable camera to work on PIR.
Note: For some settings, user needs to press “Menu” to save and exit the configuration after pressing
“OK” to confirm; (Cam ID, Delay, Time Lapse, Timer, Password)
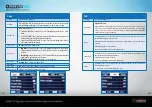
3.3 Camera Default Settings in Red Letters
4.0
Operation List
4.1 How to View Your Images or Video
Switch ON “
Power Switch
”, Press “
OK
” once to enter Test mode, press arrow button “
” to enter Playback; press
“
” and “
” for selection, “
OK
” to play photo/video.
1. Press button “
” again to exit.
2. In Playback Mode, press “
Menu
” button to delete files, or format SD card; press “
Menu
” again to exit.
4.2 Delete
a. Delete one: delete selected photo/video;
b. Delete All.
Press “
OK
” to choose, press“
” and “
”for selection, “
Yes
” to confirm, “
No
” to exit to previous page.
4.3 Format of SD Card
a. No
b. Yes: to format SD card via camera.
Press “
” and “
” for selection, “
Yes
” to confirm, “
No
” to exit to previous page.
4.4 PIR Test
Switch ON “
Power Switch
”, Press “
OK
” once to enter Test mode, press arrow button “
” to enter PIR Test mode;
screen display “
DETECTING
” when camera is in this mode.
Red indicator of camera flashes when PIR sensor detects anything in front of camera; but no photos or videos will be
recorded. Press “
OK
” to exit PIR Test Mode.
Note: Whether the camera detects anything or not, it will enter PIR AUTO MODE 5mins later.
4.5 Auto Power Off
In Test mode, camera will automatically enter PIR Auto mode if no keypad touching within 60 sec. Please manually
turn ON it as if you want to do some further configurations.
Note: camera stays in “Test” mode if camera is in Menu configuration pages.
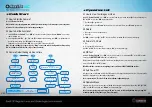
4.6 Operation Menu
Test mode, Press “Menu” once to enter camera setting menu; to navigate setting interface by pressing “
”, “
”, “
”,
or “
”, press “
OK
” for selection, and “
Menu
” to exit to previous page.
Note: For some settings, user needs to press “Menu” to save & exit the configuration after pressing “OK”
to confirm; (Cam ID, Delay, Time Lapse, Timer, Password)
Cam
Cam ID
OFF
/ON
Cam Mode
Photo
/Pic + Video
PIC + Video/ Video ON
Video Size
1080P/
720P
/D1
Video Length
05
~60 Secs
Resolution
5MP
/8MP/12MP
Night Mode
Balanced
/Min. Blur/Max Range
Multi-shot
1P
/2/3/4/5P
Other
Language
English
...
Date/Time
Month : Date : Year : Hour : Min : Sec
Time Stamp
OFF/
ON
Battery Type
Alkaline/NI-MH
Frequency
50Hz
/60Hz
SD Cycle
OFF
/ON
Reset
Yes
/No
Password
OFF
/ON (6 digits)
About
Firware Version
PIR
Sensitivity
High
/Middle/Low
Delay
OFF
/ON
Time Lapse
OFF
/ON
Timer
OFF
/ON


