9
8
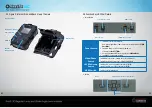
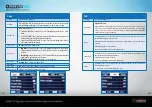
2.3 Figure 3: Internal, Side and Back View of Camera
Power Switch
1. Switch ON to enable camera to work;
Note: indicator light flashes 5 times before camera starts to work on PIR
(PIR
Auto Mode)
2. Switch ON, then press “OK” once to wake up camera
LCD screen to
enter TEST Mode
;
3. Press and hold button “OK” for 3 sec to get back to
PIR Auto Mode
4. Switch
OFF
—Camera stops working.
Video/Photo
Switch
Switch ON to Camera icon—Photo mode, or PIC + Video mode
Switch Down to Video Camera icon—Video Recording mode
IR LEDs Group
Switch
Switch up:
25
—this uses just half of the camera’s IR LEDs
Switch down:
56
—uses all 56 of the camera’s IR LEDs
GPRS Switch
Switch is disabled for this model
b. Buttons
Display LCD 2”
Camera/Video
IR LEDs
Group Switch
Navigation/Modes
ON/OFF
Battery Slot
Camera/Video switch
GPRS switch
Power switch
IR LEDs Group switch
Navigation
Menu
OK/Photo & Video Record/Test mode
2.4 Function Keys & Other Details
a. Switch Buttons


