background image

www.oster.com

www.oster.com

8

9

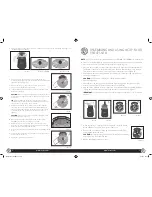
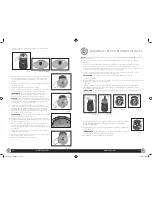
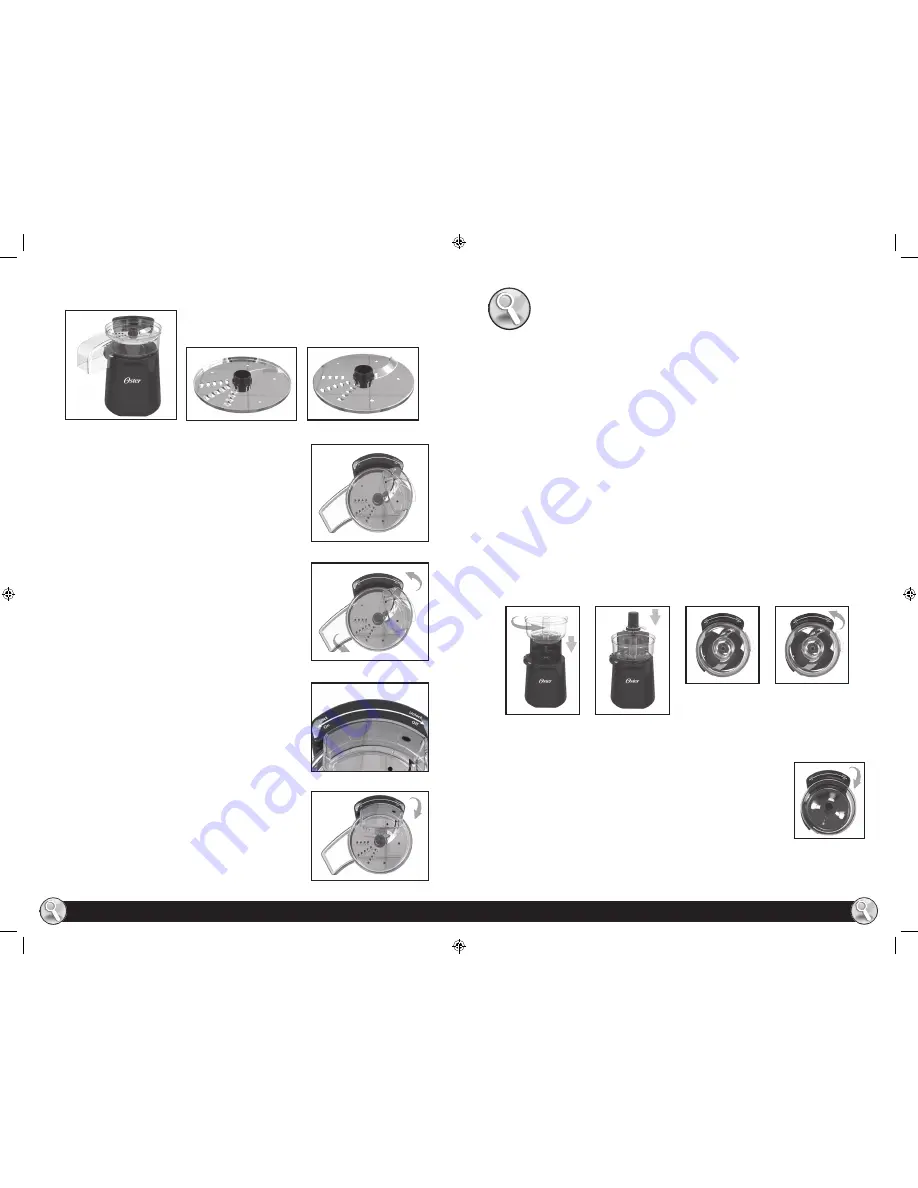
4.  Place slice/shred disc onto the food flow tool stem. Place disc with appropriate side up for slicing or for 

shredding (Figures 4a and 4b). 

5.  Place the cover with food chute on the bowl with the large 

locking tab to the right side of the bowl, near the horizontal slot at 

the back of the unit (Figure 5).

6.  Place a bowl under continuous flow chute to collect food.
7.  Plug unit into a standard electrical outlet
8.  Load the feed chute with the food to be processed and position 

food pusher over food.


CAUTION: 

Never use fingers to push food down the feed chute or 

to direct food through the continuous flow chute. Always use the 

food pusher.


TIP

: Use half of the food pusher to easily control and guide 

vegetable sticks. Insert half of the food pusher in the unit and use 

the extra piece to push down the feed chute.

9.  Holding food pusher with one hand and food chute with the 

other, turn the cover counterclockwise toward ON/LOCK until 

the large locking tab slides into horizontal slot. This engages the 

automatic interlock switch and turns the food processor on  

(Figure 6).


CAUTION:


The unit will not turn on until the locking tab on the 

bowl cover is locked in the slot.

10.  When finished, turn the attachment clockwise toward OFF/

UNLOCK to stop the processor (Figure 7a and 7b).

11.  Wait for the disc to stop spinning before removing the cover. 

Remove cover and carefully remove the slice/shred disc holding it 

by the short stem and pulling off the bowl. 

12.  Remove the food flow tool holding it by the stem and lifting off the 

bowl. 

13.  To remove the slice/shred bowl, simply turn it to the right until it 

unlocks and lift off the base.

14.  Unplug the appliance when not in use.

NOTE: 

Food Processor Bowl only sold with models FPSTFP4050, FPSTFP4100 or sold separately.

Use this bowl with the chopping blade to chop, mince, mix and puree a variety of ingredients.
1.  Place unit on a flat, leveled surface with the Oster® logo facing you.
2.  Place the chopper bowl over the center post of the base. Align the two horizontal tabs at 

the bottom of the bowl with the indentations on the base and insert bowl onto the base. 

Turn chopper bowl counterclockwise until it locks securely into place (Figure 8). 

3.  Carefully hold the blade stem at the top, place blade over center post and gently push all 

the way down (Figure 9). 

 CAUTION: 

blade and processing disc are sharp. Handle carefully.

4.  Add your ingredients.
5.  Place the cover on the chopper bowl with the large locking tab to the right side of the 

bowl, near the horizontal slot at the back of the unit (Figure 10).

6.  Plug unit into a standard electrical outlet. Turn cover counterclockwise toward ON/LOCK to 

engage the automatic interlock switch and turn the food processor on (Figure 11). 


IMPORTANT: 

The unit will not turn on until the locking tab on the bowl cover is locked in 

the slot.

7.  When processing is complete, turn chopper bowl clockwise toward 

OFF/UNLOCK to stop the food processor (Figure 12).

8.  Remove the cover and the chopping blade from the bowl before 

removing the processed food.


CAUTION: 

Be sure chopping blade has completely stopped spinning 

before removing cover from the bowl.

9.  Unplug the appliance when not in use.
 

ASSEMBLING AND USING 4-CUP FOOD 
PROCESSOR

FIGURE 4A

FIGURE 4B - SHREDDING

FIGURE 4B - SLICING

FIGURE 7a

FIGURE 7b

FIGURE 5

FIGURE 10

FIGURE 9

FIGURE 8

FIGURE 11

FIGURE 6

FIGURE 12

FPSTFP4xxx_15ESM1.indd   8-9

12/16/15   09:06

Содержание FPSTFP4050

Страница 1: ...www oster com 2015 Sunbeam Products Inc doing business as Jarden Consumer Solutions All rights reserved Distributed by Sunbeam Products Inc doing business as Jarden Consumer Solutions Boca Raton Flor...

Страница 2: ...wl properly in place 14 Be certain container cover is securely locked in place before operating appliance Make sure motor Disc and or chopping blades have completely stopped before removing cover 15 N...

Страница 3: ...chop and pur e your food with ease and ensure consistent results every time LEARNING ABOUT YOUR OSTER 2IN1 SALAD PREP AND FOOD PROCESSOR A Full to Half food pusher B Cover with food chute C Slice shr...

Страница 4: ...ning section CAUTION blade and processing disc are sharp Handle carefully Select a leveled dry countertop where the appliance is to be used allowing air space on all sides to provide proper ventilatio...

Страница 5: ...it to the right until it unlocks and lift off the base 14 Unplug the appliance when not in use NOTE Food Processor Bowl only sold with models FPSTFP4050 FPSTFP4100 or sold separately Use this bowl wit...

Страница 6: ...or slicing long thin veggies like carrot sticks CHOPPING AND BLENDING For best results process foods that are about the same size Do not overload the bowl Never leave the processor unattended while i...

Страница 7: ...f the parts in boiling water STORAGE CAUTION Blade and processing disc are sharp Handle carefully Store appliance in a clean dry place with the chopper bowl and cover in the unlocked position Problem...

Страница 8: ...l of processor combine cup olive oil 3 tbsp fresh lime juice 3 sprigs of cilantro 2 sprigs parsley 1 medium clove garlic tsp salt and 1 8 tsp coarsely ground pepper Process to blend Coleslaw with Crea...

Страница 9: ...eated 400 F oven for 10 minutes Meanwhile shred cheeses into medium bowl Top partially baked pizza crust with marinara sauce spreading evenly to within inch of edges of crust Top with cheese mixture a...

Страница 10: ...Except to the extent prohibited by applicable law any implied guarantee or condition of merchantability or fitness for a particular purpose is limited in duration to the duration of the above guarante...

Страница 11: ...el recipiente correctamente en su lugar 14 Aseg rese de que la tapa del recipiente est asegurada en su lugar cuando utilice el electrodom stico Aseg rese de que el motor el disco y o las cuchillas hay...

Страница 12: ...ar cortar y rallar sus alimentos con facilidad y asegurar resultados consistentes cada vez CONOZCA SU M QUINA PARA PREPARAR ENSALADAS Y PROCESADOR DE ALIMENTOS 2EN1 DE OSTER A Empujador de alimentos e...

Страница 13: ...velado y seco donde utilizar el electrodom stico dejando suficiente espacio a su alrededor para que el motor tenga la ventilacion adecuada Cuando utilice su procesador de alimentos por primera vez pod...

Страница 14: ...simplemente g relo hacia la derecha hasta que se libere y lcelo fuera de la base 14 Desenchufe la unidad cuando no est en uso NOTA El recipient de 4 tazas est disponible solo con los modelos FPSTFP405...

Страница 15: ...y finitos como los palitos de zanahoria PICAR Y MEZCLAR Para mejores resultados se recomienda procesar alimentos semejantes en tama o No llene demasiado el recipiente Nunca desatienda el procesador m...

Страница 16: ...irviendo ALMACENAMIENTO PRECAUCI N La cuchilla y el disco procesador est n afilados Maneje con cuidado Almacene el aparato en un lugar limpio y seco con el recipiente y la tapa en posici n abierta Pro...

Страница 17: ...das de jugo de lima fresco 3 ramitos de cilantro 2 ramitos de perejil 1 diente de ajo mediano 1 2 cucharadita de sal 1 8 cucharadita de pimienta molida gruesa Procese para mezclar los ingredientes Ens...

Страница 18: ...ecalentado a 400 F por 10 minutos Mientras tanto ralle los quesos en un recipiente mediano Cubra parcialmente la masa de la pizza con la salsa marinara esparciendola uniformemente hasta que quede a un...

Страница 19: ...resulte de la compra uso o mal uso del producto o por la imposibilidad de usar el producto incluyendo los da os incidentales especiales emergentes o similares o la p rdida de ganancias ni de ning n i...

Страница 20: ...www oster com www oster com 38 39 NOTES NOTES FPSTFP4xxx_15ESM1 indd 38 39 12 16 15 09 06...

Отзывы: