background image

20 

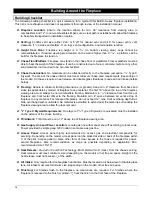
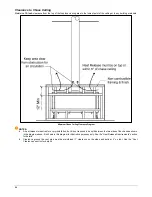
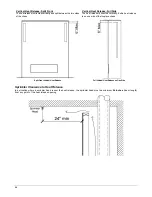
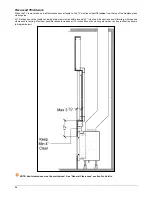
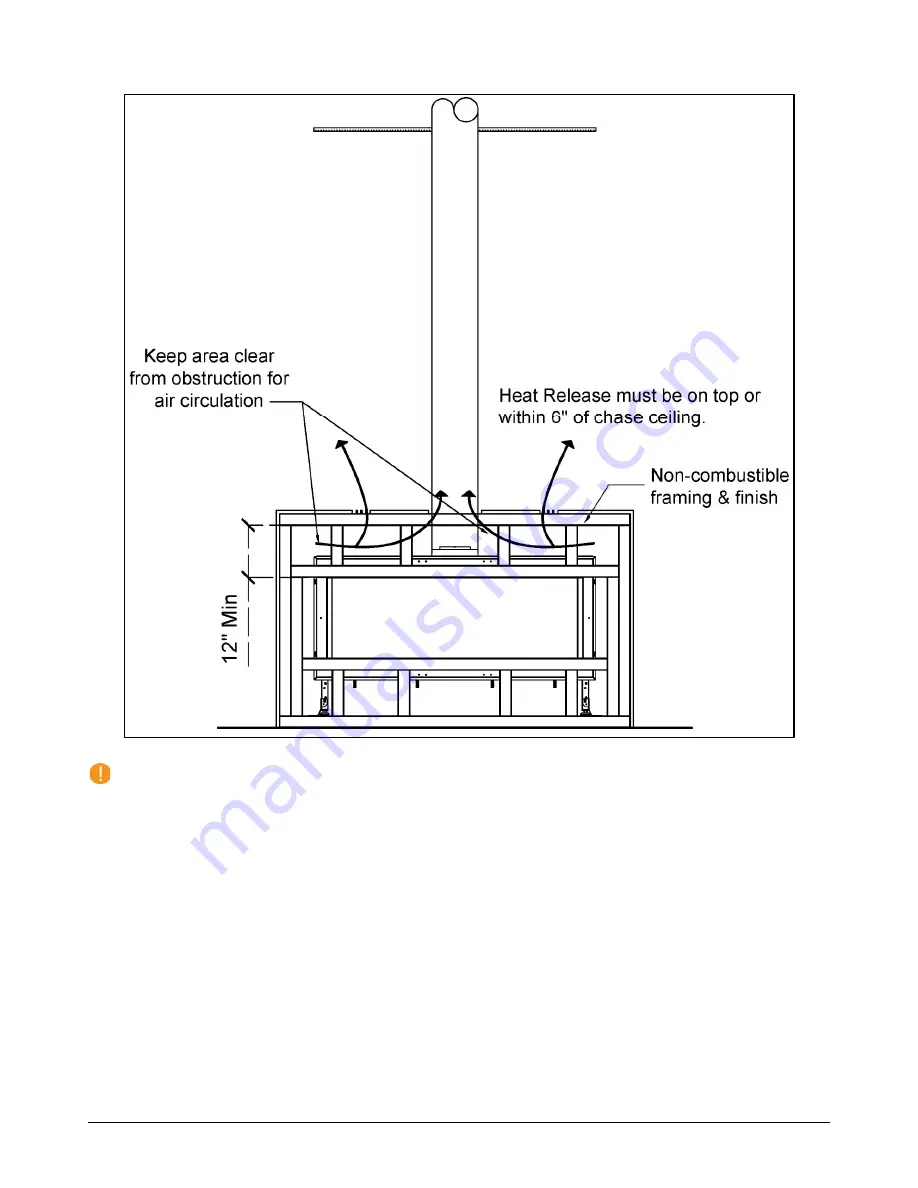
Clearance to Chase Ceiling 

Maintain a 

12-inch

 clearance from the top of the fireplace viewing area to the lowest point of the ceiling or to any building materials. 

Minimum Chase Ceiling Clearance Diagram 

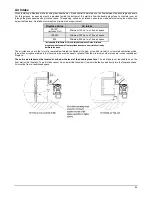
 NOTES: 


A heat release is required for every installation, but it is not required to be split between the two sides of the chase as shown 
in the diagram above. It is shown in this diagram for illustrative purposes only. See the “Heat Release Requirements” section 
for details. 

  Clearance around the vent pipe must be maintained (1” clearance on the sides and bottom, 3” on top). See the “Vent 

Clearances” section for details. 

Содержание Space Creator 120

Страница 1: ...n Manual Built In Models V3 7 Installation and Operation Manual Built In Models Built In Models Front Facing Corner RS LS Tunnel Three Side Space Creator Curve Island Manufacturer Update Serial Number 21818 and Forward ...

Страница 2: ...owing the instructions outlined in this manual is not the responsibility of Ortal WARNING HEAT BARRIER A barrier designed to reduce the risk of burns from hot viewing glass is provided with this fireplace and shall be installed The fireplace MUST not be used without the heat barrier in place If the barrier becomes damaged the barrier shall be replaced with the manufacturer s barrier for this firep...

Страница 3: ...ll Requirements 17 Chase Floor Platform 17 Hearth Extension 17 General Clearances 18 Heat Release 23 Air Intake 25 Mounting a TV Artwork 27 Access Panel 29 Chase Area Minimum 29 Recessed Partial Ledge 30 Structural Weight Support 31 Step by Step Chase Construction 32 Finishing 33 Flush Installation 33 Recessed Installation 34 Venting 35 General Vent Requirements 35 Vent Configurations 36 Vent Rest...

Страница 4: ...DOMESTIC HEATERS GAS Vented Fireplace Certified to US Standard CLASS 2901 04 DOMESTIC HEATERS GAS Vented Fireplace The fireplaces are permitted for indoor use only Indoor is defined as a conditioned space The fireplaces are not approved for outdoor or partial outdoor installation Exception Tunnel models with the Ortal Indoor Outdoor Kit are approved for partial indoor outdoor outdoor installation ...

Страница 5: ... RS LS TS TN Space Creator 120 130 F RS LS TS TN 130H F RS LS TS TN Island 130 100 Single US ANSI Z21 88 2019 Canada CSA 2 33 2019 Natural Gas or Propane Standard Type Passive Vent Vent Size 5 x8 co axial Optional Type Power Vent Vent Size 3 x5 co axial does not apply to Island Optional Island 130 only Type Enervex Power Vent Vent Size 5 x8 co axial 150 170 150 F RS LS TS TN 150H F RS LS TS TN Spa...

Страница 6: ...he fireplace s rating label with the fireplace in an area easily accessible by the owner typically near the access panel if available You must instruct the owner before handing over the fireplace where this label can be found OWNERS Make sure the installer leaves your fireplace s rating label in an area that is easily accessible for you This information is required for servicing and receiving repl...

Страница 7: ...lowing items are properly located and built to specification Framing with 5 8 Type X Drywall Platform Gas and electric Access panel if applicable Heat release Air intake if applicable Clear a path free of any possible obstruction to carry in the fireplace Uncrate the fireplace and set in place Secure the fireplace by attaching the seismic brackets to the framing See Securing the Fireplace section ...

Страница 8: ...lace Install the Interior Design Media if desired on the burner as specified in Interior Design Media section starting on page 58 Confirm the fireplace is operating properly Check remote control setup Remove protective layer from glass Clean glass Reinstall the glass and safety barrier Review operation of the fireplace and remote control with the owner Set up return visit to clean glass after the ...

Страница 9: ...eturn and perform the final inspection which includes Cleaning the glass with a ceramic glass cleaner otherwise the white residue will remain Checking the interior media setup Checking for gas leaks Adjusting the restrictor if necessary Performing an overall check to make sure that all systems and components is working properly When these activities are complete initial startup is concluded and th...

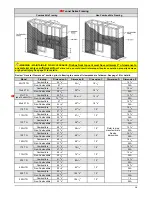
Страница 10: ...ireplace viewing area must always be non combustible framing Maintain min 1 4 clearance from front face of fireplace and front metal off set to the framing Maintain min 4 space between air vents at top of fireplace to any material For recessed fireplaces do not exceed 12 max front overhang depth limit Side overhang depth is unlimited No material is permitted to extend past the metal lip surroundin...

Страница 11: ...nts for a fireplace built flush to the finish wall It is not to drawn to scale and is intended for illustrative purposes only For a complete list of clearance requirements please see General Clearances on page 18 Dimension labels below correspond with the diagrams in the Framing Dimensions section starting on the next page Dimension A Rough Combustible Framing Opening Height Dimension B Rough Fram...

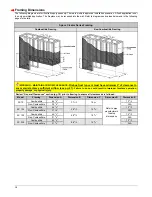
Страница 12: ...rance to any material achieve sufficient airflow see pg 21 Failure to do so could result in improper fireplace operation property damage or physical injury Review General Clearances section pg 18 prior to framing to ensure all clearances are followed Model Framing Dimension A Dimension B Dimension C Dimension D Dimension E SC 75 Combustible 44 1 2 37 3 8 19 3 8 Refer to pipe manufacturer s firesto...

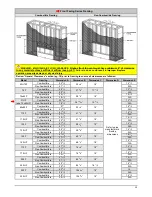
Страница 13: ...ombustible 92 5 16 38 13 16 19 5 8 13 3 4 Non Combustible 78 7 8 N A 60x80 F Combustible 57 29 3 8 18 14 5 8 Non Combustible 42 3 8 N A 110 F Combustible 41 5 8 51 7 8 18 14 1 8 Non Combustible 27 1 2 N A 110H F Combustible 49 1 2 51 7 8 18 14 1 8 Non Combustible 35 3 8 N A 130 F Combustible 41 5 8 58 5 8 18 14 1 8 Non Combustible 27 1 2 N A 130H F Combustible 49 1 2 58 5 8 18 14 1 8 Non Combustib...

Страница 14: ...0 RS LS Combustible 43 5 8 50 3 4 20 5 8 12 1 2 Non Combustible 31 1 8 N A 110H RS LS Combustible 49 1 2 51 22 1 4 12 5 8 Non Combustible 36 7 8 N A 130 RS LS Combustible 43 5 8 57 3 8 20 5 8 12 1 2 Non Combustible 31 1 8 N A 130H RS LS Combustible 49 1 2 57 5 8 22 1 4 12 5 8 Non Combustible 36 7 8 N A 150 RS LS Combustible 43 5 8 67 1 4 20 5 8 12 1 2 Non Combustible 31 1 8 N A 150H RS LS Combusti...

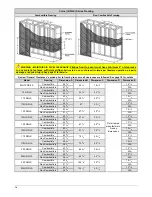
Страница 15: ...16 15 1 2 13 3 4 Non Combustible 74 13 16 N A 60x80 TN Combustible 57 29 3 8 18 7 8 14 5 8 Non Combustible 42 3 8 N A 110 TN Combustible 41 5 8 51 7 8 19 14 1 8 Non Combustible 27 1 2 N A 110H TN Combustible 49 1 2 51 7 8 19 14 1 8 Non Combustible 35 3 8 N A 130 TN Combustible 41 5 8 58 5 8 19 14 1 8 Non Combustible 27 1 2 N A 130H TN Combustible 49 1 2 58 5 8 19 14 1 8 Non Combustible 35 3 8 N A ...

Страница 16: ...le 33 1 2 N A 110 TS Combustible 43 5 8 49 20 5 8 12 1 2 Non Combustible 31 1 8 N A 110H TS Combustible 49 1 2 49 22 1 4 12 5 8 Non Combustible 36 7 8 N A 130 TS Combustible 43 5 8 55 5 8 20 5 8 12 1 2 Non Combustible 31 1 8 N A 130H TS Combustible 49 1 2 55 5 8 22 1 4 12 5 8 Non Combustible 36 7 8 N A 150 TS Combustible 43 5 8 65 1 2 20 5 8 12 1 2 Non Combustible 31 1 8 N A 150H TS Combustible 49...

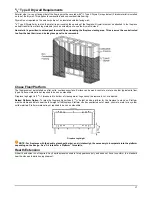
Страница 17: ...on a flat solid continuous surface Surface can be wood concrete metal and other typical solid floor types Surface material is not required to be non combustible Fireplace leg height is 9 13 16 measured to bottom of viewing area Legs cannot be removed cut or adjusted Raised Platform Option To raise the fireplace higher than 9 13 16 height build a platform for the fireplace to stand on Platform must...

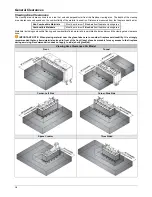
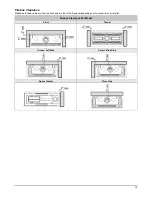
Страница 18: ...ls Must be minimum 36 inches from fireplace viewing area Materials including combustible flooring and combustible finish material are permitted below and around the viewing area clearance zone IMPORTANT NOTE When placing material near the glass take care to consider fireplace serviceability It is strongly recommended that any items materials placed in front of the front long glass be movable for e...

Страница 19: ...arance Maintain a 2 inch clearance from the back and or side of the fireplace depending on the model to any material Firebox Clearance Per Model Front Tunnel Corner Left Side Corner Ride Side Space Creator Three Side ...

Страница 20: ...NOTES A heat release is required for every installation but it is not required to be split between the two sides of the chase as shown in the diagram above It is shown in this diagram for illustrative purposes only See the Heat Release Requirements section for details Clearance around the vent pipe must be maintained 1 clearance on the sides and bottom 3 on top See the Vent Clearances section for ...

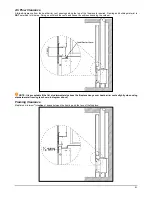
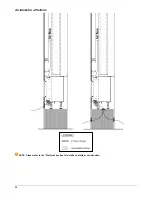
Страница 21: ...d in this area Doing so will block the vents and cause the entire surrounding to overheat NOTE It is acceptable if the flat stud immediately above the fireplace hangs over heat barrier vents slightly when using standard metal framing as shown in diagram above Framing Clearance Maintain a minimum 1 4 inches of space between the framing and the face of the fireplace ...

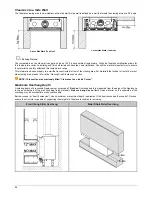
Страница 22: ...cted in front of the viewing area For materials that will be in front of a main or side viewing area please refer to the Viewing Area Clearances section NOTE This section was previously titled Clearance to an Inside Corner Maximum Overhang Depth Overhang depth of a recessed fireplace must not exceed 12 inches Overhang depth is measured from the edge of the fireplace lip to the out most part of the...

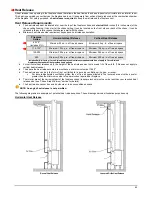
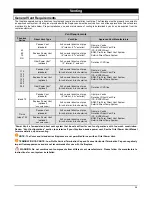
Страница 23: ...r space Minimum 260 sq in of free air space 250 Minimum 250 sq in of free air space Minimum 325 sq in of free air space Includes Built In Custom Curve Island fireplaces Heat release requirements do not apply to Curve Island fireplaces with standard Ortal provided hood options For horizontal heat releases only the height of the heat release must not exceed 1 3 of the width This does not apply to ve...

Страница 24: ... release is oriented vertically Entire heat release is on one side of the fireplace chase Split Front Vertical Heat Release Full Vertical Heat Release on One Side Sprinkler Clearance to Heat Release In a situation where a sprinkler head is near the heat release the sprinkler head must be minimum 24 inches linear length from any point of the heat release opening ...

Страница 25: ...of free air space 250 Minimum 250 sq in of free air space Includes Built In Custom Curve Island fireplaces Curve Island fireplaces with standard Ortal provided base have an air intake already built into the base The air intake can be in the form of a louvered perforated ventilation grille gap or toe kick reveal For louvered ventilation grilles the net free air space allowed in the louvered area mu...

Страница 26: ...26 Air Intake for a Platform NOTE Please refer to the Platform section for details on platform construction ...

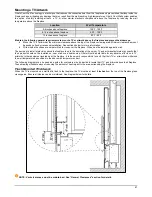
Страница 27: ...ase are not permitted to cross over the fireplace Wires must be installed against a wall The decision to install a television above the fireplace is up to the discretion of the owner TV and art manufacturers may specify that their product should not be installed on near or above a heat source Ortal will not be held liable for any adverse effects on a TV artwork or other equipment located near the ...

Страница 28: ...ng area At 12 inches above the fireplace viewing area maximum possible recess is 3 3 4 inches A deeper recess will interfere with required clearances to venting Maximum possible recess increases at 12 inches above the viewing area when venting is offset as shown in diagram below NOTE Vent clearances must be maintained See General Clearances section for details ...

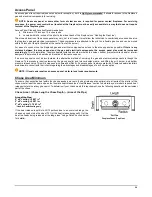
Страница 29: ...d or interior designers to determine the best size and location of their access panel If an access panel cannot be incorporated the alternative method of servicing the gas and electrical components is though the fireplace This procedure requires removing the glass panel s and interior design media and lifting the grill burner and bottom pressure release valve This will increase service time and di...

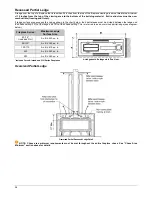
Страница 30: ...between the ledge and the chase ceiling 25 at the ledge and 75 at the chase ceiling This is referred to as an oversized partial ledge see diagram below Fireplace Series Maximum Ledge Surface Area 40 75 includes 31H A x B 220 sq in 90 130 A x B 340 sq in 150 170 A x B 410 sq in 200 A x B 520 sq in 250 A x B 580 sq in Includes Curve Island and 31H Series Fireplaces A ledge depth B ledge width Top Vi...

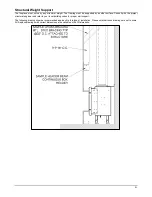
Страница 31: ...rface Consult with the project structural engineer and refer to your local building codes for proper wall support The following drawing shows a recommended approach to this type of installation Please note that these drawings are not to scale All fireplace drawings with correct dimensions are available on the Ortal website ...

Страница 32: ...d access panel location If the fireplace will not have an access panel keep gas valve and receiver unit directly underneath the fireplace Run gas and electric to the gas valve and receiver unit location Step 3 BUILD FRONT WALL Install front chase wall Build front wall according to framing requirements Stand up the front wall and move into place Secure front wall to the rest of the chase structure ...

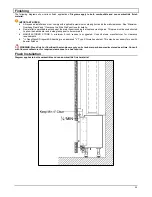
Страница 33: ...e viewing area This area must be unobstructed to allow the heat barrier and inside glass panel to be removable MANUFACTURED STONE A minimum 2 inch recess is suggested Consult stone manufacturer for clearance requirements 5 8 DensGlass Fireguard Sheathing is an approved 5 8 Type X Drywall equivalent This may be necessary for use with heavier finishes WARNING Wood finish or floor hearth extension ma...

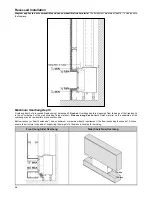
Страница 34: ...red from the edge of the fireplace lip to the out most part of the wall including finish material Side overhang has no limit Finish material on the underside of the overhang may be combustible or non combustible Bottom recess or hearth extension has no minimum or maximum depth requirement If bottom recess depth exceeds 12 inches ensure the structure is capable of supporting the weight of a firepla...

Страница 35: ...rior Ortal Power Vent optional 3x5 co axial direct vent pipe 3 inch interior 5 inch exterior DuraVent CVS line Island 70 Passive Vent standard 4x6 co axial direct vent pipe 4 interior 6 5 8 exterior Olympia Ventis DuraVent Direct Vent Pro ICC EXCELDirect BDM Pro Form Direct Vent System Selkirk Direct Temp System Enervex Power Vent optional see note below 5x8 co axial direct vent pipe 5 inch interi...

Страница 36: ...total vertical rise is 6 feet for 90 250 models This does not apply to 40 75 models Flat 90 Elbows For every flat 90 elbow a 90 elbow that stays in the horizontal plane 6 feet must be reduced from the total allowable horizontal run Up to two flat elbows are allowed Example If max allowable horizontal run is 24 feet and 1 flat elbow is added max run is reduced to 18 feet 3rd 90 Elbow in the Vertica...

Страница 37: ... ft 9 ft N A N A N A N A 6 ft 24 ft 6 ft 24 ft 6 ft 18 ft 6 ft 18 ft 6 ft 3 ft 9 ft 30 ft 9 ft 30 ft 9 ft 30 ft 9 ft 19 ft 9 ft 8 ft 12 ft 30 ft 12 ft 30 ft 12 ft 30 ft 12 ft 19 ft 12 ft 11 ft 15 ft 24 ft 15 ft 30 ft 15 ft 30 ft 15 ft 19 ft 15 ft 12 ft 18 ft 21 ft 18 ft 27 ft 18 ft 30 ft 18 ft 19 ft 18 ft 12 ft 21 ft 18 ft 21 ft 24 ft 21 ft 27 ft 21 ft 19 ft 21 ft 10 ft 24 ft 15 ft 24 ft 21 ft 24 ...

Страница 38: ...38 Examples using a 110 Front ...

Страница 39: ...our vent configuration Legend X Vent configuration is not allowed Power vent required 0 No restrictor required Numbers other than 0 Represents the recommended restrictor by width Restrictor Sizes 20mm 0 79 30mm 1 18 40mm 1 57 50mm 1 97 70mm 2 75 85mm 3 35 Space Creator Restrictor Passive Direct Vent Space Creator Restrictor Power Vent NOTE Space Creator models come with a special restrictor specif...

Страница 40: ... 0 0 0 0 0 X X X X X X X 0 X X X X X X X X X X X X 0 3 6 9 12 15 18 21 24 27 30 33 Horizontal Vent Run Series 150 170 Fireplaces V Minimum 3 Feet 44 2 75 X X X X X X X X X X X 33 2 75 2 75 2 75 1 97 X X X X X X X X 30 2 75 2 75 2 75 1 97 X X X X X X X X Total Vertical Vent Rise 27 2 75 2 75 2 75 1 97 X X X X X X X X 24 2 75 2 75 2 75 1 97 1 57 X X X X X X X 21 2 75 2 75 1 97 1 57 1 57 1 18 1 18 X ...

Страница 41: ...X 3 X X X X X X X X X X X X 0 X X X X X X X X X X X X 0 3 6 9 12 15 18 21 24 27 30 33 Horizontal Vent Run Series 250 Fireplaces V Minimum 6 Feet 44 X X X X X X X X X X X X 36 2 75 X X X X X X X X X X X 33 2 75 1 97 X X X X X X X X X X 30 2 75 1 97 X X X X X X X X X X Total Vertical Vent Rise 27 1 97 1 97 1 97 X X X X X X X X X 24 1 97 1 97 1 97 X X X X X X X X X 21 1 97 1 57 1 57 1 18 X X X X X X ...

Страница 42: ...r Vent Clearances Sides 1 inch Applies to entire circumference when venting is oriented vertically Top 3 inches Applies to venting with any amount of horizontal aspect Bottom 1 inch Applies to venting with any amount of horizontal aspect Exception Wall thimble top clearance to any material is 1 inch ...

Страница 43: ...d soffits 1 There must be 3 feet minimum between termination caps 2 All mechanical air intakes within 10 feet of a termination cap must be a minimum of 3 feet below the termination cap 3 All gravity air intakes within 3 feet of a termination cap must be a minimum of 1 foot below the termination cap Canada 12 inches I US 3 feet Clearance to a mechanical powered air supply inlet NOTE Termination in ...

Страница 44: ...ove height Q US Canada See table below Alcove width dependent on number of caps in the space R US Canada See table below Alcove depth dependent on number of caps in the space Vent Caps QMINIMUM RMAXIMUM 1 vent cap 3 feet 2 x QACTUAL 2 vent caps 6 feet 1 x QACTUAL 3 vent caps 9 feet 2 3 x QACTUAL 4 vent caps 12 feet 1 2 x QACTUAL QMIN vent caps x 3 RMAX 2 vent caps x QACTUAL HORIZONTAL TERMINATION ...

Страница 45: ...es not apply to a chimney shroud application See the Chimney Shroud section on the next page for more information TERMINATION CAP NOTE A Low Profile Vertical Termination Cap can negatively impact flame appearance and is not recommended for use with the fireplace ...

Страница 46: ...ements as detailed in the following sections in conjunction with the vent system manufacturer s installation instructions Venting must be supported by the structural surrounding and not by the fireplace Each offset elbow must be strapped to reduce movement or possible disconnection The first section of venting must be secured to the fireplace starter collar with a minimum of 3 sheet metal screws n...

Страница 47: ...must be properly connected to a venting system in accordance with the Ortal s installation instructions Operation of this appliance when not connected to a properly installed and maintained venting system can result in carbon monoxide CO poisoning and possibly death Co linear flexible aluminum venting must be professionally inspected periodically for corrosion and damage and replaced when necessar...

Страница 48: ...l Rise 40 feet see diagram below Offsets Two 45 offsets may be used directly on the fireplace with up to a 6 foot section between them The minimum vertical rise starts above them see diagram below No other offsets are permitted in the vent configuration Offsets are not required to have ...

Страница 49: ...uble Natural Gas 7 0 11 0 4 7 18 327 33 029 380 Front 380 Back Propane 11 0 13 0 10 7 17 796 28 500 160 Front 160 Back 110 120 130 100 Single Natural Gas 7 0 11 0 5 6 22 798 37 167 1200 Propane 11 0 13 0 10 0 25 113 35 316 380 150 170 135 Single Natural Gas 7 0 11 0 3 5 23 312 43 715 1400 Propane 11 0 13 0 9 5 34 008 49 704 500 200 160 Single Natural Gas 7 0 11 0 4 5 27 467 51 277 1400 Propane 11 ...

Страница 50: ...uted to the most accessible area within the 36 inch radius as shown in diagram below A gas shut off valve and a 12 gas flex connector are provided with every fireplace The location of the gas shut off valve is dependent on local codes and requirements Check with your authority having jurisdiction for more information WARNING The main gas valve must be installed to allow complete disconnection of t...

Страница 51: ...Gas Valve G25 Burner Gas Tube G301 Symax Receiver G19 Pilot Gas Tube G202 XRGB Symax Wi Fi Box G34 Spark Plug Connector G203 W2ME Symax Wi Fi Box Cable G35 Thermocouple Connector G07 Thermocouple Block G36 OLIVE D 4 Pilot gas tube compression ring valve G09 Wire Harness for Receiver and Gas Valve G37 Pilot gas tube fitting burner side G10 Switch w cables 180 500 mm G38 Pilot Assembly Gasket G11 Sp...

Страница 52: ...able G35 Thermocouple Connector G07 Thermocouple Block G36 OLIVE D 4 Pilot gas tube compression ring valve G09 Wire Harness for Receiver and Gas Valve G37 Pilot gas tube fitting burner side G10 Switch w cables 180 500 mm G38 Pilot Assembly Gasket G11 Spark Wire G45 Red Cable G12 Pilot Base G58 Connection fitting 4mm One piece G75 G14 Thermocouple NG Thermocouple LPG G47 Fitting for main line inlet...

Страница 53: ...at control system may not be used with batteries Pairing the Remote and Receiver To set up the remote control device to operate the fireplace follow the following guidelines to pair the remote and receiver unit on the same radio frequency 1 Press and hold the receiver s reset button until you hear two beeps The first beep is short and the second beep is long After the second beep release the reset...

Страница 54: ...54 Wiring Diagrams The following diagrams show the electrical wiring required for different feature combinations Wiring Diagram Screen Fireplace ...

Страница 55: ...55 Wiring Diagram Screen Fireplace with Interior Lighting ...

Страница 56: ...56 Wiring Diagram Double Glass Fireplace ...

Страница 57: ...57 Wiring Diagram Double Glass Fireplace with Interior Lighting ...

Страница 58: ...stems only and will not connect the fireplace to a wireless system Interior Design Media Ortal offers interior media options such as stones glass logs and embers that can provided with the fireplace This section provides guidelines for safe placement of media It is crucial that the placement guidelines outlined below are followed as a large portion of flame quality issues are caused by improper me...

Страница 59: ...al injury Do not use the hood to support media This could cause overheating of the thermocouple Keep the media away from the edges and the glass Do not overfill the media tray Keep 20 of the tray open to allow for air flow Glass Media Placement When placing glass media put only a single layer and do not pack down Once the media is placed go back and move the glass back slightly to open the ports S...

Страница 60: ... from creating soot on the media or to manipulate the look of the flame Block as few ports as possible and no more than 30 of total ports Do NOT block ports that are next to one another When combining both logs and glass it is recommended to place the logs and coins if needed first and then to spread the glass according to the instructions given above COINS ...

Страница 61: ...perate using the AC Adapter and therefore will not operate during a power failure Only the Mertik Maxitrol AC Adapter is permitted for use with the fireplace Use of other adapter brands can render the system inoperable The handsets receivers wall switches are not interchangeable with other electronics Batteries must be kept within their recommended temperature limits 32 F to 131 F 10 Button Remote...

Страница 62: ...to turn the fireplace off NOTE The fireplace may be turned on again after the OFF icon stops flashing Flame Height Adjustment 1 To increase flame height press and hold the button to desired flame height 2 To decrease flame height or to set fireplace to pilot flame only press and hold the button Puck Handset NOTE Any device that functions using the same radio frequency as the handset will be affect...

Страница 63: ...crease Flame Height INCREASE To increase flame height press and hold button DECREASE To decrease flame height press and hold button Holding the button long enough sets the fireplace to pilot flame Standby Mode Designated Flame Settings DESIGNATED LOW FLAME SETTING To go to designated low flame setting double click button NOTE Flame goes to High Flame before going to Low Flame DESIGNATED HIGH FLAME...

Страница 64: ...eight Adjustment INCREASE To increase flame height press and hold up flame button DECREASE To decrease flame height press and hold down flame button Holding the down flame button long enough sets the fireplace to pilot flame Standby Mode Control Option Radio Frequency Power Supply Wall Switch N A N A IMPORTANT For safety communication purposes the 10 button handset must be located within 26 feet o...

Страница 65: ...tup and operating instructions of the MyFire app see the Homeowner s Fireplace Operation Manual or visit the Ortal website or www myfireapp com MyFire Wi Fi Box The MyFire Wi Fi router box provides the Wi Fi connection that allows the MyFire App to operate the fireplace This part is included with the optional Wi Fi kit Wi Fi kit does not automatically come with the fireplace and must be ordered Pa...

Страница 66: ...e The glass must be removed ONLY by an authorized Ortal dealer service technician Only an Ortal certified installer is authorized to remove the glass Glass must be removed using an 8 inch glass handling suction cup Lower the glass to rest in a safe place to prevent damage to the glass edges Cleaning the Fireplace Only an Ortal dealer service technician can open the fireplace to clean interior surf...

Страница 67: ... Ortal 2022 Version 3 7 February 2022 SKU KPMANUALUS3 7 Ortal USA 8421 Canoga Ave Canoga Park CA 91304 T 818 238 7000 F 818 678 0541 info ortalheat com www ortalheat com ...

Отзывы: