English
.........................................................................................................................
.........................................................................................................................
.........................................................................................................................
.........................................................................................................................
English
English
English
8
9
10
11
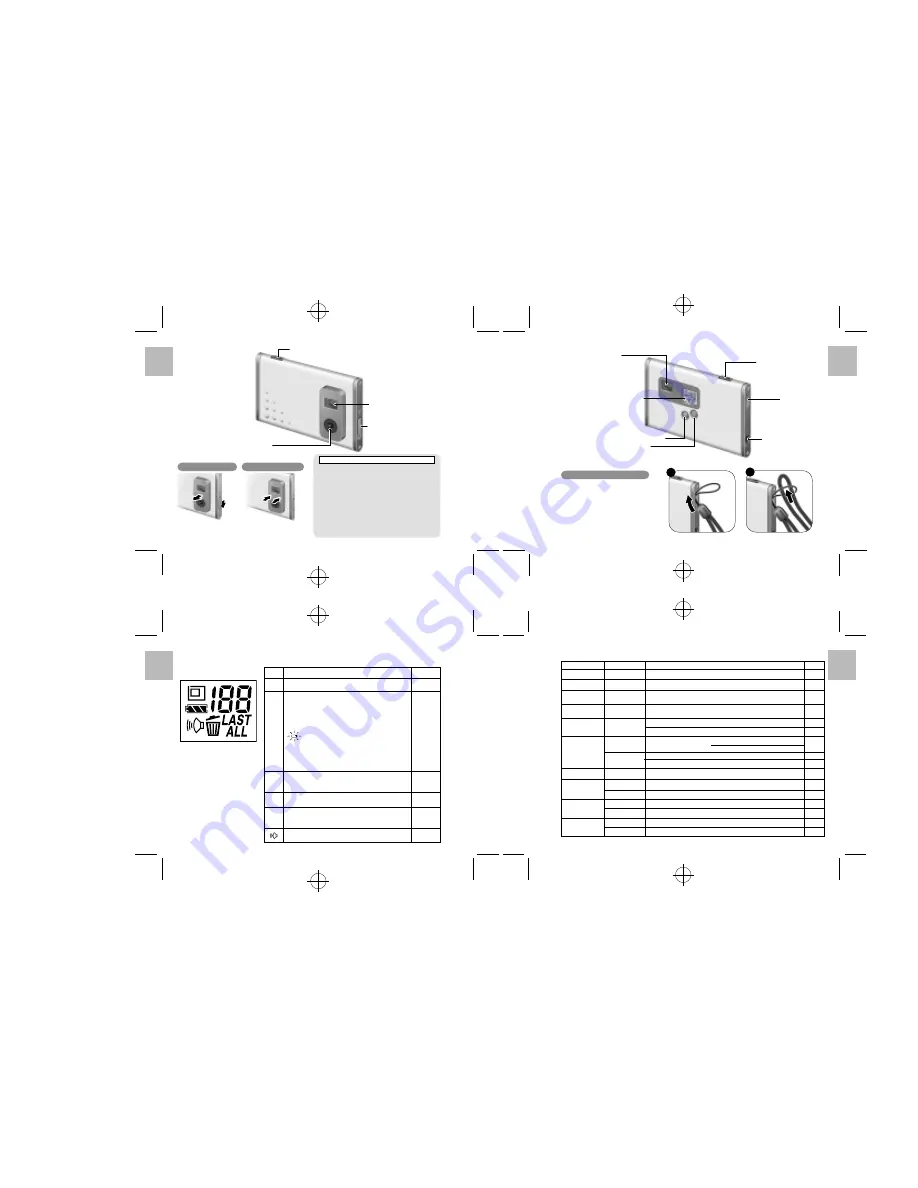
Nomenclature
Auto Power Off Function
The Auto Power Off function automatically switches
the camera off to avoid wasting battery power when
the camera is left unused for 30 seconds while
switched on.
*
The Auto Power Off function does not operate when
a USB connection is being used.
• To take pictures after the camera has automatically
switched off (Auto Power Off), push the lens back
in and then pop it up again.
• If you intend to leave the camera unused for a long
period, push the lens back in and completely switch
the camera off.
Switching On
Press the lens pop-up button.
Switching Off
Push the lens back in.
Attaching the Strap
Attach the enclosed strap. When
using a commercial strap, check the
strength and other properties of strap.
2
Liquid Crystal Display (LCD)
Description
Number of Available Shots (1-101), etc.
Battery Status
z
: The battery has ample charge.
x
: The battery is approximately half charged.
c
: The battery charge is low. Recharge the
battery as it will run out shortly.
(Flashes 5 times and the camera switches off.)
: The battery is exhausted. Recharge the
battery immediately.
*
Avoid switching the camera on and off
repeatedly when the battery is low on charge.
Image Size
B
: 640 x 480 pixels
C
: 320 x 240 pixels
Delete Mode
S
: Deletes the last image shot
D
: Deletes all the images
Beep Tone on
LCD
0
z
A
e
S
D
See page
P.18
P.17
P.19
P.20
P.20
P.20
GUIDE TO CAMERA OPERATIONS
1
Shutter button (P.18)
Viewfinder window
Lens pop-up button
Lens
Viewfinder (P.18)
Liquid crystal display (P.10)
l
Beep tone on and off button (P.20)
A
Image size selection (P.19) /
e
Delete (P.20) button
Shutter button (P.18)
Strap lug
USB socket (P.16)
*
Camera: Use the digital camera “DS6618” only.
Camera and PC: Connect the camera to your PC with the USB cable, and launch “Oregon Scientific Photo Album”.
PURPOSE
Switch on and off
Taking pictures
Connecting the
camera to a PC
Downloading
(Saving) images
Checking camera
images
e
Deleting images
Charging the
camera battery
z
Checking the
battery status
A
Selecting the
image size
l
Setting the
beep tone
INSTRUMENTS
Camera
Camera
Camera and PC
Camera and PC
Camera and PC
Camera
Camera and PC
Camera and PC
Camera
Camera and PC
Camera
Camera and PC
Camera
Camera and PC
HEADING, ETC.
Switching on and off
Taking pictures
Connecting the camera to
a PC
Downloading images
Downloading images
Displaying downloaded images
Deleting images
Deleting all images
Formatting
Charging the battery
Liquid crystal display
Modifying camera settings
Selecting the image size
Modifying camera settings
Setting the beep tone
Modifying camera settings
*
Install the “Oregon Scientific Photo
Album” software beforehand (
/
P.12).
[Camera]
/
[Download images]
[Camera]
/
[Download images]
[View]
/
[List] [Thumbnails] [Slideshow]
To delete the last image you shot:
S
To delete all the images:
D
[Camera]
/
[Configuration]
/
[Delete All Images]
[Camera]
/
[Configuration]
/
[Format]
[Camera]
/
[Configuration]
/
Battery Status
[Camera]
/
[Configuration]
/
Resolution
[Camera]
/
[Configuration]
/
Beep
See page
P.8
P.18
P.16
P.22
P.22
P.24
P.20
P.26
P.26
P.17
P.10
P.26
P.19
P.26
P.20
P.26


