background image

DVR LIST SETUP 


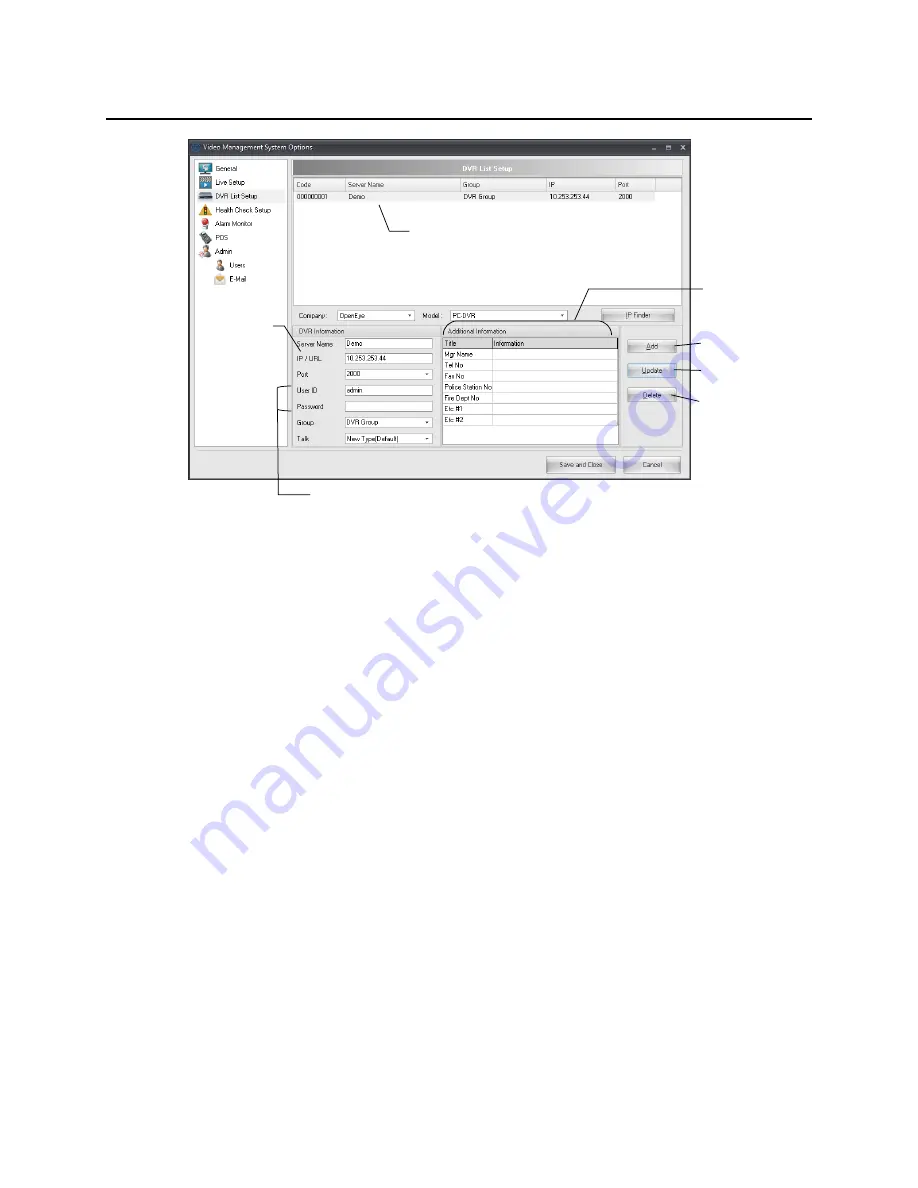
Adding a New Recorder 

1.  Click 

Menu

, and then click 

Settings.


2.  Click 

DVR List Setup

3.  Select the recorder model type from the 

Model

 list. 

4.  Type a name to identify the recorder in the 

Server Name

 field. 

5.  Type the IP Address of the recorder in the 

IP / URL

 field. 

6.  Select the 

Port

 the recorder uses to transfer data.  This port is specified in the Network Setup 

display on the recorder. 

7.  Type the 

User ID

 and 

Password

 of an authorized remote user. This is the same information used 

by the recorder. 

8.  Type the name of a new group in the 

Group

 box – or – click the arrow to select a previously 

created group. 

9.  When you are finished, click 

Add

10.  When you have added all of your recorders, click 

Save and Close


Editing a Recorder 

1.  Click 

Menu

, and then click 

Settings.


2.  Click 

DVR List Setup

3.  Select the recorder to edit from the list of connected recorders. 

4.  Edit the necessary information. 

5.  When you are finished editing information, click 

Update

6.  When you have added all of your recorders, click 

Save and Close


Displays list of added recorders 

Name used to 

identify the 

DVR 

User name/ password of an authorized remote user 

User defined local 
contact numbers 

Update edited settings 

Delete selected site 

Save new settings 


30 


32541AB 

Содержание OE-RWSR2

Страница 1: ...RADIUS Remote Client Workstation User Manual R Series OE RWSR4 OE RWSR2 OE RWST4 OE RWST2 www openeye net...

Страница 2: ...2 32541AB...

Страница 3: ...loss of business information even if OPENEYE has been advised of the possibility of such damages or whether in an action contract or tort including negligence This software and documentation are copy...

Страница 4: ...Setup 14 Mouse Setup 14 Logging in For the First Time 14 Monitor Setup 15 Connecting Multiple Monitors 15 Power Setup 15 TECHNICAL SPECIFICATIONS 16 R Series 16 Maximum Screen REsolutions 16 RADIUS B...

Страница 5: ...tor Setup 34 Set Up Alarm Monitor Options 34 Add Items to Alarm Confirm List 35 Data Setup 36 Admin Setup 37 Data Manager 38 Configuring Import Export 38 Set Schedule to Discard Alarms 39 Creating a S...

Страница 6: ...up Selected Cameras 50 SEARCH 51 Search Overview 51 Performing a Basic Search 51 Bookmarks 52 Search Bookmarks 52 Modify Bookmarks 52 Save to JPG or AVI 53 Printing an Image 53 Preview Search 54 Perfo...

Страница 7: ...CHECK 63 Health Check Overview 63 Health Check Status Icons 63 View Health Information 64 View and Export Recorder Health Reports 64 DATA FEATURES 65 Data Options 65 Add Data Search Keywords 65 Add D...

Страница 8: ...air this system All troubleshooting and repair procedures that may be shown are for reference and minor repair only Because of the complexity of the individual components and subassemblies no one shou...

Страница 9: ...oftware is Network Recorder Management Software a powerful utility that allows 100 or more recorder units to be controlled using one computer This software allows you to view live video search saved v...

Страница 10: ...panel of the system contains the devices that will be commonly used for data removal retrieval and backup 3U Front Panel Tower Front Panel DVD RW Drive Power button DVD RW Drive Power Switch Cooling F...

Страница 11: ...ONNECTORS The rear panel of the computer contains connections for any monitors or network connections you may need Below are diagrams that outline the location and description of each connector 3U Rea...

Страница 12: ...Tower Rear Panel III 12 32541AB...

Страница 13: ...Identify the following components to make sure everything has been properly included with the new recorder If any of the following items are missing contact the dealer to arrange a replacement Mouse K...

Страница 14: ...position the mouse cursor over an item and to single click the right button Double click means to position the mouse cursor over an item and to click the left button twice Select means to position the...

Страница 15: ...ired positions If all of your monitors are not displayed click Detect If you need help determining the number assigned to each monitor click Identify and the number will display on the monitor 4 In th...

Страница 16: ...VD RW Network USB 2 0 3 0 Operating System Microsoft Windows 7 Professional Storage Size 2TB Dimensions R3 3U RT Tower 5 8 H x 17 25 W x 19 5 D 148 mm H x 438 mm W x 495 mm D 13 0 H x 5 5 W x 16 3 D 3...

Страница 17: ...ght click the icon and click Connect 3 Click the plus sign next to the recorder icon to display the connected camera icons 4 Double click a camera you want to view or drag the camera icon onto a box o...

Страница 18: ...window Each recorder can be displayed with the cameras showing or cameras minimized DVR Site to hide the cameras click the minus sign Camera currently displayed Camera not displayed Display tabs DVR...

Страница 19: ...corders and their associated cameras quickly This list is the default display Screen List View the list of custom video screens add new screens and edit existing screens Map List The Map List displays...

Страница 20: ...ackup Opens the Network Backup window Clip Backup Opens the Clip Backup window View Log Files Opens the Log File window Move to Map Shows a list of the maps associated with the server Select a map to...

Страница 21: ...LIVE DISPLAY Camera Display Area Displays up to 64 cameras Move video display by dragging display to a different square Camera Display Area Page Channel 21...

Страница 22: ...e Fit to Window with Full Display the selected camera full screen Press ESC to exit full screen mode Show All Channels Open a new window will all channels displayed Show New Window Open a new window w...

Страница 23: ...rom a single camera at the same time 1 In the Server List click the camera you want to use and drag it into as many windows as you want views 2 Right click the Live screen click Mouse Action and then...

Страница 24: ...s screen Creating Custom Screens Select a screen division option for the custom screen configuration 1 Add cameras to the Live Display 2 Select the desired screen division option 3 Click Screen List i...

Страница 25: ...screen from the User Screen list and then click Add screen Tip You must have created two or more user screens to create a sequence 5 Repeat until you have added all the screens that you wish to includ...

Страница 26: ...he same time Most Microsoft operating systems support multiple monitors but the video card may need to be upgraded to support more than one display Contact a local computer vendor or your systems mana...

Страница 27: ...cify the audible alert to sound when a recorder disconnects from RADIUS Map Alarm Event Specify the colors that display around map alarms on alarm events Auto switching to map event Opens the map asso...

Страница 28: ...ser defined waiting period Video Management System Options DVR Configuration Backup Backup Viewer Show Alarm Monitor Search Edit Map Show Health Check Status Minimization or Maximization Shut down Vid...

Страница 29: ...e cameras which are set to be hidden from a user from the tree list of cameras Hold Screen Ratio Preserves the native aspect ratio of the video Hide all OSD Hide all on screen display text Use Font Se...

Страница 30: ...name of a new group in the Group box or click the arrow to select a previously created group 9 When you are finished click Add 10 When you have added all of your recorders click Save and Close Editin...

Страница 31: ...e list of connected recorders 4 Click the Sensor Relay Name tab 5 Type custom names for the sensors in the Name columns as desired 6 To reset the names to their defaults click Reset By Server s Settin...

Страница 32: ...1 Click Menu and then click Settings 2 Click Health Check Setup 3 Click the Actions tab 4 Select Enable Health Check 5 Define the Check Once Every interval by Day Hour and Minute 10 min 7 days 6 Sele...

Страница 33: ...Server Name list 7 Type or use the Up or Down arrows to change the port Note Set your Health Check port to match the port used by your recorder OpenEye Professional Recorders X Series N Series and H S...

Страница 34: ...hes Set Up Alarm Monitor Options 1 Click Menu and then click Settings 2 Click Alarm Monitor 3 Select Use to enable Alarm Monitor options 4 Type the Network Port number 5 Select Change to Alarm Monitor...

Страница 35: ...e Alarm Confirm List will be available on a list under Status Setting in the Alarm Monitor window 4 Click Add 5 To edit an entry select the entry in the Alarm Confirm List and then edit the text Click...

Страница 36: ...Enable to utilize Data functions such as searching and displaying Data text on screen Using Fonts Configure the Font Set for Normal and Alert text Search Keywords Configure for commonly searched Data...

Страница 37: ...me before RADIUS reports being disconnected from the recorder Alarm Log Cleanup Schedule Schedule alarm log clean up and resize the alarm log file Use Keyboard Control Enable use of a PTZ joystick key...

Страница 38: ...ed Installing new software versions Upgrading to a newer software version sometimes forces the deletion of settings Windows Software Failure Windows may become unstable for a number of reasons viruses...

Страница 39: ...lick and drag the mouse to select the hours of the day to ignore the desired type of alarm Motion Sensor Relay 7 Click Set after each block of time is selected 8 When you have finished click OK 9 Clic...

Страница 40: ...Tip To import custom screens from another user select Import User Screens From and then click Administrator and select your desired user from the list 6 In the Server Access Permission list select the...

Страница 41: ...Type the Display Name and E Mail Address of the e mail account used to send e mail alerts 5 Type the Primary SMTP Settings and then click Test 6 If desired click the checkbox to Use Secondary SMTP Se...

Страница 42: ...4 Click Delete to remove the user Normal Alarm E mail Setup 1 Click Menu and then click Settings 2 Click E Mail 3 Create e mail users on the User tab 4 Click the Normal Alarm tab 5 Select Use 6 Selec...

Страница 43: ...ngs 2 Click E Mail 3 Create e mail users on the User tab 4 Click the Health Check Alarm tab 5 Select Use 6 Select the types of alarm to trigger an e mail notification 7 Type a comment to include with...

Страница 44: ...nking maps together This feature allows you to quickly identify alarm zones and view the related video Search Devices on Map Display Right click in the Map List and then click Search Devices on Map Di...

Страница 45: ...he Map List and select Add Map 4 Type a New Map Name Use a name that will make the map easy to identify 5 Paste the permalink of the HTML map in the File Name or URL field 6 Select URL 7 Type any addi...

Страница 46: ...d Camera Add Sensor Add Relay Add Server 5 Click the location on the map to place the icon 6 Select a recorder from the Server list 7 Select a specific camera sensor or relay from the Camera list 8 Se...

Страница 47: ...pen the associated map on an alarm event 5 Enter the time in seconds for the alarm to flash after activation Adding a Map Alarm Sound 1 Click Menu and then click Settings 2 Click General 3 In Use Map...

Страница 48: ...s 5 Click the Hour you want to backup and then select the Minute shown in ten minute blocks Selected blocks of time will turn red To clear a block of time click it again 6 Click the Backup Path folder...

Страница 49: ...eduled Backup The Scheduled Backup screen is used for performing bulk backup of video recorded by all cameras for a selected period on a regular scheduled basis 1 24 hours 1 Open the Network Backup wi...

Страница 50: ...End Time for the clip 6 Type a name to identify the clip in the Title box 7 Type a note in the Memo box if desired 8 Type the desired file name in the Clip Name box 9 To include the proprietary Backu...

Страница 51: ...y supported with OpenEye Professional recorders Performing a Basic Search 1 Right click a recorder or camera in the Server List and select Search 2 Click the Calendar button and select a time and date...

Страница 52: ...Click Add Search Bookmarks Access previously bookmarked points of recorded video and open them in the Search screen 1 On the Search tab in the Bookmark section click Search 2 Select your desired book...

Страница 53: ...rform a Search to locate saved video 2 After locating your video click Save 3 Select the type of file format AVI for a video clip or JPG for a single frame 4 If saving a video clip select a compressio...

Страница 54: ...with the 10 minute segment broken into 1 minute increments 10 images Performing a Preview Search 1 Right click a recorder or camera in the Server List and then click Search 2 Select a single camera 3...

Страница 55: ...Index to open the Index Search window 4 Select one or more camera check boxes or Select All 5 Select the type of event to search Sensor Motion Instant Record or select All Events 6 The default search...

Страница 56: ...Search 2 Click the Calendar button to select a time and date and then click OK 3 On the Search tab click Status 4 Click on an orange recorded video block 5 After locating the desired video click Clos...

Страница 57: ...rch 3 Drag cameras from any connected professional grade recorder on the Server List to the Multiple Search display Note Multiple Search is only compatible with OpenEye Professional recorders X Xr N H...

Страница 58: ...RADIUS System Log keeps track of when the software is opened closed and which users log in and log out View the RADIUS Log 1 Click Menu and then click Log 2 Click a date on the calendar to view the lo...

Страница 59: ...recorder camera and time related to the event already selected Note If all Alarm Event results are not visible click Off to turn the Filter Options off Assign Status Settings 1 Click Menu and then cl...

Страница 60: ...IUS To access your recorder s configuration settings using RADIUS right click the recorder in the Server List and then click Device Configuration Professional Recorder For a Professional Recorder foll...

Страница 61: ...esults 9 Click On to filter results View and Export Alarm Reports 1 Click Display and then click Report 2 Click the Report Selection drop down menu and select Alarm Report 3 In the Selection Parameter...

Страница 62: ...e the desired video frame 3 Click Save 4 Select the Export Type JPG or AVI Save JPG a Select JPG and then click Next b Define the location to save the image c Click Next to save the image Save AVI a S...

Страница 63: ...window is used to view the health of recorders connected to RADIUS Health Check Status Icons DVR Status Video Recording Free Space Network Healthy Healthy Healthy Warning Warning Failure Failure Fail...

Страница 64: ...ew and Export Recorder Health Reports 1 Click Display and then click Report 2 Click the Report Selection drop down menu and select Health check Report 3 In the Selection Parameters field select each r...

Страница 65: ...e and be available in the list of search terms in the Data Search window Add Data Alert Text 1 To access the POS setup menu click Settings and then click Data 2 Select Enable Data 3 Enter text to trig...

Страница 66: ...item from the Find Item list 6 Click to add the item to the Data Search You can add multiple items to the search list 7 Select AND or OR to apply to the item names entered in the search list 8 Click F...

Страница 67: ...from OpenEye The information in this publication is believed to be accurate in all respects However OpenEye cannot assume responsibility for any consequences resulting from the use thereof The inform...

Отзывы: