OnSSI Ocularis Web Скачать руководство пользователя страница 9

Ocularis Web User Guide


Configuring Ocularis Web 

To Create an Ocularis Web Local View 

In Ocularis Web, select the 

Views

 menu and choose 

Configure Views


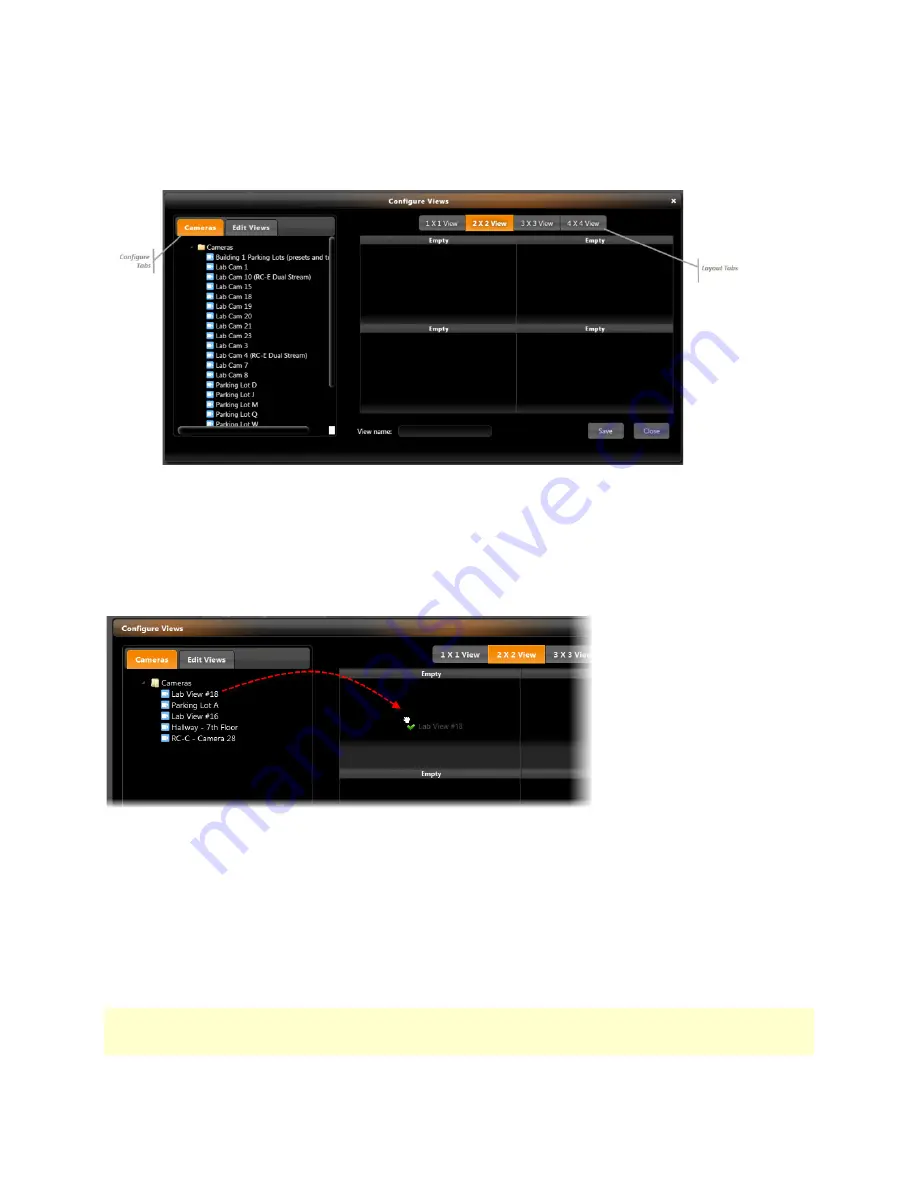
Figure 1: Configure Local Views 

The Configure Views screen allows you to create different views populated by the cameras you choose in the layout 

selected. 
Select the desired layout from the 

Layout Tabs

. Available selections include: 

1 x 1 View

2 x 2 View

3 x 3 View 

and 

x 4 View

. The screen will adjust accordingly based upon the view selected. 

Each section or rectangle making up the view is called a 

pane

. To populate each pane, simply drag and drop a camera 

displayed in the list on the 

Cameras

 tab to the desired pane. 


Drag and drop to populate a pane with a camera stream 

1.  Continue to drag and drop cameras for each available pane. If you change your mind about which camera 

should populate which pane, simply drag a new camera and drop it on top of the existing camera in the pane. 

2.  When complete, enter a name for the view in the 

View name

 field. The name is displayed in the Views menu for 

you to access later. View names should be created so that you can easily identify the cameras it includes. View 

names are not case sensitive and may include spaces. 

3.  Click 

Save

4.  You may continue to create additional views. When finished, click 

Close


Note:

  Remember that local views are saved with the browser settings on the local machine. If you open another 

manufacturer’s browser, move to another PC, or clear the browser’s cache, you will need to reconfigure local views from 

scratch. 

On-Net Surveillance Systems, Inc. 

Содержание Ocularis Web

Страница 1: ...Ocularis Web User Guide...

Страница 2: ...TROLS 7 CONFIGURING OCULARIS WEB 8 TO CREATE AN OCULARIS WEB LOCAL VIEW 9 TO MODIFY AN OCULARIS WEB LOCAL VIEW 10 TO DELETE AN OCULARIS WEB LOCAL VIEW 10 VIEWING LIVE VIDEO 11 TO DISPLAY A VIEW 11 MOD...

Страница 3: ...NetCell are trademarks of On Net Surveillance Systems Inc All other trademarks are property of their respective owners Microsoft and Windows are registered trademarks of Microsoft Corporation Disclai...

Страница 4: ...a server component and client components The Ocularis Media Server component typically resides on a stand alone server and is used to communicate with an installation of Ocularis Base The client compo...

Страница 5: ...nformation as follows User Name A user account is required to gain access to system video This account is your Ocularis account and may be used to access video via Ocularis Web Ocularis Client or Ocul...

Страница 6: ...nu bar with the following items Menu Description Debug Console Overlay The icon may be used to toggle the Debug Console on and off as needed for troubleshooting purposes Cameras Lists all cameras to w...

Страница 7: ...n as Application Controls These functions are defined as follows Control Graphic Icon Log off click this icon to log off Ocularis Web Logging off will stop the current session Help click this icon to...

Страница 8: ...l remain blank Similarly neither client Ocularis Web nor Ocularis Mobile supports asymmetrical views The only views available in these clients are 1 x 1 or 1 streams 2 x 2 or 4 streams 3 x 3 or 9 stre...

Страница 9: ...drop to populate a pane with a camera stream 1 Continue to drag and drop cameras for each available pane If you change your mind about which camera should populate which pane simply drag a new camera...

Страница 10: ...layed Make the changes you desire 4 Click Save If you wish to edit another view repeat these steps Otherwise click Close To Delete an Ocularis Web Local View 1 In Ocularis Web select the Views menu an...

Страница 11: ...ey were created Click the view name you would like to display Modifying View Panes There are occasions where you may want to see video from a different camera not displayed in the current view You can...

Страница 12: ...ve mode Image Bar Each pane in a view has a top section called the Image Bar On the left of the Image Bar is the name of the camera as it is defined in Ocularis Base The name of the view will dynamica...

Страница 13: ...Guide The View Live Full Screen You can switch the pane of a view to full screen by clicking the Image Bar Full Screen Video Click the Image Bar again to return to the original view On Net Surveillan...

Страница 14: ...line Release the mouse to perform the zoom Click and drag to draw rectangle for zoom Digital Zoom A PIP Picture in Picture appears in the upper right corner of the view pane A magnifying glass icon a...

Страница 15: ...indicate the direction the camera will be moved Continue to click on the image to adjust the camera position TO ZOOM A PTZ CAMERA To optically zoom a PTZ camera click the Zoom in or Zoom out or button...

Страница 16: ...e Ocularis Web User Guide PTZ Presets PTZ Cameras that have presets set on them may be accessed via the PTZ menu PTZ Presets Menu is located on the bottom center of a PTZ stream 16 On Net Surveillance...

Страница 17: ...ced with Live Click this menu item to return to Live mode At the bottom of the screen a set of Playback Controls appears along with the date and time stamp of the displayed video Each pane displays a...

Страница 18: ...cates that the video is playing backwards The further to the left or right that the Timeline slider is placed will direct the speed The Timeline is calibrated so that the slider jumps from one speed t...

Страница 19: ...e received In Browse mode this symbol appears whenever the Ocularis Media Server does not receive a time stamp from a camera for approximately 3 seconds No Frames No Time Stamp A CPU warning graphic a...

Страница 20: ...ew Panes 11 O Ocularis Media Server 4 Ocularis Media Server Components 4 Ocularis Web Interface 6 P Playback Controls 18 PTZ Pan Tilt Zoom 15 PTZ Presets 16 S Specifications 4 5 T The View Browse 17 T...

Отзывы: