background image

7. Connection Procedure 


16


7.3.  Setting Up the Controller 

Set up the Controller.   


7.3.1.  Hardware Settings 

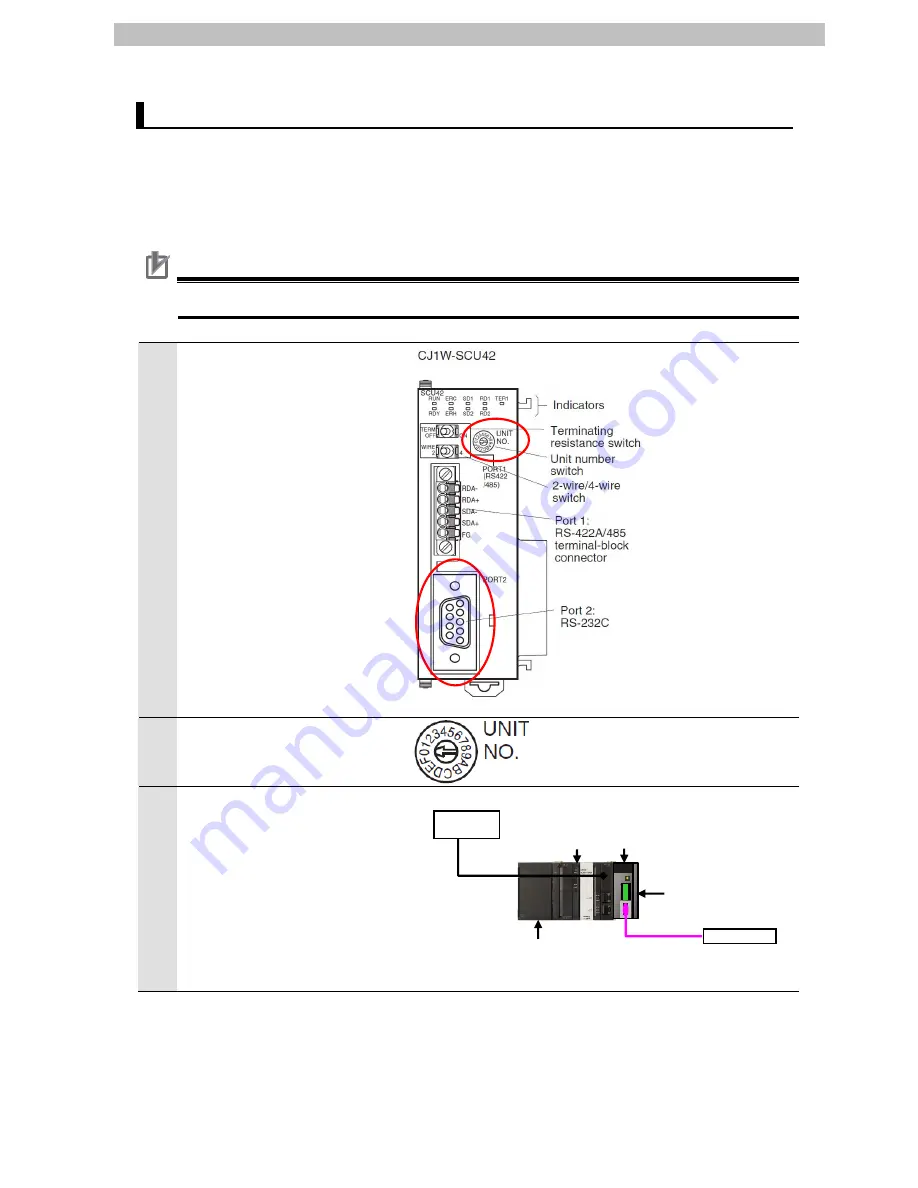
Set the hardware switches on the Serial Communications Unit.   


Precautions for Correct Use 


Make sure that the power supply is OFF when you perform the setting up.   


Make sure that the power supply 
to the PLC is OFF.   
 
*If the power supply is turned 

ON, settings may not be 
applicable as described in the 
following procedure.   

 
Check the hardware switches 
located on the front panel of the 
Serial Communications Unit by 
referring to the right figure 
 
Check the connector for Port 2 
(RS-232C) by referring to the 
right figure.   


*This setting is required to use 

Port 2 of the Serial 
Communications Unit.   


Set the Unit No. Switch to 0.   
(The unit number is set to 0 as 
the factory default setting.) 


Connect the Serial 
Communications Unit to the 
Controller as shown on the right. 
Connect the special cable for 
the Code Reader to the Serial 
Communications Unit. 
Connect the personal computer 
to the Controller with a USB 
cable.  


Special cable 

Serial Communications Unit 

USB cable


Controller

End Cover

Power Supply Unit

Code Reader

Personal 
computer 

Содержание V400-R2 Series

Страница 1: ...Machine Automation Controller NJ series General purpose Serial Connection Guide RS 232C OMRON Corporation Ultra Small Multi code Reader V400 R2 Series P567 E1 01 ...

Страница 2: ...on in the USA and other countries EtherCAT is registered trademark and patented technology licensed by Beckhoff Automation GmbH Germany Sysmac is a trademark or registered trademark of OMRON Corporation in Japan and other countries for OMRON factory automation products Company names and product names in this document are the trademarks or registered trademarks of their respective companies ...

Страница 3: ...le of Connection Check 12 7 Connection Procedure 13 7 1 Work Flow 13 7 2 Setting UP the Code Reader 15 7 3 Setting Up the Controller 16 7 4 Checking the Serial Communications 34 8 Initialization Method 40 8 1 Initializing the Controller 40 8 2 Initializing the Code Reader 41 9 Program 42 9 1 Overview 42 9 2 Communications sequence 46 9 3 Error Detection Processing 47 9 4 Variables 48 9 5 ST Progra...

Страница 4: ...ed in the system Cat No Model Manual name W500 NJ501 NJ301 NJ series CPU Unit Hardware User s Manual W501 NJ501 NJ301 NJ series CPU Unit Software User s Manual W494 CJ1W SCU 2 CJ series Serial Communications Units Operation Manual for NJ series CPU Unit W504 SYSMAC SE2 Sysmac Studio Version 1 Operation Manual W344 CXONE AL C V4 AL D V4 CX Protocol Operation Manual W502 NJ501 NJ301 NJ series Instru...

Страница 5: ...ssage send receive processing clear receive buffer or step wait Up to 15 steps can be set per sequence Send message A communication frame command sent to the external general purpose device A send message is read from the step in the sequence and sent to the external general purpose device Receive message A communication frame response sent from the external general purpose device A receive messag...

Страница 6: ... information provided in all Safety Precautions Precautions for Safe Use and Precaution for Correct Use of manuals for each device used in the system 3 The user is encouraged to confirm the standards and regulations that the system must conform to 4 It is prohibited to copy to reproduce and to distribute a part or the whole of this document without the permission of OMRON Corporation 5 The informa...

Страница 7: ...ally hazardous situation which if not avoided may result in minor or moderate injury or in property damage Precautions for Safe Use Precautions on what to do and what not to do to ensure safe usage of the product Precautions for Correct Use Precautions on what to do and what not to do to ensure proper operation and performance Additional Information Additional information to read as required This ...

Страница 8: ...btain the files contact your OMRON representative Name File name Version Sysmac Studio project file extension smc OMRON_V400 R2_PMCR232C_EV100 smc Ver 1 00 CX Protocol project file extension psw OMRON_V400 R2_PMCR_EV100 psw Ver 1 00 Hereinafter the Sysmac Studio project file is referred to as the project file The user program in the project file is referred to as the program The CX Protocol projec...

Страница 9: ...or connecting devices and checking the connection You cannot use devices with versions lower than the versions listed in Section 5 2 To use the above devices with versions not listed in Section 5 2 or versions higher than those listed in Section 5 2 check the differences in the specifications by referring to the manuals before operating the devices Additional Information This document describes th...

Страница 10: ...Multi code Reader V400 R2CF65 OMRON Special cable RS 232C V509 W011 5 VDC power supply Precautions for Correct Use Prepare the latest project file and protocol macro data in advance To obtain the files contact your OMRON representative Precautions for Correct Use Update the Sysmac Studio and CX Protocol to the versions specified in this section or higher versions using the auto update function If ...

Страница 11: ...he special cable V509 W011 refer to Cable for programmable controller connection made by OMRON V509 W011 in Specifications and External Dimension in Section 5 Appendix of the Ultra Small Multi code Reader V400 R2 Series User s Manual Cat No Z333 Additional Information The system configuration in this document uses USB for the connection to the Controller For information on how to install a USB dri...

Страница 12: ...rt Port 2 RS 232C Serial communications mode Protocol macro Data length 8 bits 8 bits Default Stop bit 1 bit 1 bit Default Parity None None Default Transmission rate Baud rate 9 600 bps Default 9 600 bps Default Protocol macro transmissions Full duplex Header None Default Footer CR Default Number of digit output None Default RS CS control None no protocol system Default CS waiting time Not limited...

Страница 13: ...es Serial Communications Units Operation Manual for NJ series CPU Unit Cat No W494 Check the connector configuration and pin assignment before wiring You do not need to make a cable when you use the special cable V509 W011 Connector configuration and pin assignment CJ1W SCU42 Applicable connector D sub 9 pin V400 R2CF65 Applicable connector DIN 8 pin ...

Страница 14: ...onnector When you make a connection cable use the following connectors to connect it to the connector of the Code Reader Special cable The special cable V509 W011 is used in this document 5V 0V External trigger NJ501 1500 CJ1W SCU42 Code Reader V400 R2CF65 Special cable V509 W011 5 VDC power supply Code Reader V400 R2CF65 NJ501 1500 CJ1W SCU42 Connection Cable The external trigger is not used in t...

Страница 15: ...er command sequence No 900 is selected from the protocol macro data and it is sent to the Code Reader 3 The Code Reader executes the command according to the send data from the Controller 4 The Controller receives the result of the command executed by the Code Reader and then stores in the specified variable Controller CPU Unit Serial Communications Unit RS 232C Code Reader Project file Send data ...

Страница 16: ...e Sysmac Studio and import the project file 7 3 3 Checking the Parameters and Building Check the parameters that are set execute the program check on the project data and build the Controller 7 3 4 Connecting Online and Transferring the Project Data Connect online with the Sysmac Studio and transfer the project data to the Controller 7 3 5 Transferring the Unit Settings Transfer the setting data o...

Страница 17: ...the Trace Data Confirm that the correct data is sent and received by checking the trace data of the CX Protocol 7 4 4 Checking the Receive Data Confirm that the correct data are written to the variables of the Controller with the Sysmac Studio ...

Страница 18: ...up the Code Reader from the factory default setting If the Code Reader was changed from the factory default setting make sure to initialize by referring to Section 8 2 Initializing the Code Reader Additional Information For details on the factory default setting of the Code Reader refer to Factory default setting in Return to the factory default setting in Menu Sheet Command List in Section 4 Sett...

Страница 19: ...e front panel of the Serial Communications Unit by referring to the right figure Check the connector for Port 2 RS 232C by referring to the right figure This setting is required to use Port 2 of the Serial Communications Unit 2 Set the Unit No Switch to 0 The unit number is set to 0 as the factory default setting 3 Connect the Serial Communications Unit to the Controller as shown on the right Conn...

Страница 20: ...confirmation dialog for an access right is displayed at start select to start 2 The Import File Dialog Box is displayed Select OMRON_V400 R2_PMCR232C _EV100 smc and click the Open Button Obtain the project file from OMRON 3 The OMRON_V400 R2_PMCR232C _EV100 project is displayed The left pane is called Multiview Explorer the right pane is called Toolbox and the middle pane is called Edit Pane If an...

Страница 21: ...etup in the Multiview Explorer 2 The CPU Expansion Racks Tab is displayed in the Edit Pane Select the Serial Communications Unit icon as shown on the right Confirm that CJ1W SCU42 is displayed the Device name is J01 and the Unit No is 0 If the settings are different change the values Click Edit Special Unit Settings 3 The 0 Unit 0 Tab is displayed Select Port2 Protocol macro Settings from the pull...

Страница 22: ...es from the pull down lists After changing the values click the Apply Button 5 Double click I O Map under Configurations and Setup on the Multiview Explorer The I O Map Tab is displayed and then the parameters for the Unit are listed 6 Confirm that data in the Variable Columns start with J01 and the Global Variable is set in each Variable Type Column If the settings are different from the above ri...

Страница 23: ...grams from the Project Menu 10 Confirm that 0 Errors and 0 Warnings are displayed in the Build Tab Page under the Edit Pane 11 Select Rebuild Controller from the Project Menu A confirmation dialog box is displayed Check the contents and click the Yes Button A screen is displayed indicating the conversion is being performed 12 Confirm that 0 Errors and 0 Warnings are displayed in the Build Tab Page...

Страница 24: ... may perform unexpected operation regardless of the operating mode of the CPU Unit Always confirm safety before you reset the Controller or any components 1 Select Change Device from the Controller Menu 2 The Change Device Dialog Box is displayed Confirm that the Device and Version are set as shown on the right and click the OK Button If the settings are not correct select the setting items from t...

Страница 25: ...og on the right is displayed the model or version of the Controller does not match that of the project file Review the Controller model version and device settings of the project file and then repeat the procedure from step 1 in this section Close the dialog box by clicking the OK Button The model and version displayed on the confirmation dialog box differ depending on the Controller used and the ...

Страница 26: ... Yes Button to proceed with the processing The displayed serial ID differs depending on the device Additional Information For details on online connections to a Controller refer to Section 5 Online Connections to a Controller of the Sysmac Studio Version 1 Operation Manual Cat No W504 8 When an online connection is established a yellow bar is displayed on the top of the Edit Pane 9 Select Synchron...

Страница 27: ...izing is displayed A confirmation dialog box is displayed Confirm that there is no problem and click the No Button Click the No Button to operate in PROGRAM mode in the following steps 12 Confirm that the synchronized data is displayed with the color specified by Synchronized and that a message is displayed stating The synchronization process successfully finished If there is no problem click the ...

Страница 28: ...e PROGRAM Mode from the Controller Menu to change to PROGRAM mode and perform the procedure in this step 14 A confirmation dialog box is displayed several times Check the contents and click the Yes Button 15 The Controller is reset and the Sysmac Studio goes offline Then the yellow bar on the top of the Edit Pane disappears Go online again by following steps 6 to 8 ...

Страница 29: ...mation dialog box is displayed Confirm that there is no problem and click the Yes Button 3 PROGRAM mode is displayed on the Controller Status Pane 4 Double click CPU Expansion Racks under Configurations and Setup in the Multiview Explorer Select the Serial Communications Unit icon Click Edit Special Unit Settings 5 The 0 Unit 0 Tab is displayed Click the Transfer To Controller Button ...

Страница 30: ... is displayed Check the contents and click the Yes Button 7 The Port Selection Dialog Box is displayed Select All ports and click the OK Button 8 A confirmation dialog box is displayed Check the contents and click the OK Button 9 Select Port2 Protocol macro Settings from the pull down list of Parameter group to show Click the Compare Button 10 Confirm that mismatch is not shown in the red frame on...

Страница 31: ...data 1 Start the CX Protocol CX Protocol 2 Select Open from the File Menu 3 On the Open Dialog Box select OMRON_V400 R2_PMCR_EV1 00 psw and click the Open Button Obtain the protocol macro data from OMRON 4 The project workspace and the Project Window display the protocol macro data that was read Output Tab Page Project workspace Project Window ...

Страница 32: ..._EV1 00 on the project workspace to display a tree 2 Select Edit PC PLC Comms Settings from the PLC Menu 3 The Change PLC Dialog Box is displayed Select a device type to use from the pull down list of the Device Type and click the Settings Button NJ501 is used in this document 4 The Device Type Settings Dialog Box is displayed Select the CPU type to use from the pull down list and click the OK But...

Страница 33: ... Offline to Program It means that the Controller is connected online If Run is displayed change it to Program by following steps 8 and 9 8 If the operating mode of the Controller is Run select Operating Mode Program from the PLC Menu 9 The dialog box on the right is displayed Confirm that there is no problem and click the Yes Button Confirm that the operating mode was changed to Program mode as sh...

Страница 34: ...ght figure 12 Select New Protocol List and select Download Protocols from the Protocol Menu 13 The dialog box on the right is displayed Select the Include Source Information Check Box and click the Compile Button 14 When 100 is displayed in the Complied Column the compiling operation is completed After confirming that the compiling operation is completed click the Download Button ...

Страница 35: ...he OK Button 16 Check that 100 is displayed in the Downloaded Column in the right figure and click the Close Button 17 Select New Protocol List and select Compare Protocols from the Protocol Menu 18 The dialog box on the right is displayed Select the Include Source Information Check Box and click the Compile Button ...

Страница 36: ... Confirming that the compiling operation is completed and click the Compare Button 20 The dialog box on the right is displayed Confirm that Successful is displayed in the Result Column and click the OK Button 21 Confirm that 100 is displayed in the Compared Column in the right figure and click the Close Button ...

Страница 37: ...Code Reader from the factory default setting If the Code Reader was changed from the factory default setting make sure to initialize by referring to Section 8 2 Initializing the Code Reader Precautions for Correct Use Confirm that the serial cable is connected before proceeding to the following procedure If it is not connected turn OFF the power supply to each device and then connect the serial ca...

Страница 38: ...gure 5 Select the Trace 2 Icon on the Project Window Confirm that Trace 2 is highlighted as shown in the right figure Trace 2 corresponds to port 2 of the Serial Communications Unit 6 Select Start Trace One Shot Trace from the PLC Menu 7 Confirm that the status of Trace 2 in the Project Window was changed to One shot Trace Running ...

Страница 39: ...displayed in the Name Columns To add a variable click Input Name If is displayed to the left of the variable instead of click and open the configuration of the structure variable Program0 of the Name is omitted from the following descriptions 4 Read the bar code shown on the right as an example Position the Code Reader so that it can read the bar code shown on the right Start input Program executi...

Страница 40: ...op of the Code Reader is lit green and a buzzer sounds then the read operation succeeds If the bar code shown in the document cannot be read read a bar code shown in Preliminary Examination in Section 2 Introduction Procedure of the Ultra Small Multi code Reader V400 R2 Series User s Manual Cat No Z333 When reading change Input_Start to False and then change Input_Start to True again by using the ...

Страница 41: ...e right is displayed Check the contents and click the Yes Button 3 Check the send receive message on the trace data file shown in the right figure In the example on the right the Reading Trigger command is sent from the Controller and the bar code data that are shown in step 4 of Section 7 4 2 are received Send message Hex 1B 5A 0D String ESC Z CR Receive message Hex 34 39 31 32 33 34 35 36 37 38 ...

Страница 42: ...to 9 8 Error Process Normal end Error end 3 Check the received data code that was read in the Watch Window of the Sysmac Studio In the example on the right the data stored in Output_RecvMessage is 4912345678904 It is the same as the trace data in step 3 of Section 7 4 3 The number of words used to store the receive data 0008 in hexadecimal is stored in Output_RecvData 0 The bar code data that were...

Страница 43: ...zing the Controller To initialize the Controller it is necessary to initialize the Serial Communications Unit and the CPU Unit Place in PROGRAM Mode before the initialization 8 1 1 Serial Communications Unit To initialize the settings of the Serial Communications Unit click Edit Special Unit Settings of CJ1W SCU42 in CPU Expansion Racks from the Sysmac Studio Click the Return to default Button and...

Страница 44: ...f the Sysmac Studio The Clear All Memory Dialog Box is displayed Click the OK Button 8 2 Initializing the Code Reader For the initialization of the Code Reader refer to Return to the factory default setting in Menu Sheet Command List in Section 4 Setting Method of the Ultra Small Multi code Reader V400 R2 Series User s Manual Cat No Z333 ...

Страница 45: ...ogram means a normal end of the communications sequence of the protocol macro An error end means an error end of the communications sequence of the protocol macro In this section the prefix 10 possible to omit is added to decimal data and the prefix 16 to hexadecimal data when it is necessary to distinguish between decimal and hexadecimal data e g 1000 or 10 1000 for decimal data and 16 03E8 for h...

Страница 46: ...otocol macro instruction Instruction ExecPMCR with the sequence number specified in the program and loads the communications sequence protocol macro data registered in the Serial Communications Unit 2 Sending a command The Serial Communications Unit issues the send message command data to the destination device based on the sequence number specified in step 1 3 Response receive processing The Seri...

Страница 47: ...er to Serial Communications Instructions ExecPMCR in Section 2 Instruction Descriptions of the NJ series Instructions Reference Manual Cat No W502 for details ExecPMCR instruction This program uses the following standard instruction to perform serial communications Name Function blocks Explanation Protocol macro ExecPMCR Requests execution of a communications sequence protocol data registered in a...

Страница 48: ...nation Device Send message CPU Communications Unit Send data array ScrDat 0 15 0 15 0 15 0 15 Bit No of send data words Terminator Data ScrDat 0 ScrDat 1 ScrDat 2 ScrDat n 1 Relationship between the DstDat receive data array and the receive message Destination device Communications Unit Receive message Communications Unit CPU Receive data array DstDat 0 15 0 15 0 15 0 15 Bit No of receive data wor...

Страница 49: ...nd name Description 900 Reading Trigger Issues the reading trigger for a code 9 2 2 ExecPMCR instruction input variables The ExecPMCR instruction input variables for communication sequence No 900 Reading Trigger are set as follows Variable Name data format Data explanation Port Destination port specification _sPROT UnitNo Unit number _eUnitNo _eUnitNo _CBU_No00 Specifies the unit number for the Se...

Страница 50: ...r An error is detected with the Sequence Abort Completion Flag J01_P2_PmrSeqAbtSta 3 Errors in the destination device Destination device errors Destination device errors include a command error a parameter error data error and an execution failure in the destination device An error is detected with the response data which is returned from the destination device With this program the destination de...

Страница 51: ...e Explanation Input_Start BOOL Communication start switch The program starts when this flag changes from FALSE to TRUE Input_SendData ARRAY 0 249 OF WORD Send data storage area 500 bytes WORD AT Output_RecvData ARRAY 0 249 OF WORD Receive data storage area 500 bytes WORD An area that stores DstDat of the ExecPMCR instruction 5500 Output_RecvMessage STRING 498 An area that stores the receive data a...

Страница 52: ...to Related System defined Variables in Serial Communications Instructions ExecPMCR in Section 2 Instruction Descriptions of the NJ series Instructions Reference Manual Cat No W502 Internal variables Instance variables The following tables list the internal variables used to execute the function blocks in the program An internal variable is called an instance The name of the function block to use i...

Страница 53: ...ort _sPort Used port Local_SeqNo UINT Communications sequence number Local_PmrStaCode WORD Protocol macro error code edit area Local_RecvWordData ARRAY 0 248 OF WORD An area that extracts and stores the data to be converted into a string from the receive data 498 bytes Local_RecvWordSize UINT A size of data to be converted into a string unit WORD Local_RecvByteData ARRAY 0 497 OF BYTE An area that...

Страница 54: ...lizing the communications instruction execution flag 2 3 Initializing the error code storage areas 2 4 Setting the input variable of the ExecPMCR instruction 2 5 Initializing the receive data storage areas 2 6 Initialization setting end processing The parameter setting of the communications instruction ExecPMCR instruction and the receive data storage areas are cleared 3 PMCR communications proces...

Страница 55: ...9 Program 52 9 5 2 Program List The program is shown below Program Program0 General purpose serial communications connection check program 1 Communications processing ...

Страница 56: ...lization processing To change the input values such as the unit number of the Serial Communications Unit the port number to be used protocol macro sequence number and send data size change the code indicated by a red frame ...

Страница 57: ...9 Program 54 3 PMCR communications processing ...

Страница 58: ...9 Program 55 4 Processing number error process ...

Страница 59: ...age formats for a step send receive once Set the send message and matrix for the step Set several types of cases receive messages for the matrix Sequence No 900 Step No 00 Send message 00 Matrix Case No 00 Receive message 00 Step No yy yy 15 max zz 14 max Case No zz Receive message zz Sequence No xxx xxx 999 max Case No 15 is automatically set Case No 15 Other 9 6 1 Composition of Protocol Macro D...

Страница 60: ...cedure of the protocol macro 1 Step No 00 Issuing send message SD_RDCODE 2 When step No 00 ends normally When step No 00 ends in an error 3 Next Process Terminates the communications sequence as an End Error Process Interrupts the step as an Abort and terminates the communications sequence End End ...

Страница 61: ... wait monitoring time Monitors the time from the receive wait status to the reception of the first data header in the step of the sequence This timer is set to 3 seconds in this protocol macro data Timer Tfr Receive finished monitoring time Monitors the time from the reception of the first data to the completion of the reception in the step of the sequence This timer is set to 3 seconds in this pr...

Страница 62: ... setting This section describes the retry count setting for the step The step is retried for the specified number of times 0 to 9 times when an error occurs If an error occurs after retries the step moves to the error process The retry count is enabled for the Send Receive command only Step setting screen Settings Step No Retry count 00 3 Send Receive message massage name settings This section des...

Страница 63: ...nds normally If a communications error occurs the process set in the Error Column is executed Step setting screen Settings Step No Next process Error process 00 End Abort Process list Process Description End Ends the communications sequence Next Moves to the next step No Abort Interrupts the step and ends the communications sequence Goto Moves to the specified step number Matrix Uses the settings ...

Страница 64: ...ption 1 h Header Type Code Data ESC 2 Z Constant ASCII 3 t Terminator Type Code Data CR The footer for the destination device is the terminator for the protocol macro data Hereinafter the term terminator is used Send message command format This is the command format of the message that is sent from the Serial Communications Unit to the destination device according to the settings of SD_RDCODE ESC ...

Страница 65: ...l variable length data are read and stored from array variable n which is specified with DstDat of the ExecPMCR instruction 1 With this program data is stored from Output_RecvData 1 2 t Terminator Message data Constant hex Type Code Data CR The header h is set to None Response format of receive message This is the response format of the receive message which is received by the Serial Communication...

Страница 66: ...l_Status Done Output for 1 period Local_Status Error Output_PmrErrorID Output_PmrErrorIDEx Output_PmrStaErrCode Output_TransErrorCode Error end 1 2 Input_Start Local_Status Busy Output_RecvData Local_Status Done Local_Status Error Output for 1 period Output_PmrErrorID Output_PmrErrorIDEx Output_PmrStaErrCode Output_TransErrorCode If Input_Start changes from TRUE to FALSE during an execution Busy T...

Страница 67: ...d Additional Information For details on ErrorID and error codes not listed in the table above refer to A 2 Error Code Descriptions and A 3 Error Code Details in Appendices of the NJ series Instructions Reference Manual Cat No W502 Output_PmrErrorIDEx The content of ExecPMCR_instance ErrorIDEx is set when the value of ExecPMCR_instance ErrorID is 16 0800 Code Description 16 00000000 Normal end 16 0...

Страница 68: ...smission error status The error flags used when a transmission error occurs are shown below They are set in Output_TransErrCode Output_TransErrCode The content of J01_P2_TransErrSta is set Bit Description 15 1 Transmission error 0 No transmission error 14 1 Send Finished Monitoring Time Exceeded 0 Normal 13 1 Receive Finished Monitoring Time Exceeded 0 Normal 12 1 Receive Wait Monitoring Time Exce...

Страница 69: ...10 Revision History 66 10 Revision History Revision code Date of revision Revision reason and revision page 01 Sep 3 2013 First edition ...

Страница 70: ...ent or addition to the above warranty See http www omron247 com or contact your Omron representative for pub lished information 14 Limitation on Liability Etc OMRON COMPANIES SHALL NOT BE LIABLE FOR SPECIAL INDIRECT INCIDENTAL OR CONSEQUENTIAL DAMAGES LOSS OF PROFITS OR PRODUCTION OR COMMERCIAL LOSS IN ANY WAY CONNECTED WITH THE PRODUCTS WHETHER SUCH CLAIM IS BASED IN CONTRACT WARRANTY NEGLIGENCE ...

Страница 71: ...o SP Brasil 55 11 2101 6300 www omron com br OMRON ARGENTINA SALES OFFICE Cono Sur 54 11 4783 5300 OMRON CHILE SALES OFFICE Santiago 56 9 9917 3920 OTHER OMRON LATIN AMERICA SALES 54 11 4783 5300 OMRON INDUSTRIAL AUTOMATION THE AMERICAS HEADQUARTERS Schaumburg IL USA 847 843 7900 800 556 6766 www omron247 com OMRON EUROpE B V Wegalaan 67 69 NL 2132 JD Hoofddorp The Netherlands Tel 31 0 23 568 13 0...

Отзывы: