background image

11

(2)  Select "Japanese" or "English" and click the [Next] Button.

The following Dialog Box will be displayed.

*  After installation, you cannot change the language of the software tool. If you want to change the language, reinstall 

the software tool.

*  If you select Japanese on your PC with other than Japanese OS, depending on the environment of your PC, the 

characters during installation may not be displayed correctly, or the software tool may not work properly.

(3)  Click the [Next] Button.

The License Agreement Dialog Box appears.

(4)  Please read "License Agreement" carefully and check "I accept the terms of the license agreement" and click the  [Next] 

Button if you can agree to all the terms.

The [User Information] Dialog Box appears.

(5)  Click the "Install" Button.

Installation of the Motor condition monitoring Tool starts. 

(6) 

Install the Communications Middleware. Select the language to display in the installation.

If an old version of the Communications Middlware is already installed, select whether to update Communications 

Middlware.

If a new version of the Communications Middlware is already installed, go to step (15).

(7) 

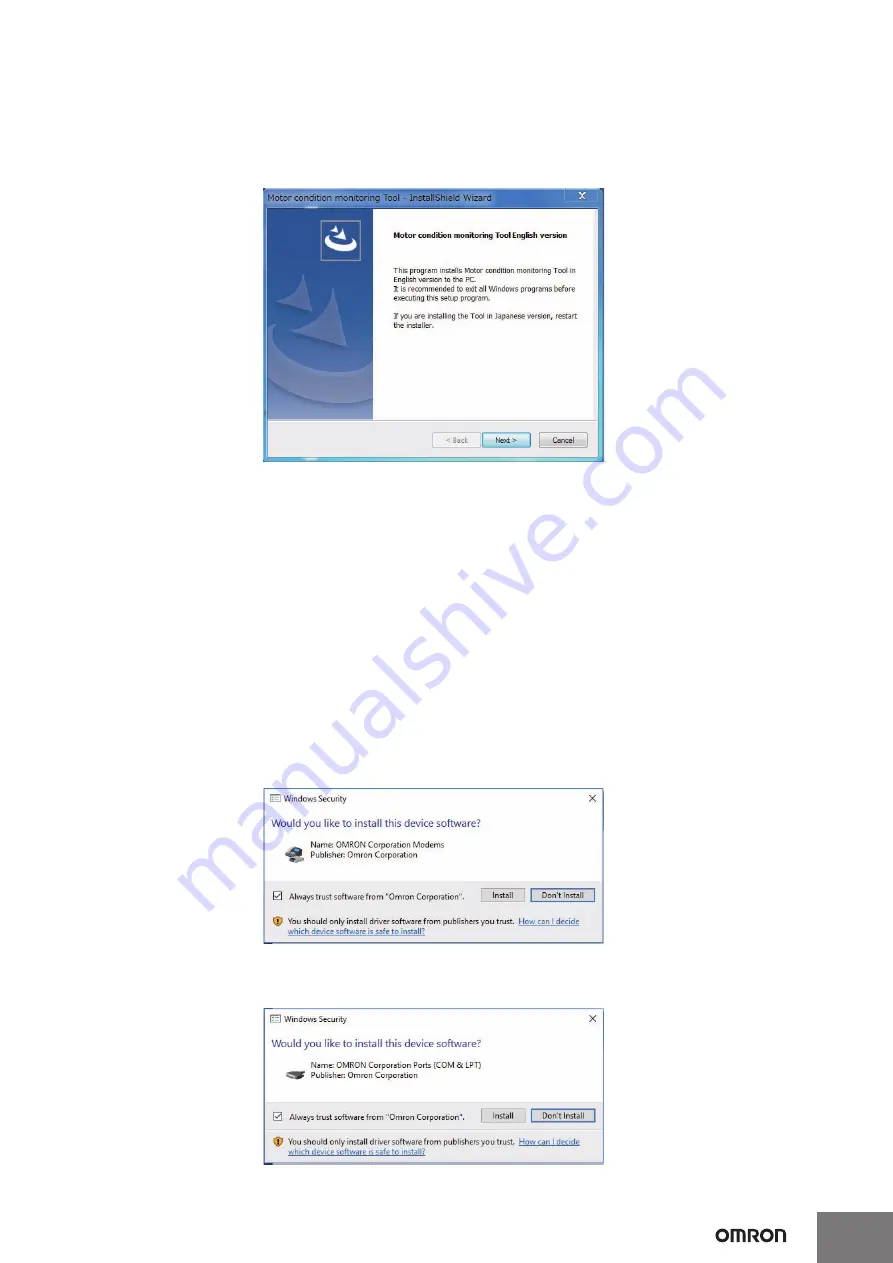
While the installation wizard is running, the [Windows Security] Dialog Box will be displayed.

Click the [Install] Button.

"OMRON Corporation Modems" is installed and the following [Windows Security] Dialog Box will be displayed.

(8)  Click the [Install] Button.

"OMRON Corporation Ports (COM & LPT)" is installed.

Содержание K6CM series

Страница 1: ...ep6 Step7 Step8 Step2 Step3 Step4 Selection of sensor to use Confirmation of details Installation Connection Monitoring Pre verification Preparation of necessary items Installation of Motor condition...

Страница 2: ...AC K6CM CICB005 5 A 1 00 A to 5 25 A 0 75 kW 1 5 kW to 2 2 kW K6CM CICB025 25 A 5 00 A to 26 25 A 1 5 kW to 5 5 kW 3 7 kW to 11 kW K6CM CICB100 100 A 20 A to 105 A 7 5 kW to 22 kW 15 kW to 45 kW K6CM...

Страница 3: ...ide K6CM Step0 Step1 Step5 Step6 Step7 Step2 Step3 Step4 Selection of sensor to use Confirmation of details Installation Connection Monitoring Preparation of necessary items Motor condition monitoring...

Страница 4: ...more HDD or DVD This procedure also details the resolution technique published on the following Microsoft official website Microsoft official website URL https msdn microsoft com ja jp library windows...

Страница 5: ...at the bottom and select the same one as the PC you want to install the Motor condition monitoring Tool If you do not know the architecture of your PC perform the following procedure 1 On the persona...

Страница 6: ...cognize the created OS media on the PC you want to install If you are using a USB memory or HDD connect it to a PC mount it on a PC if it is a DVD When the OS media is recognized correctly the followi...

Страница 7: ...the following data will be displayed Execute the command prompt shell script with administrator privileges after confirming that the OS media was recognized correctly Hold down the Windows key while...

Страница 8: ...Online Enable Feature FeatureName NetFX3 All Source D Sources SxS LimitAccess Enter the command on one line without line break Insert a space between Dism and the set of words that compose the comman...

Страница 9: ...m the autoplay screen If automatic playback was not done double click the setup exe file under the CD drive The following Select language setting Dialog Box will be displayed CAUTION If the following...

Страница 10: ...has already been installed in your PC Modify is used to change the function to be installed Do not use it now for future expansion Repair is used to reinstall the software tool Remove is used to unin...

Страница 11: ...icense agreement and click the Next Button if you can agree to all the terms The User Information Dialog Box appears 5 Click the Install Button Installation of the Motor condition monitoring Tool star...

Страница 12: ...ton If WinPcap is already installed go to step 15 10 Click the Next Button 11 Click the I Agree Button The Installation options Dialog Box appears 12 Check Automatically start the WinPcap driver at bo...

Страница 13: ...ith the K6CM device with that wired LAN port select the following If the name of the network connection has been changed select the one with the changed name Windows 7 Select Local Area Connection Win...

Страница 14: ...as below it is possible to connect the Motor condition monitoring Tool to the K6CM device Device name IP address Sub net mask Default gateway PC 192 168 250 100 255 255 255 0 Blank K6CM device 1st Uni...

Страница 15: ...Device setting The following SYSMAC Gateway Console screen is displayed Confirm that Status is currently Start in the Communication Service field and that Startup is Auto Set the network port to whic...

Страница 16: ...k the IP address tab select the IP address to use in communications then select OK CAUTION Do not select AutoIP address 169 254 xxx xxx x is an arbitrary number If IP addresses other than the AutoIP a...

Страница 17: ...yed by selecting Device setting on the startup screen If IP address selection is incomplete i e Network port parame ter is Do not use 0 0 0 0 is displayed If 0 0 0 0 is displayed you can connect to th...

Страница 18: ...Connecting to device wizard screen When the connection is successful the following IP address setting wizard screen will be displayed Set the K6CM IP address in reference to the procedure in Step 4 N...

Страница 19: ...Acceleration alarm warning critical Input the motor status warning critical threshold levels Velocity alarm warning critical Motor temperature alarm warn ing critical Temperature gap alarm warning cri...

Страница 20: ...click the Next button The following Navigating is completed wizard screen is displayed If registering a different device select the check box then click End This opens the Device Connection wizard scr...

Страница 21: ...is being monitored Initially temporarily set a short monitoring cycle for example 5 seconds to confirm if the motor status is being measured The procedure for this is as follows Click the device setti...

Страница 22: ...ring status will be displayed Any devices unable to communicate normally will show a communications error mark Communications error occurred If this communications error mark is shown then review PC a...

Страница 23: ...e Each device detailed status screen click the area outlined in red The Each device detailed status screen will be displayed If you confirm that the motor state can be monitored we recommend setting t...

Страница 24: ...100N 1000 mm Screw Mounting When installing the product using screws first drill screw holes using the dimensions in the figure below then tighten using specified size screws and flat washers to the c...

Страница 25: ...0 V AC D 24 V AC DC 1 2 1 2 No polarity External trigger input Do not use 7 8 9 10 1 Sensor input VB Vibration and temperature sensor input IS ZCT IRT input K6CM VBS pre amplifier 7 8 9 10 K6CM ISZ ZC...

Страница 26: ...apacity and voltage Refer to the Datasheet N218 for the formula to calculate the current value from the motor capacitance Using a K6CM CIM 1 When the motor is driven by an inverter it may not be possi...

Страница 27: ...le By keeping a PC or PLC continuously connected you can monitor the state of a motor Modbus TCP 2 Built in EtherNet IP port Note Even without a PC the alarm bar of the main unit notifies you of chang...

Страница 28: ...requency of the inverter See the User s Manual N219 for more information 3 Can be used only with EIP CPU version 1 2 or higher Three phase four conductor N phase ground Measurement trigger signal Dedi...

Страница 29: ...al and conducts measurements before and after the maintenance part replacement overhaul etc planned for the motor 2 Reproduction of critical state Reproduce the critical state you want to detect in th...

Страница 30: ...ettings Moving average times Ci1 3 8 times 0 OFF Moving average times except Ci1 0 OFF 0 OFF Refer to Monitoring cycle dedicated tool Click the monitoring setting button in the software tool set Monit...

Страница 31: ...ing the equipment Set power ON OFF as a trigger and set the number of seconds until stabilization as the monitoring delay time Measurements in a stable state If the motor s load is fluctuating the mea...

Страница 32: ...etected Changing the inverter carrier frequency settings For the K6CM CI2M it is possible to reduce variation by setting the inverter carrier frequency to 5 kHz or more Try changing this setting if it...

Страница 33: ...number The following table is taken from IEC 60072 1 For frame numbers that are not listed in the table below check the shaft diameter from the motor manual 4GH 5JCHV FKCOGVGT OO R RQ QN NG GU U R RQ...

Страница 34: ...l sized machines typical example motor with output less than 15 kW Large sized machines machine installed on a heavy foundation with high rigidity Large sized machines machine installed on a foundatio...

Страница 35: ...CONNECTED WITH THE PRODUCTS WHETHER SUCH CLAIM IS BASED IN CONTRACT WARRANTY NEGLIGENCE OR STRICT LIABILITY Further in no event shall liability of Omron Companies exceed the individual price of the P...

Страница 36: ...438A Alexandra Road 05 05 08 Lobby 2 Alexandra Technopark Singapore 119967 Tel 65 6835 3011 Fax 65 6835 2711 OMRON CHINA CO LTD Room 2211 Bank of China Tower 200 Yin Cheng Zhong Road PuDong New Area S...

Отзывы: