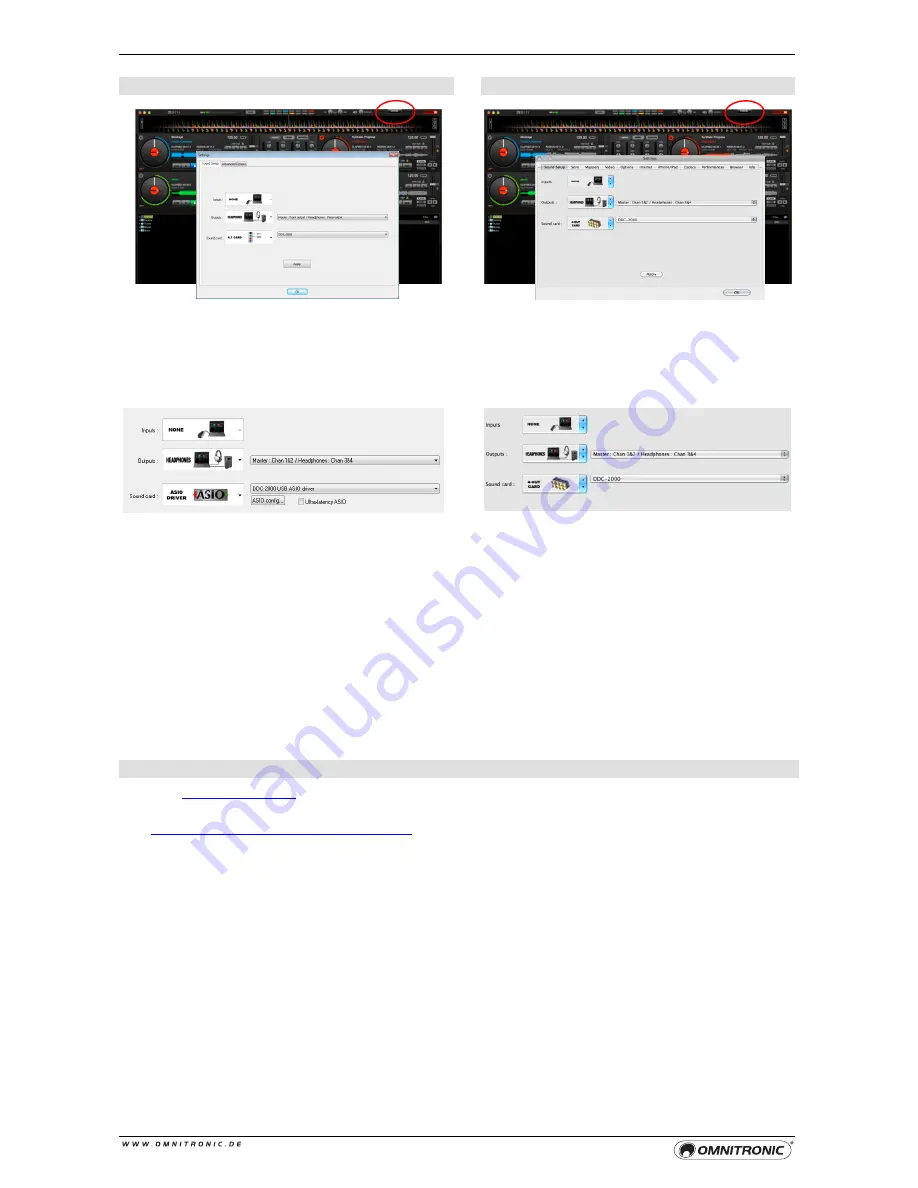
Omnitronic DDC-2000 Скачать руководство пользователя страница 30


30


Audio Setup Windows


Audio Setup Mac OS 


When running Virtual DJ LE for the first time, you 
will need to configure the software for use with the 
controller. Open the configuration menu with the 
[

CONFIG

] button and select the [

Sound Setup

tab. 


Inputs: None* 
Outputs: Headphones (Master/Headphones)


Sound card: ASIO Driver (DDC-2000) 

 
Select [

Headphones

] and [

ASIO DRIVER

] and 

confirm your settings with [

Apply

]. This 

configuration will enable you to use both output 
channels Master and Headphones. 
 

NOTE:

 There are some limitations to Virtual DJ LE. 

Inputs and the option External Mixer will be 
available in Virtual DJ PRO (or during a trial of 
Virtual DJ PRO). 


When running Virtual DJ LE for the first time, you 
will need to configure the software for use with 
the controller. Open the configuration menu with 
the [

CONFIG

] button and select the [

Sound 

Setup

] tab 


Inputs: None* 
Outputs: Headphones (Master/ Headphones)


Sound card: 4-Out Card (DDC-2000) 

 
Select [

Headphones

] and [

4-OUT CARD

] and 

confirm your settings with [

Apply

]. This 

configuration will enable you to use both output 
channels Master and Headphones.  
 

NOTE:

 There are some limitations to Virtual DJ 

LE. Inputs and the option External Mixer will be 
available in Virtual DJ PRO (or during a trial of 
Virtual DJ PRO).


Support and Updates for Virtual DJ LE 

Visit 

www.virtualdj.com

 for downloads and extensive support. 

To  access  software  updates,  plug-ins  and  further  services,  register  on  the  Virtual  DJ  website.  Go  to 

http://www.virtualdj.com/users/create.html

 and create a user account. You will need your serial number 

supplied with the product. 

With  the  included  limited  edition  of  the  software  you  have  the  benefit  of  purchasing  the  extensive  full 
version  at  a  discount  price.  Current  conditions  regarding  the  price  can  be  found  at  the  Virtual  DJ 
website. The full version can be tested for 20 days. For a trial call the configuration menu > [

Advanced 

Options

] with the [

CONFIG

] button.  


Содержание DDC-2000

Страница 1: ......

Страница 2: ...rbkodierte LED Tasten liefern optimale visuelle Kontrolle beim Triggern von Loops Samples Effekten und Cue Punkten Crossfader mit Audio Video Doppelfunktion für Videokontrolle in VIRTUAL DJ 105 mm große berührungsempfindliche Jogwheels mit einstellbarer Empfindlichkeit 45 mm Pitchfader mit Range und Keylock Funktionen Track Encoder und 2 Load Tasten für mausloses Browsen in der Music Library Jeder...

Страница 3: ...buttons provide optimal visual feedback while triggering loops samples effects and cue points Dual function audio video crossfader for video performances within VIRTUAL DJ 105 mm touch sensitive jog wheels with adjustable sensitivity 45 mm pitch fader with range and keylock functions File selector encoder and 2 load buttons for mouseless music library control 3 band EQ with full output kill functi...

Страница 4: ... GETTING STARTED WITH VIRTUAL DJ 29 7 HARDWARE SETTINGS 37 8 MIDI MESSAGES 38 9 TECHNICAL SPECIFICATIONS 40 NOTES 41 Mitgeliefertes Zubehör Supplied Accesories Öffnen Sie den Versandkarton und überprüfen Sie ob alle Zubehörteile vorhanden sind Sollten Teile fehlen kontaktieren Sie bitte Ihren Fachhändler Please open the shipping carton and verify that all accessories have arrived intact If any ite...

Страница 5: ...n sind wir sicher dass Sie lange Zeit Freude an Ihrem Kauf haben werden Bitte bewahren Sie diese Bedienungsanleitung für weiteren Gebrauch auf und geben Sie sie ggf an nachfolgende Besitzer weiter Bei Schäden die durch Nichtbeachtung dieser Bedienungsanleitung verursacht werden erlischt der Garantieanspruch Für daraus resultierende Folgeschäden übernimmt der Hersteller keine Haftung Schützen Sie d...

Страница 6: ...fonanzeige Leuchtet wenn der Eingangsumschalter INPUT 2 auf MIC steht 4 Eingangsumschalter INPUT 1 Schaltet die integrierte Soundkarte bzw den Masterausgang zwischen den Eingangsquellen AUX und LINE PHONO 1 um 5 Eingangsumschalter INPUT 2 Weist die Eingangsquelle LINE PHONO 2 der integrierten Soundkarte zu Position MIC ist ohne Funktion 6 Master Regler Pegelregler für die Gesamtlautstärke Hinweis ...

Страница 7: ...fangen Zusätzlich wird der Controller über das USB Kabel mit Strom versorgt 19 Masterausgang sym Symmetrische 6 3 mm Klinkenbuchsen L R zum Anschluss an Verstärker bzw anderer Geräte mit Line Pegel Eingängen 20 Masterausgang unsym Unsymmetrische Cinchbuchsen L R zum Anschluss an Verstärker bzw anderer Geräte mit Line Pegel Eingängen 21 Eingangsbuchsen INPUT 1 und 2 Stereo Eingänge Cinch zum Anschl...

Страница 8: ...5 AUX Eingang 3 5 mm Klinkenbuchse zum Anschluss eines weiteren analogen Geräts mit Line Pegel z B tragbarer MP3 Player alternativ zum Cinch Eingang INPUT 1 26 Regler INPUT 1 GAIN Zum Einstellen der Eingangsverstärkung für die Eingangsbuchsen INPUT 1 und AUX 27 Kensington Schloss Zur Diebstahlsicherung des Geräts 4 ANSCHLÜSSE HERSTELLEN ...

Страница 9: ...schen Phono Eingang und Line Eingang umschalten Die Signale der Eingangsquellen werden über die integrierte Soundkarte an die Software geleitet und können dort als zusätzliche Line Eingänge und für Timecode Anwendungen genutzt werden Ein weiteres Gerät mit Line Pegel z B tragbarer MP3 Player kann an die 3 5 mm Klinkenbuchse AUX angeschlossen werden 5 Computer Verbinden Sie den USB Anschluss des Ge...

Страница 10: ...ügt Der Controller ist nach dem Anschluss an den Computer sofort betriebsbereit 1 Trennen Sie den DDC 2000 vom Computer Sie werden erst während der Installation aufgefordert das Gerät anzuschließen 2 Laden Sie den ASIO Treiber aus dem Internet herunter www omnitronic de Downloadbereich des Artikels 3 Kopieren und entpacken Sie die Datei auf Ihrem Computer z B auf den Desktop 4 Doppelklicken Sie di...

Страница 11: ...op 3 Doppelklicken Sie die Installationsdatei Install_virtualdj_le_4deck_vxxx exe und folgen Sie nun den Anweisungen des Installationsprogramms xxx steht für die Version des Programms 1 Laden Sie die Software aus dem Internet herunter www omnitronic de Download bereich des Artikels 2 Kopieren und entpacken Sie die Datei auf Ihrem Computer z B auf den Schreibtisch 3 Doppelklicken Sie die Installati...

Страница 12: ...Kopfhörer Soundkarte 4 Out Card DDC 2000 Wählen Sie die Einstellungen Headphones und 4 Out Card und bestätigen Sie mit Anwenden Mit dieser Konfiguration stehen Ihnen dann die beiden Ausgangskanäle Master und Kopfhörer für den Controller zur Verfügung HINWEIS Für Virtual DJ LE ergeben sich einige Beschränkungen Eingänge und die Option Externer Mixer können nur mit Virtual DJ PRO verwendet werden od...

Страница 13: ...ehenden Schritte befolgt haben sollte Virtual DJ PRO den DDC 2000 erkennen Sie können dies prüfen indem Sie im Einstellungsmenü das Register Mapper öffnen CONFIG Mappers Das Gerät sollte nun im Dropdown Menü angewählt sein 1 Laden Sie das Mapping für Virtual DJ PRO aus dem Internet herunter www omnitronic de Downloadbereich des Artikels 2 Kopieren und entpacken Sie die beiden XML Dateien auf Ihrem...

Страница 14: ...ielgeräte bei Bedarf getauscht werden Mit dem Feld Timecode KonfigM öffnen Sie das erweiterte Konfigurationsfenster für Timecode Signale Mac OS X erkennt den DDC 2000 als externes Audiogerät mit 4 Eingängen und 4 Ausgängen Rufen Sie mit CONFIG das Einstellungsmenü von Virtual DJ PRO auf und wählen Sie das Register Soundkarten Grundeinstellung Eingänge None Ausgänge Headphones Master Kopfhörer Soun...

Страница 15: ... auf die Decks 5 und 6 Das Ein und Ausschalten der Line Eingänge erfolgt mit den Tasten Bild und Bild Eingänge Eingänge Line Ins Ausgänge Headphones Master Kopfhörer Soundkarte 4 In 4 Out Card DDC 2000 Mit dieser Konfiguration können Sie externe Au diogeräte als Line Eingänge in Virtual DJ nutzen Das Signal der Geräte wird dem Mastersignal beigemischt Für die Ausgänge stehen die bei den Kanäle Mas...

Страница 16: ...sbelegung unter Virtual DJ beschrieben Nr Bedienelement Funktion 1 Funktion 2 Shift 1 AUTO LOOP drehen Bestimmt die Loop Länge 1 32 Takte AUTO LOOP drücken Schaltet Auto Loop ein und aus Bei eingeschalteter Funktion wird ein Loop automatisch basierend auf der Taktgeschwindigkeit des Titels bestimmt und gestartet Verschiebt den Loop um 4 Takte nach links bzw rechts 2 FX 1 ON Flanger Effekt ein aus ...

Страница 17: ...eck 20 DECK LED B D Zeigt das angewählte Deck 21 SYNC Synchronisiert die Geschwindig keit des ausgewählten Titels mit einem anderen Deck Deck als Master definieren Alle anderen Decks beim Synchroni sieren an die Geschwindigkeit des Master Decks angepasst 22 23 PITCH BEND Verringert erhöht die Geschwindig keit solange Sie die Tasten gedrückt halten Bestimmt den Geschwindigkeitsbe reich für den Pitc...

Страница 18: ...aut stärke 53 DRY WET Regelt den Videoübergang Regelt den Videoeffekt 54 BROWSER drehen Zum Navigieren durch Ordner und Titel Springt in der Ordnerstruktur eine Ebene nach oben BROWSER drücken Ordner öffnen Browser Fenster vergrößern verkleinern 55 LOAD A C Markierten Titel auf Deck A C laden Anzeige im Browser Fenster umschalten Ordner Titel Playlist Sidelist unter Virtual DJ PRO 56 LOAD B D Mark...

Страница 19: ...te CUE 1 drücken Die Grundeinstellung ist HOLD HOLD Die SHIFT Taste muss solange gedrückt werden bis die Zweitfunktion beendet ist TOGGLE Der erste Druck auf SHIFT aktiviert die Zweitfunktion der zweite Druck beendet sie Samples Je nach DJ Software können sich Samples in einem globalen Bereich oder in einem Deck Bereich befinden Sie können die Einstellung für Samples ändern indem Sie den linken Um...

Страница 20: ... SW A 1 15 B3 47 JOG WHEEL berühren SW D1 26 E5 58 JOG WHEEL ENC 2 02 32 20 CUE PLAY SW A 1 16 C4 48 CUE SW B 1 17 C 4 49 PLAY SW C0 18 D4 4A MIXER GAIN VR 3 03 33 21 HIGH KILL drücken SW C 0 19 D 4 4B HIGH DREHEN VR 4 04 34 22 MID KILL drücken SW D0 1A E4 4C MID DREHEN VR 5 05 35 23 LOW KILL drücken SW D 0 1B F4 4D LOW drehen VR 6 06 36 24 CHANNEL CUE SW E0 1C F 4 4E CHANNEL FADER SW 7 07 37 25 L...

Страница 21: ...LOAD B D B0 23 127 7F 0 00 EFFEKTE FX ON F 0 1E 127 7F 0 00 FX 1 G0 1F 127 7F 0 00 FX 2 G 0 20 127 7F 0 00 FX 3 A0 21 127 7F 0 00 MITTLERE SEKTION TX A 1 2E 127 7F 0 00 FX B1 2F 127 7F 0 00 VIDEO X FADER C1 24 127 7F 0 00 VIDEO X FADER LINK C 1 25 127 7F 0 00 VU METER MASTER CC MASTER METER L1 3 03 12 0C 0 00 MASTER METER L2 3 03 24 18 0 00 MASTER METER L3 3 03 36 24 0 00 MASTER METER L4 3 03 48 3...

Страница 22: ...ich Master Gain max Master Out 0 dB Line Aux Phono Mikrofon 20 20 kHz 20 20 kHz 20 20 kHz 20 20 kHz Klirrfaktor Master Gain max Master Out 0 dB mit 20 kHz LPF A gewichtet Line Aux Phono Mikrofon 0 05 bei 1 kHz 0 05 bei 1 kHz 0 15 bei 1 kHz 0 15 bei 1 kHz Maximaler Eingangspegel Master Gain max 1 kHz THD 1 mit 20 kHz LPF A gewichtet Line Aux Phono Mikrofon 6 dBV 6 dBV 30 dBV 35 dBV Maximaler Ausgan...

Страница 23: ...performance of the controller s built in sound card You can download the driver at www omnitronic de download section of the product 2 SAFETY INSTRUCTIONS If you follow the instructions given in this manual we are sure that you will enjoy this device for a long period of time Please keep this manual for future needs and pass it on to further owners Damages caused by the disregard of this user manu...

Страница 24: ...hts when the INPUT 2 selector switch is set to MIC 4 INPUT 1 Selector Switch Switches the built in sound card or the master output between the input sources AUX and LINE PHONO 1 5 INPUT 2 Selector Switch Selects input source LINE PHONO 2 for the built in soundcard position MIC has no function 6 MASTER Control Controls the overall volume of the unit Note Prior to switching on turn the master contro...

Страница 25: ...atively to power supply via the USB connection 17 Power Switch Press this button to turn the unit on and off 18 USB Port For connecting a computer The controller sends and receives audio and MIDI data via the USB connection and is supplied with power 19 Balanced Master Output Balanced 6 3 mm output L R of the master signal for connecting an amplifier or other units with line level inputs 20 Unbala...

Страница 26: ...er needs to be replaced or restarted because of a crash or freeze or when changing DJs Either use the INPUT 1 stereo RCA jacks or the AUX 3 5 mm jack for connecting the unit and set the INPUT 1 selector switch accordingly 25 AUX Input 3 5 mm jack for connecting a further unit with line level output e g portable MP3 player alternatively to the RCA input INPUT 1 26 INPUT 1 GAIN Control Adjusts the i...

Страница 27: ...of the input sources are routed through the built in sound card into Virtual DJ where they can be added as additional line inputs or used for Timecode applications A further unit with line level output e g portable MP3 player can be connected to the 3 5 mm jack AUX input 5 Computer Use the supplied USB cable to connect the controller to an available USB port on your computer The first time the uni...

Страница 28: ...s section as their operating system uses a generic Core Audio driver 1 Disconnect the DDC 2000 from the computer You will be prompted to connect the unit during the installation 2 Download the driver from the internet www omnitronic de download section of the product 3 Copy and extract the file to your computer e g your desktop 4 Double click the installation file setup cmd 5 Select a language 6 C...

Страница 29: ...act the file to your computer e g your desktop 3 Double click the installation file Install_virtualdj_le_4deck_vxxx exe and follow the instructions of the installation program xxx represents the version number 1 Download the software from the internet www omnitronic de download section of the product 2 Copy and extract the file to your computer e g your desktop 3 Double click the installation file...

Страница 30: ... Outputs Headphones Master Headphones Sound card 4 Out Card DDC 2000 Select Headphones and 4 OUT CARD and confirm your settings with Apply This configuration will enable you to use both output channels Master and Headphones NOTE There are some limitations to Virtual DJ LE Inputs and the option External Mixer will be available in Virtual DJ PRO or during a trial of Virtual DJ PRO Support and Update...

Страница 31: ...PRO should detect the DDC 2000 You can verify this by opening the Mapper tab in the configuration menu CONFIG Mappers The controller should be indicated as the selected device in the drop down menu 1 Download the Virtual DJ PRO mapping from the internet www omnitronic de download section of the product 2 Copy and extract both XML files to your computer e g your desktop 3 Copy each file into Virtua...

Страница 32: ...put sources in the drop down menu next to the Inputs option Click Timcode ConfigM to open the timecode configuration dialog Mac OS X detects the DDC 2000 as external device with 4 inputs and 4 outputs Open the configuration menu with the CONFIG button and select the Sound Setup tab Basic Setting Inputs None Outputs Headphones Master Headphones Sound card 4 Out Card DDC 2000 The basic setting does ...

Страница 33: ... 2 assigned to decks 5 and 6 The Page and Page keys are used for enabling disabling the line inputs Line Inputs Inputs Line Ins Outputs Headphones Master Headphones Sound card 4 In 4 Out Card DDC 2000 This configuration will enable you to route ex ternal audio devices as line inputs through Virtual DJ The signals will be added to the software s master output The Master and Headphone channels will ...

Страница 34: ...ribes the full Virtual DJ function assignment No Control Element Function 1 Function 2 Shift 1 Auto Loop turn Determines the loop length 1 32 beats Auto Loop press Turns the auto loop mode on and off With the function activated the unit sets and starts a loop based on the BPM of the title Moves the loop by 4 beats to the left or right 2 FX 1 On Flanger effect on off Brake effect on off 3 FX 2 On B...

Страница 35: ... the other deck Select deselect deck as master When a master deck is set all synchronization operations will take the master deck as a reference 22 23 Pitch Bend Decreases increases the playback speed as long as the buttons Selects the pitch adjustment range for the pitch fader 6 10 16 100 24 Scratch Turns the scratch mode for the jog wheel on and off Reverse play of the title 25 Jog Wheel For pit...

Страница 36: ... Browser turn Scrolls through folders or titles To jump one level higher in the folder structure Browser press Opens a folder Zooms in out of the browser window 55 Load A C Loads the title selected into deck A C Changes the display in the browser window folders titles playlist and sidelist in Virtual DJ PRO 56 Load B D Loads the title selected into deck B D Changes the display in the browser windo...

Страница 37: ...HOLD HOLD You need to keep pressing the SHIFT button until the secondary function is finished TOGGLE The first actuation of the SHIFT button activates the secondary function the second actuation deactivates it Samples Depending on the DJ software used samples may be located in a Global section or a Deck section To change the setting for samples hold the left DECK SWITCH for 3 seconds and press the...

Страница 38: ... 15 B3 47 JOG WHEEL touch SW D1 26 E5 58 JOG WHEEL ENC 2 02 32 20 CUE PLAY SW A 1 16 C4 48 CUE SW B 1 17 C 4 49 PLAY SW C0 18 D4 4A MIXER GAIN VR 3 03 33 21 HIGH KILL push SW C 0 19 D 4 4B HIGH turn VR 4 04 34 22 MID KILL push SW D0 1A E4 4C MID turn VR 5 05 35 23 LOW KILL push SW D 0 1B F4 4D LOW turn VR 6 06 36 24 CHANNEL CUE SW E0 1C F 4 4E CHANNEL FADER SW 7 07 37 25 LOAD A C SW A 0 22 C5 54 L...

Страница 39: ... LOAD B D B0 23 127 7F 0 00 EFFECTS FX ON F 0 1E 127 7F 0 00 FX 1 G0 1F 127 7F 0 00 FX 2 G 0 20 127 7F 0 00 FX 3 A0 21 127 7F 0 00 CENTER SECTION TX A 1 2E 127 7F 0 00 FX B1 2F 127 7F 0 00 VIDEO X FADER C1 24 127 7F 0 00 VIDEO X FADER LINK C 1 25 127 7F 0 00 VU METER MASTER CC MASTER METER L1 3 03 12 0C 0 00 MASTER METER L2 3 03 24 18 0 00 MASTER METER L3 3 03 36 24 0 00 MASTER METER L4 3 03 48 30...

Страница 40: ...quency response master gain max master out 0 dB Line Aux Phono Mic 20 20 kHz 20 20 kHz 20 20 kHz 20 20 kHz THD master gain max master out 0 dB with 20 kHz LPF A weighted Line Aux Phono Mic 0 05 at 1 kHz 0 05 at 1 kHz 0 15 at 1 kHz 0 15 at 1 kHz Max input level master gain max 1 kHz THD 1 with 20 kHz LPF A weighted Line Aux Phono Mic 6 dBV 6 dBV 30 dBV 35 dBV Max output level master gain max 1 kHz ...

Страница 41: ...41 NOTES ...

Страница 42: ...42 ...

Страница 43: ...43 ...

Страница 44: ... OMNITRONIC 201 OMNITRONIC 201 OMNITRONIC 201 OMNITRONIC 2015 5 5 5 Technische Änderungen und Irrtum vorbehalten Every information is subject to change without prior notice 00089187 DOCX Version 1 1 ...

Отзывы: