3
EN
Windows XP
A “Setup” dialog will be displayed.
Windows Vista/Windows 7
An Autorun dialog will be displayed. Click “OLYMPUS
Setup” to display the “Setup” dialog.
If the “Setup” dialog is not displayed, select “My Computer”
(Windows XP) or “Computer” (Windows Vista/Windows 7)
from the start menu. Double-click the CD-ROM (OLYMPUS
Setup) icon to open the “OLYMPUS Setup” window and
then double-click “SETUP.EXE”.
If a “User Account Control” dialog is displayed, click “Yes”
or “Continue”.
2
Follow the on-screen instructions on your
computer.
If nothing is displayed on the camera screen even after
connecting the camera to the computer, the battery may be
exhausted. Leave the camera connected to the computer
until the battery has charged, then disconnect and
reconnect the camera.
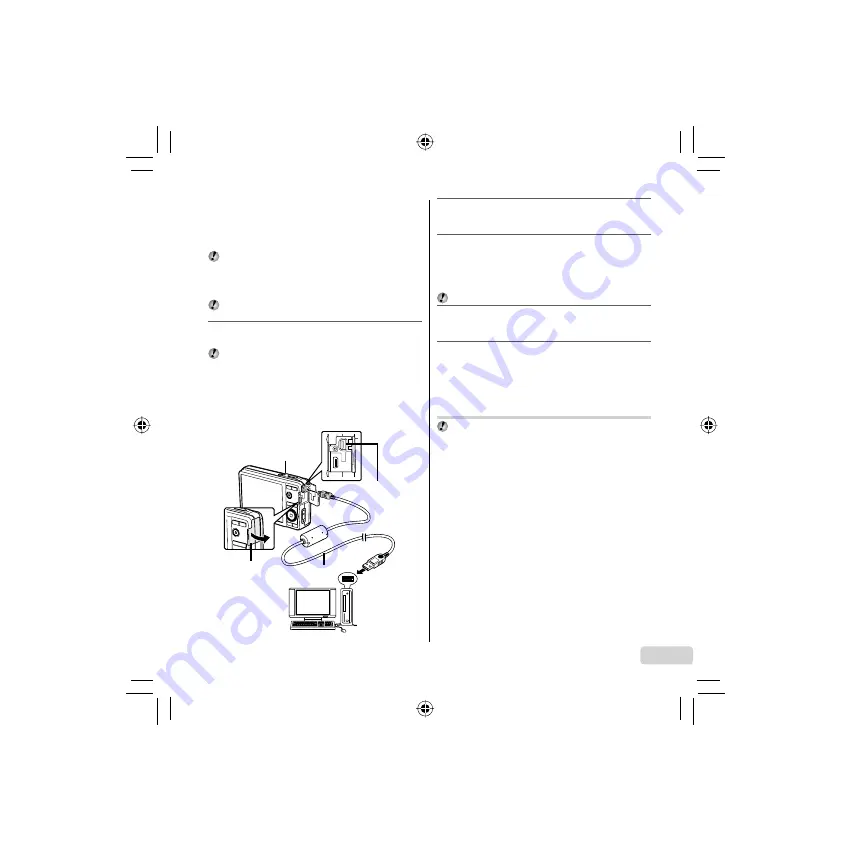
Connecting the camera
Multi-connector
Connector
cover
USB cable
(supplied)
Computer (on
and running)
Indicator lamp
●
●
3
Register your Olympus product.
Click the “Registration” button and follow the on-screen
instructions.
4
Install the camera manual.
Click the “Camera Instruction Manual” button and follow
the on-screen instructions.
Macintosh
Mac OS X v10.4.11–v10.6
1
Insert the supplied CD in a CD-ROM drive.
Double-click the CD (OLYMPUS Setup) icon on the
desktop.
2
Copy the camera manual.
Click the “Camera Instruction Manual” button to open
the folder containing the camera manuals. Copy the
manual for your language to the computer.
Charging the battery with the
included USB-AC adapter
The included USB-AC adapter (F-2AC) (hereafter referred
as USB-AC adapter) has been designed to be used only
for charging. Make sure that operations such as shooting,
viewing images and so on are not being used while the
USB-AC adapter is connected to the camera.
●
●
●
●
Содержание m-7050
Страница 1: ...7050 Basic Manual DIGITAL CAMERA ENGLISH 2 10 18 INDONESIA 26 34...
Страница 15: ...15 KR 2 HI HI A 10 10 26 12 30 10 10 26 12 30 4 30 4 30 OK 1 G D OK MENU 2 FG A 10x 1 FGHI A FGHI OLYMPUS...
Страница 16: ...16 KR Olympus USB AC LED 1 m SD SDHC USB AC Olympus USB AC USB AC Olympus...
Страница 21: ...21 CT SD SDHC 1 2 2 1 2 1 M 1 n 4 4 14M NORM 00 34 00 34 MENU MENU M A M 4 4 iAUTO iAUTO 14M MENU MENU P P n...
Страница 23: ...23 CT 2 HI HI A 10 10 26 12 30 10 10 26 12 30 4 30 4 30 OK 1 G D MENU OK 1 2 FG 1 A 10 1 FGHI A FGHI OLYMPUS...
Страница 24: ...24 CT Olympus USB AC LED 1 m SD SDHC USB AC Olympus USB AC USB AC...
Страница 37: ...37 TH SD SDHC 1 2 2 1 2 1 M 1 n 4 4 14M NORM 00 34 00 34 MENU MENU M A M 4 4 iAUTO iAUTO 14M MENU MENU P P n...
Страница 39: ...39 TH 2 HI HI A 10 10 26 12 30 10 10 26 12 30 4 30 4 30 OK 1 G D MENU OK 2 FG A 10x 1 FGHI A FGHI OLYMPUS...
Страница 40: ...40 TH Olympus USB AC LED 1 SD SDHC USB AC Olympus USB AC USB AC...
Страница 42: ...42 MEMO...
Страница 43: ...43 MEMO...
Страница 44: ...Printed in Indonesia 1AG6P1P6070 VR133201...