3
Erasing files/f
olders
48
EN
Erasing files/folders
Erasing a folder
1
Select the folder you want to
erase (
☞
P.22).
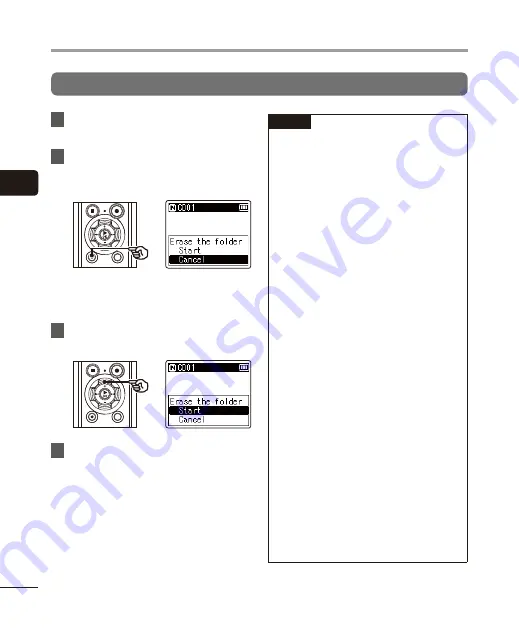
2
In the folder display screen, press
the
ERASE
button while the voice
recorder is in stop mode.
•
The voice recorder returns to the
stopped mode if no operation is
performed for 8 seconds.
3
Press the
+
button to select
[
Start
].
4
Press the
`
OK
button.
•
[
Erasing!
] appears in the display, and
the erasing process starts. [
Erased
]
appears when the process has
finished.
NOTE
•
Files cannot be restored after being
erased, so please check carefully before
erasing a file.
•
When there is a microSD in the voice
recorder, be sure to check whether the
recording media being erased is on the
[
Internal memory
] or [
microSD card
]
(
☞
P.68).
•
Locked files and read-only files cannot
be erased (
☞
•
The voice recorder’s default [
Recorder
]
folders ([
FolderA
] to [
FolderE
]) and
[
Music
] folder cannot be erased.
•
[
Music
] folder subfolders other than
the [
Music
] can be erased.
•
Files unrecognizable to the voice
recorder will not be erased, nor will
folders containing these files. The voice
recorder must be connected to a PC to
erase these files and folders.
•
Before erasing a file or folder, charge or
replace the battery to ensure it will not
run out before the process has finished.
Erasing processes can take over 10
seconds to complete. To prevent the
risk of damage to data, never attempt
to perform any of the following
processes before an erasing process
has finished :
1
Disconnecting the AC adapter
2
Removing the battery
3
Removing the microSD card (if the
recording media has been set to
[
microSD card
]).


