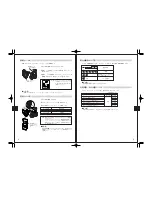
Olympus FS-HV1 Скачать руководство пользователя страница 9

16

17

1.

 Remove the protective cap from the BN-1 Ni-Mh Battery Pack.

2.

 Set the HV-1 power switch to OFF.

NOTE:

If the battery pack is attached while the power switch is ON,
the indicator lamp blinks in red and the HV-1 does not function.

3.

 Attach the BN-1 Ni-Mh Battery Pack to the HV-1 as described

below.
Align the groove at the bottom of the BN-1 Ni-Mh Battery Pack
with the claw on the lower part of the HV-1 and fit the upper part
of the BN-1 Ni-Mh Battery Pack into the release lever on the HV-
1 so that it clicks. Make sure the battery pack is attached firmly.

4.

 When detaching the BN-1 Ni-Mh Battery Pack, be sure to

set the power switch to OFF and then lift the release lever.

Recharging the battery pack

Attaching/detaching the battery pack
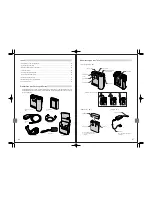
Nomenclature

1

2

3

4

1

2

4

5

Remove the cover
before connection.

1.

 Set the HV-1 power switch to OFF/CHARGE.

(Charging is impossible if the power switch is set to ON.)

2.

 Push the BN-1 Ni-Mh Battery Pack power indicator button

and check the remaining battery capacity.

3.

 Attach the BN-1 Ni-Mh Battery Pack to the HV-1.

4.

 Connect the AC power cord to the input side of the AC-2

AC Adapter, and connect the other end of the AC power
cord to a power outlet.

5.

 Connect the connection plug of the AC-2 AC Adapter to

the DC-IN terminal of the HV-1. (Remove the terminal cover
before connection.)

6.

 Charging is complete when the indicator lamp on the HV-

1 lights in green.

Lamp Status

Charging Status

Extinguished

Battery not connected.

Red lighting

Battery being charged.

Green lighting

Battery charging completed.

Red blinking

Charge error (Time-out or temperature error)

Notes

• Once battery charging starts, it is recommended to continue charging until the battery has been fully charged, without stopping

charging in the middle. (The remaining battery capacity cannot be indicated correctly unless the battery is charged fully.)

• Whenever possible , use the battery until it has been fully discharged.

(Repeatedly recharging the battery before it has been fully used up may reduce the battery’s service life.)

• In the following cases, immediately unplug the power cord from the wall outlet and contact Olympus;

• if recharging does not complete in 10 hours;
• if the indicator lamp blinks in red while the battery pack is attached correctly as described in this manual.

• High Voltage Pack   HV-1

Indicator lamp

DC-IN terminal

Release lever

Connection
cable terminal

Power switch

Protective cap
storage position

Strap attaching
position

Belt loop

How to attach the strap

• Ni-Mh Battery Pack   BN-1

Protective cap

Power indicator
lamp

Power indicator
button

• Always attach the

protective cap  be-
fore storage.

• AC Adapter

AC-2

Connection plug

AC power cord

• Plug the AC cord in firmly.

NK

OK

PK

Содержание FS-HV1

Страница 1: ...ort is available from 8 am to 10 pm Monday to Friday ET E Mail e slrpro olympusamerica com Olympus software updates can be obtained at http www olympusamerica com E1 Premises Goods delivery Wendenstra...

Страница 2: ...2 3 BN 1 AC AC AC 2 AC AC AC BN 1 AC AC100V AC HV 1 10 30...

Страница 3: ...4 5 5 6 7 7 8 8 8 9 10 1 O P 10 60 HV 1 OFF 15 25 500 http www baj or jp recycle 10 30 HV 1 BN 1 AC AC 2...

Страница 4: ...6 7 esJN _kJN JO DC IN 1 BN 1 2 HV 1 OFF ON 3 BN 1 HV 1 HV 1 BN 1 BN 1 HV 1 4 OFF 1 HV 1 OFF CHARGE ON 2 BN 1 3 BN 1 HV 1 4 AC AC 2 5 AC HV 1 DC IN 6 HV 1 10 1 2 3 4 1 2 4 5 NK OK PK...

Страница 5: ...8 9 FL 50 1 HV 1 OFF 2 HV 1 3 1 HV 1 2 3 HV 1 OFF HV 1 HV 1 BN 1 FL 50 10 10 FL 50 3 LR6 3 FR6 3 ZR6 CR V3 LB 01 3 1000mAh 3 1900mAh 1 2 1 280 400 400 400 400 370 450 HV 1 E F 1 2 3 1 2 3 0...

Страница 6: ...0 00 18 00 TEL 0266 26 0330 FAX 0266 26 2011 394 0083 3 15 1 9 00 17 00 esJN MODEL NO FS HV1 BN 1 6V 330V 10 BN 1 0 40 20 60 110mm 149 5mm 53 5mm 320g _kJN MODEL NO FS BN1 DC7 2V 2600mAh 0 40 10 60 20...

Страница 7: ...ver throw this product into a fire or put it near a fire When unplugging the AC adapter from a power outlet hold it by the plug Do not pull it out by the cord Do not bend or pull the cord excessively...

Страница 8: ...g conditions Recycling the battery Please recycle BN 1 batteries to help save our planet s resources When you throw away dead batteries be sure to cover their and terminals and always observe local la...

Страница 9: ...to the DC IN terminal of the HV 1 Remove the terminal cover before connection 6 Charging is complete when the indicator lamp on the HV 1 lights in green Lamp Status Charging Status Extinguished Batter...

Страница 10: ...ote that battery charge time increases and the flashing count decreases Note If the indicator lamp blinks in red while the battery pack is attached correctly as described in this manual unplug the pow...

Страница 11: ...14 5 oz excluding the protective cap AC 2 Model No FS AC2 Rated input 100 to 240 V AC 50 60 Hz 27 VA 100 V to 36 VA 240 V Rated output 12 V DC 1 0 A Ambient temperatures 0 C to 40 C operation 20 C to...

Страница 12: ...denen entflammbare Gase auftreten k nnen Andernfalls besteht Explosions und Feuergefahr Niemals die Kontakte Plus und Minuspol des Akkus kurzschlie en Beim Transportieren oder Lagern desAkkus stets d...

Страница 13: ...t und dem Fernseh oder Rundfunkempf nger vergr ert werden Auch innerhalb des zul ssigen Temperaturbereichs kann es im unteren Temperaturbereich zum Nachlassen der Akkuleistung kommen Bei niedrigen Umg...

Страница 14: ...st ndigkeit Bei unvollst ndigem oder fehlerhaftem Packungsinhalt wenden Sie sich bitte an Ihren Fachh ndler High Voltage Pack HV 1 Ni Mh Akkus BN 1 Netzteil AC 2 Netzkabel Anschlusskabel Trageriemen S...

Страница 15: ...V 1 einlegen 4 Das Netzkabel erst am Netzteil AC 2 und dann an einer Netzsteckdose anbringen 5 Das Anschlusskabel des Netzteil AC 2 an die DC IN Buchse des HV 1 anschlie en Vor dem Anschluss die Buchs...

Страница 16: ...n diesem Fall wird mehr Zeit zur Herstellung der Blitzbereitschaft ben tigt und die Anzahl der Blitze verringert sich Hinweis Wenn die Anzeige LED in Rot blinkt obwohl der Akku einwandfrei wie in dies...

Страница 17: ...71 B x 117 H x 25 T mm Gewicht Ca 410 g ohne Schutzabdeckung AC 2 Modellnummer FS AC2 Nenneingang 100 bis 240 V Wechselstrom 50 60 Hz 27 VA 100 V bis 36 VA 240 V Nennausgang 12 V Gleichstrom 1 0 A Umg...

Страница 18: ...bustion une surchauffe et ou un choc lectrique En d branchant un cordon de raccordement ou le cordon d alimentation ne pas tirer sur le cordon mais tenir la fiche Sinon des dommages sur le cordon risq...

Страница 19: ...e distance plus loign e du t l viseur ou du r cepteur radio M me lorsque la batterie est utilis e dans la gamme de temp rature de fonctionnement garanti la dur e de fonctionnement diminue comme la tem...

Страница 20: ...es accessoires taient manquants ou endommag s Ensemble haute tension HV 1 Batterie Ni Mh BN 1 Adaptateur secteur AC 2 Cordon d alimentation secteur C ble de raccordement Courroie tui rigide Ensemble h...

Страница 21: ...n secteur au c t entr e de l adaptateur secteur AC 2 et raccorder l autre extr mit du cordon d alimentation secteur une prise de courant 5 Raccorder la fiche de raccordement de l adaptateur secteur AC...

Страница 22: ...la dur e de charge augmente et que le nombre d clairs diminue Remarque Si le voyant clignote en rouge bien que la batterie soit fix e correctement comme d crit dans ce manuel d brancher le cordon d al...

Страница 23: ...rges 500 cycles environ variable selon les conditions de fonctionnement Dimensions 71 L x 117 H x 25 E mm environ Poids 410 g environ sans le capot de protection AC 2 Num ro de mod le FS AC2 Entr e no...

Страница 24: ...umularse calor por ejemplo bajo un acolchado No utilice este producto en una atm sfera de gas inflamable De lo contrario puede resultar en peligros de explosi n o incendio debido a la generaci n de fu...

Страница 25: ...ara evitar cortocircuitos y tampoco introduzca cualquier otro elemento en el bolsillo junto con la pila Precauciones para el transporte y almacenamiento No guarde la pila dej ndola colocada al Paquete...

Страница 26: ...o est da ado consulte con su tienda habit al Paquete de Alto Voltaje HV 1 Paquete de pilas Ni Mh BN 1 Adaptador de CA AC 2 Cable de alimentaci n de CA Cable de conexi n Correa Estuche duro Paqute de...

Страница 27: ...restante 3 Coloque el paquete de pilas de Ni Mh BN 1 al HV 1 4 Conecte el cable de alimentaci n de CA al lado de entrada del adaptador de CA AC 2 y conecte el otro extreme del cable de alimentaci n de...

Страница 28: ...as En este caso sin embargo tenga en cuenta que el tiempo de carga de pila aumenta y la cantidad de destellos disminuye Nota Si la l mpara indicadora destella en rojo mientras el paquete de pilas est...

Страница 29: ...a de cargas descargas Aprox 500 ciclos variable dependiendo en las condiciones de operaci n Dimensiones Aprox 71 An x 117 Al x 25 Pr mm Peso Aprox 410 g excluyendo la tapa de protecci n AC 2 N mero de...

Страница 30: ...MEMO MEMO...

Отзывы: