


6
7
!"
!"#$%&'()
esJN
!"#$%&'
_kJN
^`
!"#
^`JO
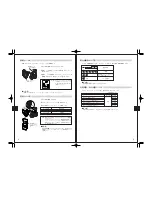
DC-IN端子
電源スイッチ
ストラップ
取り付け部
取り外しレバー
接続ケーブル
端子
ベルト通し
パワーインジケーター
ボタン
保護キャップ
パワーインジケーター
ランプ
・保管する際は必ず
保護キャップを付けて
ください。
接続プラグ
電源コード
・電源コードをしっかりと
接続します。
インジケーターランプ
!"#$%&'(
!"#$%!"&' '()
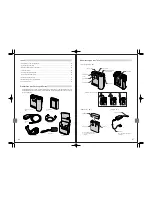
1.
ニッケル水素電池BN-1の保護キャップを外します。
2.
HV-1本体の電源スイッチをOFFにします。
: ONの状態で取り付けると、インジケーターランプが赤
く点滅し、作動しません。
3.
ニッケル水素電池BN-1をHV-1本体に装着します。
HV-1本体下部にあるツメとニッケル水素電池BN-1下部に
ある溝をあわせて、ニッケル水素電池BN-1の上側をHV-1
本体の取り外しレバーに、カチッと音がし、確実に取り付
いていることを確認します。
4.
取り外す時は、必ず電源をOFFにしてから取り外しレバー
を上げます。
!"#
1.
HV-1本体の電源スイッチをOFF/CHARGEにします。
(ONでは充電できません)
2.
ニッケル水素電池BN-1のパワーインジケーターボタンを
押して、電池の残量を確認します。
3.
ニッケル水素電池BN-1をHV-1本体へ取り付けます。
4.
ACアダプターAC-2に電源コードをしっかりと接続し、コン
セントに差し込みます。
5.
ACアダプターの接続プラグをHV-1本体のDC-IN端子に接
続します。(カバーを外して接続してください)
6.
HV-1本体のインジケーターランプが緑色に変われば充電
完了です。
!"#
!"
消 灯
赤点灯
緑点灯
赤点滅
!
*充電を開始した電池は中断せずにフル充電する事をお勧めします。
(フル充電しないと電池残量表示の状態が正しく表示されません)
*電池はできるだけ使い切ってから充電してください。
(使いきらずに充電することを繰り返すと電池寿命が短くなることがあります)
*以下の場合は電源コードをコンセントから抜いてオリンパス岡谷修理センターにご相談ください。
・10時間以上たっても充電が完了しない。
・電池を取扱説明書どおりに正しく取り付けているのに赤点滅したとき。
カバーを外して接続します
電池未接続
充電中
充電完了
充電エラー(タイムアウト・温度異常)
1
2
3
4
1
2
4
5
保護キャップ収納部
NK
OK
PK
Содержание FS-HV1
Страница 2: ...2 3 BN 1 AC AC AC 2 AC AC AC BN 1 AC AC100V AC HV 1 10 30...
Страница 30: ...MEMO MEMO...