background image

38

3

EN

Ho

w t
o u

se t

he m
en

u

EXIT

Main Menu

File Menu

LCD/Sound Menu

Device Menu

Rec Menu

EXIT

Main Menu

File Menu

LCD/Sound Menu

Device Menu

Rec Menu

BACK

EXIT

Rec Menu

Mic Sense

Rec Mode

VCVA

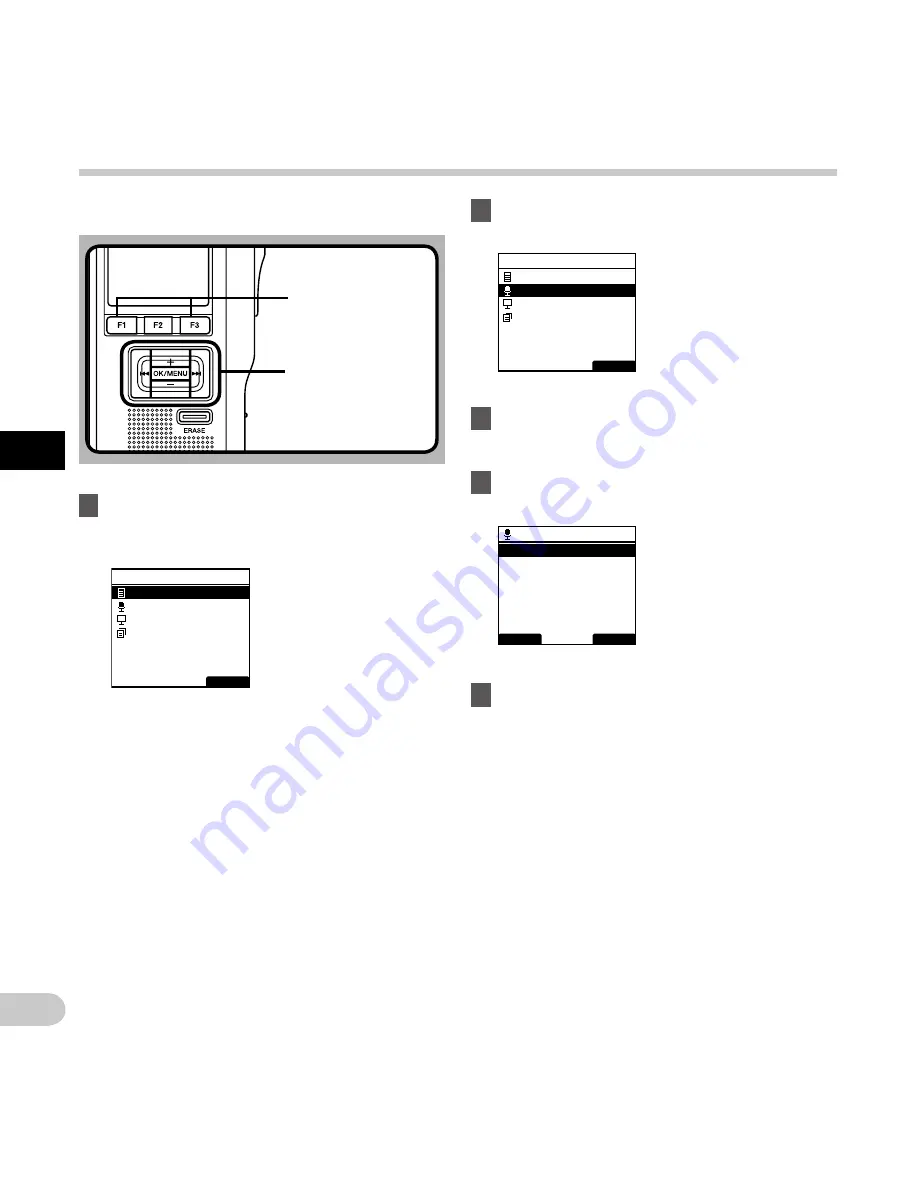
How to use the menu

To set each menu item, follow the steps below.


1

  While the recorder is in stop mode, press 

the 

OK/MENU

 button.

•  The menu will appear on the display.


3

  Press the 

OK/MENU

 button.

•  Setting items in the selected menu will 

appear.


4

  Press the 

+

 or 

 button to select the item 

to be set.


2

  Press the + or − button to select the 

menu including the item to be set.

OK/MENU

 button

+

 button

9

0

 button

F1

F3

 button


5

  Press the 

OK/MENU

 button.

•  Settings of the selected item will appear.

Содержание DS-5500

Страница 1: ...s Digital Voice Recorder Please read these instructions for information about using the product correctly and safely Keep the instructions handy for future reference To ensure successful recordings we recommend that you test the record function and volume before use EN DS 5500 ...

Страница 2: ...t our Customer Support Center Any liability for passive damages or damage of any kind occurred due to data loss incurred by a defect of the product repair performed by the third party other than Olympus or an Olympus authorized service station or any other reason is excluded Trademarks and registered trademarks Microsoft and Windows are registered trademarks of Microsoft Corporation Macintosh is a...

Страница 3: ...ayback 27 Erasing 29 Erasing files 29 Partially erasing a file 30 Using the hold function 32 3 Advanced operations Selecting folders and files 33 Displaying file information 33 Device lock function 34 Setting the Author ID and Work Type 35 Verbal Comment 36 Index marks 37 How to use the menu 38 Menu items 40 File Menu 40 Rec Menu 40 LCD Sound Menu 41 Device Menu 42 Editing the Work Type informatio...

Страница 4: ...ifiers Near flammable items or explosives In wet places such as bathrooms or in the rain In places prone to strong vibrations Never drop the recorder or subject it to severe shocks or vibrations The recorder may malfunction if it is used in a location where it is subject to a magnetic electromagnetic field radio waves or high voltage such as near a TV set microwave video game loud speakers large m...

Страница 5: ... use other types of cards If you accidentally insert another type of card into the recorder contact an authorized distributor or service center Do not try to remove the card by force Do not operate the unit while operating a vehicle f Caution Stop using the recorder immediately if you notice any unusual odors noise or smoke around it Never remove the battery with bare hands which may cause a fire ...

Страница 6: ...f Danger The battery should never be exposed to flame heated short circuited or disassembled Never heat or incinerate battery Take precautions when carrying or storing batteries to prevent them from coming into contact with any metal objects such as jewelry pins fasteners etc To prevent causing battery leaks or damaging their terminals carefully follow all instructions regarding the use of batteri...

Страница 7: ...le battery when using it for the first time or if it has not been used for a long period Rechargeable batteries have limited lifetime When the operating time becomes shorter even if the rechargeable battery is fully charged replace it with a new one Dispose of the used battery following the instructions Please recycle batteries to help save our planet s resources When you throw away dead batteries...

Страница 8: ...therwise damaged the AC adapter is dropped in water or if water metal flammable substances or other foreign objects get inside it you notice anything unusual when using the AC adapter such as abnormal noise heat smoke or a burning odor 1do not touch any of the exposed parts 2immediately disconnect the power supply plug from the power outlet and 3call your dealer or local Olympus representative for...

Страница 9: ...corder is compatible with USB 2 0 enabling fast data transfer to a computer s Five folders and up to 200 files per folder for a maximum of 1 000 recordings P 22 When using ODMS Olympus Dictation Management System software it is possible to create up to seven folders max 1 400 files P 47 P 49 s Large LCD screen with backlight s Device Lock function to prevent unauthorized access to device P 34 P 47...

Страница 10: ... REV switch 5POWER HOLD switch 6ERASE button 7EAR Earphone jack 8MIC Microphone jack 9Status indicator light 0Display LCD panel Volume button Fast Forward 9 button OK MENU button Programmable smart F1 F2 F3 buttons Rewind 0 button Volume button Built in speaker Battery cover USB connector Docking station connector Battery cover release button ...

Страница 11: ... number 0Battery type Total number of recorded files in the folder Playback position bar indicator Current playback time File length Slide switch guide You can display the slide switch guide by using Slide switch guide P 47 of the customize functions of ODMS software Display in the recording mode Display in the playback mode SD card SD card lock Built in memory Battery Power supply from AC adapter...

Страница 12: ...tery loses power When indicator appears on the display charge or replace the batteries as soon as possible When the battery is too weak and Battery Low will appear on the display and the recorder will shut down Notes Turn off the recorder before replacing the batteries Removing the batteries while the recorder is still in use may cause malfunctions file corruption or file loss After replacing the ...

Страница 13: ...able After loading the Ni MH rechargeable batteries into the recorder you can charge them by connecting the recorder with a PC or USB connecting AC adapter via the USB cable Before connecting the USB cable exit the hold mode P 32 Charging by connecting to a PC via USB cable 1 Boot the PC 2 Connect the USB cable to the USB port of the PC 3 While the recorder is in stop mode or turned off connect th...

Страница 14: ...rging is completed when and Battery Full are displayed Charging the batteries using the docking station After loading the Ni MH rechargeable batteries into the recorder you can charge them by using the docking station in combination with the USB cable or the AC adapter The Standard version of the DS 5500 does not include the docking station and the AC adapter optional Charging using docking statio...

Страница 15: ...stead Do not charge the recorder through a USB hub Do not attach or remove the batteries if the USB cable is connected Push the USB cable into the USB connector all the way Otherwise the recorder may not operate properly Use the included dedicated USB cable If any other manufacturer s cable is used it may lead to malfunction of the recorder Also never use this dedicated cable with any other manufa...

Страница 16: ...This is an inherent nature of these products Recommended temperature range of use During operation 0 C 42 C 32 F 107 6 F Charging 5 C 35 C 41 F 95 F Storage for a long period 20 C 30 C 4 F 86 F Using the battery outside the above temperature range may result in declining efficiency and shorter battery life Notes This recorder is designed to fully charge batteries regardless of their energy level H...

Страница 17: ...e recorder via the docking station Always turn off the recorder before you connect power Detecting abnormal voltage If the recorder detects a DC power voltage outside the allowed voltage range 4 5 5 5V then Power Supply Error Remove Power Plug will appear on the display and all operation will stop The recorder will not be operable if abnormal voltage is detected Stop use of the recorder Power supp...

Страница 18: ...urchased the product Notes When initializing formatting a card confirm that no necessary data is stored on the memory card beforehand Initialization completely erases the existing data on the card Cards initialized formatted by another device like a computer may not be recognized Be sure to format them with this recorder before use The card has a service life When reaching the end of its life writ...

Страница 19: ...tomatically display the format menu options P 45 Use only cards formatted with the recorder P 45 Never remove the card while the recorder is operating as this may damage the data After pushing the card inward to eject it releasing your finger too quickly may cause the card to be ejected unexpectedly The recorder may not properly recognize the card even when that card is compatible with it The proc...

Страница 20: ...aline 3 Press the OK MENU button to complete the setting The time date setting screen may appear after displaying message Set Time Date In this case follow the steps given in Setting time and date Time Date Setting time and date Time Date If you set the time and date beforehand the information when the file is recorded is automatically stored for each file Setting the time and date beforehand enab...

Страница 21: ...ime and date setting The recorder will return to the previous time and date You can set the time and date from your PC using ODMS and DSS Player software P 47 Changing the time and date If the current time and date is not correct set it using the procedure below 1 While the recorder is in stop mode press the OK MENU button 2 Press the or button to select Device Menu 3 Press the OK MENU button 4 Pr...

Страница 22: ... and deletes part of the previously recorded file starting from the chosen position P 24 Insert The recorded file will be inserted in the middle of the previously recorded file starting from the chosen recording position The original file will be kept P 25 By default the RECORD function is configured to record using the overwrite option Recording will start from the current position of the existin...

Страница 23: ...e recorded When you press the F2 DISPLY button during recording you can change the screen displays 3 Move the slide switch to the STOP 4 position to stop recording If you want to append additional recordings to the same file move the slide switch to the REC s position again Notes During recording a beep will sound whenever the remaining recording time reaches 60 30 and 10 seconds When the remainin...

Страница 24: ... will be erased 1 Select and play the file you want to overwrite Stop the playback at the point you want to start overwriting 2 Move the slide switch to the REC s position to start overwriting The red status indicator light turns on aRecording elapsed time bTotal recording time of the selected file 3 Move the slide switch to the STOP 4 position to stop overwriting Note You cannot select a recordin...

Страница 25: ...e playing the file press the F1 INSERT button to insert an additional recording Insert Rec will appear on the display 3 Move the slide switch to the REC s position to start inserting the additional recording The blue status indicator light will turn on Insert Rec and the remaining recording time will alternate on the display 4 Move the slide switch to the STOP 4 position to stop inserting the addi...

Страница 26: ...to monitor your recording by listening to it even while the recording is in progress In order to do so insert the earphone plug into the earphone jack and use the or buttons to control the volume level Notes When connecting an earphone or an external microphone s plug insert the plug all the way in as shown in the illustration above To avoid irritation to the ear insert the earphone after turning ...

Страница 27: ...k a file starting from any point 1 Select the file then move the slide switch to the PLAY position to start playback The green status indicator light will turn on 2 Press the or button to adjust the volume The volume can be adjusted within a range from 00 to 30 3 Move the slide switch to the STOP 4 position at any point you want to stop the playback Playback ...

Страница 28: ...layback Playback at normal speed Slow Play slow playback Playback speed slows down 50 and Slow play will be displayed Fast Play fast playback Playback speed becomes faster 50 and Fast play will be displayed Notes If you press the 9 button once while fast forwarding or twice while in stop mode the recorder will stop at the end of the file F Skip If you press the 0 button once while rewinding or twi...

Страница 29: ... start Erase Done is displayed when the file is erased File numbers will be reassigned automatically A selected file can be erased from a folder Also all files in a folder can be erased simultaneously 3 Press the button to select Erase in Folder or File Erase Erase in Folder All files in a folder can be erased simultaneously File Erase Erase one file 4 Press the OK MENU button Notes An erased file...

Страница 30: ...op In case of a Verbal comment P 36 before the end of the file that point will be set automatically as the ending point of the partial erase If you press the F1 button playback will skip back B Skip and restart from the partial erase starting point Playback will continue until the end of the file or until the partial erase ending point is confirmed Any unnecessary part of a file can be erased 3 In...

Страница 31: ...otes If the ERASE button is not pressed within 8 seconds after the Start point and End point are alternately displayed the recorder will revert to stop status An erased file cannot be restored The erasing process may take up to 10 seconds Do not interrupt this process or data may be damaged Files cannot be partially erased in the following cases Files are locked P 40 Partial erasing is not possibl...

Страница 32: ...tton operations are locked Notes If any button is pressed during the hold mode current date and time is displayed for approximately 2 seconds If the POWER HOLD switch is slid to the HOLD position during recording or playback button operations are locked but the recording or playback continues to the end Exiting the hold mode Slide the POWER HOLD switch back to the default position ...

Страница 33: ...e F1 FOLDER button The folder list screen will be displayed 2 Press the or F1 FOLDER button to select the folder then press the OK MENU button a Current file number b Total number of recorded files in the folder Selecting a file 1 While the file is being displayed press the 9 0 button The recorder can display a variety of information related to the current file 1 Select the file containing the inf...

Страница 34: ...next one over to the right Repeat steps 1 and 2 to enter all four digits Pressing the ERASE button at any time will erase the last entry and move the cursor to the previous entry to the left 3 After all four digits have been entered press the F2 ENTER button If the 4 digit number entered matches the registered password then the start up message will appear and the recorder will start up Authentica...

Страница 35: ...gistered up to a maximum of 16 characters Setting the Work Type Up to 20 Work Types can be registered and uploaded to the recorder using the ODMS software Each Work Type can have up to 10 optional items associated with it Work Types and Optional Items can be used on the recorder to populate the file header information Refer to the ODMS software online help for registering setting up Optional Items...

Страница 36: ...s and hold the F1 VERBAL button Data recorded while pressing the F1 VERBAL button will be recorded as Verbal Comment Locating a Verbal Comment 1 When playing back a file press and hold the 9 or 0 button The recorder stops for 1 second when it reaches the Verbal Comment Clearing a Verbal Comment 1 When playing a Verbal Comment press the ERASE button 2 Press the button to select Clear then press the...

Страница 37: ...ill start flashing Locating an index mark 1 While playing back a file press and hold the 9 or 0 button The recorder stops for 1 second when it reaches the index mark Clearing an index mark 1 Select a file in which index marks you want to erase are contained 2 Press the 9 or 0 button to select the index mark to erase 3 While the index number appears for approximately 2 seconds on the display press ...

Страница 38: ...em follow the steps below 1 While the recorder is in stop mode press the OK MENU button The menu will appear on the display 3 Press the OK MENU button Setting items in the selected menu will appear 4 Press the or button to select the item to be set 2 Press the or button to select the menu including the item to be set OK MENU button button 9 0 button F1 F3 button 5 Press the OK MENU button Settings...

Страница 39: ...plete the setting You will be informed that the settings have been established via the screen Menu list File Menu Priority Pending File Lock Work Type Information Rec Menu Mic Sense Rec Mode VCVA LCD Sound Menu Backlight Contrast LED Beep Language Lang Device Menu Memory Select Cue Rev Power Save Time Date Battery USB Class Reset Settings Format Memory Info System Info 6 Press the or button to cha...

Страница 40: ...ume drops below the threshold level 1 Select On 2 Move the slide switch to the REC s position to start recording File Menu Priority By default the F2 button is programmed with the Priority function The setting can also be performed from the menu You can set a priority level on each file recorded You can select High or Normal The default is Normal level Set High level Cancel Normal level Each time ...

Страница 41: ...es available may vary depending on the country region where the product is purchased Adjust the start stop actuation level While the recorder is in recording mode press the 9 or 0 button to adjust the actuation level The VCVA level can be set to any of 15 different values The higher the value is the more sensitive the recorder can react to sounds At the highest value even the faintest sound will a...

Страница 42: ... memory space for the build in memory and SD card in use will be displayed System Info System information about the recorder like the Model Version and Serial No can be displayed Device Menu Memory Select You can switch the recording media between Built in Memory and SD Card default The recording media will appear on the display as or Cue Rev The playback sound of Cue and Review operation and Cue ...

Страница 43: ...ton to select Edit Work Type or Select From Work Type List then press the OK MENU button FINISH EXIT E 029 030 Work Type Letter REFERENCE SUBJECT 012 Ni FINISH EXIT E 0 1 BACK REFERENCE Work Type information screen Option Item name input screen 6 Entering characters s Character selection 0 9 button Use these buttons to select the character you want to input on the Keyboard window s Character confi...

Страница 44: ... moved up to the first character button The Input position changes from lighting to flashing The cursor is lit on the 0 string within the Keyboard window and makes character selection available Entry is performed by insert entry When the character in the Input position has already been finalized the character after the cursor will move one column to the right s Maximum entered character count The ...

Страница 45: ...used in non Olympus devices or cards that are not recognized by the recorder must be formatted before they can be used with the recorder 1 Select Format at the Device Menu screen then press the OK MENU button 2 Press the or button to select Built in Memory or SD Card then press the OK MENU button Formatting the memory Format 4 Press the OK MENU button to confirm Start selection 5 Press the or butt...

Страница 46: ...rmatting the memory will erase all the stored data including locked files When an unformatted card is inserted the format menu will be displayed automatically Locked SD cards cannot be initialized Memory cards will be formatted using quick format Formatting the card will reset the information in file management but the data inside the card may not be deleted completely Be careful of data leakage w...

Страница 47: ...rmation which is displayed on the lower part of LCD in the Recording mode Level Meter Author ID File Name Work Type Recording Time LED Color You can select the color of LED during recording and playback Off Red Green Blue Orange Yellow Customizing the recorder Device Security You can customize adjust set configure various settings related to the recorder s device lock function PIN Code Password se...

Страница 48: ...igure various settings related to the recording and recorded files DSS Format Select the recording format DSS Pro DSS Classic Record function Select the recording mode Overwrite Append Insert File download Select the files you want to be transferred to the PC All files Finished files Programmable Buttons You can change the allocated functions for the Programmable Smart Buttons F1 F2 F3 buttons the...

Страница 49: ... recognition text editing with audio playback for efficient transcription ODMS only Make sure that your computer meets the minimum requirements listed below Please check with your system administrator or your Olympus Professional Dealer Minimum requirement ODMS software Windows Operating System For Stand Alone Microsoft Windows XP Professional Home Edition SP3 x86 Professional Home Edition SP2 x64...

Страница 50: ...r more Drive CD ROM CD R CD RW DVD ROM drive Browser Macintosh Safari 3 0 4 or later mozilla Firefox 3 6 20 or later ODMS and DSS Player software Display 1024 x 768 pixels or more 32 000 colors or more USB port One or more free ports Others Audio device Notes Even if the above conditions are satisfied self modified computers self upgraded OS or multiple OS environments are not supported Macintosh ...

Страница 51: ...SB cable When connected to a PC the built in memory and SD card will be recognized by the PC as separate removable disk drives Notes NEVER remove the card or disconnect the USB cable while the status indicator light is flashing If you do the data will be destroyed Some PC s may not supply sufficient power and the recorder fails to connect Refer to your PC user s manual regarding the USB port on yo...

Страница 52: ... at the lower right corner of the screen Click Safely remove USB Mass Storage Device The drive letter will differ depending on the PC being used 2 Confirm that the status indicator light turns off before disconnecting the USB cable Macintosh 1 Drag and drop the recorder s drive icon for this recorder displayed on the desktop to the Recycle Bin icon 2 Confirm that the status indicator light turns o...

Страница 53: ...ect All Programs All program menu will be displayed 2 Select Olympus Dictation Management System then click Dictation Module Macintosh Disabling automatic start 1 Click the Dock s System Preferences 2 Click Device Detector 3 Turn the automatic startup setting to Off Manual start 1 Double click the DSS Player icon for the folder in Application DSS Player 2 Register user information The user s regis...

Страница 54: ... memory and the PC Example Copying data from PC to recorder s memory 1 Connect the recorder to the PC For connection procedure see Connecting to your PC P 51 The recorder will appear as a removable drive icon 2 Open the recorder removable drive with Explorer Windows or Finder Macintosh 3 Copy the data from the PC to the recorder s memory 4 Disconnect the recorder from the PC For disconnection proc...

Страница 55: ...ll The maximum number of Verbal comments has been reached max 32 Verbal comments per file Erase unnecessary Verbal comments P 36 Folder Full The maximum number of files has been reached max 200 files per folder Erase unnecessary files P 29 Erase Error An error occurred while erasing Erase once again When an Erase Error occurs format the card P 45 Memory Error The built in memory has a problem Form...

Страница 56: ...ge to any other folder P 33 The file is locked Unlock the file from the file menu P 40 The SD card is locked Unlock the SD card No playback tone heard The earphone is connected Unplug the earphones to use the internal speaker The volume level is set to 00 Adjust the volume level P 27 Unable to erase The file is locked Unlock the file from the file menu P 40 The SD card is locked Unlock the SD card...

Страница 57: ...Erase unnecessary verbal comments P 36 Cannot find the recorded file Wrong recording media or folder Switch to the correct recording media or folder P 22 P 33 P 42 Cannot find the transferred files The transferred files are not supported by this recorder The recorder can recognize the DSS file format only Cannot connect to a PC Sometimes a connection cannot be made with some PCs running Windows XP...

Страница 58: ...surrounding noise s PC transcription kit AS 7000 The AS 7000 transcription kit provides you with a Foot Switch a headset and ODMS and DSS Player software for easy transcription of DSS recordings s Foot Switch RS27 28 Connect to the docking station with DS 5500 for hands free transcription s Hand Controller RS32 Connect to the docking station with DS 5500 for tethered remote control using three lar...

Страница 59: ...CH directive Compliant to 2011 65 EU RoHS Lead free soldered product Overall frequency response QP 200 Hz to 7 000 Hz SP 200 Hz to 5 000 Hz Specifications and design are subject to change without notice Battery life is measured by Olympus It varies greatly according to the conditions of use Guide to battery life 4 During recording mode Built in microphone Battery type QP SP Ni MH rechargeable batt...

Страница 60: ...ting to installation and set up please contact your professional dealer from whom you purchased the system FCC notice Radio and Television Interference Changes or modifications not expressly approved by the manufacturer may void the user s authority to operate this equipment This equipment has been tested and found to comply with the limits for a Class B digital device pursuant to Part 15 of the F...

Страница 61: ... 2 This device must accept any interference received including interference that may cause undesired operation 4 For customers in CANADA CAN ICES 3 B NMB 3 B For customers in Europe This symbol crossed out wheeled bin Directive 2006 66 EC Annex II indicates separate collection of waste batteries in the EU countries Please do not throw the batteries into the domestic refuse Please use the return an...

Страница 62: ...clude the above copyright notice this list of conditions and the following disclaimer in the documentation and or other associated materials 3 the copyright holder s name is not used to endorse products built using this software without specific written permission ALTERNATIVELY provided that this notice is retained in full this product may be distributed under the terms of the GNU General Public L...

Страница 63: ...88 553 4448 http www olympusamerica com OLYMPUS EUROPA SE CO KG Premises Consumer Product Division Wendenstrasse 14 18 20097 Hamburg Germany Tel 49 40 23 77 3 0 Fax 49 40 23 07 61 Goods delivery Modul H Willi Bleicher Str 36 52353 Düren Germany Letters Postfach 10 49 08 20034 Hamburg Germany http www olympus europa com OLYMPUS IMAGING AUSTRALIA PTY LTD 82 Waterloo Rd North Ryde NSW 2113 Australia ...

Отзывы: