background image

64

P

lay

b

a

ck

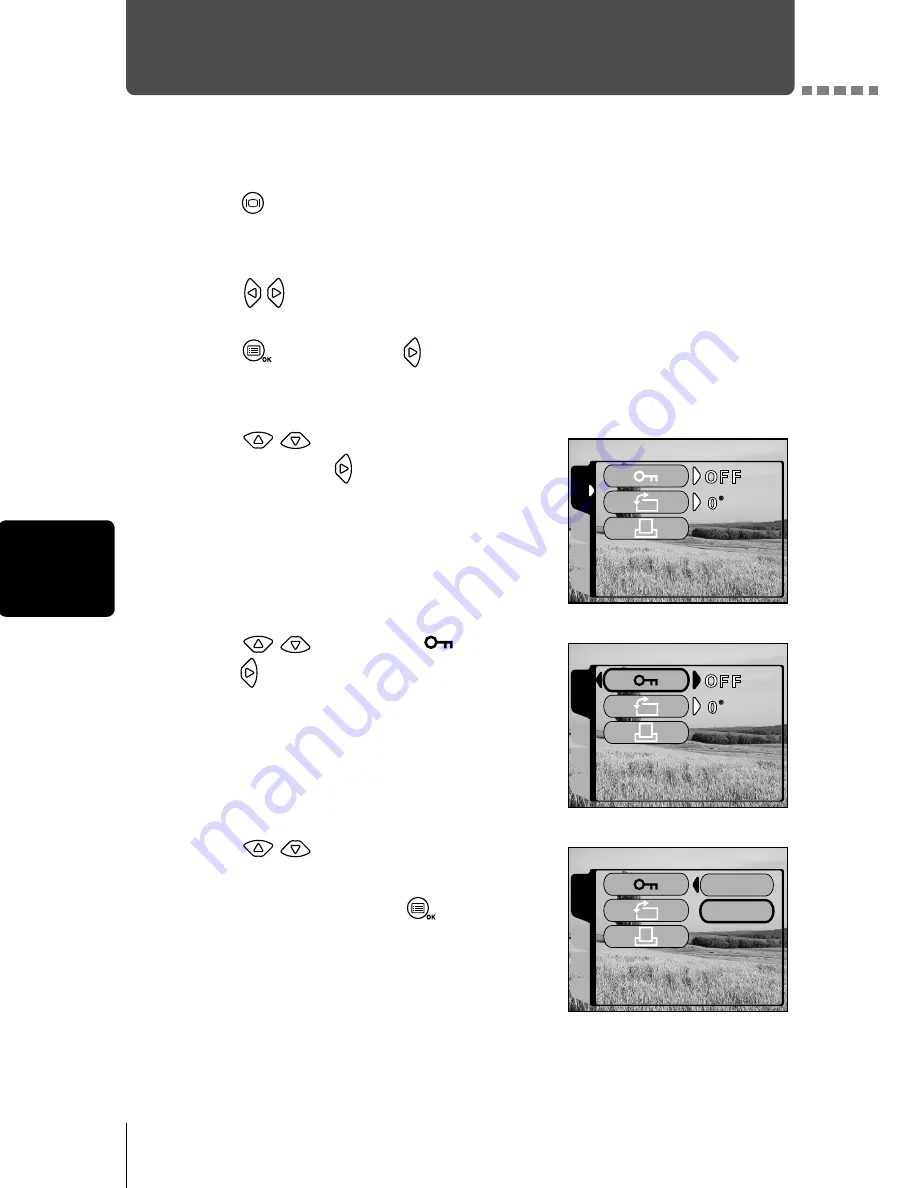
Protecting pictures (Protect)

You are recommended to protect important pictures to avoid accidentally 
erasing them. 

1

Press 

 with the lens barrier closed.

The monitor turns on.

2

Press 

 to select the picture you want to protect.

3

Press , 

then 

press .

The mode menu is displayed.

4

Press 

 to select the PLAY 

tab, then press 

5

Press 

 to select 

, then 

press . 

6

Press 

 to select ON. 

The selected picture is protected.
To close the menu, press 

 twice.

CARD
SEt

EDIt

PLAY

CARD
SEt

EDIt

PLAY

CARD
SEt

EDIt

PLAY

OFF

ON

Содержание C-120 - CAMEDIA - Digital Camera

Страница 1: ...DIGITAL CAMERA C 120 D 380 REFERENCE MANUAL Click Here CONNECTING THE CAMERA TO A PC CAMERA OPERATION...

Страница 2: ...efore you start to use your new camera please read these instructions carefully to enjoy optimum performance and a longer service life Keep this manual in a safe place for future reference We recommen...

Страница 3: ...in Canada This Class B digital apparatus meets all requirements of the Canadian Interference Causing Equipment Regulations Trademarks IBM is a registered trademark of International Business Machines C...

Страница 4: ...3 INDEX Contents 4 Getting started 7 Shooting basics 28 Advanced shooting 38 Playback 54 Camera settings 73 Print settings 83 Troubleshooting 89 Specifications 96 Index 98...

Страница 5: ...TUP screen is displayed 18 Setting the date and time 19 Using the menus and tabs 21 How to use the menus 22 Shortcut menus 24 Mode menus 26 Shooting basics 28 Holding the camera 28 Taking still pictur...

Страница 6: ...ayback 55 Index display 56 Slide show 58 Playing back movies 59 Erasing pictures 61 Single frame erase 61 All frame erase 62 Protecting pictures Protect 64 Editing still pictures 66 Creating black and...

Страница 7: ...If the image quality is poor 93 Specifications 96 Index 98 Indications used in this manual Important information on factors which may lead to a malfunction or operational problems Also warns of opera...

Страница 8: ...oting mode Shutter button Flash Lens Self timer lamp Connector cover DC IN jack USB connector Macro lever Monitor button Turns the camera on and off in the playback mode Card cover Strap eyelet Monito...

Страница 9: ...aining 16 16 p 32 11 Number of pixels 1600 1208 1600 1200 1024 768 640 480 p 46 12 Date and time 02 01 12 12 30 p 19 13 File number Frame number Playing time 100 0016 16 16 14 Print reservation Number...

Страница 10: ...dication on the monitor changes as follows while the camera is turned on Before shooting Gauge is off No more pictures can be taken Fully Lit One picture taken Lit More than two taken Lit Shoot Shoot...

Страница 11: ...ull the strap tight making sure that it is securely fastened and will not come loose Be careful with the strap when you carry the camera as it can easily catch on stray objects causing serious damage...

Страница 12: ...correctly oriented as shown in the illustration 4 Close the battery compartment cover in the direction of While pressing the mark slide the cover in the direction of If the battery compartment cover...

Страница 13: ...economical Their low temperature resistance makes them a good choice for cold areas AA R6 alkaline batteries When you need batteries in a hurry you can use AA R6 alkaline batteries which are easy to g...

Страница 14: ...the AC adapter while the camera is connected to the PC Do not remove or load the batteries or connect or disconnect the AC adapter while the camera is turned on This may affect the camera s internal s...

Страница 15: ...Write protect area Attach the provided write protect seal when you want to protect your data from accidental erasure or overwriting e Index area Use the provided index label to indicate the card s co...

Страница 16: ...far as it will go in the direction shown in the illustration There is an arrow inside the card cover indicating the direction in which the card should be inserted 4 Close the card cover securely until...

Страница 17: ...he card Hold the card with your fingertips and pull it out in the direction of the arrow Never open the card cover or remove the card or the batteries while the camera is turned on Doing so could dest...

Страница 18: ...turns off the monitor turns off If you open the lens barrier without the card inside the camera NO CARD appears on the monitor In this case you can record pictures in the camera s internal memory To s...

Страница 19: ...en the card is formatted To turn the camera off To format the card Press on the arrow pad to select POWER OFF then press the OK Menu button The camera turns off Press on the arrow pad to select FORMAT...

Страница 20: ...2 Press The shooting mode top menu is displayed 3 Press on the arrow pad to select MODE MENU 4 Press to select the SETUP tab then press 5 Press to select then press MODE MENU DRIVE FUNCtION CAM PI C...

Страница 21: ...tting field 8 Repeat the above steps until the date and time are completely set 9 Press For a more accurate setting press when the clock hits 00 seconds The clock starts when you press 10 Close the le...

Страница 22: ...enus Let you quickly access the most frequently used menu settings Display operational buttons at the bottom of the screen and let you select items by pressing Select each menu using the arrow pad Pre...

Страница 23: ...tION CARD SEt PI C CAMERA MEtERING CARD SEt CAM PICtURE WB SEt CAM PI C CARD CARDSEtUP ALL RESEt REC VIEW 1Press to display the top menu then press 2Press to select a tab then press to display the men...

Страница 24: ...rently selected settings If you want to save the settings after the camera is turned off set All Reset to OFF Saving the settings All Reset p 78 CARD SEt PI C CAMERA MEtERING CARD SEt PI C CAMERA MEtE...

Страница 25: ...ty of the image Still picture SHQ HQ SQ1 SQ2 Movie HQ SQ p 46 2 IN 1 Lets you combine two still pictures taken in succession into one picture p 51 Self Portrait mode Lets you take a picture of yoursel...

Страница 26: ...plays all recorded pictures in slide show fashion p 58 Plays back a movie p 59 Displays all the shooting information on the monitor p 80 Erases a selected picture p 61 MODE MENU INFO ERASE MODE MENU M...

Страница 27: ...used to determine exposure or image brightness from the two available settings ESP or spot metering p 42 PICTURE tab WB Sets the appropriate white balance according to the light source p 44 CARD tab C...

Страница 28: ...aller p 68 INDEX Creates an index picture of a movie in 9 frames p 71 CARD tab CARD SETUP Formats a card Erases all image data stored on the card p 74 p 62 BACKUP Copies images stored in the internal...

Страница 29: ...moving When taking pictures in the vertical position hold the camera so that the flash is at the top Incorrect grip Keep your fingers and the strap away from the lens and flash Clear images cannot be...

Страница 30: ...viewfinder 1 Open the lens barrier Slide the lens barrier open until it clicks 2 Position the target mark over the subject in the viewfinder When the distance from the camera to the subject is less t...

Страница 31: ...ictures with the monitor off press again While the green lamp is blinking after the shutter button is pressed halfway the flash is charging While the green lamp is blinking after shooting the picture...

Страница 32: ...actually records more accurately Disadvantages When close to a subject the image in the viewfinder is a little different from the picture that the camera actually records Camera shake can occur easil...

Страница 33: ...r of seconds remaining for one record is displayed Press the shutter button fully again to stop recording z To cancel movie mode Press The monitor turns off and the movie mode is canceled The movie mo...

Страница 34: ...ess while the current flash setting is displayed Each time you press the flash mode is switched in the following sequence AUTO 4 Take the picture The flash working range is approximately 2 5 m 8 2 ft...

Страница 35: ...e phenomenon Fill in flash The flash always fires every time the shutter button is released This mode is suitable when you need minimize shadows around the subject such as the shade of tree leaves on...

Страница 36: ...d to shoot the background ensuring both are exposed Night scene with red eye reduction Use this mode when shooting a portrait against a night background to reduce the red eye phenomenon In this mode p...

Страница 37: ...observing your subject on the monitor 4 Take the picture while observing your subject on the monitor Record mode and zoom magnification When the record mode is set to SHQ HQ or SQ1 1x 2 5x When the r...

Страница 38: ...Slide the macro lever on the front of the camera in the direction of the arrow To cancel the macro mode slide the lever back to its original position 3 Press The monitor turns on 4 Take the picture wh...

Страница 39: ...etting is displayed The setting changes between ON and OFF each time is pressed 4 Press the shutter button fully The self timer lamp lights up for approximately 10 seconds then starts blinking After b...

Страница 40: ...menu is closed 4 Take the pictures Press the shutter button fully and keep it pressed The camera will take pictures in sequence until you release the button The sequential shooting mode is canceled wh...

Страница 41: ...tness in the range of 2 0 in 0 5 steps Often white subjects such as snow will turn out darker than their natural colors Adjusting towards makes these subjects closer to their real shades For the same...

Страница 42: ...s closed Saving the settings All Reset p 78 When you adjust the exposure while observing the subject on the monitor the brightness of the image displayed also changes However the variation may be less...

Страница 43: ...e background light 1 Display the top menu in the shooting mode Open the lens barrier Press 2 Press to select MODE MENU 3 Press to select the CAMERA tab and press 4 Press to select METERING then press...

Страница 44: ...metering is set To close the menu press twice 6 Take the picture while positioning the target mark on your subject in the viewfinder The camera returns to ESP factory default setting when the lens ba...

Страница 45: ...olors 1 Display the top menu in the shooting mode Open the lens barrier Press 2 Press to select MODE MENU 3 Press to select the PICTURE tab then press 4 Press White balance settings AUTO The white bal...

Страница 46: ...settings All Reset p 78 If you want a color tone that resembles what you see under tungsten lighting set the white balance mode to White balance may not be effective under some special light sources...

Страница 47: ...cm or you want to process images on a PC The image quality is higher but the number of storable images is fewer It takes longer to store the images 1600 1208 pixels Clearer Larger HQ High Quality Use...

Страница 48: ...ity File size HQ High Quality You can record continuously for 15 seconds at a time 320 240 pixels Clearer Larger SQ Standard Quality You can record continuously for 60 seconds at a time 160 120 pixels...

Страница 49: ...omputer screen When a picture is transferred to a computer the size of the picture on the computer screen varies depending on the computer s monitor setting For instance a picture taken in 1024 768 re...

Страница 50: ...shooting in panorama mode 1 Display the top menu in the shooting mode Open the lens barrier Press 2 Press to select FUNCTION 3 Press to select PANORAMA then press The panorama mode is set and the mon...

Страница 51: ...CAMEDIA brand SmartMedia cards Exposure and white balance are set by the first picture Do not select an extremely bright subject such as the sun for the first picture Your computer s memory may be ins...

Страница 52: ...Press to select FUNCTION 3 Press to select 2 IN 1 then press The two in one picture mode is set and the monitor turns on automatically 4 Take the first shot while observing your subject on the monitor...

Страница 53: ...sed During two in one picture shooting the sequential shooting and self timer functions are disabled If you are using the digital zoom you cannot change the magnification between the first shot and th...

Страница 54: ...for self portrait shooting 1 Display the top menu in the shooting mode Open the lens barrier Set the macro mode Taking close up pictures Macro mode p 37 Press 2 Press to select FUNCTION 3 Press to se...

Страница 55: ...n lets you play back pictures during shooting with the lens barrier open It is useful when you want to check shooting results and resume shooting quickly 1 Press twice quickly double click in the shoo...

Страница 56: ...Each time you press the picture is enlarged in the sequence 1 5x 2x 2 5x 3x 3 To enter scroll mode press while the enlarged picture is displayed Press to scroll in the corresponding direction and disp...

Страница 57: ...f pictures p 57 1 Press with the lens barrier closed The monitor turns on and displays the last picture taken Single frame playback 2 Press to enter the index display mode 3 Pressing moves the green f...

Страница 58: ...enu in the playback mode Press with the lens barrier closed Press 2 Press to select MODE MENU 3 Press to select the SETUP tab then press 4 Press to select then press 5 Press to select 4 9 or 16 The nu...

Страница 59: ...d Press 2 Press to select and the slide show starts Each picture is displayed for 3 seconds then the display automatically changes to the next picture 3 Press to cancel the slide show and return to th...

Страница 60: ...right of the viewfinder blinks and the movie data is downloaded to the camera When the movie reaches the end the display returns automatically to the beginning of the movie 4 Press The MOVIE PLAYBACK...

Страница 61: ...e displayed continuously by holding the button down Displays the previous frame The movie can be displayed continuously in reverse by holding the button down Displays the MOVIE PLAYBACK menu To play b...

Страница 62: ...s The top menu is displayed 4 Press to select ERASE 5 Press to select YES then press The picture is erased and the menu is closed Erasure is not possible if the picture you want to erase is protected...

Страница 63: ...ss 2 Press to select MODE MENU 3 Press to select the CARD tab then press 4 Press to select CARD SETUP then press 5 Press to select ALL ERASE then press Note that selecting FORMAT will erase all existi...

Страница 64: ...Erasing pictures 63 Playback 6 Press to select YES then press All the pictures are erased YES NO CAUtION ERASING ALL SELECt GO ALL ERASE...

Страница 65: ...ier closed The monitor turns on 2 Press to select the picture you want to protect 3 Press then press The mode menu is displayed 4 Press to select the PLAY tab then press 5 Press to select then press 6...

Страница 66: ...ed picture Protection on each picture remains even when the camera is turned off Protected pictures cannot be erased by the single frame all frame erase function but they can be all erased with the fo...

Страница 67: ...WHITE then press 6 Press to select BLACK WHITE then press After a bar is displayed to show the progress of creating the camera returns to the playback mode The black and white picture is stored as a s...

Страница 68: ...ct SEPIA then press 6 Press to select SEPIA then press After a bar is displayed to show the progress of creating the camera returns to the playback mode The sepia toned picture is stored as a separate...

Страница 69: ...or turns on 2 Press to select the picture you want to resize 3 Press then press The mode menu is displayed 4 Press to select the EDIT tab then press 5 Press to select then press 6 Press to select one...

Страница 70: ...the picture you want to rotate 3 Press then press The mode menu is displayed 4 Press to select the PLAY tab then press 5 Press to select then press You cannot resize movies or images that have been ed...

Страница 71: ...and displayed vertically To close the menu press twice 90 clockwise 90 counterclockwise You cannot rotate pictures taken in SHQ mode movies protected pictures or pictures that have been edited on a P...

Страница 72: ...be stored as still pictures 1 Press with the lens barrier closed The monitor turns on 2 Press to select a picture with the indicator 3 Press then press The mode menu is displayed 4 Press to select th...

Страница 73: ...icture Record mode when the movie is shot Record mode when stored as an index HQ SQ1 1024 768 pixels SQ SQ2 640 480 pixels The frames at the beginning and end of a movie cannot be selected The interva...

Страница 74: ...ens barrier Press 2 Press to select MODE MENU 3 Press to select the SETUP tab then press 4 Press to select then press 5 Press to select OFF The beep sound turns off To close the menu press twice The b...

Страница 75: ...ss 2 Press to select MODE MENU 3 Press to select CARD tab then press 4 Press 5 Press to select YES then press All existing data including protected data is erased when the card or the internal memory...

Страница 76: ...card cover or remove the batteries during formatting as this may cause malfunction of the card Never connect or disconnect the AC adapter during formatting as this may cause malfunction of the card C...

Страница 77: ...ss 4 Press to select BACKUP then press 5 Press to select MEMORY CARD then press All image data stored in the internal memory is copied to the card Never open the card cover remove the batteries or con...

Страница 78: ...u resume shooting immediately OFF The picture just taken is not displayed This is useful when you want to prepare for your next shot while the previous picture is being recorded 1 Display the top menu...

Страница 79: ...LL RESET then press 5 Press to select OFF To close the menu press twice All Reset settings ON All settings are returned to the factory default settings when the power is turned off OFF The settings ma...

Страница 80: ...era settings Functions that All Reset affects Function Factory default setting Ref page Monitor OFF p 17 DRIVE Single frame shooting for still pictures p 29 FLASH AUTO p 33 0 p 40 METERING ESP p 42 WB...

Страница 81: ...1 Display the top menu in the playback mode Press with the lens barrier closed Press 2 Pressing displays the full amount of shooting information on the monitor ON To turn INFO off press to bring up th...

Страница 82: ...MODE MENU 3 Press to select the SETUP tab then press 4 Press to select then press 5 Press to adjust the brightness while observing the monitor Pressing brightens the monitor and pressing darkens it 6...

Страница 83: ...ormance of the Pixel Mapping function 1 While pressing and at the same time open the lens barrier Hold the buttons until the monitor turns on 2 Press to select START then press When 10 seconds have pa...

Страница 84: ...pictures can be printed easily by DPOF compatible printing service labs or on a personal DPOF compatible printer Printing on an Olympus CAMEDIA P 400 P 330N E or P 200 digital printer If you insert a...

Страница 85: ...overwrite the previous reservations This camera cannot be directly connected to printers such as the Olympus P 300 digital printer Not all functions may be available on all printers or at all photo la...

Страница 86: ...a DPOF photo lab 1 Display the top menu in the playback mode Press with the lens barrier closed Press 2 Press to select MODE MENU 3 Press to select the PLAY tab then press 4 Press to select then press...

Страница 87: ...ata then press Selecting RESET clears all previous reservations The PRINT ORDER screen is displayed Select single frame or all frame reservation Select whether you want to specify the number of prints...

Страница 88: ...of prints already set appears 8 Press to set the number of prints Increases the number Decreases the number The maximum number of prints you can set is 10 If you set 0 no print reservation is made Pr...

Страница 89: ...ted with the shooting time Confirm the reservation data Check the number of ordered frames the total number of prints and the date time printing data 11 Press to select SAVE then press The print reser...

Страница 90: ...d There is no empty space on the card so no more pictures can be taken Replace the card or erase unwanted pictures Before erasing download important images to a PC There is no empty space on the card...

Страница 91: ...ns no pictures Record pictures The selected picture cannot be played back on this camera Use image processing software on a PC to view it If that cannot be done the image file is partially damaged The...

Страница 92: ...ies before turning it on again The camera is connected to a PC The camera will not operate while it is connected to a PC Condensation When it is cold outside the water vapor in the air is rapidly cool...

Страница 93: ...ed If you want the flash to fire set the flash to fill in mode p 33 Sequential shooting or movie mode is set The flash does not fire in sequential shooting or movie mode Set in the DRIVE menu p 32 p 3...

Страница 94: ...everal hours with the batteries removed the date time setting is canceled Set the date time again p 11 p 19 Erasure protection print reservation and card formatting cannot be performed Possible cause...

Страница 95: ...menu p 39 The colors of pictures taken indoors look unnatural Possible cause Corrective action Ref Page Indoor lighting can affect the picture s colors Set the white balance according to the lighting...

Страница 96: ...e shutter button was pressed Hold the camera correctly and press the shutter button gently p 28 The subject was too close Use the macro mode p 37 The flash was set to the flash off mode in a lighting...

Страница 97: ...mes SHQ Approx 16 frames HQ Approx 29 frames SQ1 Approx 47 frames SQ2 No of effective pixels 1 960 000 pixels Image pickup device 1 3 2 CCD solid state image pickup 2 110 000 pixels gross Lens Olympus...

Страница 98: ...kaline batteries lithium batteries NiMH batteries or NiCd batteries Or two lithium CR V3 battery packs Or AC adapter optional Manganese zinc carbon batteries cannot be used Dimensions 124 mm W 65 mm H...

Страница 99: ...uble click playback 54 DPOF 83 85 Drive 24 E Erasing 61 Exposure compensation 40 F File number 8 Fill in flash 34 Flash 7 33 Flash off 35 Fluorescent 44 Formatting 18 74 Frame number 8 Fully pressed 2...

Страница 100: ...ing 68 Resolution 46 Rotating 69 S Seconds remaining 8 Self portrait 53 Self timer 38 Self timer lamp 7 38 Sepia pictures 67 Sequential shooting 39 Shooting mode 8 Shortcut menu 21 24 SHQ 46 Shutter b...

Страница 101: ...ail distec olympus com Olympus software updates can be obtained at http olympus com digital OLYMPUS AMERICA INC Premises Goods delivery Wendenstra e 14 18 20097 Hamburg Germany Tel 040 237730 Letters...

Страница 102: ...ra Thank you for purchasing an Olympus digital camera This manual provides instructions on how to install the USB driver To ensure correct installation refer only to these installation procedures DIGI...

Страница 103: ...e its accuracy However if you find any errors or incomplete information please contact your local Olympus representative It is prohibited by copyright laws to duplicate in part or in whole the informa...

Страница 104: ...3 Macintosh Windows INDEX Flowchart 4 Identifying the OS 6 Windows 98 Me 2000 XP 8 Macintosh OS 9 X 23 Downloading image files using other OS For other OS users 31...

Страница 105: ...card etc Windows 95 NT 4 0 Windows 98 98 SE upgrade from Windows 95 Mac OS 8 6 or lower except Mac OS 8 6 equipped with USB MASS Storage Support 1 3 5 installed at the factory Data transfer is not gua...

Страница 106: ...he AC adapter disconnect the camera from the computer and make sure that the camera is turned off To avoid computer malfunctions do not turn off the camera when the camera is connected to a computer I...

Страница 107: ...your desktop When the My computer icon is not on your desktop click Control Panel from the Start menu 2 Double click the Control Panel icon 3 Double click the System icon The way the file icons inside...

Страница 108: ...ose the window If your OS is Windows 98 98 SE proceed to Installing the USB driver for Windows 98 p 9 Users running Windows Me 2000 XP p 11 Users running other OS p 31 Mac OS Macintosh Select About Th...

Страница 109: ...ns out while the computer is accessing the card in the camera the camera will turn off in the middle of the operation and this could destroy image files data If you are using batteries make sure that...

Страница 110: ...he procedure below as the USB driver will be automatically installed Proceed to Connecting the camera to the computer p 11 1 Insert the provided software CD into your CD ROM drive 2 The Olympus Window...

Страница 111: ...Continue The installation of the USB driver will start 4 Click OK to restart your computer and the installation is complete 5 When the computer has restarted installation is complete If the Olympus W...

Страница 112: ...cable to the USB connector on the camera The location of the USB connector or multi connector varies depending on the camera model Refer to the camera manual for details The location of the USB port...

Страница 113: ...re you to press the monitor button When the camera is turned on the lamp on the right of the viewfinder lights up Camera with a mode Set the mode dial to If the camera has a power switch as well as a...

Страница 114: ...ws XP You can download image files from the camera easily Select Copy pictures to folder on my computer using Microsoft Scanner and Camera Wizard then follow the on screen instructions You may also se...

Страница 115: ...be other Removable Disk icons for other devices such as a removable media drive or USB SmartMedia Reader Writer In this case the digital camera is recognized as another Removable Disk If you cannot fi...

Страница 116: ...e Disk follow the procedure below to check whether the USB driver has been fully installed 1 Open My Computer and double click the Control Panel icon For users running Windows XP open Control Panel fr...

Страница 117: ...nd start again Users running Windows 98 98 SE start again from Confirming the USB driver is installed and Users running Window Me 2000 XP start from Connecting the camera to the computer If the USB dr...

Страница 118: ...as a Removable Disk 3 Double click the Dcim folder If an error message appears when you double click the icon there may be a problem with one of the following the camera s power source the AC adapter...

Страница 119: ...he My Documents icon The camera automatically assigns folder names and file names according to the following rules Serial numbers of image files run from 0001 to 9999 Serial numbers of folders run fro...

Страница 120: ...ge files downloaded to your computer The files will be opened in the default image viewer of the operating system If you want to view the image a different size or process it you will need to open the...

Страница 121: ...right of the viewfinder or the card access lamp is not blinking Some camera models have either a lamp on the right of the viewfinder or a card access lamp and the location varies depending on the mode...

Страница 122: ...cable from the camera 6 Remove the USB cable from your computer Windows Me 2000 XP 1 Make sure that the lamp on the right of the viewfinder or the card access lamp is not blinking Some camera models...

Страница 123: ...rs 3 Click on the message The Unplug or Eject Hardware window appears 4 When a message appears click OK 5 Remove the USB cable from the camera 6 Remove the USB cable from your computer If the window r...

Страница 124: ...the operation and this could destroy image files data If you are using batteries make sure that there is sufficient remaining battery power If you are running Mac OS X the connection to the computer...

Страница 125: ...nnector or multi connector varies depending on the camera model Refer to the camera manual for details The location of the USB port varies depending on the computer For details refer to your computer...

Страница 126: ...e dial turn the power switch to ON Camera with a mode Camera setup connection mode Set the mode dial to to turn the camera on 4 The computer recognizes the camera as a new device The computer recogniz...

Страница 127: ...ror message appears when you double click the icon there may be a problem with one of the following the camera s power source the AC adapter is not properly connected or the battery power is low the c...

Страница 128: ...names according to the following rules Serial numbers of image files run from 0001 to 9999 Serial numbers of folders run from 100 to 999 When file number 9999 is reached a new folder is created and a...

Страница 129: ...les in the Hard Disk folder The files will be opened in the default image viewer of the operating system If you want to view the image a different size or process it you will need to open the image wi...

Страница 130: ...Capture software dialog appears 1 From the Download To menu select a destination folder 2 To download all images click Download All To selectively download images click Download Some and highlight the...

Страница 131: ...ight of the viewfinder or the card access lamp is not blinking 2 Drag the untitled icon on the desktop to Trash 3 Make sure that the lamp on the right of the viewfinder or the card access lamp is off...

Страница 132: ...card slot Consult your nearest Olympus representative Is your OS one of the following Windows 98 Windows 2000 Windows Me Windows XP Mac OS 9 X Yes No No Yes Connect the camera directly to your compute...

Страница 133: ...ned at http olympus com digital Adobe Photoshop Support Adobe software updates and technical information can be obtained at http www adobe com support OLYMPUS AMERICA INC Premises Goods delivery Wende...

Отзывы: