background image

15 

To adjust speed: use the adjustment keys (13) to increase or decrease speed. Please see the table below 

for speed range for each gear ration value. 

The selected program is shown on the display (5). 
To  select  the  gear  ratio:  use  Gear  Ratio  key  (10).  There  are  the 

following values available: 1:5, 1:1, 4:1, 10:1, 16:1 and 20:1. 

The selected gear ratio is shown on the display (4). 
To change the rotation direction: use the Direction key (9). 


The selected direction is shown on the display (3). 

To  adjust  the  micromotor  water:  use  the  water  control    

knob (15) on the instruments control panel. 

To access setup menu: press and hold the Setting key (12). 

Use the Setting key (12) to select the desired option. 

To adjust LED options: use the adjustment keys (13) to set 

the parameter. 


To adjust pneumatic activation method: use the adjustment keys (13) to set the parameter. 


To adjust Input pneumatic pressure: use the adjustment keys (13) to set the parameter. 


Note:  the  micromotor  system  preset  by  the  factory  according  to  the  internal  equipment  pressure.  It  is  not 
recommended to change the pressure parameters. 


- Scaler 

6.4.1


- Standard Scaler 

To start the use of scaler it is necessary to first install 

the  tip  that  will  be  used,  according  to  the  instructions  in 

section 6.4.2

To  activate  the  scaler:  it  is  necessary  to  remove  the 

scaler from the support and press the propulsion/activation 
pedal (6). 

Observe the settings for scaler in 

section 6.4.3

The standard scaler is not removable. 


6.4.2


- Scaler with LED Light (Optional) 

For  the  use  of  scaler,  it  is  necessary  to  connect  the 

transducer  (1)  to  the  coupling  (3)  and  install  the  tip  on  the 
transducer (1). 

To attach the transducer (1) to the coupling: align the 

adjustment indicators (2) of the two parts and carefully insert them. 

To install the scaler tips: insert the tip into the transducer (1) by threading it carefully, 

then insert the Torque wrench (4) into the tip and then rotate it clockwise until it is tight. To 
remove the tip, turn it counterclockwise with the Torque wrench (4). 

To install a file adapter (not supplied with scaler): attach the adapter to the transducer (1) and screw it 

gently. Insert the file into the tip of the adapter, thread the tip and then use the Endo wrench (5) to tighten. To 
remove the adapter, use the Endo wrench (5) to loosen it and then carefully unscrew. 

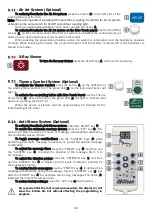
LED Off 

LED On 

without delay 

LED On 

with 10s delay 

When pedal (14) is pressed micromotor 

performs the maximum speed adjusted 

Micromotor performs speed according to 

the pressure on the pedal (14) 

Set minimum activation pressure 

from 0.03 to 0.10 MPa 

Set maximum input pressure 

from 0.20 to 0.40 MPa 

Reverse 

Forward 

Содержание Flex Quality

Страница 1: ......

Страница 2: ......

Страница 3: ...On the Equipment 7 Turning On the Equipment 7 5 2 1 Delivery System 7 5 2 2 Electric Panel 7 Base and Progressive Pedal Controls Operation 8 5 3 1 Remote Foot Pedal Commands Opcional 8 Working Table 8...

Страница 4: ...Operation and Basic Adjustments 16 6 4 4 Scaler Tips 16 Curing Light Optional 16 3 Way Syringe 16 Venturi Saliva Ejector 17 High Power Saliva Ejector V rtice Optional 17 Vacuum Pump Adaptor Optional 1...

Страница 5: ...Delivery Unit Quality 1 Operating Light 1 Packing Support 1 Dental Stool 1 Quality Quick Operation Guide Optional Items Handpieces and Accessories Separated Junction Box Cart System Additional Stool...

Страница 6: ...ce Saliva Ejector Vacuum Pump Adaptor Set Midwest Couplings Cart System Prophylaxis System with Bicarbonate Jet Remote Foot Pedal Note optional items are defined on the customer s order Quality Models...

Страница 7: ...Equipment 1 Turn the On Off switch 3 its LED indicator will light 2 Activate the Seat Up command section 5 3 on the chair base until the seat reaches its maximum height limit 3 Close the pressure valv...

Страница 8: ...be placed on the water unit and the command for V rtice ejector 9 will be available on the chair base To activate the handpieces press the progressive activation pedal 10 5 3 1 Remote Foot Pedal Comma...

Страница 9: ...Seat Down Position 3 4 Backrest Down 5 Work Position 6 Zero Position 7 Spittoon Bowl Flush 8 Cup Filler 9 On Off Operating Light 10 X Ray Viewer 11 On Off X Ray Viewer X Ray Viewer 1 Electrical Micro...

Страница 10: ...3 Seat Down Position 4 Backrest Down 5 Work Position 6 Zero Position Command Panel 2 7 Spittoon Bowl Flush 8 Cup Filler 9 On Off Operating Light 10 On Off Optical Fiber Light 11 On Off Air Jet System...

Страница 11: ...e section 5 3 or on the command panel section 5 4 to enable sensor 5 and control knob 4 To turn On Off the operating light pass the hand in front of the sensor 5 approximately 5 cm away or press the c...

Страница 12: ...commands are pressed during this time the equipment will emit 3 short beeps canceling the operation 6 Press the Zero Position key Repeat the previous steps by replacing the command 1 by the command 2...

Страница 13: ...l Fiber Handpiece Optional Before starting the operation connect the optical fiber handpiece to the coupling by attaching it to the coupling ring 1 ensuring that it is properly connected and there is...

Страница 14: ...ssion To record memory select the transmission and adjust the speed of rotation to store Press and hold one of the Memory key 6 until the system emits 2 beeps indicating that the memory has been recor...

Страница 15: ...g to the instructions in section 6 4 2 To activate the scaler it is necessary to remove the scaler from the support and press the propulsion activation pedal 6 Observe the settings for scaler in secti...

Страница 16: ...p first attach the light hood 2 to the tip and then attach it to the curing light unit 3 The tip must be pushed all the way to the fitting end To activate deactivate the curing light press the On Off...

Страница 17: ...connect the bicarbonate jet handpiece 3 to its coupling 2 To fill the bicarbonate reservoir open the reservoir 4 by turning the cover 6 anticlockwise and deposit the bicarbonate sodium until to the r...

Страница 18: ...l use the Thermo Comfort key 3 Above the button the green LED 2 will light to indicate that device is operating section 5 4 When the device is started wait for approximately 10 minutes for the initial...

Страница 19: ...axis tilt adjustment and lateral rotation for the monitor The monitor is not part of the monitor holder Do not use on the monitor holder 1 Equipment powered with more than 24 Volts 2 Equipment with we...

Страница 20: ...20 7 Symbology The symbology complies with IEC 60601 1 and IEC 60878...

Страница 21: ...br or by phone 55 48 2106 6000 The installation and maintenance of the equipment and its accessories must only be carried out by Olsen technicians Use Olsen genuine parts only The use of non genuine p...

Страница 22: ...with a wrong voltage power supply 5 This warranty will cease when a The warranty period expires b The user makes any changes to the product or uses inappropriate accessories c For adulterations in the...

Страница 23: ...and of low maintenance cost These characteristics have been achieved thanks to our competent and dedicated team which make me very proud for many reasons as they are always giving the best of their cr...

Страница 24: ...________________________ __________________________________________________ __________________________________________________ __________________________________________________ ______________________...

Страница 25: ...________________________ __________________________________________________ __________________________________________________ __________________________________________________ ______________________...

Страница 26: ...________________________ __________________________________________________ __________________________________________________ __________________________________________________ ______________________...

Страница 27: ...27...

Страница 28: ...28 55 48 2106 6000 export3 olsen odo br Registration at Ministry of Health 1028130009 Technician in Charge Eng Luciano de Oliveira Rodrigues CREA SC 124605 9 Cod 5409178 Rev 02 09 04 2019...

Страница 29: ......

Страница 30: ......

Страница 31: ...Equipo 7 Encendiendo el Equipo 7 5 2 1 Plataforma 7 5 2 2 Panel El ctrico 7 Comandos de la Base del Sill n y Pedal Progresivo 8 5 3 1 Comandos Pedal Remoto Opcional 8 Mesa Odontol gica 8 5 4 1 Mesa Qu...

Страница 32: ...16 6 4 4 Puntas del Ultrasonido 16 Fotocurado con LED Opcional 17 Jeringa Triple 17 Eyector Venturi 17 Eyector de Alta Potencia V rtice Opcional 17 Eyetor de Bomba de Vac o Opcional 17 Sistema de Pro...

Страница 33: ...y 1 M dulo Quality 1 L mpara 1 Soporte de Embalaje 1 Taburete 1 Gu a R pida de Operaci n Quality Opcionales Piezas de Mano y Accesorios Caja de Conexiones Sistema Cart Taburete Adicional Soporte de Pa...

Страница 34: ...tencia V rtice Adaptador de Bomba de Vac o Acoples Midwest Sistema Cart Sistema de Profilaxis por Chorro de Bicarbonato Pedal Remoto Taza de Porcelana Nota los art culos opcionales se definen en el pe...

Страница 35: ...ecesario ll nelo con agua potable filtrada hasta el l mite indicado en el tanque y ac plalo nuevamente Si desea colocar productos profil cticos baja concentraci n 5 Abra la v lvula de presi n 2 y veri...

Страница 36: ...ctor de V rtice 9 estar disponible en la base de lo sill n Para activar las piezas de mano presione el pedal progresivo de propulsi n activaci n 10 5 3 1 Comandos Pedal Remoto Opcional 1 Sube Asiento...

Страница 37: ...ltrasonido y Selector de Funciones General P rio Endo 4 Control de Agua del Ultrasonido 5 LED del Sistema Thermo Comfort 6 Control de Agua de la Fibra ptica 7 Control de Agua del Micromotor Brushless...

Страница 38: ...ento Posici n 3 4 Baja Respaldo 5 Posici n de Trabajo 6 Posici n Cero 7 Comando de Agua en la Taza 8 Comando del Llena Vasos 9 On Off L mpara 10 On Off Fibra ptica 11 On Off Sistema Air Jet 12 On Off...

Страница 39: ...n 5 3 o en el panel de comando secci n 5 4 para activar el sensor 5 y el bot n de control 4 Para apagar o encender la l mpara pase la mano delante del sensor 5 cerca de 5 cm de distancia o presione e...

Страница 40: ...resionado en estos 2 segundos el equipo emitir otro bip largo cancelando la operaci n 6 Presione el comando Posici n Cero Repita los pasos anteriores cambiando el comando 1 por los comandos 2 Sube Res...

Страница 41: ...onal Antes de empezar la operaci n conecte la pieza de mano de fibra ptica al acople fij ndola con el anillo de acople 1 verificando si est bien conectada y sin fugas de aire o agua Para activar la ro...

Страница 42: ...abar memoria seleccione la transmisi n y ajuste la velocidad de rotaci n para memorizar Presione y mantenga presionada una de las teclas Memory 6 hasta que el sistema emita 2 beeps indicando que la me...

Страница 43: ...a ajustar el m todo de activaci n neum tica use las teclas de ajuste 13 Para ajustar la presi n de entrada use las teclas de ajuste 13 Nota el sistema del micromotor est ajustado de acuerdo con los va...

Страница 44: ...lima en el adaptador y gire la punta del adaptador con las manos para entonces terminar la fijaci n con la llave Endo 5 Para remoci n del adaptador gire con la llave Endo 5 en sentido antihorario y t...

Страница 45: ...triple 5 conecte la punta de la jeringa 3 presionando el anillo de bloqueo 4 para el encaje correcto Para chorro de aire presione el bot n de aire 1 Para chorro de agua presione el bot n de agua 2 Pa...

Страница 46: ...l tanque 4 e instale el Prophy Jet en el acoplamiento neum tico 2 disponible Remueva la pieza de mano del soporte apunte para el local de aplicaci n y presione el pedal de propulsi n activaci n 1 Cuan...

Страница 47: ...masaje presione la tecla TEMPO 6 y entonces las teclas AJUSTES 8 para ajustar la duraci n del masaje de 5 hasta 45 minutos Para ajustar la intensidad de vibraci n presione la tecla POT NCIA 7 y enton...

Страница 48: ...20 7 Simbolog a S mbolos en conformidad con las normas IEC 60601 1 y IEC 60878...

Страница 49: ...r o por el tel fono 55 48 2106 6000 La instalaci n y el mantenimiento del equipo y sus accesorios solo deben ser realizados por t cnicos Olsen Utilice solamente piezas originales Olsen El uso de pieza...

Страница 50: ...n a la red el ctrica de energ a con tensi n incorrecta 5 Esta garant a cesar a Por el decurso normal de su plazo de validez b Por alteraciones no autorizadas por Olsen en el producto c Por adulteracio...

Страница 51: ...de mantenimiento muy bajo Estas cualidades se alcanzaron a trav s de un equipo competente y dedicado del cual me enorgullezco sobre todos los aspectos dispuesto a llevar a nuestros clientes lo mejor...

Страница 52: ...________________________ __________________________________________________ __________________________________________________ __________________________________________________ ______________________...

Страница 53: ...________________________ __________________________________________________ __________________________________________________ __________________________________________________ ______________________...

Страница 54: ...________________________ __________________________________________________ __________________________________________________ __________________________________________________ ______________________...

Страница 55: ...27...

Страница 56: ...28 55 48 2106 6000 export3 olsen odo br Registro en el Ministerio de Salud de Brasil 1028130009 Responsable T cnico Ing Luciano de Oliveira Rodrigues CREA SC 124605 9 Cod 5409178 Rev 02 09 04 2019...

Отзывы: